Lexus UX 300e (2022 year). Manual in english - page 7
 

  Index      Manuals     Lexus UX 300e (2022 year). Manual in english


Search            copyright infringement  


Content      ..     5      6      7      8     ..


Lexus UX 300e (2022 year). Manual in english - page 7


126

2-2. Charging

4

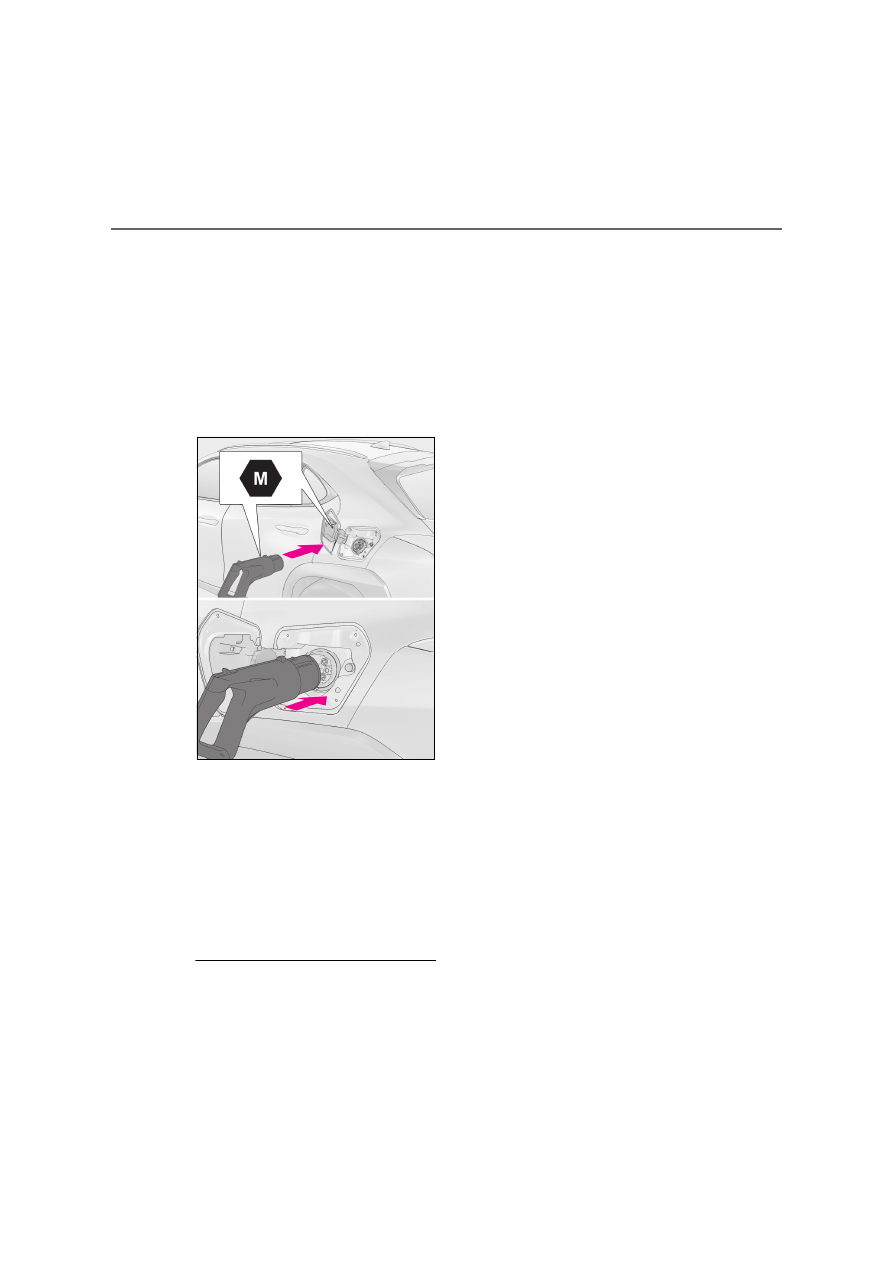
Insert the DC charging connector 
into the DC charging inlet.

When inserting the DC charging connec-

tor into the DC charging inlet, make sure 

that the identification symbols are the 

same.
The DC charging connector shape and 

treatment will differ depending on the type 

of DC charger. Perform the operations in 

accordance to handling procedures of the 

DC charger.

5

Operate the DC charger and start 
the charging.

Follow the handling procedures of the DC 

charger to start charging.
Charging starts after a system check is 

done.
Stop the charging in accordance to the 

handling procedures of the DC charger 

when it is desired to interrupt the DC 

charging.

Q

Charging time

P.109

Q

Charging time may increase when

P.110

Q

If a message indicating vehicle error on 

the DC charger side is displayed

Even if a message indicating vehicle error 

on the DC charger side (ex. vehicle error 

found, vehicle error occurred, etc.) is dis-

played, there is no vehicle fault but possibly 

a communication error between the DC 

charger and vehicle. In this case, there may 

be a terminal damage (bad contact) in the 

DC charging connector. If there is no error 

with the vehicle, contact the facility man-

ager of the DC charger.

Q

The charging time displayed on the DC 

charger

Depending on the type of the DC charger, 

the charging time displayed on the DC 

charger may be longer than normal. This is 

not a malfunction.

Q

During DC charging

O

The current charging condition can be 

checked on the multi-information display.

O

The actual charging time may differ from 

that displayed on the DC charger during 

charging.

O

There may be occasions the radio cannot 

be heard due to noise occurrence during 

DC charging

O

The charging may stop before reaching 

the upper limit of the charge capacity, 

due to the remaining charge of the trac-

tion battery, the outside temperature, 

etc., when charging starts.

O

It is recommended to avoid frequent DC 

charging to prevent a decline in the trac-

tion battery capacity.

O

Quickly move from the DC charging 

space for other users after the DC 

charging is completed.

Q

Changing the “Charging Limit” settings

P.120

127

2

2-2. Charging

El

ect
ric V
eh

icle

 sy

st

em

Q

If “Check Charging System Close 

Charging Port Lid See Owner’s Man-

ual” is displayed on the multi-informa-

tion display

After DC charging, the following may 

occur if the system check after the DC 

charging is not completed as normal.

O

The EV system can not be started.

O

The EV system can be started but DC 

charging and AC charging can not be 

done.

Perform a system check with the following 
procedures.

1

Be sure to engage the parking brake 

and then turn the power switch off.

2

Install the DC charging inlet cap, close 

the DC charging port lid.

3

Check if “Checking Charging System” 

is displayed on the multi-information 

display when the power switch is turned 

to ON.

Do not open the DC charging port lid while 

the charging system is checking.
When the system check is completed, the 

power switch automatically turns off.

4

Press the power switch while depress-

ing the brake pedal. The “READY” indi-

cator turns on.

Contact any authorized Lexus retailer or 

Lexus authorized repairer, or any reliable 

repairer if the charging system check is 

done and the message on the multi-infor-

mation display does not go off.

WARNING

Q

Warnings for DC charging

Be sure to observe the following when 

using DC charging.
Failure to do so may cause an accident 

that could lead to death or serious injury.

O

Check that the DC charger and DC 

charging inlet are not damaged. If 

there is any damage to the DC 

charging inlet, do not perform a DC 

charge and have it inspected immedi-

ately at any authorized Lexus retailer 

or Lexus authorized repairer, or any 

reliable repairer.

O

Do not touch the terminals of the DC 

charging connector or inlet with 

metallic sharp tips (wires and needles), 

or allow a short circuit to occur with 

foreign objects.

O

Do not insert anything other than the 

DC charging connector into the DC 

charging inlet.

O

Check that the DC charging cable is 

not coiled up or pinned underneath 

heavy objects.

O

When DC charging is interrupted, fol-

low the handling procedures of the 

DC charger. Immediately stop the DC 

charging when there is an outbreak of 

heat, smoke, strange noises or smells, 

etc., during charging.

O

Check that the DC charging connec-

tor and DC charging inlet do not have 

foreign objects or snow or ice 

attached to it. If anything is attached to 

the inlet, be sure to completely remove 

the material before connecting the 

DC charging connector.

O

Do not charge the vehicle when there 

is a possibility of lightning. If you notice 

lightning while charging the vehicle, do 

not touch the vehicle and the DC 

charging cable.

128

2-2. Charging

1

Operate the DC charger and stop 
the charging.

2

Remove the DC charging connec-
tor.

The DC charging connector shape and 

treatment will differ depending on the type 

of DC charger. Perform the operations in 

accordance to handling procedures of the 

DC charger.
Return the removed DC charging connec-

tor to its original position.

3

Attach the DC charging inlet cap 
and close the DC charging port lid.

Align the horizontal sections of the cap 

and inlet, and then insert the cap straight 

into the inlet.

Q

If the DC charging connector cannot be 

unlocked

O

The DC charging connector is locked by 

the DC charger. Operation of the emer-

gency release lever cannot unlock the 

WARNING

O

Do not get the DC charging inlet ter-

minals wet.

O

Be sure the DC charging inlet makes 

direct contact with the DC charging 

connector. Do not connect conversion 

adapters, extension cords, etc., 

between the DC charging connector 

and DC charging inlet.

O

Close the hood when using DC 

charging. The cooling fans may sud-

denly start to run. Keep hands and 

clothing (especially a tie, a scarf or a 

muffler) away from the fans. Failure to 

do so may cause the hands or clothing 

to be caught, resulting in serious injury.

Q

When connecting the DC charging 

connector

Follow the handling procedures of the 

DC charger to connect the DC charging 

connector. If the connector is not con-

nected properly, the system cannot rec-

ognize the connection, and it may be 

possible to start the EV system.
After charging is completed, make sure 

to remove the DC charging connector 

from the DC charging inlet before start-

ing the EV system.
If the vehicle is started off with the con-

nector still connected, it could lead to an 

accident, possibly resulting in death or 

serious injury.

NOTICE

Q

When using DC charging

Make sure to follow the handling proce-

dures of the DC charger. If the proce-

dures are not followed properly, the 

vehicle and the DC charger may be 

damaged.

After charging

129

2

2-2. Charging

El

ect
ric V
eh

icle

 sy

st

em

DC charging connector.

O

The DC charging connector cannot be 

removed during DC charging. Stop the 

DC charging when it is necessary to 

remove the DC charging connector. The 

DC charging connector can be removed 

when the DC charging is stopped.

O

If the DC charging connector cannot be 

removed even if the DC charging is 

stopped, there may be a malfunction with 

the DC charger, contact the facility man-

ager of the DC charger.

Q

After DC charging

Even if the traction battery is charged to the 

upper limit value that is set, the level of 

charge displayed on the DC charger may 

be lower than the actual one.

When registering the charging sched-
ule, the following settings can be 
changed.

Q

Select the charging mode

One of the following two charging 
modes can be selected.

*1

: There might be a slight error in the tim-

ing when charging starts due to the 
capacity of the traction battery.

*2

: Charging schedule function is per-

formed in accordance with the clock. 

NOTICE

Q

Caution after DC charging

O

Be sure to attach the DC charging 

inlet cap to the DC charging inlet and 

then close the DC charging port lid 

after removing the DC charging con-

nector from the inlet. If the DC 

charging inlet cap is not attached, for-

eign materials may get into the inlet 

and the EV system may be malfunc-

tioning.

Using the charging schedule 
function (AC charging)

AC charging can be performed at 
the desired time by registering the 
charging schedule. Also, it is possi-
ble to set the schedule to one’s 
preferences, such as having 
charging complete by a certain 
departure time or be performed at 
the same time on certain days.

Settings of the charging sched-
ule function

Charging 

mode

Operation description

“Start”

Starts charging at the set time

*1


and completes charging when 
fully charged.

*2

“Depar-

ture”

Starts charging to complete at 
the set time.

*3, 4

When this setting is selected, 
the air conditioning linked 
function can be used.

130

2-2. Charging

Before registering the charging sched-
ule, check and set the clock to the 
proper time.

*3

: If the system determines that charging 

cannot be completed by the set depar-
ture time, it will start charging. Check 
the charging schedule.

*4

: If the outside temperature changes sud-

denly or the state of the power source 
being used is changed during charging, 
the system may not complete the 
charging as estimated.

Q

Repeated setting

The periodic charging schedule can be 
set by selecting your desired day of the 
week.
Charging schedule can be performed 
only once if the days are not selected.

Q

Air conditioning-linked setting

When the charging mode is set to 
“Departure”, the vehicle air condition-
ing system can be set to automatically 
operate

*

 according to the set time.

By adjusting the cabin temperature in 
advance and matching it with the depar-
ture time, passengers can enjoy a pleasant 
interior immediately after entering the 
vehicle.

*

: Operation starts approximately 20 min-

utes before the set departure time.

Q

Turning “Charge Now” on and off

If even one charging schedule is regis-
tered, charging does not start until the 
set time, even if the AC charging cable 
is connected to the vehicle. To start 
charging immediately without chang-
ing the charging schedule setting, turn 
“Charge Now” on to temporarily can-

cel the charging schedule and enable 
charging after connecting the AC 
charging cable.

*

*

: If the charging connector is unlocked 

during charging while the charging 
schedule is registered and “Charge 
Now” is on, “Charge Now” turns off.

Q

Changing “Next Event”

*1

It is possible to temporarily set the time 
of the next charging schedule without 
changing the registered repeated set-
ting.

*2

*1

: The “Next Event” refers to the closest 

charging schedule from the current 
time among the registered charging 
schedules. Charging schedule is per-
formed based on the “Next Event”.

*2

: When “Next Event” is changed, the cur-

rent charging schedule will be tempo-
rarily ignored and charging will not be 
performed until the time specified by 
“Next Event”. (For example, when 
“Next Event” is set for 2 days later, even 
if items are registered on the charging 
schedule, charging will not be per-
formed until the time specified by “Next 
Event”.)

Q

Charging schedule settings

A maximum of 15 charging schedules can 

be registered.

Q

Charging schedule function

The charging schedule function can not be 

used when using DC charging.

Q

To make sure that the charging sched-

ule function operates correctly

Check that the following conditions are 

met:

O

The clock is adjusted to the proper time 

and the day of the week is proper

131

2

2-2. Charging

El

ect
ric V
eh

icle

 sy

st

em

O

The power switch is OFF

O

After registering the charging schedule, 

connect the AC charging cable. When 

the AC charging cable is connected, the 

charging start time is determined based 

on the charging schedule at the time.

O

The AC charging indicator flashes after 

the AC charging cable is connected 

(

P.91)

O

Do not use an electrical socket that has 

power cut off function (including off timer 

function). Only use an electrical socket 

that constantly supplies power. If the 

electrical socket is cut off due to a off 

timer function, etc., charging may not be 

performed appropriately during the set 

time.

O

The traction battery is not fully charged.

O

The automatic adjustment of the clock by 

GPS is set to “On”. If the clock has been 

adjusted in an area where a GPS signal 

cannot be received, set the automatic 

adjustment of the clock by GPS to “On” 

in an area where a GPS signal can be 

received.

For details regarding GPS, refer to the 
“NAVIGATION AND MULTIMEDIA 
SYSTEM OWNER’S MANUAL”.

Q

When charging is performed regardless 

of the charging schedule

When the charging schedule is on standby, 

if a temporary cancelation operation is per-

formed, charging schedule will be canceled 

and charging will begin immediately.

Q

When the AC charging cable remains 

connected to the vehicle

Even if multiple consecutive charging 

schedules are registered, the next charge 

will not be carried out according to the 

schedule until the AC charging cable is 

removed and reconnected after charging 

completes. Also, when the traction battery 

is fully charged, charging according to the 

schedule will not be performed.

Q

Air conditioning-linked setting

O

When the air conditioning-linked setting 

is turned on, the air conditioning operates 

until the set departure time. Therefore, 

depending on the air conditioning elec-

tricity consumption, charging may not be 

completed by the set departure time.

O

If the traction battery is fully charged, 

charging will not be carried out, even if 

the charging schedule is registered. 

However, if Air conditioning-linked set-

ting is turned on, the air conditioning will 

operate only once when it nears the time 

set in “Departure”. If this occurs, the air 

conditioning will consume electricity and 

the remaining charge of the traction bat-

tery when departing may be decreased.

O

When the doors are unlocked, the air 

conditioning system does not operate.

Q

When charging schedule settings are 

ignored

When the following operations are per-

formed while the charging schedule is on 

standby, charging schedule is temporarily 

canceled and charging is started.

O

When the Remote Air Conditioning Sys-

tem (

P.355) is operated

O

When “My Room Mode” is activated 

(

P.139)

O

When setting “Charge Now” to “On” 

(

P.135)

O

When an operation that temporarily can-

cel the charging schedule is performed 

(

P.120)

Q

Effects of outside temperature

When the charging mode is set to “Depar-

ture”, charging schedule may be ignored 

due to the outside temperature and 

charging may start.

Q

Traction battery cooler (

P.111)

When charging is performed using the 

charging schedule, the traction battery 

cooling function may operate according to 

the temperature of the traction battery.

O

When the charging mode is set to “Start”, 

cooling starts at the set charging start 

time.

O

When the charging mode is set to 

“Departure”, cooling starts approxi-

mately 30 minutes before the charging 

132

2-2. Charging

start time. However, if there is no time to 

complete charging according to the 

charging schedule, the traction battery 

cooling time may be shortened and trac-

tion battery cooler may not operate.

The meter control switches are used to 
change the charging schedule function 
settings.

Meter control switches

Multi-information display

Q

Registering the charging schedule

1

Press 

 or 

 of the meter con-

trol switches to select 

 on the 

multi-information display.

2

Press 

 or 

 of the meter con-

trol switches to select “Vehicle Set-
tings” and then press “OK”.

3

Press 

 or 

 of the meter con-

trol switches to select “Charging 
Settings”, and then press “OK”.

The “Charging Settings” display will be dis-

played.

4

Press 

 or 

 of the meter con-

trol switches to select “Charging 
Schedule” and then press “OK”.

The “Charging Schedule” display will be 

displayed.

5

Press 

 or 

 of the meter con-

trol switches to select “Scheduled 
Events” and then press “OK”.

The “Scheduled Events” display will be dis-

played.

6

Select “Add”, and then press “OK”.

The “Charging Mode” display will be dis-

played.

Setting “Charging Schedule” on 
the multi-information display

A
B

133

2

2-2. Charging

El

ect
ric V
eh

icle

 sy

st

em

7

Press 

 or 

 of the meter con-

trol switches to select item and then 
press 

 or 

 to change the 

charging mode/time settings.

Set the desired charge mode, as well as the 

charging start (or Departure) time.
When the settings have been changed, 

press “OK”.
Set the time that is desired to start the 

charging when charge mode is “Start” and 

the desired completion time when the 

mode is “Departure”.
When the charging mode is set to “Depar-

ture”, the “Climate Prep” display will be 

displayed. When the charging mode is set 

to “Start”, the “Repeat” display (step 

9

) will 

be displayed.

8

Press 

 or 

 of the meter con-

trol switches when operating the air 
conditioner, select “Yes” and then 
press “OK”.

The “Repeat” display will be displayed.

9

Press 

 or 

 of the meter con-

trol switches, select the day desired 
to activate the repeated setting, 
and press “OK”.

Each time “OK” is pressed, the repeat set-

tings switches between on and off.
Charging schedule is done repeatedly on 

the day selected.
It is also possible to turn the repeated set-

ting to “On” for multiple days.
If no days are set to “On”, charging is only 

done once according to the charging 

schedule within 24 hours.
When setting are complete, select “Done” 

and then press “OK”.
A display that confirms the settings are 

saved is displayed.

134

2-2. Charging

10

Press 

 or 

 of the meter con-

trol switches, select “Save” and 
press “OK”.

The setup contents are saved.
If it is desired to change the setting details, 
press “

” and change the operation 

settings.
After completing the settings, when the 

AC charging cable is connected to the 

vehicle, the charging schedule is done in 

accordance with the setting details.

Q

Changing the registered charging 
schedules

The registered charging schedules can 
be turned on/off, deleted or modified.

1

Press 

 or 

 of the meter con-

trol switches to select 

 on the 

multi-information display.

2

Press 

 or 

 of the meter con-

trol switches to select “Vehicle Set-
tings” and then press “OK”.

3

Press 

 or 

 of the meter con-

trol switches to select “Charging 
Settings”, and then press “OK”.

The “Charging Settings” display will be dis-

played, which displays a list of the regis-

tered charging schedules.

4

Press 

 or 

 of the meter con-

trol switches to select “Charging 
Schedule” and then press “OK”.

The “Charging Schedule” display will be 

displayed.

5

Press 

 or 

 of the meter con-

trol switches to select “Scheduled 
Events” and then press “OK”.

The “Scheduled Events” display will be dis-

played.

6

Press 

 or 

 of the meter con-

trol switches, select the line of the 
settings where the contents are 
desired to be changed, and then 
press and hold “OK”.

135

2

2-2. Charging

El

ect
ric V
eh

icle

 sy

st

em

The “Edit Event” display will be displayed.

7

Press 

 or 

 of the meter con-

trol switches, select the item to 
operate and perform each neces-
sary operation.

ON/OFF

Each time “OK” of the meter control 
switch is pressed on the “Scheduled 
Events” display, the selected charging 
schedule switches between “On” and 
“Off”.
When set to OFF, a charging schedule is 
ignored and charging according to the 
schedule is not performed.

When 

 is pressed, setup is completed.

“Edit”

Change the desired settings as described 
starting from step 

7

 of the Registering the 

charging schedule procedure. (

P.132)

Press 

 or 

 of the meter control 

switches, select “Save” and press “OK” to 
save the settings.

Press the 

 switch to return to the pre-

vious display.

“Delete”

When “OK” is pressed on the meter con-
trol switches, a deletion confirmation will 
be displayed.

Press 

 or 

 of the meter control 

switches, select “Yes” and then press “OK” 
to delete the selected charging schedule.

Press the 

 switch to return to the pre-

vious display.
To cancel deletion of the registered con-
tents, select “No” and then press “OK”.

Q

Setting “Charge Now” to “On”

The “Charge Now” setting can be 
changed by performing one of the two 
following procedures.

136

2-2. Charging

Operation on the “Charging Sched-
ule” display

1

Press 

 or 

 of the meter con-

trol switches to select 

 on the 

multi-information display.

2

Press 

 or 

 of the meter con-

trol switches to select “Vehicle Set-
tings” and then press “OK”.

3

Press 

 or 

 of the meter con-

trol switches to select “Charging 
Settings” and then press “OK”.

4

Press 

 or 

 of the meter con-

trol switches to select “Charging 
Schedule” and then press “OK”.

The “Charging Schedule” display will be 

displayed on the multi-information display.

5

Press 

 or 

 of the meter con-

trol switches to select “Charge 
Now”, and then press “OK”.

Each time “OK” is pressed, “Charge Now” 

switches between “On” and “Off”.

Operation on the ending display

The “Next Event” display will be dis-
played after the power switch is turned 
off.

1

Turn the power switch off.

The ending display will be displayed on the 

multi-information display.

2

Press “OK” to set “Charge Now” to 
“On”.

Each time “OK” is pressed, “Charge Now” 

switches between “On” and “Off”.

After setting operations are complete, 

charging starts when the AC charging 

cable is connected. (

P.116)

Q

Changing “Next Event”

*

*

: When “Charge Now” is set to “On” or 

My Room Mode is in use (

P.139) etc., 

the registered “Next Event” cannot be 
changed.

1

Press 

 or 

 of the meter con-

trol switches to select 

 on the 

multi-information display.

2

Press 

 or 

 of the meter con-

trol switches to select “Vehicle Set-
tings” and then press “OK”.

3

Press 

 or 

 of the meter con-

trol switches to select “Charging 
Settings” and then press “OK”.

4

Press 

 or 

 of the meter con-

trol switches to select “Charging 
Schedule” and then press “OK”.

The “Charging Schedule” display will be 

displayed on the multi-information display.

137

2

2-2. Charging

El

ect
ric V
eh

icle

 sy

st

em

5

Press 

 or 

 of the meter con-

trol switches to select “Next Event”, 
and then press “OK”.

The “Next Event” display will be displayed.

6

Press 

 or 

 of the meter con-

trol switches to select “Yes”, and 
then press “OK”.

A display that confirms changes for the 

“Next Event” will be displayed.
When canceling changes, Select “No” and 

then press “OK”.

7

Press 

 or 

 of the meter con-

trol switches to select “OK”, and 
then press “OK”.

The “Charging Mode” display will be dis-

played.

Press 

 to return to the previous dis-

play.

8

Press 

 or 

 of the meter con-

trol switches, select the item to 
change, press 

 or 

 and 

change the settings.

138

2-2. Charging

9

When setting are complete, press 
“OK”.

A display to confirm the setup saving will 

be displayed.

Press 

 or 

 of the meter control 

switches to select “Save”, and then press 

“OK” to save the contents that were setup.
If it is desired to change the setup contents, 
press 

 and change the operation 

setup.

Q

The charging schedule setting display 

will be suspended when

O

It is necessary for a message with a 

higher priority than the charging sched-

ule setting to be displayed.

O

The power switch is turned off before the 

settings are confirmed.

O

The vehicle is started off.

Q

“Next Event”

Even after charging is performed according 

to the “Next Event” schedule, the “Next 

Event” displayed on the multi-information 

display will not change until the AC 

charging cable is removed after charging 

completes.

Q

To return to original setting after chang-

ing “Next Event” setting

Turning the setting of “Charge Now” on 

and then off can return the setting of “Next 

Event” to its original setting.

Q

When “Next Event” is changed while 

charging

O

When the charging mode is “Departure”, 

the current charging is interrupted or 

continued depending on the remaining 

time until the charging is completed.

O

When the charging mode is “Start”, the 

current charging is interrupted, the next 

charging will start at the set time.

Q

When the power switch is turned off

When the power switch is turned off, the 

next charging schedule will be displayed on 

the ending display and the registered con-

Setting

Operation

Charge 

mode/Time

Operate , ,  

and 

 of the meter control 

switches to set the 
charging mode (“Start” or 
“Departure”) and charging 
start (or departure) time.
When setting are com-
plete, press “OK”.

Day

Operate 

 or 

 of the 

meter control switches to 
select the day to perform 
charging according to the 
schedule.
When setting are com-
plete, press “OK”.

Air condi-

tioner linked

This can be set when the 
charging mode is set to 
“Departure”. To activate 
the air conditioner link, 
press 

 or 

 of the 

meter control switches to 
select “Yes” and then press 
“OK”.

139

2

2-2. Charging

El

ect
ric V
eh

icle

 sy

st

em

tents can be checked.
Also, the ending display may not be dis-

played during charging.

1

Connect the charge cable to the 
vehicle to start charging.

AC Charging: 

P.116

DC Charging: 

P.125

2

Turn the power switch to ON while 
charging.

The My Room Mode settings is automati-

cally displayed on the multi-information 

display.

3

Press 

 or 

 of the meter con-

trol switches to select “Yes”, and 
then press “OK”.

My Room Mode is started and it is possible 

to use the air conditioning system, audio 

system, etc.
Select “No” and press “OK” when My 

Room Mode is not being used.

To disable My Room Mode, turn the 

power switch off.

NOTICE

Q

While setting the charging schedule

To prevent 12-volt battery discharge, 

ensure that the EV system is operating 

while setting the charging schedule on 

the multi-information display.

Using My Room Mode

When the charging cable is con-
nected to the vehicle, electrical 
components such as the air condi-
tioning system and audio system 
can be used by the power supply 
from an external power source.

Starting My Room Mode

140

2-2. Charging

My Room Mode will automatically be off 

when DC charging is completed.

When starting My Room Mode, the 
electric power balance will be auto-
matically displayed on the multi-infor-
mation display, and an approximation 
of the electricity balance (the balance 
between the amount of electricity pro-
vided and electricity consumed) during 
My Room Mode can be checked.

Discharging (-)

Charging (+)

The size of the arrow symbol changes 
depending on the power supply and elec-
tricity consumption amounts.
If the electricity consumption is more than 
the power supply, 

 is displayed more 

than .
If the power supply and electricity con-
sumption amounts are equal, 

 and 


are displayed as the same size.

Q

Meter display while charging

After turning the power switch to ON while 

charging, the power switch automatically 

turns off if My Room Mode is not selected 

within approximately 100 seconds.

Q

When using My Room Mode the follow-

ing may occur

O

When the remaining charge of the trac-

tion battery drops to the lower limit, the 

air conditioning system automatically 

stops. In that case, the air conditioning 

system can not operate until the remain-

ing charge of the traction battery 

increases. Turn off the power switch 

once, then use My Room Mode after the 

remaining charge of the traction battery 

increases.

O

If the doors are unlocked while using My 

Room mode, the AC charging connector 

will be unlocked and the My Room mode 

will be stopped. To use My Room mode 

again, perform the operation to start it. 

(

P.139) In addition, when using AC 

charger at the public charging station, it is 

necessary to perform the operation to 

start the charger before using My Room 

mode.

O

The charging time of the traction battery 

gets longer.

O

Noise may be heard from the radio 

depending on conditions of the radio 

wave.

O

Fan noises may be heard from under the 

floor.

O

The surrounding area of the onboard 

traction battery charger in the motor 

compartment may become hot.

O

The electric power steering system warn-

ing light (yellow) may turn on, but this is 

not a malfunction.

Q

Registering the charging schedule 

(

P.132)

When My Room Mode starts while a 

charging schedule is on standby, the 

charging schedule settings are disable and 

charging starts immediately.

Q

Using My Room Mode with the traction 

battery fully charged

A warning message “Charging Port Lid is 

Open” will be displayed on the multi-infor-

Display information for electric 
power balance during My Room 
Mode

A
B

A

B

A

B

141

2

2-2. Charging

El

ect
ric V
eh

icle

 sy

st

em

mation display, if the power switch is turned 

on when the traction battery is fully charged 

and the AC charging connector is con-

nected.

In that case, by pressing the 

 of meter 

control switches, the My Room Mode set-

tings screen will be displayed and “Yes” can 

be selected.
When My Room Mode is used with the 

traction battery fully charged, electricity of 

the traction battery will be consumed. In 

that case, perform the charging again.

Q

Warning message display

When trying to start My Room Mode or My Room Mode is being used, if a message is dis-

played on the multi-information display, refer to the corresponding table and perform the 

appropriate correction procedures.

*

: During My Room Mode, the information for electric power balance can be checked on 

the multi-information display.

Message

Correction procedure

“Traction Battery is too Low 
for “My Room Mode””

There is no remaining charge of the traction battery to start 
My Room Mode. Wait until the remaining charge of the 
traction battery increases, start the My Room Mode.

““My Room Mode” has 
stopped due to low traction 
battery level”

The remaining charge of the traction battery is insufficient. 
Stop using the My Room Mode and charge the traction 
battery.

““My Room Mode” will stop 
when traction battery level is 
too low Reduce power usage 
to continue using “My Room 
Mode””

The electricity consumption of the vehicle is more than the 
charge amount for the traction battery, thus the remaining 
charge of the traction battery is low.

*

• If the electricity consumption of the vehicle can not be 

improved, the My Room Mode will be off.

• When My Room Mode continuation is desired, turn off 

the air conditioning system, audio system, etc., to 
increase the remaining charge of the traction battery.


Content      ..     5      6      7      8     ..