LEXUS LS 500 (2019 year). Instruction - part 6


  Index      Lexus     LEXUS LS 500 - instruction 2019 year in english


Search            


Content   ..  4  5  6  7   ..


LEXUS LS 500 (2019 year). Instruction - part 6


92

2-1. Instrument cluster

LS500_OM_(U)_1809

menu screen.
If a screen other than “Trip Information” 
is displayed, select “Trip Information”.

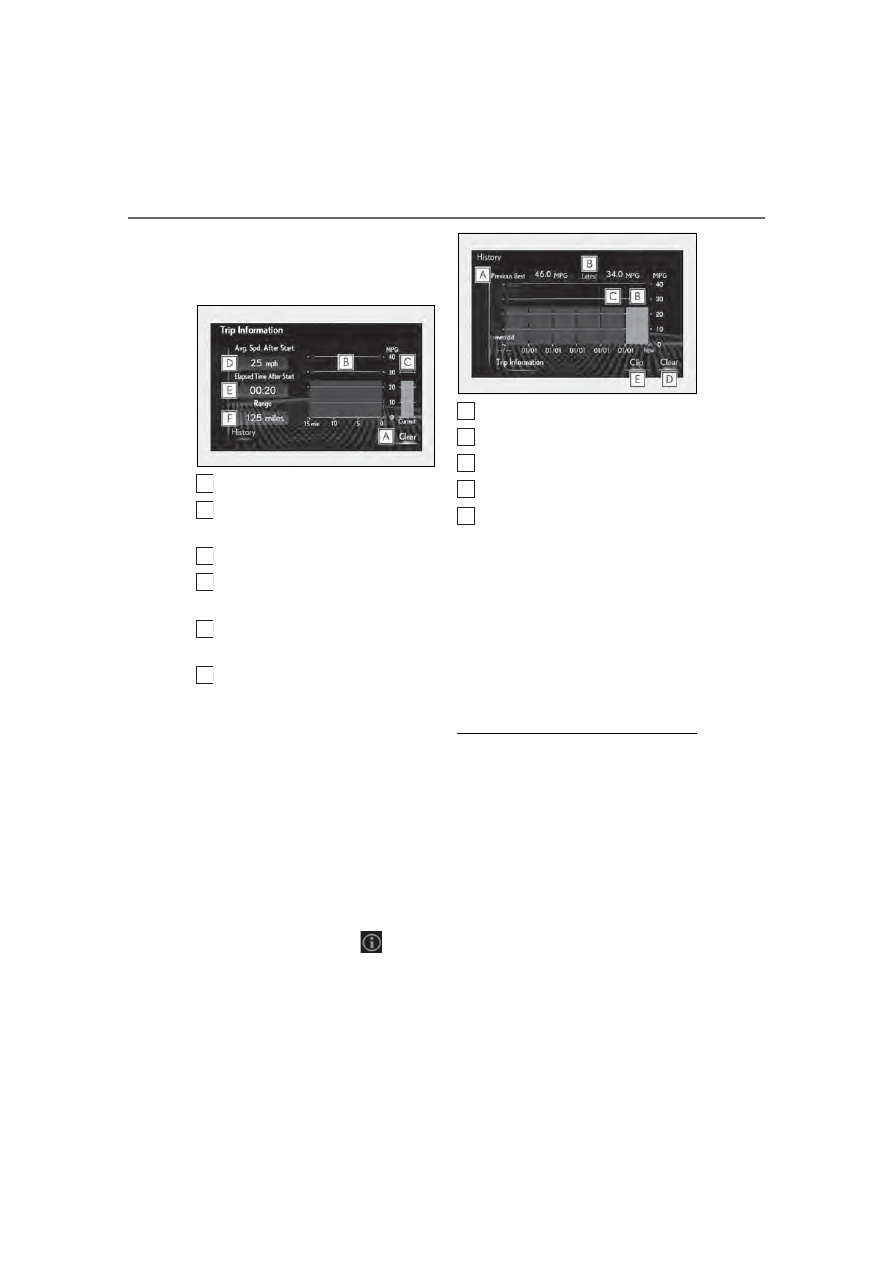
Resetting the consumption data
Fuel consumption in the past 15 
minutes
Current fuel consumption
Average vehicle speed since the 
engine was started.
Elapsed time since the engine was 
started.
Cruising range

Average fuel consumption for the past 
15 minutes is divided by color into past 
averages and averages attained since 
the engine switch was last turned to 
IGNITION ON mode. Use the dis-
played average fuel consumption as a 
reference.

The image is an example only, and may 
vary slightly from actual conditions.

History

Press the “MENU” button on the 
Remote Touch, then select 

 on the 

menu screen.
If a screen other than “History” is dis-
played, select “History”.

Best recorded fuel consumption
Latest fuel consumption
Previous fuel consumption record
Resetting the history data
Updating the latest fuel consump-
tion data

The average fuel consumption history 
is divided by color into past averages 
and the average fuel consumption 
since the last updated. Use the dis-
played average fuel consumption as a 
reference.

The image is an example only, and may 
vary slightly from actual conditions.

Updating the history data

Update the latest fuel consumption by 

selecting “Clip” to measure the current fuel 

consumption again.

Resetting the data

The fuel consumption data can be deleted 

by selecting “Clear”.

Cruising range

Displays the estimated maximum distance 

that can be driven with the quantity of fuel 

remaining.
This distance is computed based on your 

average fuel consumption. 

As a result, the actual distance that can be 

driven may differ from that displayed.

A
B

C
D

E

F

A
B
C
D

E

93

2-1. Instrument cluster

LS500_OM_(U)_1809

2

Vehi

cle

 status 

inform

ati

on a

nd i

ndic
ators

Display the vehicle information on the 
side display (

P.307), and then select 

 or 

 to display the desired 

screen. 
The image is an example only, and may 
vary slightly from actual conditions.

Trip information (type A)

Displays the average fuel consumption 
for the past 10 minutes in 1 minute 
intervals, as well as the cruising range.

Use the displayed average fuel consump-
tion as a reference.

Trip information (type B)

Displays the cruising range, latest fuel 
consumption and the amount of time 
elapsed since the engine was started.

Use the displayed average fuel consump-
tion as a reference.

History

Displays the average fuel consumption 
and highest fuel consumption.

Use the displayed average fuel consump-
tion as a reference.

Using the side display

94

2-1. Instrument cluster

LS500_OM_(U)_1809

95

LS500_OM_(U)_1809

3

3

Be

fore
 dri
ving

Before driving

.

3-1. Key information

Keys ...................................................

96

3-2. Opening, closing and locking the 

doors and trunk

Doors...............................................

100

Trunk................................................

104

Smart access system with 

push-button start.......................

111

3-3. Adjusting the seats

Front seats......................................

119

Power rear seat...........................

126

Driving position memory ........

130

Rear seat position memory....

134

Head restraints............................

135

3-4. Adjusting the steering wheel and 

mirrors

Steering wheel.............................

138

Inside rear view mirror.............

139

Outside rear view mirrors......

140

3-5. Opening, closing the windows 

and moon roof

Power windows...........................

142

Moon roof .....................................

145

Panoramic moon roof ..............

147

96

3-1. Key information

LS500_OM_(U)_1809

3-1.Key information

The following keys are provided with 
the vehicle.

Electronic keys

• Operating the smart access system with 

push-button start (

P.111

)

• Operating the wireless remote control 

function (

P.98

)

Mechanical keys
Key number plate
Card key (electronic key) (if 
equipped)

Operating the smart access system with 
push-button start (

P.111)

Card key (if equipped)

The card key is not waterproof.

The mechanical key that is stored inside 

the card key should be used only if a 

problem arises, such as when the card 

key does not operate properly.

If it is difficult to take out the mechanical 

key, push down the lock release button 

using a pen tip etc. If it is still difficult to 

pull it out, use a coin etc.

To store the mechanical key in the card 

key, insert it while pressing the lock 

release button.

If the battery cover is not installed and the 

battery falls out or if the battery was 

removed because the key got wet, rein-

stall the battery with the positive terminal 

facing the Lexus emblem.

When riding in an aircraft

When bringing an electronic key onto an 

aircraft, make sure you do not press any 

buttons on the electronic key while inside 

the aircraft cabin. If you are carrying an 

electronic key in your bag etc., ensure that 

the buttons are not likely to be pressed acci-

dentally. Pressing a button may cause the 

electronic key to emit radio waves that 

could interfere with the operation of the air-

craft.

Electronic key battery depletion

The standard battery life is 1 to 2 years. 

(The card key battery life is about a year 

and a half.)

If the battery becomes low, an alarm will 

sound in the cabin and a message will be 

shown on the multi-information display 

when the engine is stopped.

Keys

The keys

A

B
C
D

97

3-1. Key information

LS500_OM_(U)_1809

3

Be

fore
 dri
ving

To reduce key battery depletion when the 

electronic key is to not be used for long 

periods of time, set the electronic key to 

the battery-saving mode. (

P.113)

As the electronic key always receives 

radio waves, the battery will become 

depleted even if the electronic key is not 

used. The following symptoms indicate 

that the electronic key battery may be 

depleted. Replace the battery when nec-

essary.

• The smart access system with push-but-

ton start or the wireless remote control 

does not operate.

• The detection area becomes smaller.

• The  LED  indicator  on the key surface 

does not turn on.

To avoid serious deterioration, do not 

leave the electronic key within 3 ft. (1 m) 

of the following electrical appliances that 

produce a magnetic field:

• TVs

• Personal computers

• Cellular phones, cordless phones and 

battery chargers

• Recharging cellular phones or cordless 

phones

• Table lamps

• Induction cookers

Replacing the battery

P.399

Confirmation of the number of regis-

tered keys

The number of keys already registered to 

the vehicle can be confirmed. Ask your 

Lexus dealer for details.

If “A New Key has been Registered 

Contact Your Dealer for Details” is 

shown on the multi-information display

This message will be displayed each time 

the driver’s door is opened when the doors 

are unlocked from the outside for approxi-

mately 10 days after a new electronic key 

has been registered.

If this message is displayed but you have not 

had a new electronic key registered, ask 

your Lexus dealer to check if an unknown 

electronic key (other than those in your 

possession) has been registered.

NOTICE

To prevent key damage

Do not drop the keys, subject them to 

strong shocks or bend them.

Do not expose the keys to high tem-

peratures for a long period of time.

Do not get the keys wet or wash them 

in an ultrasonic washer etc.

Do not attach metallic or magnetic 

materials to the keys or place the keys 

close to such materials.

Do not disassemble the keys.

Do not attach a sticker or anything else 

to the surface of the electronic key.

Do not place the keys near objects that 

produce magnetic fields, such as TVs, 

audio systems and induction cookers, 

or medical electrical equipment, such 

as low-frequency therapy equipment.

Carrying the electronic key on your 

person

Carry the electronic key 3.9 in. (10 cm) 

or more away from electric appliances 

that are turned on. Radio waves emitted 

from electric appliances within 3.9 in. (10 

cm) of the electronic key may interfere 

with the key, causing the key to not func-

tion properly.

In case of a smart access system with 

push-button start malfunction or 

other key-related problems

P.433

When an electronic key is lost

P.432

Handling the card key (if equipped)

Do not apply excess force when insert-

ing the mechanical key into the card 

key. Doing so may damage the card 

key.

98

3-1. Key information

LS500_OM_(U)_1809

The electronic keys are equipped with 
the following wireless remote control:

Locks the doors (

P.100)

Unlocks the doors (

P.100)

Opens the windows

*1

 and moon 

roof

*1, 2

 or panoramic moon roof

*1, 

2

 (

P.100)

Opens the trunk (

P.107)

Sounds the alarm

*1

: This setting must be customized at your 

Lexus dealer.

*2

: If equipped

Theft deterrent panic mode

When 

 is pressed for longer than 

about one second, an alarm will sound 

intermittently and the vehicle lights will flash 

to deter any person from trying to break 

into or damage your vehicle.
To stop the alarm, press any button on the 

electronic key.

To take out the mechanical key, push 
the release button and take the key out.

NOTICE

If the battery or card key terminals get 

wet, the battery may corrode and the 

card key may stop working.

If the key is dropped into water, or if 

drinking water, etc. is spilled on the key, 

immediately remove the battery cover 

and wipe the battery and terminals. (To 

remove the battery cover, lightly grasp 

and pull it.) If the battery is corroded, 

have your Lexus dealer replace the 

battery.

Do not crush the battery cover or use 

a screwdriver to remove the battery 

cover.

Forcibly removing the battery cover 

may bend or damage the key.

If the battery cover is frequently 

removed, the battery cover may 

become loose.

When installing the battery, make sure 

to check the direction of the battery.

Installing the battery in the wrong 

direction may cause the battery to 

deplete rapidly.

The surface of the card key may be 

damaged, or its coating may peel off in 

the following situations:

• The card key is carried together with 

hard objects, such as coins and keys.

• The card key is scraped with a sharp 

object, such as the tip of a mechanical 

pencil.

• The surface of the card key is wiped 

with thinner or benzene.

Wireless remote control

Using the mechanical key

A
B
C

D

E

99

3-1. Key information

LS500_OM_(U)_1809

3

Be

fore
 dri
ving

The mechanical key can only be inserted in 
one direction, as the key only has grooves 
on one side. If the key cannot be inserted in 
a lock cylinder, turn it over and re-attempt 
to insert it.
After using the mechanical key, store it in 
the electronic key. Carry the mechanical 
key together with the electronic key. If the 
electronic key battery is depleted or the 
entry function does not operate properly, 
you will need the mechanical key. 
(

P.433)

When required to leave the vehicle’s 

key with a parking attendant

Turn the trunk opener main switch off 

(

P.110) and lock the glove box (P.336) 

as circumstances demand.

Remove the mechanical key for your own 

use and provide the attendant with the elec-

tronic key only.

If you lose your mechanical keys

P.432

If a wrong key is used

The key cylinder rotates freely, isolated 

from the internal mechanism.

100

3-2. Opening, closing and locking the doors and trunk

LS500_OM_(U)_1809

3-2.Opening, closing and locking the doors and trunk

Smart access system with 
push-button start

Carry the electronic key to enable this 
function.

1

Grip the driver’s door handle to 
unlock the door. Holding the 
driver’s door handle for approxi-
mately 2 seconds unlocks all the 
doors. Grip any passenger door 
handle to unlock all the doors.

*

Make sure to touch the sensor on the back 
of the handle.
The doors cannot be unlocked for 3 sec-
onds after the doors are locked.

*

: The door unlock settings can be 

changed.

2

Touch the lock sensor (indentation 
on the upper part of the door han-
dle) to lock all the doors.

Check that the door is securely locked.

Wireless remote control

1

Locks all the doors

Check that the door is securely locked.

2

Unlocks all the doors

Pressing the button unlocks the driver’s 
door. Pressing the button again within 5 
seconds unlocks the other door.
Press and hold to open the windows

*1

 and 

moon roof

*1,2

 or panoramic moon roof

*1,2

.

*1

: This setting must be customized at your 

Lexus dealer.

*2

: If equipped

Switching the door unlock function

It is possible to set which doors the entry 

function unlocks using the wireless remote 

control.

1

Turn the engine switch off.

2

When the indicator light on the key sur-
face is not on, press and hold 

 or 

 for approximately 5 

seconds while pressing and holding 

.

The setting changes each time an operation 

is performed, as shown below. (When 

changing the setting continuously, release 

the buttons, wait for at least 5 seconds, and 

repeat step 

2

.)

Doors

Unlocking and locking the doors 
from the outside

101

3-2. Opening, closing and locking the doors and trunk

LS500_OM_(U)_1809

3

Be

fore
 dri
ving

To prevent unintended triggering of the 

alarm, unlock the doors using the wireless 

remote control and open and close a door 

once after the settings have been changed. 

(If a door is not opened within 60 seconds 
after 

 is pressed, the doors will be 

locked again and the alarm will automati-

cally be set.)

In a case that the alarm is triggered, imme-

diately stop the alarm. (

P.65)

Impact detection door lock release sys-

tem

In the event that the vehicle is subject to a 

strong impact, all the doors are unlocked. 

Depending on the force of the impact or the 

type of accident, however, the system may 

not operate.

Operation signals

A buzzer sounds and the emergency flash-

ers flash to indicate that the doors have 

been locked/unlocked. (Locked: once; 

Unlocked: twice)
A buzzer sounds to indicate that the win-

dows and moon roof or panoramic moon 

roof are operating.

Security feature

If a door is not opened within approximately 

60 seconds after the vehicle is unlocked, 

the security feature automatically locks the 

vehicle again.

When the doors cannot be locked by the 

lock sensor on the upper part of the 

door handle

When the doors cannot be locked even if 

the lock sensor on the upper part of the 

door handle is touched by a finger, touch 

the lock sensor with the palm.
If you are wearing gloves, remove them.

Open door warning buzzer

If an attempt to lock the doors is made when 

a door is not fully closed, a buzzer sounds 

continuously for 5 seconds. Fully close the 

door to stop the buzzer, and lock the vehi-

cle once more.

Setting the alarm

Locking the doors will set the alarm system. 

(

P.65)

Conditions affecting the operation of 

the smart access system with push-but-

ton start or wireless remote control

P.113

If the smart access system with 

push-button start or the wireless remote 

control does not operate properly

Use the mechanical key to lock and unlock 

the doors. (

P.433)

Replace the key battery with a new one if it 

is depleted. (

P.399)

If the battery is discharged

The doors cannot be locked and unlocked 

using the smart access system with 

push-button start or wireless remote con-

trol. Lock or unlock the doors using the 

mechanical key. (

P.433)

Multi-information 

display/Beep

Unlocking function

Exterior: Beeps 3 

times

Interior: Pings once

Holding the driver’s 
door handle unlocks 
only the driver’s 
door.

Holding any of the 
passenger door 
handles unlocks all 
the doors.

Exterior: Beeps 

twice

Interior: Pings once

Holding a door han-
dle unlocks all the 
doors.

102

3-2. Opening, closing and locking the doors and trunk

LS500_OM_(U)_1809

Customization

Some functions can be customized. 

(

P.466)

Door lock switches (to 
lock/unlock)

1

Locks all the doors

2

Unlocks all the doors

Inside lock buttons (to lock)

Push down the inside lock button to 
lock the door.

Inside door handles (to unlock)

For the front doors

Pull the handle to unlock and open the 
door.

When the door is unlocked, the inside lock 
button will pop up.

For the rear doors

Pull the handle to unlock the door. Pull 
the handle a second time to open the 
door.

WARNING

To prevent an accident

Observe the following precautions while 

driving the vehicle.

Failure to do so may result in a door 

opening and an occupant throwing out of 

the vehicle, resulting in death or serious 

injury.

Ensure that all doors are properly 

closed and locked.

Do not pull the inside handle of the 

doors while driving.

Be especially careful for the front doors, 
as the doors may be opened even if the 
inside lock buttons are in locked position.

Set the rear door child-protector locks 

when children are seated in the rear 

seats.

When opening or closing a door

Check the surroundings of the vehicle 

such as whether the vehicle is on an 

incline, whether there is enough space 

for a door to open and whether a strong 

wind is blowing. When opening or clos-

ing the door, hold the door handle tightly 

to prepare for any unpredictable move-

ment.

Vehicle height control precautions 

(vehicles with electronically modu-

lated air suspension)

In the following situations, make sure to 

check the safety of the area around the 

vehicle, as the vehicle height may change 

and part of someone’s body may be 

caught in the vehicle, possibly causing 

injury or the vehicle may be damaged.

When opening a door

When unlocking the doors using the 

smart access system with push-button 

start

Unlocking and locking the doors 
from the inside

103

3-2. Opening, closing and locking the doors and trunk

LS500_OM_(U)_1809

3

Be

fore
 dri
ving

When the door is unlocked, the inside lock 
button will pop up.

Locking the front doors from the outside 

without a key

1

Push down the inside lock button.

2

Close the door.

The door cannot be locked if the engine 

switch is in ACCESSORY or IGNITION 

ON mode, or the electronic key is left 

inside the vehicle. However, the key may not 

be detected correctly and the door may be 

locked.

Door closer (if equipped)

In the event that a door is left slightly open, 

the door closer will automatically close it to 

the fully closed position.

The door closer will operate regardless 

of the engine switch mode.

The door closer will not function if the 

door has been closed while pulling the 

inside or outside door handle.

The door can be opened by pulling the 

inside or outside door handle, even when 

the door closer is operating (except 

when the lock button is in the lock posi-

tion or the child-protector lock is set).

A motor sound may be heard for several 

seconds after the door closer closes the 

door. This does not indicate a malfunc-

tion.

Open door warning buzzer

If a door or the trunk is not fully closed, a 

buzzer will sound when the vehicle speed 

reaches 3 mph (5 km/h).

The open door(s) or trunk is indicated on 

the multi-information display.

The door cannot be opened from 
inside the vehicle when the lock is set.

WARNING

Door closer (if equipped)

In the event that a door is left slightly 

open, the door closer will automatically 

close it to the fully closed position. It 

takes several seconds before the door 

easy closer begins to operate.

If the child-protector lock is set, the door 

closer will not stop during operation even 

if an attempt is made to open the door 

from inside the vehicle. Be careful not to 

catch fingers or anything else in the door. 

Failure to do so may result in serious 

injury.

NOTICE

To prevent door closer malfunction (if 

equipped)

Do not frequently repeat opening and 

closing of doors, or apply excessive force 

to a door while the door closer is operat-

ing.

Rear door child-protector lock

104

3-2. Opening, closing and locking the doors and trunk

LS500_OM_(U)_1809

1

Unlock

2

Lock

These locks can be set to prevent children 
from opening the rear doors. Push down 
on each rear door switch to lock both rear 
doors.

The following functions can be set or 
canceled:

For instructions on customizing, refer to 
P.466.

Automatic door locking and 
unlocking systems

Function

Operation

Speed linked 
door locking 
function

All doors are automati-
cally locked when vehi-
cle speed is 
approximately 12 mph 
(20 km/h) or higher.

Shift position 
linked door lock-
ing function

All doors are automati-
cally locked when the 
shift position is shifted 
to a position other than 
P.

Shift position 
linked door 
unlocking func-
tion

All doors are automati-
cally unlocked when 
the shift position is 
shifted to P.

Driver’s door 
linked door 
unlocking func-
tion

All doors are automati-
cally unlocked when 
driver’s door is opened 
within approximately 
45 seconds after turn-
ing the engine switch 
off.

Trunk

The trunk can be opened using the 
trunk opener switch, entry function 
or wireless remote control.

If the vehicle is equipped with a 
power trunk opener and closer, the 
trunk can be closed using the trunk 
closer.

WARNING

Observe the following precautions.

Failure to do so may result in death or 

serious injury.

Before driving

Make sure that the trunk lid is fully 

closed. If the trunk lid is not fully 

closed, it may open unexpectedly 

while driving and hit near-by objects or 

luggage in the trunk may be thrown 

out, causing an accident.

Do not allow children to play in the 

trunk.

If a child is accidentally locked in the 

trunk, they could suffer from heat 

exhaustion, suffocation or other inju-

ries.

Do not allow a child to open or close 

the trunk lid.

Doing so may cause the trunk lid to 

open unexpectedly, or cause the 

child’s hands, head, or neck to be 

caught by the closing trunk lid.

Important points while driving

Never let anyone sit in the trunk. In the 

event of sudden braking or a collision, 

they are susceptible to death or serious 

injury.

Using the trunk

Observe the following precautions.

Failure to do so may cause parts of the 

body to be caught, resulting in serious 

injury.

105

3-2. Opening, closing and locking the doors and trunk

LS500_OM_(U)_1809

3

Be

fore
 dri
ving

WARNING

Remove any heavy loads, such as snow 

and ice, from the trunk lid before 

opening it. Failure to do so may cause 

the trunk lid to suddenly shut again 

after it is opened.

When opening or closing the trunk lid, 

thoroughly check to make sure the 

surrounding area is safe.

If anyone is in the vicinity, make sure 

they are safe and let them know that 

the trunk is about to open or close.

Use caution when opening or closing 

the trunk lid in windy weather as it may 

move abruptly in strong wind.

The trunk lid may suddenly shut if it is 

not opened fully. It is more difficult to 

open or close the trunk lid on an 

incline than on a level surface, so 

beware of the trunk lid unexpectedly 

opening or closing by itself. Make sure 

that the trunk lid is fully open and 

secure before using the trunk.

When closing the trunk lid, take extra 

care to prevent your fingers etc. from 

being caught.

When closing the trunk lid, make sure 

to press it lightly on its outer surface. If 

the trunk handle is used to fully close 

the trunk lid, it may result in hands or 

arms being caught.

Do not attach any accessories other 

than genuine Lexus parts to the trunk 

lid. Such additional weight on the trunk 

lid may cause the lid to suddenly shut 

again after it is opened.

Trunk easy closer

In the event that the trunk lid is left slightly 

open, the trunk easy closer will automati-

cally close it to the fully closed position. It 

takes several seconds before the trunk 

easy closer begins to operate. Be careful 

not to catch fingers or anything else in 

the trunk lid, as this may cause bone frac-

tures or other serious injuries.

Power trunk opener and closer (if 

equipped)

Observe the following precautions when 

operating the power trunk opener and 

closer.

Failure to do so may cause serious injury.

Check the safety of the surrounding 

area to make sure there are no obsta-

cles or anything that could cause any 

of your belongings to get caught.

If anyone is in the vicinity, make sure 

they are safe and let them know that 

the trunk is about to open or close.

If the trunk closer switch is pressed 

while the trunk lid is opening during 

automatic operation, the trunk lid 

stops opening. Take extra care when 

on an incline, as the trunk lid may open 

or close suddenly.

106

3-2. Opening, closing and locking the doors and trunk

LS500_OM_(U)_1809

Trunk opener switch

Press the trunk opener switch.

If the vehicle is equipped with a power 
trunk opener and closer, the trunk lid will 
fully open.

WARNING

On an incline, the trunk lid may sud-

denly shut after it opens automatically. 

Make sure the trunk lid is fully open 

and secure before using the trunk.

In the following situations, the power 

trunk opener and closer may detect an 

abnormality and automatic operation 

may be stopped. In this case, the trunk 

lid has to be operated manually. Take 

extra care in this situation, as the 

stopped trunk lid may suddenly shut, 

causing an accident.

• When the trunk lid contacts an obsta-

cle

• When the battery voltage suddenly 

drops, such as when the engine switch 

is turned to IGNITION ON mode or 

the engine is started during automatic 

operation

Do not attach any accessories other 

than genuine Lexus parts to the trunk 

lid. The power trunk opener and closer 

may not operate, causing itself to mal-

function, or the trunk lid may suddenly 

shut again after it is opened.

Hands Free Power Trunk Lid (if 

equipped)

Observe the following precautions.

Failure to do so may cause serious injury.

Exhaust gasses cause the exhaust 

pipes to become quite hot. When 

operating the Hands Free Power Trunk 

Lid, be careful not to touch the exhaust 

pipe.

Do not operate the Hands Free Power 

Trunk Lid if there is little space under 

the rear bumper.

Jam protection function

Observe the following precautions.

Failure to do so may cause serious injury.

Never use any part of your body to 

intentionally activate the jam protec-

tion function.

The jam protection function may not 

work if something gets caught just 

before the trunk lid fully closes. Be 

careful not to catch fingers or anything 

else in the trunk lid.

The jam protection function may not 

work depending on the shape of the 

object that is caught. Be careful not to 

catch fingers or anything else.

NOTICE

To prevent trunk easy closer malfunc-

tions

Do not apply force to the trunk lid while 

the trunk easy closer is operating.

To prevent damage to the power 

trunk opener and closer (vehicles 

with power trunk opener and closer)

Make sure that there is no luggage or 

snow on the trunk lid before operating 

the power trunk opener and closer. In 

addition, make sure that there is no ice 

between the trunk lid and frame that 

prevents movement of the trunk lid. 

Operating the power trunk opener 

and closer when excessive load is 

present on the trunk lid may cause a 

malfunction.

Do not apply excessive force to the 

trunk lid while the power trunk opener 

and closer is operating.

Opening/closing the trunk

107

3-2. Opening, closing and locking the doors and trunk

LS500_OM_(U)_1809

3

Be

fore
 dri
ving

Smart access system with 
push-button start

While carrying the electronic key, 
press the button.

If the vehicle is equipped with a power 
trunk opener and closer, the trunk lid will 
fully open.
If the button is pressed while the trunk lid is 
opening, the trunk lid will stop moving.

When all the doors are unlocked using 
one of the following methods, the trunk 
can be opened without the electronic 
key:
 Entry function
 Wireless remote control
 Door lock switches
 Automatic door unlocking system
 Mechanical key

Wireless remote control

Press and hold the switch.

A buzzer sounds.
If the vehicle is equipped with a power 
trunk opener and closer, the trunk lid will 
fully open.
If the button is pressed while the trunk lid is 
opening, the trunk lid will stop moving.

Hands Free Power Trunk Lid (if 
equipped)

1

While carrying an electronic key, 
stand within the smart access sys-
tem with push-button start opera-
tion area, approximately 11.8 to 19.7 
in. (30 to 50 cm) from the rear 
bumper.

Hands Free Power Trunk Lid sensor
Hands Free Power Trunk Lid opera-
tion detection area
Smart access system with 
push-button start operation detec-
tion area (

P.112)

A
B

C


Content   ..  4  5  6  7   ..