LEXUS CT200H (2017 year). Instruction - part 17


  Index      Lexus     LEXUS CT200H - instruction 2017 year in english


Search            


Content   ..  15  16  17  18   ..


LEXUS CT200H (2017 year). Instruction - part 17


267

5-3. Using the radio

5

Audio system

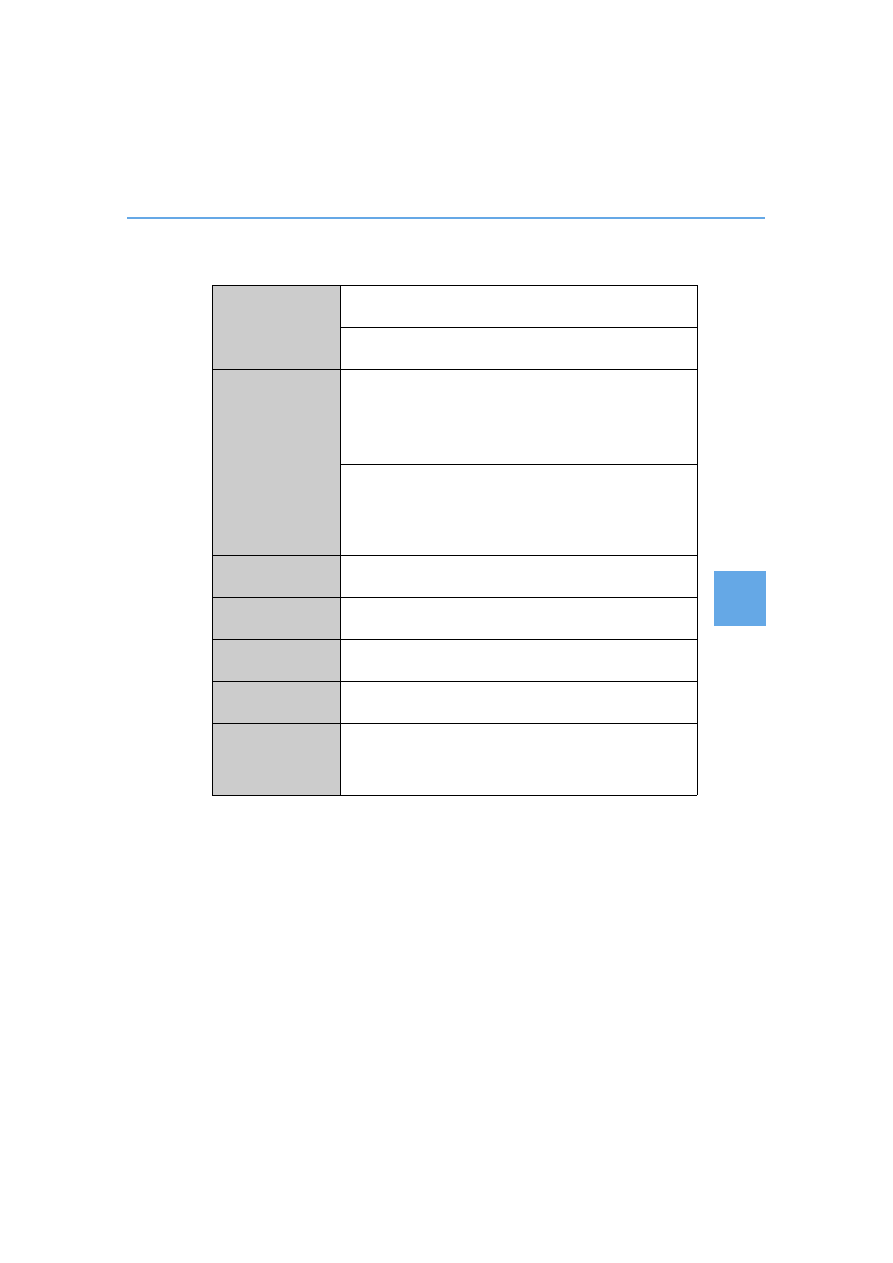
If the satellite radio does not operate normally
If a problem occurs with the XM

®

 tuner, a message will appear on the display. Refer to

the table below to identify the problem, and take the suggested corrective action.

Contact the XM

®

 Listener Care Center at 1-877-447-0011 (U.S.A.) or 1-877-438-9677

(Canada).

ANTENNA

The XM

®

 antenna is not connected. Check whether the XM

®

antenna cable is attached securely.

There is a short-circuit in the antenna or the surrounding

antenna cable. See a Lexus certified dealer.

UNAUTH

You have not subscribed to the XM

®

 Satellite Radio. The radio

is being updated with the latest encryption code. Contact the
XM

®

 Satellite Radio for subscription information. When a

contract is canceled, you can choose the “CH000” and all the

free-to-air channels.

The premium channel you selected is not authorized. Wait for

about 2 seconds until the radio returns to the previous channel

or “CH001”. If it does not change automatically, select another

channel. If you want to listen to the premium channel, contact
the XM

®

 Satellite Radio.

NO SIGNAL

The XM

®

 signal is too weak at the current location. Wait until

your vehicle reaches a location with a stronger signal.

LOADING

The unit is acquiring audio or program information. Wait until

the unit has received the information.

OFF AIR

The channel you selected is not broadcasting any program-

ming. Select another channel.

-----

There is no song/program title or artist name/feature associ-

ated with the channel at that time. No action needed.

CH UNAVL

The channel you selected is no longer available. Wait for about

2 seconds until the radio returns to the previous channel or

“CH001”. If it does not change automatically, select another

channel.

268

5-3. Using the radio

Certifications for the radio tuner
This equipment has been tested and found to comply with the limits for a class B digital

device, pursuant to Part 15 of the FCC Rules. These limits are designed to provide rea-

sonable protection against harmful interference in a residential installation. This equip-

ment generates, uses and can radiate radio frequency energy and, if not installed and

used in accordance with the instructions, may cause harmful interference to radio com-

munications. However, there is no guarantee that interference will not occur in a particu-

lar installation.
If this equipment does cause harmful interference to radio or television reception, which

can be determined by turning the equipment off and on, the user is encouraged to try to

correct the interference by trying one or more of the following:

Reorienting or relocate the receiving antenna.

Increasing the separation between the equipment and receiver.

Connecting the equipment into an outlet on a circuit different from that to which the

receiver is connected.

Consulting the dealer or an experienced radio/TV technician for help.

269

5-4. Playing audio CDs and MP3/WMA discs

5

Audio system

CD player operation

Insert a CD.

Press 

 and remove the CD.

Insert a disc or press the “CD•AUX” button to begin listening to a disc.

Control panel

CD eject
Repeat play
Search play
“TUNE•SEL” knob
Track/file selection
Playback
Folder selection

Track/file selection
Random play
Power/volume knob

Press: Turning the audio system on or

off
Turn: Adjusting the volume

Displaying text message

Loading CDs or MP3 and WMA discs

Ejecting CDs or MP3 and WMA discs

1

2
3
4

5
6

7

8
9

10

270

5-4. Playing audio CDs and MP3/WMA discs

Selecting a track
Press “

” to move up or “” to move down using the “SEEK•TRACK” button

until the desired track number appears on the displayed.

Fast-forwarding and reversing tracks
To fast-forward or reverse, press and hold “

”or “” on the “SEEK•TRACK”

button until you hear a beep.

Scanning tracks

Press the “SCAN” button.

The first 10 seconds of each track will be played.
To cancel, press the button again.

Press the button again when the desired track is reached.

Random play
Press the “1” button.

Songs are played in random order.
To cancel, press the button again.

Repeat play
Press the “2” button.

To cancel, press the button again.

Switching the display
Press the “TEXT” button.

Each time the button is pressed, the display changes in the following order: 

Elapsed time 

 CD title  Track title

Selecting a folder one at a time
Press “

”or “” on the “TYPE•FOLDER” button to select the desired folder.

Returning to the first folder
Press and hold “

” on the “TYPE•FOLDER” button until you hear a beep.

Scanning the first file of all the folders

Press and hold the “SCAN” button until you hear a beep. 

The first 10 seconds of the first file in each folder will be played. 

When the desired folder is reached, press the button again.

Using the CD player

Playing back MP3 and WMA discs

1

2

1

2

271

5-4. Playing audio CDs and MP3/WMA discs

5

Audio system

Fast-forwarding and reversing files
To fast-forward or reverse, press and hold “

”or “” on the “SEEK•TRACK”

button until you hear a beep.

Selecting file
Turn the “TUNE•SEL” knob or press “

”or “” on the “SEEK•TRACK” button

to select the desired file.

Scanning the files in a folder
Press the “SCAN” button. 

The first 10 seconds of each file will be played.
To cancel, press the button again.

When the desired file is reached, press the button again.

Random play

Playing files from a folder in random order

Press the “1” button.

To cancel, press the button again.

Playing all the files from a disc in random order

Press and hold the “1” button until you hear a beep.

To cancel, press the button again.

Repeat play

Repeating a file

Press the “2” button.

To cancel, press the button again.

Repeating all the files in a folder

Press and hold the “2” button until you hear a beep.

To cancel, press


the button again.

Switching the display
Press the “TEXT” button.

Each time the button is pressed, the display changes in the following order: Folder

no./File no./Elapsed time 

 Folder name  File name  Album title (MP3 only)

 Track title  Artist name

272

5-4. Playing audio CDs and MP3/WMA discs

CD player protection feature
To protect the internal components, playback is automatically stopped when a problem is

detected.

Display
Up to 12 characters can be displayed at a time.

If there are 13 or more characters, pressing and holding the “TEXT” button for 1 second

or more enables to display the remaining characters.

A maximum of 24 characters can be displayed.

If the button is pressed for more than 1 second again or has not been operated for more

than 6 seconds, the display will return to the first 12 characters.
Depending on the contents recorded, the characters may not be displayed properly or

may not be displayed at all.

When “ERROR”, “WAIT” or “NO MUSIC” is shown on the display
“ERROR”:

This indicates a trouble either in the CD or inside the player. The CD may be dirty, dam-

aged, or inserted up-side down.
“WAIT”: 

This indicates that operation is stopped due to a high temperature inside the player. Wait

for a while and then press the “CD•AUX” button. If the CD still cannot be played back,

contact your Lexus dealer.
“NO MUSIC”: 
This indicates that an MP3/WMA file is not included in the CD.

Discs that can be used
Discs with the marks shown below can be used.

Playback may not be possible depending on recording format or disc features, or due to

scratches, dirt or deterioration.

CDs with copy-protection features may not be used.

Lens cleaners
Do not use lens cleaners. Doing so may damage the CD player.

If discs are left inside the CD player or in the ejected position for extended periods of

time
The discs may be damaged and may not play properly.

273

5-4. Playing audio CDs and MP3/WMA discs

5

Audio system

MP3 and WMA files
MP3 (MPEG Audio LAYER 3) is a standard audio compression format.
Files can be compressed to approximately 1/10 of their original size by using MP3 com-

pression.
WMA (Windows Media Audio) is a Microsoft audio compression format.
This format compresses audio data to a size smaller than that of the MP3 format.
There is a limit to the MP3 and WMA file standards that can be used and to the media/

formats on which the files are recorded.

MP3 file compatibility
• Compatible standards

MP3 (MPEG1 LAYER3, MPEG2 LSF LAYER3)

• Compatible sampling frequencies

MPEG1 LAYER3: 32, 44.1, 48 (kHz)

MPEG2 LSF LAYER3: 16, 22.05, 24 (kHz)

• Compatible bit rates (compatible with VBR)

MPEG1 LAYER3: 64, 80, 96, 112, 128, 160, 192, 224, 256, 320 (kbps)

MPEG2 LSF LAYER3: 64, 80, 96, 112, 128, 144, 160 (kbps)

• Compatible channel modes: stereo, joint stereo, dual channel and monaural

WMA file compatibility
• Compatible standards

WMA Ver. 7, 8, 9

• Compatible sampling frequencies

32, 44.1, 48 (kHz)

• Compatible bit rates (only compatible with 2-channel playback)

Ver. 7, 8: CBR 48, 64, 80, 96, 128, 160, 192 (kbps)

Ver. 9: CBR 48, 64, 80, 96, 128, 160, 192, 256, 320 (kbps)

Compatible media
Media that can be used for MP3 and WMA playback are CD-Rs and CD-RWs.
Playback in some instances may not be possible if the CD-R or CD-RW is not final-

ized. Playback may not be possible or the audio may jump if the disc is scratched or

marked with fingerprints.

Compatible disc formats
The following disc formats can be used:
• Disc formats: CD-ROM Mode 1 and Mode 2

CD-ROM XA Mode 2, Form 1 and Form 2

• File formats: ISO9660 Level 1, Level 2, (Romeo, Joliet)

MP3 and WMA files written in any format other than those listed above may not

play correctly, and their file names and folder names may not be displayed correctly.

Items related to standards and limitations are as follows:
• Maximum directory hierarchy: 8 levels (including the root)

• Maximum length of folder names/file names: 32 characters

• Maximum number of folders: 192 (including the root)

• Maximum number of files per disc: 255

274

5-4. Playing audio CDs and MP3/WMA discs

File names
The only files that can be recognized as MP3/WMA and played are those with the

extension .mp3 or .wma.

Discs containing multi-session recordings
As the audio system is compatible with multi-sessions, it is possible to play discs that

contain MP3 and WMA files. However, only the first session can be played.

ID3 and WMA tags
ID3 tags can be added to MP3 files, making it possible to record the track title, artist

name, etc.
The system is compatible with ID3 Ver. 1.0, 1.1, and Ver. 2.2, 2.3 ID3 tags. (The number

of characters is based on ID3 Ver. 1.0 and 1.1.)
WMA tags can be added to WMA files, making it possible to record the track title and

artist name in the same way as with ID3 tags.

MP3 and WMA playback
When a disc containing MP3 or WMA files is inserted, all files on the disc are first

checked. Once the file check is finished, the first MP3 or WMA file is played. To make

the file check finish more quickly, we recommend you do not write in any files other

than MP3 or WMA files or create any unnecessary folders.
Discs that contain a mixture of music data and MP3 or WMA format data cannot be

played.

Extensions
If the file extensions .mp3 and .wma are used for files other than MP3 and WMA files,

they will be mistakenly recognized and played as MP3 and WMA files. This may result

in large amounts of interference and damage to the speakers.

Playback
• To play MP3 files with steady sound quality, we recommend a fixed bit rate of at least

128 kbps and a sampling frequency of 44.1 kHz.

• CD-R or CD-RW playback may not be possible in some instances, depending on

the characteristics of the disc.

• There is a wide variety of freeware and other encoding software for MP3 and WMA

files on the market, and depending on the status of the encoding and the file format,

poor sound quality or noise at the start of playback may result. In some cases, play-

back may not be possible at all.

• When files other than MP3 or WMA files are recorded on a disc, it may take more

time to recognize the disc and in some cases, playback may not be possible at all.

• Microsoft, Windows, and Windows Media are the registered trademarks of

Microsoft Corporation in the U.S.A. and other countries.

275

5-4. Playing audio CDs and MP3/WMA discs

5

Audio system

NOTICE

CDs and adapters that cannot be used
Do not use the following types of CDs.

Also, do not use 3 in. (8 cm) CD adapters, DualDiscs or printable discs.

Doing so may damage the CD player and/or the CD load/eject function.

Discs that have a diameter that is not 4.7 in. (12 cm).

Low-quality or deformed discs.

Discs with a transparent or translucent recording area.

Discs that have tape, stickers or CD-R labels attached to them, or that have had the

label peeled off.

CD player precautions
Failure to follow the precautions below may result in serious damage to the CDs or the

player itself.

Do not insert anything other than CDs into the CD slot.

Do not apply oil to the CD player.

Store CDs away from direct sunlight.

Never try to disassemble any part of the CD player.

276

5-5. Using an external device

Listening to an iPod

P. 259

Connecting an iPod enables you to enjoy music from the vehicle speakers.
Press the “CD•AUX” button to select “iPod”.

Connecting an iPod

Control panel

Displaying text message
Repeat play
Playback/pause
Go back
“TUNE•SEL” knob
iPod menu/Song selection

Playback
Song selection
Shuffle playback
Power/volume knob

Press: Turning the audio system on or

off
Turn: Adjusting the volume

1

2
3
4
5

6
7
8
9

277

5-5. Using an external device

5

Audio system

Press the “TUNE•SEL” knob to select iPod menu mode.
Turning the knob changes the play mode in the following order:
“PLAYLISTS” 

“ARTISTS”  “ALBUMS”  “SONGS” 

“PODCASTS” 

“GENRES”  “COMPOSERS” 

“AUDIOBOOKS”
Press the knob to select the desired play mode.

Play mode list

Selecting a list

Turn the “TUNE•SEL” knob to display the first selection list.
Press the knob to select the desired item.
Pressing the knob changes to the second selection list.
Repeat the same procedure to select the desired song name.

To return to the previous selection list, select “GO BACK” or press the “4” button.

Selecting a play mode

1

2

3

Play mode

First 

selection

Second 

selection

Third 

selection

Fourth 

selection

“PLAYLISTS”

Playlists select

Songs select

-

-

“ARTISTS”

Artists select

Albums select

Songs select

-

“ALBUMS”

Albums select

Songs select

-

-

“SONGS”

Songs select

-

-

-

“PODCASTS” Albums select

Songs select

-

-

“GENRES”

Genre select

Artists select

Albums select

Songs select

“COMPOSERS”

Composers

select

Albums select

Songs select

-

“AUDIOBOOKS” Songs select

-

-

-

1

2

3

278

5-5. Using an external device

Turn the “TUNE•SEL” knob or press “

”or “” on the “SEEK•TRACK” button to

select the desired song.

To play or pause a song, press the “3” button.

To fast-forward or rewind, press and hold “

”or “” on the “SEEK•TRACK” but-

ton until you hear a beep.

Playing songs from one playlist or album in random order
Press the “1” button.

To cancel, press the button again.

Playing songs from all the playlists or albums in random order
Press and hold the “1” button until you hear a beep.

To cancel, press the button again.

Press the “2” button.

To cancel, press the button again.

Press the “TEXT” button.

Each time the button is pressed, the display changes in the following order: Elapsed

time 

 Album title  Track title  Artist name

Press the “TUNE•SEL” knob to enter iPod menu mode.
Pressing the knob changes sound modes. (

P. 261)

Selecting songs

Playing and pausing songs

Fast-forwarding and rewinding songs

Shuffle playback

Repeat play

Switching the display

Adjusting sound quality and volume balance

1

2

279

5-5. Using an external device

5

Audio system

About iPod

Apple is not responsible for the operation of this device or its compliance with safety

and regulatory standards.

iPod is a trademark of Apple, Inc., registered in the U.S. and other countries. 

iPod functions

When an iPod is connected and the audio source is changed to iPod mode, the iPod will

resume play from the same point in which it was last used.

Depending on the iPod that is connected to the system, certain functions may not be

available. Disconnecting the device and reconnecting it once again may resolve some

malfunctions. 

iPod problems
To resolve most problems encountered when using your iPod, disconnect your iPod from

the vehicle iPod connection and reset it. 

For instructions on how to reset your iPod, refer to your iPod Owner’s Manual.

Display
P. 272

Error messages
“ERROR”:

This indicates a problem in the iPod or its connection.
“NO MUSIC”:

This indicates that there is no music data in the iPod.
“EMPTY”:

This indicates that an empty playlist is selected.
“UPDATE”:

This indicates that the version of the iPod is not compatible. Upgrade your iPod software

to the latest version.

280

5-5. Using an external device

Compatible models

Depending on differences between models or software version etc., some models listed

above might be incompatible with this system.

iPod 4G and earlier models are not compatible with this system.

iPod mini, iPod shuffle and iPod photo are not compatible with this system.

*

: It is recommended to update your iPod/iPhone to the newest software version.

Items related to standards and limitations are as follows:

Maximum number of lists in device: 9999

Maximum number of songs in device: 65535

Maximum number of songs per list: 65535

Model

Generation

Software version

*

iPod

5G

Ver. 1.3.0 or higher

iPod nano

1G

Ver. 1.3.1 or higher

2G

Ver. 1.1.3 or higher

3G

Ver. 1.1.3 or higher

4G

Ver. 1.0.4 or higher

5G

Ver. 1.0.2 or higher

iPod touch

1G

Ver. 2.1.0 or higher

2G

Ver. 3.1.3 or higher

3G

Ver. 3.1.3 or higher

iPod classic

1G (80GB, 160GB)

Ver. 1.1.2 or higher

2G (120GB)

Ver. 2.0.1 or higher

2009 160GB

Ver. 2.0.4 or higher

iPhone

iPhone

Ver. 2.2.1 or higher

iPhone 3G

Ver. 3.1.3 or higher

iPhone 3GS

Ver. 3.1.3 or higher

iPhone 4

Ver. 4.0.0 or higher

281

5-5. Using an external device

5

Audio system

WARNING

Caution while driving
Do not connect iPod or operate the controls.

NOTICE

To prevent damage to iPod

Do not leave iPod in the vehicle. The temperature inside the vehicle may become

high, resulting in damage to the player.

Do not push down on or apply unnecessary pressure to the iPod while it is connected

as this may damage the iPod or its terminal.

Do not insert foreign objects into the port as this may damage the iPod or its terminal.

282

5-5. Using an external device

Listening to a USB memory device

P. 259

Connecting a USB memory enables you to enjoy music from the vehicle
speakers. Press the “CD•AUX” button to select “USB”.

Connecting a USB memory

Control panel

Displaying text message
Repeat play
Search play
“TUNE•SEL” knob
File selection
Playback

Folder selection
File selection
Random play
Power/volume knob

Press: Turning the audio system on or

off
Turn: Adjusting the volume

1

2
3
4

5

6
7
8
9


Content   ..  15  16  17  18   ..