Lexus SC300 / Lexus SC400. Manual - part 115
 

  Index      Lexus     Lexus SC300 / Lexus SC400 - service repair manual


Search            


Content   ..  113  114  115  116   ..


Lexus SC300 / Lexus SC400. Manual - part 115


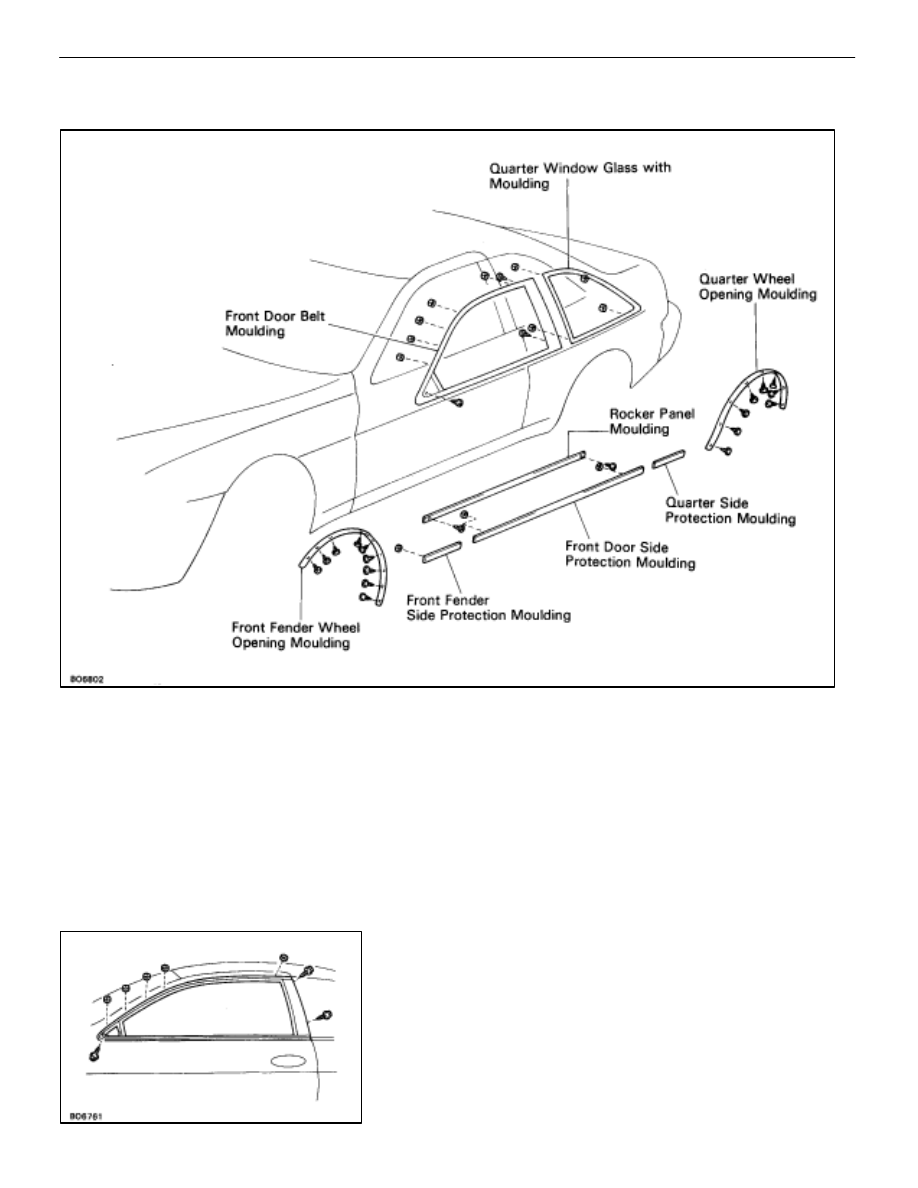
Body Outside Moulding

COMPONENTS

Front Door Belt Moulding
REMOVAL AND INSTALLATION

1. 

REMOVE FOLLOWING PARTS:
(See steps 1 to 7 on pages 

BO–33

 to 34)

(a)  Armrest base panel
(b) Door 

Trim

(c)  Door Speaker Grille
(d)  Door Trim Upper Panel

(e)  Outside Rear View Mirror

2. 

REMOVE FRONT DOOR BELT MOULDING
(See step 13 on page 

BO–35

)

3. 

INSTALL FRONT DOOR BELT MOULDING
(See step 8 on page 

BO–39

)

4. 

INSTALL FOLLOWING PARTS:
Install the parts following removal sequence in reverse.
(See steps 14 to 20 on pages 

BO–40

 to 41)

BODY

Moulding (Body Outside Moulding)

BO–101

Quarter Window Glass with Moulding

REMOVAL AND INSTALLATION

(See page 

BO–101

)

1. 

REMOVE FOLLOWING PARTS:
(See steps 5 to 8 on pages 

BO–123

 to 124)

(a)  Rear seat cushion
(b)  Rear seat back
(c) Quarter 

trim

(d)  Roof side inner garnish
(e)  Shoulder belt anchor

2. 

REMOVE QUARTER WINDOW GLASS
(See page 

BO–52

)

3. 

INSTALL QUARTER WINDOW GLASS
(See page 

BO–53

)

4. 

INSTALL FOLLOWING PARTS:
Install the parts following removal sequence in reverse.

Rocker Panel Moulding

REMOVAL AND INSTALLATION

(See page 

BO–101

)

1. 

REMOVE ROCKER PANEL MOULDING
(a)  Remove two screws.
(b) Pry 

loose clips and remove the moulding onto the panel.

2. 

INSTALL ROCKER PANEL MOULDING
(a)  Insert the top of clips into the panel hole and tap the

moulding onto the panel.

(b)  Install two screws.

Front Fender Wheel Opening Moulding

REMOVAL AND INSTALLATION

(See page 

BO–101

)

1. REMOVE 

FRONT FENDER WHEEL OPENING MOULDING

Remove eight screws and the moulding.

2. 

INSTALL FRONT FENDER WHEEL OPENING MOULDING
Install eight screws and the moulding.

Quarter Wheel Opening Moulding

REMOVAL AND INSTALLATION

(See page 

BO–101

)

HINT: 

Do the same manner as the front fender wheel

opening moulding.

BO–102

BODY

Moulding (Body Outside Moulding)

Front Fender Side Protection Moulding
REMOVAL AND INSTALLATION

1. REMOVE FRONT FENDER SIDE PROTECTION

MOULDING
(a)  Remove a nut.
(b)  Pry loose the clip and remove the moulding onto the

panel.

2. INSTALL FRONT FENDER SIDE PROTECTION

MOULDING
(a)  Insert the top of the clip into the panel hole and tap the

moulding onto the panel.

(b)  Install a nut.

Front Door Side Protection Moulding
REMOVAL AND INSTALLATION

1. 

REMOVE FRONT DOOR SIDE PROTECTION MOULDING
(a)  Remove two nuts.
(b)  Pry loose clips remove the moulding onto the panel.

2. 

INSTALL FRONT DOOR SIDE PROTECTION MOULDING
(a)  Insert the top of clips into the panel hole and tap the

moulding onto the panel.

(b)  Install two nuts.

Quarter Side Protection Moulding
REMOVAL AND INSTALLATION

1. 

REMOVE QUARTER SIDE PROTECTION MOULDING
(a)  Remove a nut.
(b) Pry 

loose clips and remove the moulding onto the panel.

2. 

INSTALL QUARTER SIDE PROTECTION MOULDING
(a)  Insert the top of clips into the panel hole and tap the

moulding onto the panel.

(b)  Install a nut.

BODY

Moulding (Body Outside Moulding)

BO–103

MUD GUARD (For Canada)

COMPONENTS

Front Fender Mudguard

REMOVAL AND INSTALLATION

1. 

REMOVE FRONT FENDER MUDGUARD
Remove three screws and the mudguard.

2. 

INSTALL FRONT FENDER MUDGUARD
Install the mudguard with three screws.

Quarter Panel Mudguard

REMOVAL AND INSTALLATION

HINT: 

Do the same manner as the front fender mudguard.

BO–104

BODY

Mud Guard


Content   ..  113  114  115  116   ..