Lexus SC300 / Lexus SC400. Manual - part 102
 

  Index      Lexus     Lexus SC300 / Lexus SC400 - service repair manual


Search            


Content   ..  100  101  102  103   ..


Lexus SC300 / Lexus SC400. Manual - part 102


9. 

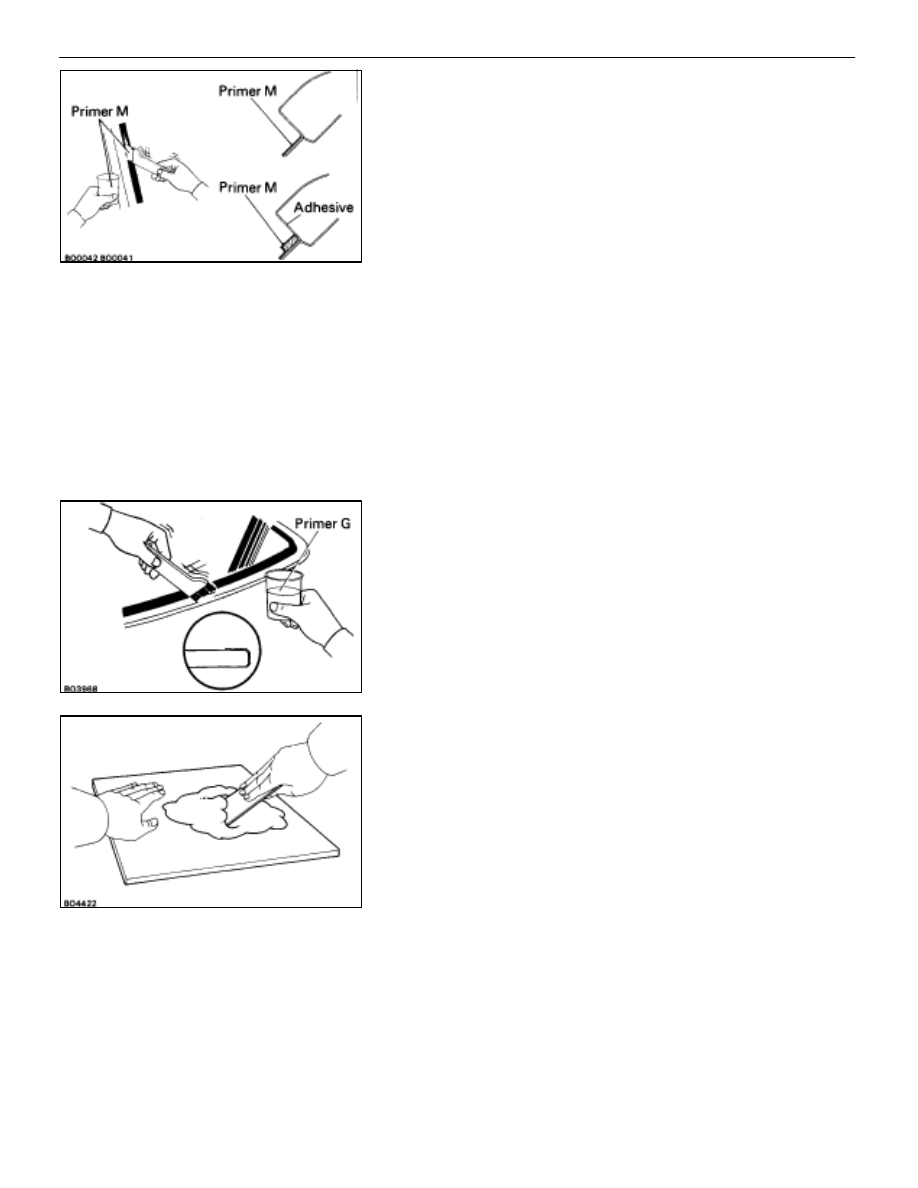
COAT CONTACT SURFACE OF BODY WITH PRIMER ”M”
Using a brush, coat the contact surface on the body with
Primer M.
NOTICE:

Let the Primer coating dry for 10 minutes or more. Make

sure that the installation of the glass is finished within 2

hours.

Take care not to leave any part of the contact surface

uncoated or excessively coated, as Primer M and G serve

to boost he adhesive power of the adhesive to the glass

or body.

Do not keep any of the opened Primer M and G for later

use.

10.  COAT CONTACT SURFACE OF GLASS WITH PRIMER

”G”
(a) Using 

brush or sponge, coat the edge of the glass and

the contact surface with Primer G.

(b) Before 

the Primer dries, wipe it off with a clean shop rag.

NOTICE: Be sure that installation of the glass is finished
within 70 minutes.

11.  MIX ADHESIVE COATING

NOTICE:

Be sure that installation of the moulding is finished

within usable time. (See step 3 on page 

BO–11

)

The mixture should be made in 5 minutes or less.

(a)  Thoroughly clean the glass plate and putty spatula with

solvent.

(b)  Thoroughly mix 500 g (17.64 oz.) of the main agent and

75 g (2.65 oz.) of the hardening agent on a glass plate
or like object with a putty spatula.

12. APPLY ADHESIVE

(a)  Cut off the tip of the cartridge nozzle. Fill the cartridge

with adhesive.

(b)  Load the cartridge into the sealer gun.
(c)  Coat the glass with adhesive on all contact surfaces as

shown.

Adhesive height:

If adhesive remains on body

3.5 – 5.0 mm (0.138 – 0.197 in.)

If no adhesive remains on body

8 – 10 mm (0.31 – 0.39 in.)

BODY

Windshield

BO–49

13. INSTALL GLASS

(a)  Position the glass so that the reference marks are lined

up, and press in gently along the rim.

(b)  Using a spatula, apply adhesive on the glass rim.

(c)  Use a scraper to remove any excess or protruding

adhesive.

(d)  Fasten glass securely until the adhesive sets.

14.  INSPECT FOR LEAKS AND REPAIR

(a)  Perform a leak test after the hardening time has

elapsed.

(b)  Seal any leak with auto glass sealer.

Part No. 08833–00030 or equivalent

15.  INSTALL WINDSHIELD MOULDINGS

(See steps 1 to 4 on pages 

BO–98

 to 99)

16.  INSTALL COWL LOUVER

(a)  Put the louver in the glass.
(b)  Install four clips.
(c) Install 

weatherstrip.

17.  INSTALL WIPER ARMS

BO–50

BODY

Windshield

18. INSTALL 

FOLLOWING 

PARTS:

(a) Hood
HINT: 

Torque the hood support

Torque:

22 N

m (225 kgf

cm, 16 ft

lbf)

(b)  Front roof headlining
(c) Holders
(d)  Center visor and inner rear view mirror
(e) Interior 

light

(f)  Front pillar garnish

BODY

Windshield

BO–51

QUARTER WINDOW GLASS

COMPONENTS

REMOVAL OF QUARTER WINDOW
GLASS

1. 

REMOVE FOLLOWING PARTS:
(a)  Rear seat cushion and back
(b)  Seat belt shoulder anchor
(c)  Quarter trim and roof side inner garnish

2. 

REMOVE QUARTER WINDOW GLASS
(a)  Remove four nuts.
(b)  Remove roof side rail weatherstrip.

BO–52

BODY

Quarter Window Glass


Content   ..  100  101  102  103   ..