Land Rover Engine 2.0 Litre L Series. Manual - part 11


  Index      Land Rover     Land Rover Engine 2.0 Litre L Series Diesel - service manual 2000 year


Search            


Content   ..  9  10  11  12   ..


Land Rover Engine 2.0 Litre L Series. Manual - part 11


ENGINE

34

OVERHAUL

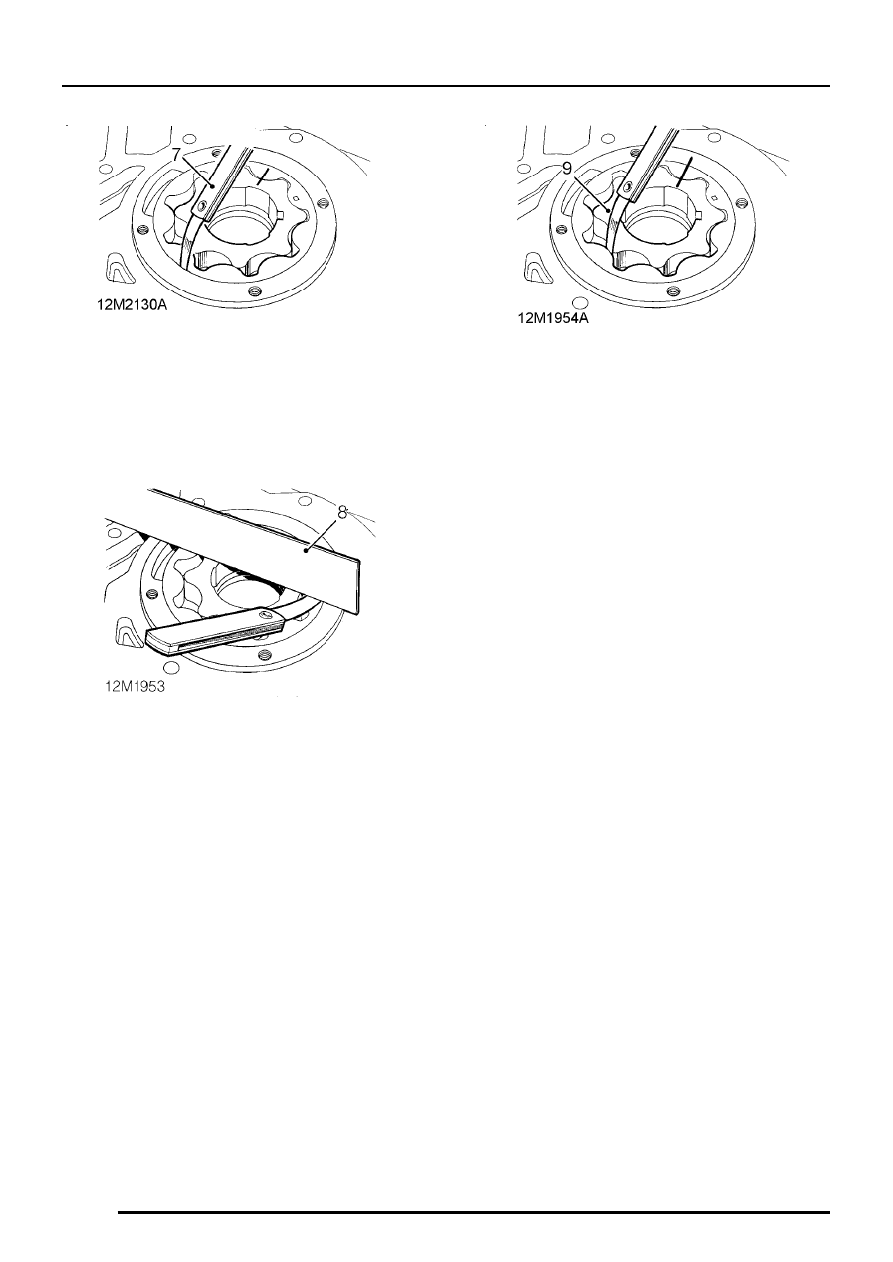
7. Using feeler gauges, check pump body to rotor

clearance.
Clearance = 0.05 to 0.10 mm.

8. Place a straight edge across pump body and

using feeler gauges, measure end-float of
outer rotor.
End-float = 0.03 to 0.08 mm.

9. Using feeler gauges, check clearance between

inner and outer rotor lobes.
Clearance = 0.025 to 0.12 mm.

10. Renew oil pump assembly if excessive scoring

exists or clearances exceed specified limits.

ENGINE

OVERHAUL

35

Oil pressure relief valve - remove

Early engines

1. Remove and discard plug.
2. Remove spring and relief valve plunger.

Later engines

1. Remove and discard plug.
2. Remove and discard Dowty washer.
3. Remove spring and relief valve plunger.

All engines

4. Check plunger and bore for wear, corrosion

and scoring.

NOTE: Light scoring may be removed
using grade 600 emery cloth soaked in oil.

5. Check spring free length.

Free length = 38.9 mm.

6. Renew relief valve as an assembly.

Oil pressure relief valve - refit

1. Remove all traces of sealant from plug threads

in oil pump body.

2. Lubricate spring, relief valve plunger and bore

with engine oil.

3. Fit plunger and spring.

Early engines

1. Apply Loctite 577 to threads of replacement

plug.

2. Fit plug and tighten to 25 Nm.

CAUTION: Do not attempt to re-seal and fit
the original plug.

Later engines

1. Fit a new Dowty washer to replacement plug.
2. Apply Loctite 577 to threads of plug.
3. Fit plug and tighten to 25 Nm.

CAUTION: Do not attempt to re-seal and fit
the original plug.

All engines

4. Check oil pressure switch - if fitted for damage,

replace as necessary. Apply Loctite 577 to
threads of replacement switch; fit switch and
tighten to 16 Nm.

ENGINE

36

OVERHAUL

Thermostatic valve

1. Remove diverter plug, remove and discard

Dowty washer.

2. Withdraw spring and valve from oil pump body.

CAUTION: Do not separate spring from
valve.

3. Check spring for distortion and corrosion.
4. Check valve for corrosion, seating faces of

valve and diverter plug for damage and pitting;
replace valve as an assembly.

5. Check valve bore for corrosion.

NOTE: Light corrosion may be removed
from valve bore using grade 600 emery
cloth soaked in oil.

6. Remove all traces of Loctite from threads of

diverter valve plug and oil pump body.

CAUTION: Do not remove blanking plug
from oil gallery below thermostatic valve
bore.

7. Lubricate valve, spring and bore with engine

oil.

8. Secure oil pump body in a soft-jawed vice with

thermostatic valve bore facing upwards.

CAUTION: Valve bore must be as near
vertical as possible.

9. Insert valve and spring in bore ensuring that it

is positioned centrally in bore.

CAUTION: Valve will not seat correctly in
diverter plug if it is not positioned
centrally.

10. Fit a new Dowty washer to diverter plug.
11. Apply Loctite 577 to threads of diverter plug.
12. Fit diverter plug, carefully tighten plug by hand

ensuring that valve is not displaced as plug is
tightened.

13. When diverter plug is screwed fully down,

tighten to 35 Nm.

ENGINE

OVERHAUL

37

Oil pump - assembling

1. Using gasket removal spray and plastic

scraper, remove all traces of gasket material
from oil pump body.

2. Using suitable solvent, remove all traces of

sealant from oil pump body and backplate.

3. Remove all traces of Loctite from Torx screws

and holes in oil pump body, ensure holes are
clean and dry.

CAUTION: Do not use a tap.

4. Ensure all components are clean, lubricate

rotors and housing with engine oil.

5. Fit rotors ensuring that reference marks are

aligned and chamfered side of outer rotor
carrying a square identification mark is facing
away from backplate side of pump body.

6. Apply a 1 mm bead of Loctite 573 to pump

backplate as shown.

7. Fit pump backplate ensuring reference marks

on backplate and pump body are aligned.

8. Apply Loctite 222 to threads of Torx screws, fit

and tighten screws.

9. Check that pump rotates freely.

Oil pump - refit

1. Using gasket removal spray and plastic

scraper, remove all traces of gasket from
cylinder block.

2. Using a suitable cleaning solvent, remove all

traces of sealant from joint faces of front -
Number 1 main bearing cap.

3. Clean oil seal running surface on crankshaft.
4. Check that crankshaft front oil seal recess in

pump body is clean and dry.

5. Fit new crankshaft front oil seal to pump using

tool LRT-12-069.

CAUTION: Oil seal must be fitted dry.

NOTE: Replacement oil pumps are
supplied with oil seal fitted.

6. Fit Woodruff key to crankshaft.


Content   ..  9  10  11  12   ..