Range Rover Classic. Manual - part 125


  Index      Land Rover     Range Rover Classic - service manual 1995 year


Search            


Content   ..  123  124  125  126   ..


Range Rover Classic. Manual - part 125


BRAKES

7

REPAIR

19. Coat new seals in unused brake fluid. Fit ’L’ seal

to plunger.

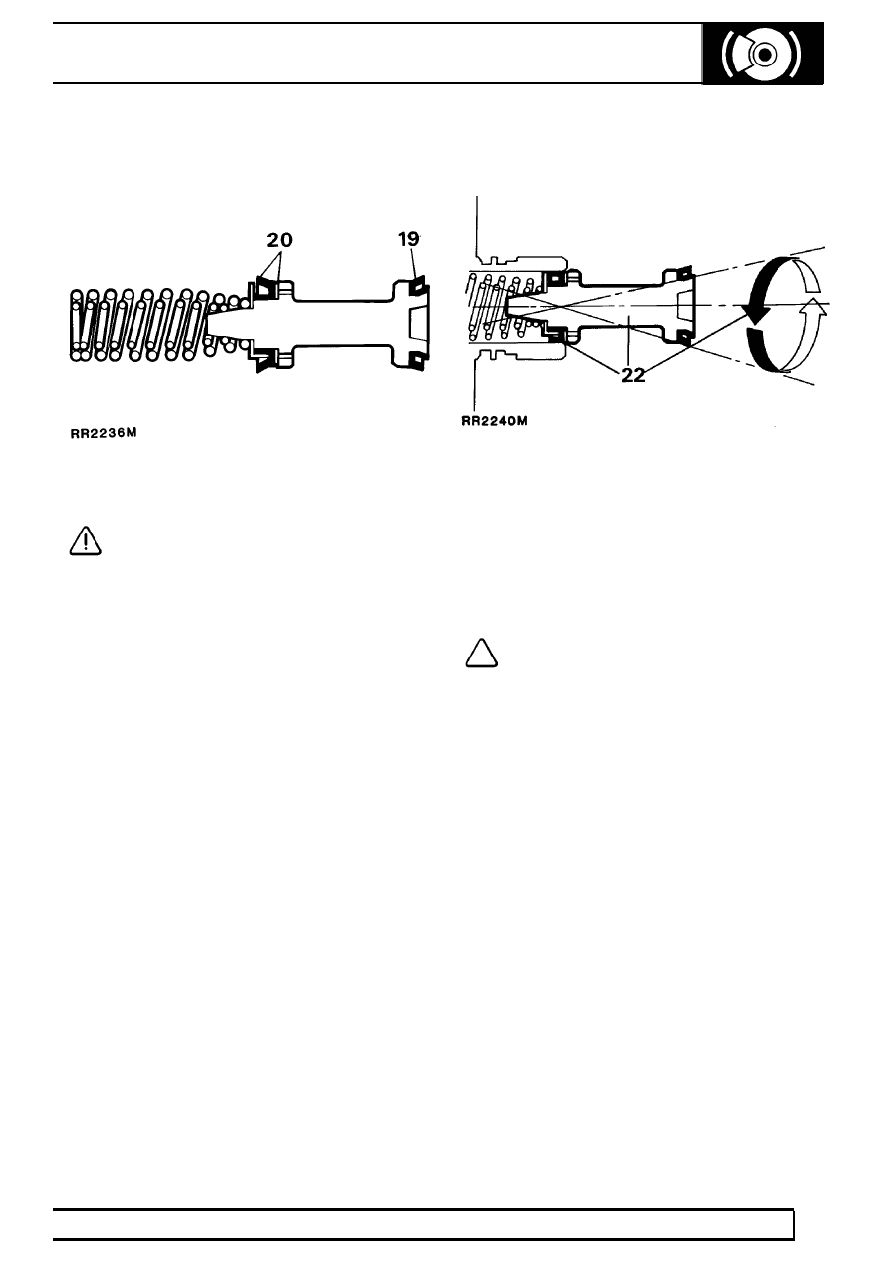
20. Fit washer followed by recuperating seal. Fit seal

retainer and springs, ensure springs are
correctly seated.

ASSEMBLING MASTER CYLINDER

CAUTION: It is important that following
instructions are carried out precisely,
otherwise damage could be caused to new

seals when inserting plungers into cylinder bore.
Generous amounts of new brake fluid should be
used to lubricate parts during assembly. Never
use old fluid or any other form of cleaning and
lubricating material. Cleanliness throughout is
essential.

21. Fit new swirl tube to bottom of cylinder bore.
22. Lubricate secondary plunger and cylinder bore.

Offer plunger assembly to cylinder until
recuperation seal is resting centrally in mouth of
bore. Gently introduce plunger with a circular
rocking motion, as illustrated. Ensuring that seal
does not become trapped, ease seal into bore
and slowly push plunger down bore in one
continuous movement.

23. Fit new primary plunger assembly using same

method as for secondary plunger.

24. Fit original guide ring to support primary plunger.
25. Coat a new ’O’ ring with brake fluid and fit to its

respective groove on outer location surface of
master cylinder.

NOTE: DO NOT ROLL ’O’ ring down outer
location surface of master cylinder. It
should be slightly stretched and eased

down cylinder and into its groove. DO NOT OVER
STRETCH SEAL.

26. Fit new retaining ring on outer surface of master

cylinder ensuring that serrations of ring are
facing mounting flange.

27. Fit two new reservoir seals in respective ports.
28. Fit a new vacuum seal to either primary plunger

or to bottom of transfer housing bore, open face
of seal towards primary plunger.

29. Lubricate vacuum seal with brake fluid. Fit

transfer housing to master cylinder, push
housing fully up to cylinder mounting flange, DO
NOT ADJUST TRANSFER HOUSING AFTER
FITTING.

30. Lubricate new water ingress seal with brake

fluid, Slightly stretch seal and ease down
housing until it is in position between housing
and flange.

31. Roll reservoir into top of master cylinder,

reversing procedure described in instruction 10.

70

BRAKES

8

REPAIR

Refit

32. Fit master cylinder to servo. Secure in position

with two nuts, plain and spring washers. Tighten
to

26 Nm.

33. Fit brake pipes to master cylinder. Tighten to

10Nm.

34. Top-up master cylinder with correct grade of

brake fluid.

See LUBRICANTS, FLUIDS AND

CAPACITIES, Information, Recommended
Lubricants and Fluids

35. Bleed system.

See Brake System Bleed (Non

ABS)

WARNING: Do not use brake fluid
previously drained or bled from system.
Carefully dispose of unwanted fluid, if

stored in a sealed container, ensure that container
is marked USED BRAKE FLUID.

36. Fit cap, reconnect electrical lead to fluid level

switch. Reconnect battery negative lead.

SERVO ASSEMBLY

Service repair no - 70.50.01

Remove

NOTE: Other than replacing filter,
non-return valve and grommet, the servo
is not a serviceable component, in event of

failure or damage fit a new unit.

1. Disconnect battery negative lead.
2. Disconnect electrical plug to low fluid level

switch.

3. Thoroughly clean immediate area around all

master cylinder outlet ports. Remove each brake
pipe, sealing each pipe and outlet port with
suitable plugs to prevent ingress of foreign
matter.

4. Disconnect vacuum supply hose to servo.
5. Remove lower dash panel to gain access to

servo push rod.

6. Remove clevis pin securing servo push rod to

brake pedal.

7. Remove 2 nuts and plain washers securing

servo.

BRAKES

9

REPAIR

8. Remove servo and master cylinder assembly.
9. Drain brake fluid into a suitable container. (If

master cylinder is kept horizontal it is not
necessary to drain fluid).

WARNING: Do not use brake fluid
previously drained or bled from system.
Carefully dispose of unwanted fluid, if

stored in a sealed container, ensure that container
is marked USED BRAKE FLUID.

10. Detach spacer from pedal box mounting face of

servo.

NOTE: Retain spacer reassembly. The
spacer ensures stringent pedal to servo
operating dimensions are maintained.

11. Remove master cylinder from existing servo and

refit to new servo, if fitting new unit.

Refit

12. Fit spacer to servo.
13. Fit servo to pedal box.
14. Lightly grease brake pedal around area servo

push rod pivots.

15. Fit push rod to brake pedal. Fit clevis pin and

clip. Use lower hole.

16. Secure servo with two nuts and plain washers.

Tighten nuts to

24 Nm.

17. Refit lower dash panel.
18. Fit master cylinder to servo, refit nuts, plain and

spring washers. Tighten nuts to

26 Nm.

19. Remove all sealing plugs. Refit brake pipes to

respective ports. Tighten brake pipes to

10 Nm.

20. Refit vacuum supply hose.
21. Fill master cylinder to correct level using correct

grade of brake fluid.

See LUBRICANTS,

FLUIDS AND CAPACITIES, Information,
Recommended Lubricants and Fluids

22. Bleed brake system.

See Brake System Bleed

(non ABS)

70

BRAKES

10

REPAIR

FRONT BRAKE PADS

Service repair no - 70.40.02

Service tool:
LRT-70-500 - Piston clamp

Remove

Brake pad identification

Direction of rotation

From side of vehicle, looking through disc and caliper
at inboard pad, ’D’ shaped material on rear of inboard
pad should face direction of forward rotation of road
wheel with curved part of ’D’ always at trailing end of
caliper.

Brake pad wear sensed on RH calipers.

1. Remove front road wheels.

See WHEELS AND

TYRES, Repair, Wheels

2. Disconnect battery negative lead.

3. Disconnect pad wear sensor plug (front right

hand side only).

4. Clean exterior of calipers.
5. Remove split pins from retaining pins.
6. Remove pad retaining pins and anti-rattle

springs.

7. Remove brake pads.
8. Clean exposed parts of pistons, using new brake

fluid.


Content   ..  123  124  125  126   ..