Freelander Body Repair Manual - part 48


  Index      Land Rover     Freelander Body Repair Manual 1998 year


Search            


Content   ..  46  47  48  49   ..


Freelander Body Repair Manual - part 48


BODY

SEATS AND SEAT BELTS

11

FINISHER - SEAT BASE - FRONT SEAT

Service repair no - 78.55.01

Remove

1. Remove front seat cushion side finisher.

See

this section.

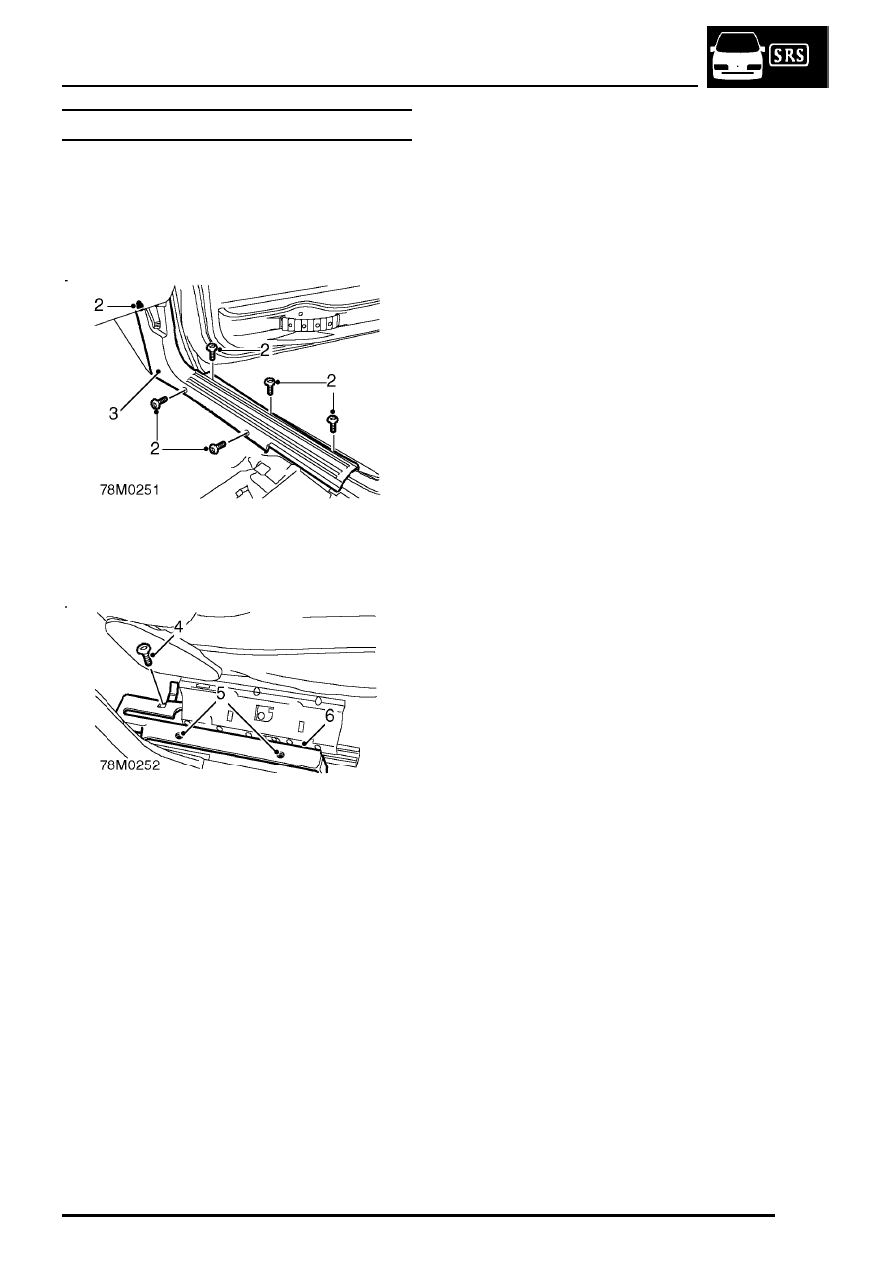
2. Remove scrivet and 5 Torx screws from carpet

retainer.

3. Remove front carpet retainer.

4. Release cover to access Torx screw under

front seat, remove Torx screw.

5. Remove 2 Torx screws securing finisher to

seat runner.

6. Remove finisher.

Refit

1. Position finisher to seat runner.
2. Fit and tighten Torx screws.
3. Fit and tighten Torx screw under front seat and

close cover.

4. Fit front carpet retainer and secure with scrivet

and Torx screws.

5. Fit front seat cushion side finisher.

See this

section.

BODY

12

SEATS AND SEAT BELTS

FINISHER - CUSHION SIDE - FRONT SEAT

Service repair no - 78.55.06

Remove

1. Remove 2 covers to access screws.
2. Remove 3 screws securing finisher.
3. Release catches at front and side of seat and

remove finisher.

Refit

1. Position finisher to seat, locate catches, fit and

tighten securing screws.

2. Fit screw covers.

LUMBAR SUPPORT - FRONT SEAT

Service repair no - 78.60.07

Remove

1. Remove front seat.

See this section.

2. Release and remove head restraint.
3. Remove recline control knob.
4. Release retaining studs from side covers and

remove covers.

5. Remove 4 Torx bolts from squab frame and

remove squab frame from cushion frame.

6. Remove lumbar control knob.

7. Release squab cover at base of seat frame.

BODY

SEATS AND SEAT BELTS

13

8. Release squab cover from squab frame and

squab pad.

9. Remove and discard 2 hog rings from rear of

cover.

10. Drill out 2 pop rivet from squab frame.

11. Remove head restraint guide tubes.
12. Remove squab cover and pad.

13. Remove 2 bolts from cable control and release

cable control.

14. Release 8 lumbar support retainers from squab

frame and collect 4 hook retainers

15. Remove lumbar support mechanism.

Refit

1. Position lumbar support to squab frame, locate

hook retainers.

2. Fit lumbar support retainers to squab frame.
3. Position cable control and tighten bolts.
4. Fit squab cover and pad to frame.
5. Fit head restraint guide tubes.
6. Fit new hog rings to rear of cover.
7. Position straps and secure with pop rivets.
8. Fit squab cover to squab pad and frame.
9. Secure squab cover at base of frame.

10. Fit lumbar support control knob.
11. Fit squab frame to cushion frame and tighten

Torx bolts.

12. Fit side covers and secure retaining studs.
13. Fit head restraint.
14. Fit recline control knob.
15. Fit front seat.

See this section.

BODY

14

SEATS AND SEAT BELTS

LATCH ASSEMBLY - REAR SQUAB - RH

Service repair no - 78.80.05

Remove

1. Remove rear seat squab cover.

See this

section.

2. Remove 3 screws from lock button.
3. Remove 2 Torx screws from squab lock.
4. Release lock button from lock.
5. Release cable from abutment and remove from

lock.

6. Release cable from lever abutment and

remove from lever.

Refit

1. Position cable to lever and locate in abutment.
2. Fit cable to lock and locate in abutment.
3. Fit lock button to lock.
4. Fit Torx screws to squab lock.
5. Fit screws to lock button.
6. Fit squab cover.

See this section.

LATCH ASSEMBLY - REAR SQUAB - LH

Service repair no - 78.80.16

Remove

1. Remove rear seat squab cover.

See this

section.

2. Remove 2 Torx screws from squab lock.
3. Release cable from abutment and remove from

lock.

4. Release cable from lever abutment and

remove from lever.

Refit

1. Position cable to lever and locate in abutment.
2. Fit cable to lock and locate in abutment.
3. Fit and tighten Torx screws to lock.
4. Fit squab cover.

See this section.


Content   ..  46  47  48  49   ..