Freelander Body Repair Manual - part 39
 

  Index      Land Rover     Freelander Body Repair Manual 1998 year


Search            


Content   ..  37  38  39  40   ..


Freelander Body Repair Manual - part 39


BODY

INTERIOR TRIM COMPONENTS

3

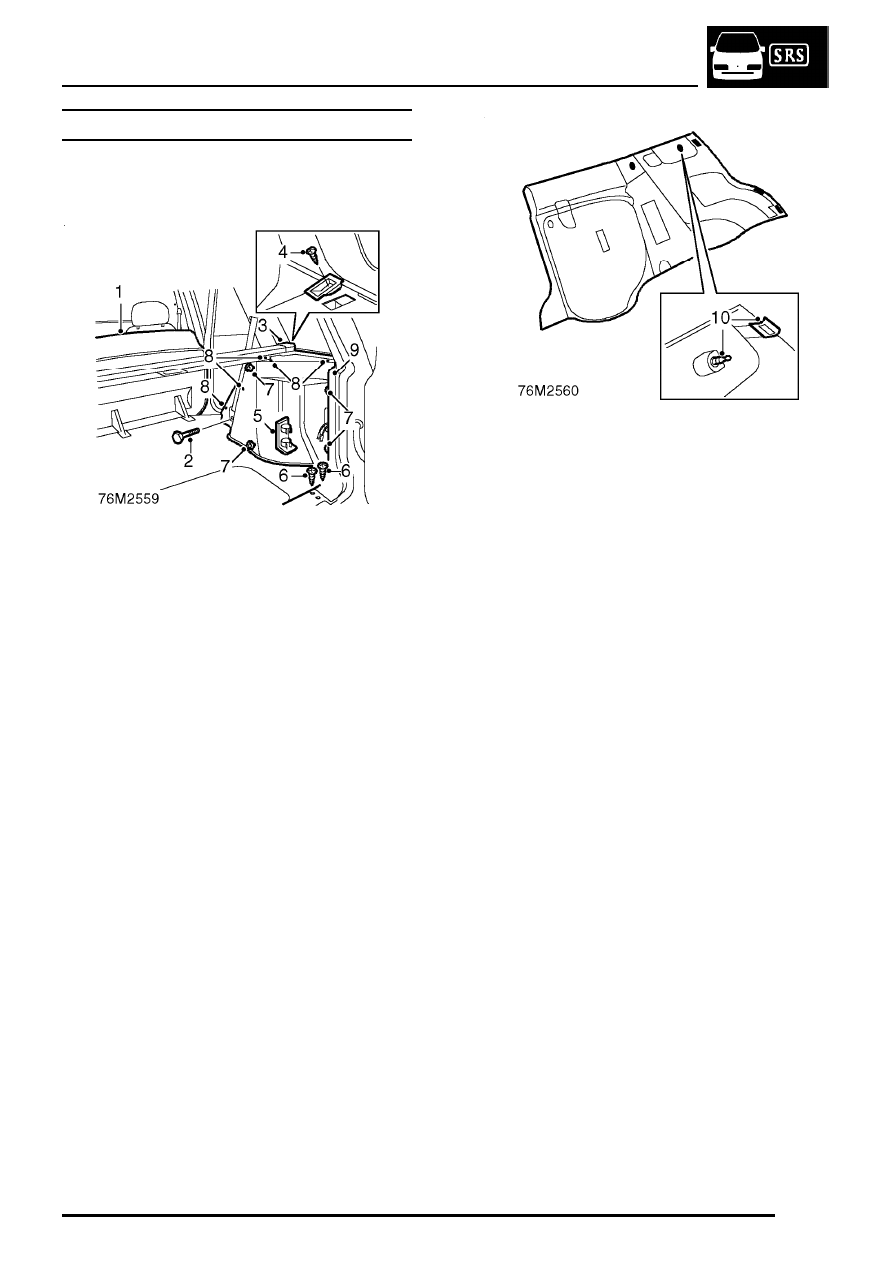
CASING - REAR QUARTER LOWER - 5 DOOR

Service repair no - 76.13.12

Remove

1. Release back of rear seat and fold forward.
2. Remove bolt securing rear seat belt lower

mounting and position seat belt aside.

3. Release load space cover from retainers and

remove cover.

4. Remove screw securing load space cover

retainer and remove retainer.

5. Release load space lamp from trim casing.

Disconnect 2 Lucars and remove load space
lamp.

6. Remove 2 screws securing casing to load

space carpet retainer.

7. Release 4 turn buckles securing trim casing.
8. Release trim casing from 5 retaining clips.
9. Remove trim casing from load space.

10. Remove 5 retaining clips from casing.

Refit

1. Fit retaining clips to casing.
2. Position casing in load space, locate and

secure retaining clips.

3. Fit turn buckles
4. Fit screws securing casing to carpet retainer.
5. Position load space lamp to casing, connect

Lucars and secure lamp in casing.

6. Position load space cover retainer and secure

with screw.

7. Fit load space cover and secure in retainers.
8. Position rear seat belt and tighten bolt to 40

Nm

9. Lower seats and secure back of seat in

position.

BODY

4

INTERIOR TRIM COMPONENTS

CASING - REAR QUARTER UPPER - 3 DOOR

Service repair no - 76.13.13

Remove

1. Remove rear quarter lower casing.

See this

section.

2. Remove body rear side casing.

See this

section.

3. Remove screw and release rear vent catch.
4. Remove seat belt access cover from upper

casing.

5. Release 4 clips securing upper casing.
6. Remove upper casing.

7. Remove 4 retaining clips from casing

Refit

1. Fit retaining clips to casing.
2. Position casing, align seat belt and secure

casing retaining clips.

3. Fit seat belt access cover.
4. Position rear vent sealing rubber to upper

casing.

5. Position rear vent catch and tighten screw.
6. Fit side casing.

See this section.

7. Fit lower casing.

See this section.

BODY

INTERIOR TRIM COMPONENTS

5

CASING - REAR QUARTER UPPER - 5 DOOR

Service repair no - 76.13.13

Remove

1. Remove rear quarter lower casing.

See this

section.

2. Remove 3 screws securing upper casing to

body.

3. Release casing from 8 retaining clips.
4. Remove upper casing from load space.

5. Remove 8 retaining clips from casing

Refit

1. Fit retaining clips to casing.
2. Position casing to body and secure retaining

clips.

3. Fit screws securing bottom of casing.
4. Fit rear quarter lower casing.

See this section.

BODY

6

INTERIOR TRIM COMPONENTS

FINISHER - ’B/C’ POST UPPER - 5 DOOR

Service repair no - 76.13.28

Remove

1. Remove seat base finisher.

See this section.

2. Remove Torx bolt retaining seat belt lower

mounting and position seat belt aside.

3. Release finisher from 6 retaining clips and

remove finisher.

Do not carry out further dismantling if
component is removed for access only.

4. Remove 6 clips from finisher.
5. Remove seat belt slide.
6. Fit seat belt slide to replacement finisher.
7. Fit clips to replacement finisher.

Refit

1. Position finisher and engage retaining clips.
2. Position seat belt lower mounting. Fit and

tighten Torx bolt to 40 Nm.

3. Fit seat base finisher.

See this section.


Content   ..  37  38  39  40   ..