Freelander 1. Manual - part 208


  Index      Land Rover     Freelander 1 - service manual 2002 year


Search            


Content   ..  206  207  208  209   ..


Freelander 1. Manual - part 208


DOORS

REPAIRS 76-1-25

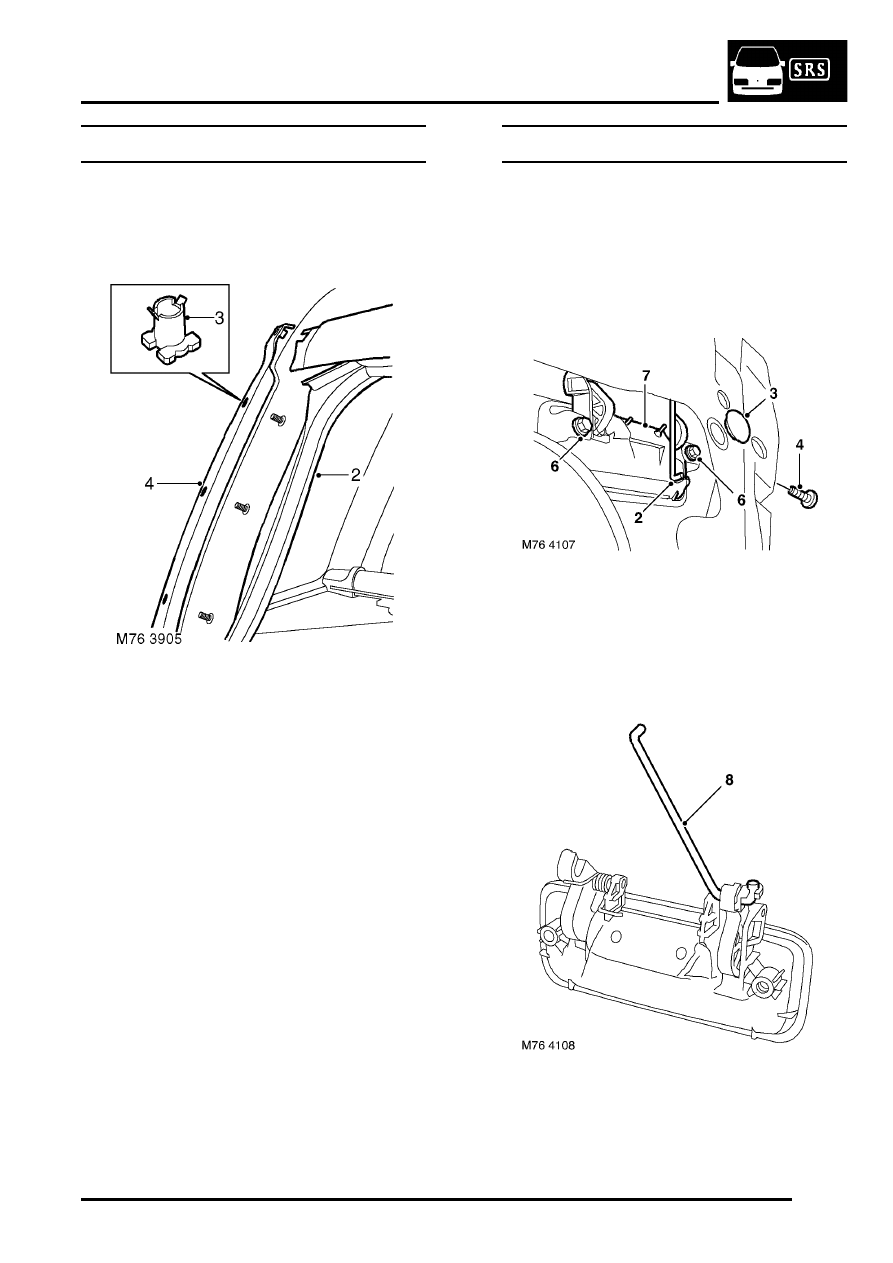
Finisher - rear screen - side - 5 door 

$% 76.43.81

Remove

1. Open tail door.

2. Release tail door glass seal from aperture for 

access to side finisher fixings.

3. Using a suitable trim stud removal tool, release 

3 side finisher fixings from studs on body.

4. Remove side finisher from upper fixing.
5. Remove and discard fixings from finisher.

Refit

1. Fit NEW fixings to finisher.
2. Fit door glass seal to flange.
3. Fit finisher and secure fixings.

Handle - exterior - rear door 

$% 76.58.02

Remove

1. Remove rear door plastic sheet.


 + 

 DOORS, REPAIRS, Plastic sheet - 

rear door.

2. Release door latch control rod.
3. Remove grommet to access screw.
4. Remove 3 Torx screws securing latch to door.
5. Release and lower latch to access screw.
6. Remove 2 door handle screw fixings.
7. Remove door handle.

8. Remove door latch control rod.

DOORS

76-1-26 REPAIRS

Refit

1. Fit door latch control rod to handle.
2. Position handle to door and tighten securing 

screws.

3. Position latch to door, fit and tighten Torx 

screws.

4. Fit grommet to door.
5. Connect door latch control rod.
6. Fit rear door plastic sheet.


 + 

 DOORS, REPAIRS, Plastic sheet - 

rear door.

Handle - exterior - tail door

$% 76.58.05

Remove

1. Remove tail door plastic sheet.


 + 

 DOORS, REPAIRS, Plastic sheet - 

tail door.

2. Raise glass by clicking latch.

3. Remove 3 nuts securing tail door handle to tail 

door.

4. Release handle from tail door.
5. Disconnect 2 Lucars from number plate lamp.
6. Disconnect multiplug and remove handle from 

door.

DOORS

REPAIRS 76-1-27

7. Collect gasket.
8. Remove nut from lock barrel.
9. Remove lock barrel from handle.

Refit

1. Fit lock barrel to handle.
2. Fit gasket to handle.
3. Position handle and connect Lucars and 

multiplug.

4. Fit handle to door and tighten nuts to 5 Nm (3.5 

lbf.ft).

5. Fit tail door plastic sheet.


 + 

 DOORS, REPAIRS, Plastic sheet - 

tail door.

6. Reset latch to lower glass.
7. Close door.

Handle - exterior - front door

$% 76.58.07

Remove

1. Remove front door plastic sheet.


 + 

 DOORS, REPAIRS, Plastic sheet - 

front door - 5 door.

2. Release clip securing latch control rod to door 

latch and release rod.

3. Remove 3 Torx screws securing door latch, 

lower latch and release door lock paddle.

4. Remove grommet to access screw.
5. Remove 2 door handle screw fixings.

DOORS

76-1-28 REPAIRS

6. Remove door handle.
7. Remove door latch control rod.

Refit

1. Fit door latch control rod to handle.
2. Position handle to door and tighten securing 

screws.

3. Fit grommet to door.
4. Position latch, locate door lock paddle, fit and 

tighten Torx screws.

5. Connect control rod to door latch.
6. Fit front door plastic sheet.


 + 

 DOORS, REPAIRS, Plastic sheet - 

front door - 5 door.

Door pull - 5 door 

$% 76.58.25

Remove

1. Remove front door trim casing.


 + 

 DOORS, REPAIRS, Trim casing - 

front door - 5 door.

2. Remove 4 Torx screws securing door pull to 

trim casing and remove door pull.

Refit

1. Fit door pull to trim casing and secure with Torx 

screws.

2. Fit front door trim casing.


 + 

 DOORS, REPAIRS, Trim casing - 

front door - 5 door.


Content   ..  206  207  208  209   ..