Freelander 1. Manual - part 174


  Index      Land Rover     Freelander 1 - service manual 2002 year


Search            


Content   ..  172  173  174  175   ..


Freelander 1. Manual - part 174


STEERING

ADJUSTMENTS

57-1

STEERING

ADJUSTMENTS

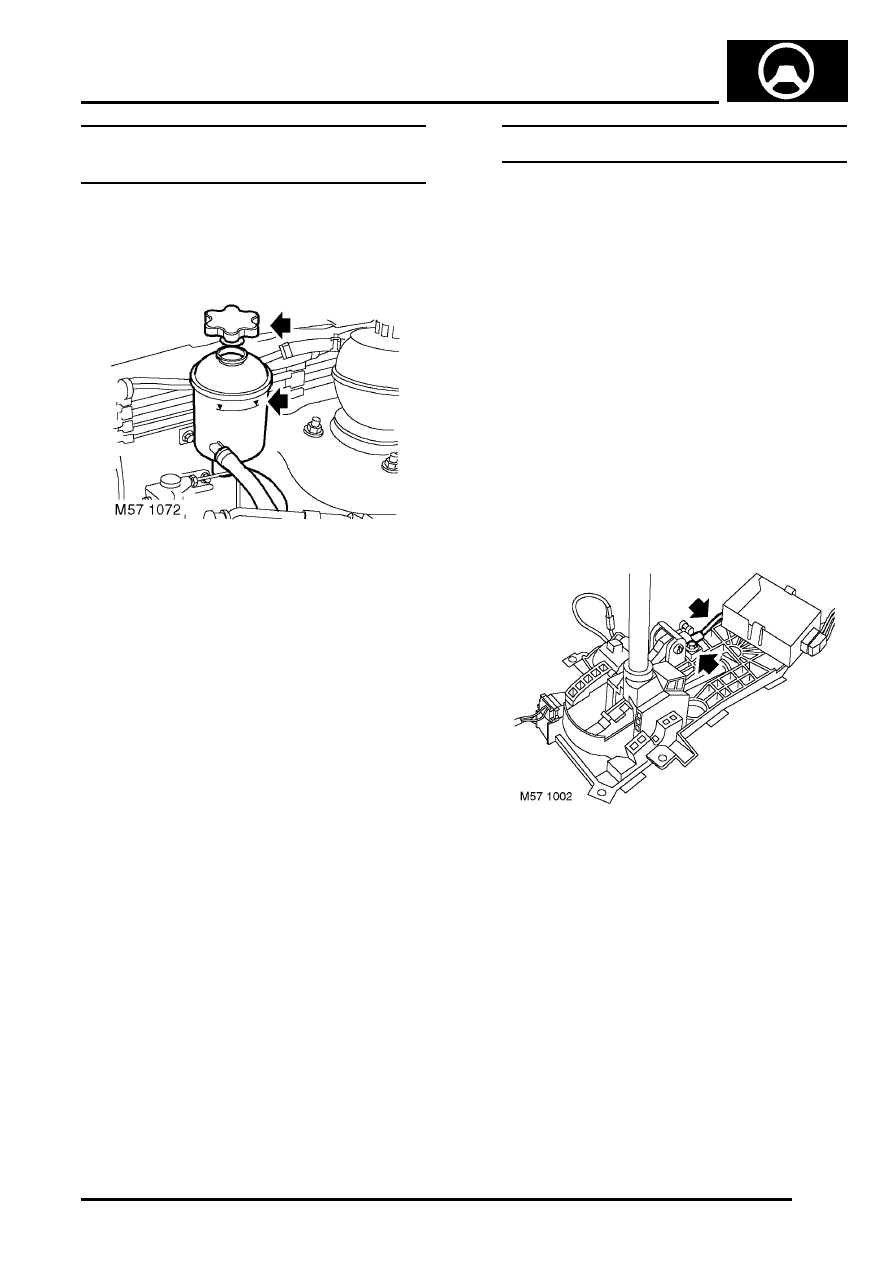
Power assisted steering (PAS) system - 
bleed

$% 57.15.02

Check

1. Switch off engine.

2. Check power steering fluid, if aerated, wait until 

fluid is free from bubbles then top-up reservoir 
to 'UPPER' level mark.

3. Fit reservoir filler cap.

Adjust

1. Clean PAS fluid reservoir around filler cap and 

fluid level indicators.

2. Remove filler cap from reservoir and fill 

reservoir to 'UPPER' mark with Dexron II D 
power steering fluid. Fluid must always be 
present in reservoir while bleeding.

3. Start engine and allow to run at idle for 10 

seconds. Stop engine.

4. Top-up steering fluid reservoir.
5. Start engine and turn steering fully to LH and 

RH locks. Stop engine.

CAUTION: Do not hold steering at full lock 
for longer than 10 seconds.

6. Top-up steering fluid reservoir.
7. Start and run engine for 2 minutes, turn 

steering fully to RH and LH locks.

Cable - key interlock - adjust

$% 57.40.52

Check

1. Select position 'P'.
2. Remove key from starter switch.
3. Check that selector lever cannot be moved 

from 'P' position.

4. Insert and turn key to position II.
5. Depress brake pedal and check that selector 

lever can be moved from 'P' position, and key 
cannot be removed from starter switch. Key 
should only rotate back to a position between I 
and 0.

Adjust

1. Select position 'P'.
2. Remove key from starter switch.
3. Remove front console.


 + 

 INTERIOR TRIM COMPONENTS, 

REPAIRS, Console - front.

4. Loosen bolt securing cable clamp.
5. Pull cable away from interlock mechanism until 

spring pressure is felt. Correct adjustment is 
cable free play removed without compressing 
spring. When correct tighten interlock cable 
clamp screw to 6 Nm (4.5 lbf.ft).

6. Recheck cable operation.
7. Fit front console.


 + 

 INTERIOR TRIM COMPONENTS, 

REPAIRS, Console - front.

STEERING

57-2

ADJUSTMENTS

Front wheel alignment - check & adjust

$% 57.65.01

Check

1. Ensure tyre pressures are correct and vehicle 

is at kerbside weight.

2. Roll vehicle backwards and forwards to relieve 

stresses in steering and suspension.

3. Ensure that wheel alignment equipment is 

properly calibrated.

4. Check front wheel alignment is within 

tolerance. 
 

 + 

 GENERAL DATA, Steering.

Adjust

1. Mark position of steering ball joints for 

reference.

2. Loosen track rod and ball joint pinch bolts.

3. Rotate turn buckle to obtain correct alignment. 

Ensure ball joint is not rotated.

CAUTION: Both track rods must be rotated 
an equal amount.

4. Recheck front wheel alignment.

5. Tighten track rod and ball joint pinch bolts to 28 

Nm (21 lbf.ft).

CAUTION: Ensure slots in turn buckle 
clamps are aligned.

STEERING

ADJUSTMENTS

57-3

Alignment - rear wheel - check & adjust

$% 57.65.06

Check

1. Ensure tyre pressures are correct and vehicle 

is at kerbside weight.

2. Roll vehicle backwards and forwards to relieve 

stresses in steering and suspension.

3. Ensure that wheel alignment equipment is 

properly calibrated.

4. Check front wheel alignment is within 

tolerance.
 

 + 

 GENERAL DATA, Steering.

5. Check rear wheel alignment is within tolerance. 


 + 

 GENERAL DATA, Steering.

Adjust

1. Hold turnbuckle  on adjustable link and loosen 

both lock nuts.

2. Rotate turnbuckle to obtain correct alignment. 


 + 

 GENERAL DATA, Steering.

3. Hold turnbuckle and tighten lock nuts to 90 Nm 

(66 lbf.ft).

4. Roll vehicle backwards and forwards to relieve 

stress in suspension.

5. Repeat check and adjust procedure on other 

side of vehicle.

Power steering - pressure test

$% 57.90.10.01

Check

1. Position absorbent cloth to catch spillage.
2. Remove bolt securing PAS high pressure pipe 

clip to PAS pump.

3. Loosen union securing high pressure pipe to 

PAS pump and release pipe.

4. K1.8 models: Fit adaptor LRT-57-034A to high 

pressure port of PAS pump.

5. KV6 & Td4 models: Fit adaptor LRT-57-042 to 

high pressure port of PAS pump.

6. Fit adaptor LRT-57-035 to existing high 

pressure hose.

7. Fit hose LRT-57-002 to each adaptor.
8. Fit pressure gauge LRT-57-005 to test valve 

LRT-57-001

9. Connect hoses LRT-57-002 to LRT-57-001 

and tighten unions.

10. Ensure steering system and test equipment is 

free from leaks.

11. Maintain maximum fluid level during test.
12. With the test valve open, start the engine.
13. Pressure at idle should be between 5 and 7  

bar.

14. With the engine at idle, slowly turn the steering 

wheel and hold on full lock.

15. Repeat procedure for other side.
16. Test pressure should rise significantly as 

steering wheel is rotated and continue to rise as 
full lock is approached, at full lock  pressure 
should be: 

l

K1.8 models: 90 to 100 bar.

l

Td4 & KV6 models: 112 to 120 bar. 
(maximum pump pressure)

17. With the engine at idle, release steering wheel. 

Pressure should read  below 7 bar.

STEERING

57-4

ADJUSTMENTS

18. Pressures outside the above tolerance 

indicates a fault.

19. To determine if fault is in steering pump or 

steering rack, close the test valve for a 
maximum of 5  seconds.

CAUTION: Pump damage will occur if test 
valve is closed for longer periods.

20. If gauge does not register correct reading, 

suspect faulty pump.

21. If PAS pump pressure is correct and steering is 

heavy at idle and becomes light as engine RPM 
is increased, suspect pump flow rate.

22. If maximum pump pressure is correct, suspect 

steering rack.

23. On completion stop engine and remove test 

equipment.

24. Clean PAS pump and pipe union.
25. Fit new 'O' ring to high pressure pipe, align to 

PAS pump and tighten union to 25 Nm (18 
lbf.ft). 

26. Fit bolt securing high pressure pipe clip and 

tighten to 8  Nm (6 lbf.ft).

27. Check and top-up PAS fluid level.


 + 

 MAINTENANCE, MAINTENANCE, 

Intermediate Reduction Drive - Non NAS 
models.


Content   ..  172  173  174  175   ..