Freelander 1. Manual - part 172


  Index      Land Rover     Freelander 1 - service manual 2002 year


Search            


Content   ..  170  171  172  173   ..


Freelander 1. Manual - part 172


REAR AXLE & FINAL DRIVE

REPAIRS

51-1

REAR AXLE & FINAL DRIVE

REPAIRS

Differential assembly 

$% 51.15.01

Remove

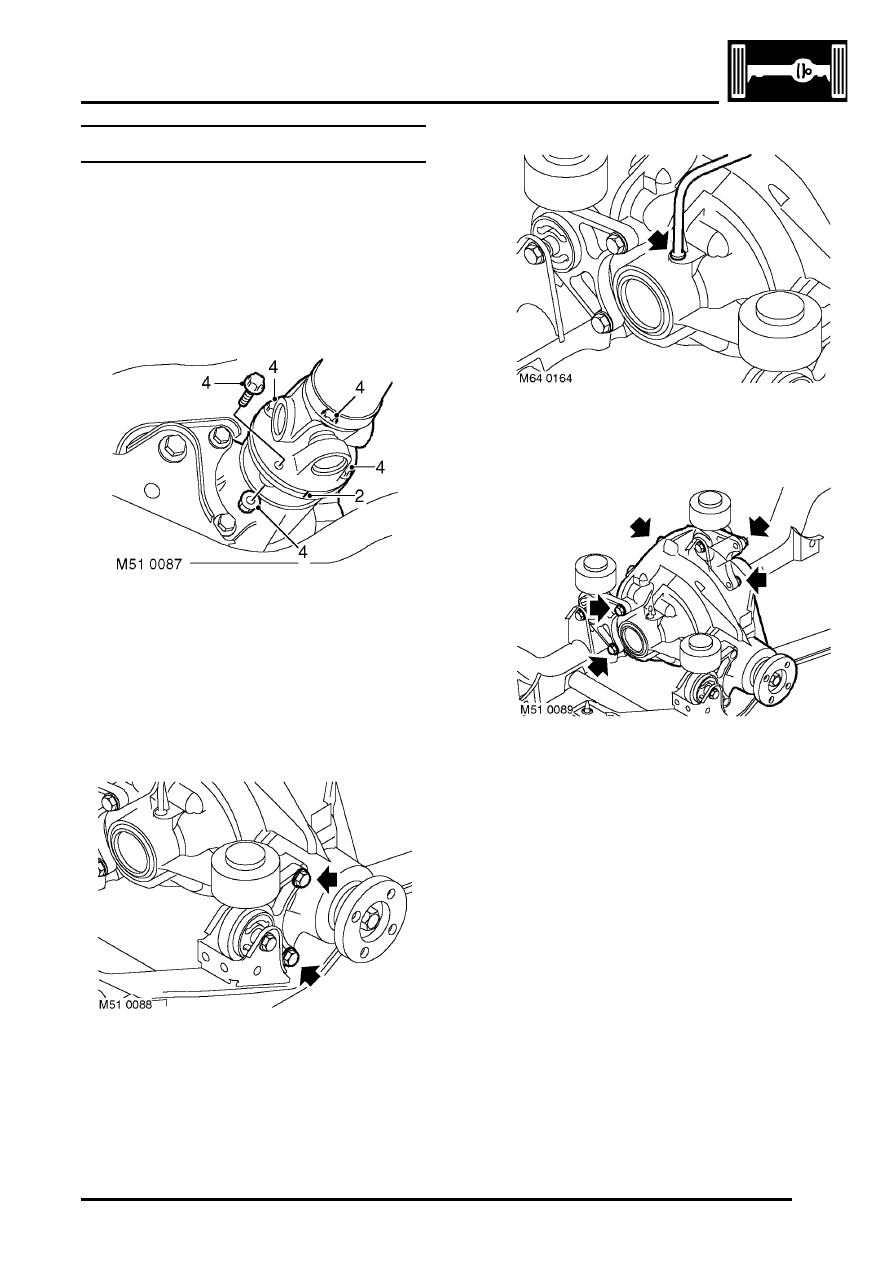
1. Remove both drive shafts.


 + 

 DRIVESHAFTS, REPAIRS, Shaft 

with both joints - LH.
 

 + 

 DRIVESHAFTS, REPAIRS, Shaft 

with both joints - RH.

2. Reference mark rear propeller shaft for 

reassembly.

3. Position container to catch oil spillage
4. Remove 4 nuts and bolts securing propeller 

shaft to differential. Release propeller shaft and 
tie aside.

5. Support weight of differential assembly on a 

jack.

6. Remove 2 bolts securing differential to front 

mounting.

7. Depress red locking collar and disconnect 

breather pipe from differential casing.

8. Remove 4 bolts securing differential assembly 

to rear mountings.

9. With assistance, rotate differential assembly 

through 90

°

 and remove from subframe.

Refit

1. With assistance position differential assembly 

to subframe and locate in mountings, fit bolts 
but do not tighten at this stage.

REAR AXLE & FINAL DRIVE

51-2

REPAIRS

2. Position centralising jig LRT-51-013 to align 

differential assembly.

3. Tighten forward bolts to 65 Nm (48 lbf.ft).
4. Tighten rearward bolts to 65 Nm (48 lbf.ft).
5. Remove LRT-51-013.
6. Connect breather pipe.
7. Position propeller shaft to rear axle and align 

reference marks.

8. Fit and tighten nuts and bolt securing propeller 

shaft to rear axle  to 65 Nm (48 lbf.ft).

9. Fit drive shafts.


 + 

 DRIVESHAFTS, REPAIRS, Shaft 

with both joints - LH.
 

 + 

 DRIVESHAFTS, REPAIRS, Shaft 

with both joints - RH.

10. Check differential oil level. 


 + 

 MAINTENANCE, MAINTENANCE, 

Rear Axle.

Cover - rear - differential

$% 51.15.04

Remove

1. Raise rear of vehicle.

WARNING: Do not work on or under a 
vehicle supported only by a jack. Always 
support the vehicle on safety stands.

2. Position container to catch oil spillage.

3. Remove oil level plug.
4. Remove 10 bolts securing rear cover to 

differential casing.

5. Remove rear cover.

Refit

1. Clean rear cover, mating face on differential 

and sealant from bolts and bolt threads.

2. Apply sealant, Part No. STC 3254 to casing 

and fit rear cover.

3. Fit bolts and tighten to 25 Nm (18 lbf.ft).
4. Fill differential with oil. 


 + 

 MAINTENANCE, MAINTENANCE, 

Rear Axle.

5. Fit and tighten level plug.
6. Remove stands and lower vehicle.

REAR AXLE & FINAL DRIVE

REPAIRS

51-3

Bush - differential mounting - front 

$% 51.15.43

Remove

1. Remove LH mounting.


 + 

 REAR AXLE & FINAL DRIVE, 

REPAIRS, Bush - differential mounting - 
rear.

2. Remove 2 bolts securing RH mounting to 

differential.

3. Remove 2 bolts securing front mounting to 

differential.

4. Remove bolt securing front mounting 

subframe.

5. Ease differential away from front mounting and 

remove front mounting.

Refit

1. Ease differential away from front mounting and 

fit front mounting.

2. Ensure differential is correctly located in LRT-

51-013.

3. Fit bolt securing mounting to subframe  and 

tighten to 120 Nm (89 lbf.ft).

4. Fit bolts securing front mounting to differential 

and tighten to 65 Nm (48 lbf.ft).

5. Tighten RH mounting bolts to 65 Nm (48 lbf.ft).
6. Fit LH mounting.


 + 

 REAR AXLE & FINAL DRIVE, 

REPAIRS, Bush - differential mounting - 
rear.

REAR AXLE & FINAL DRIVE

51-4

REPAIRS

Bush - differential mounting - rear 

$% 51.15.44

Remove

1. Raise rear of vehicle.

WARNING: Do not work on or under a 
vehicle supported only by a jack. Always 
support the vehicle on safety stands.

2. Position centralising jig LRT-51-013 to align 

differential assembly.

3. Remove bolt securing differential mounting to 

subframe.

4. Remove 2 bolts securing mounting to 

differential.

5. Remove mounting.

Refit

1. Position differential mounting.
2. Fit bolts securing mounting to differential and 

tighten to 65 Nm (48 lbf.ft).

3. Fit bolt securing mounting to subframe  and 

tighten to 120 Nm (89 lbf.ft).

4. Remove LRT-51-013.
5. Remove stands and lower vehicle.


Content   ..  170  171  172  173   ..