Freelander 1. Manual - part 137


  Index      Land Rover     Freelander 1 - service manual 2002 year


Search            


Content   ..  135  136  137  138   ..


Freelander 1. Manual - part 137


MANIFOLDS & EXHAUST SYSTEMS - TD4

REPAIRS

30-1-7

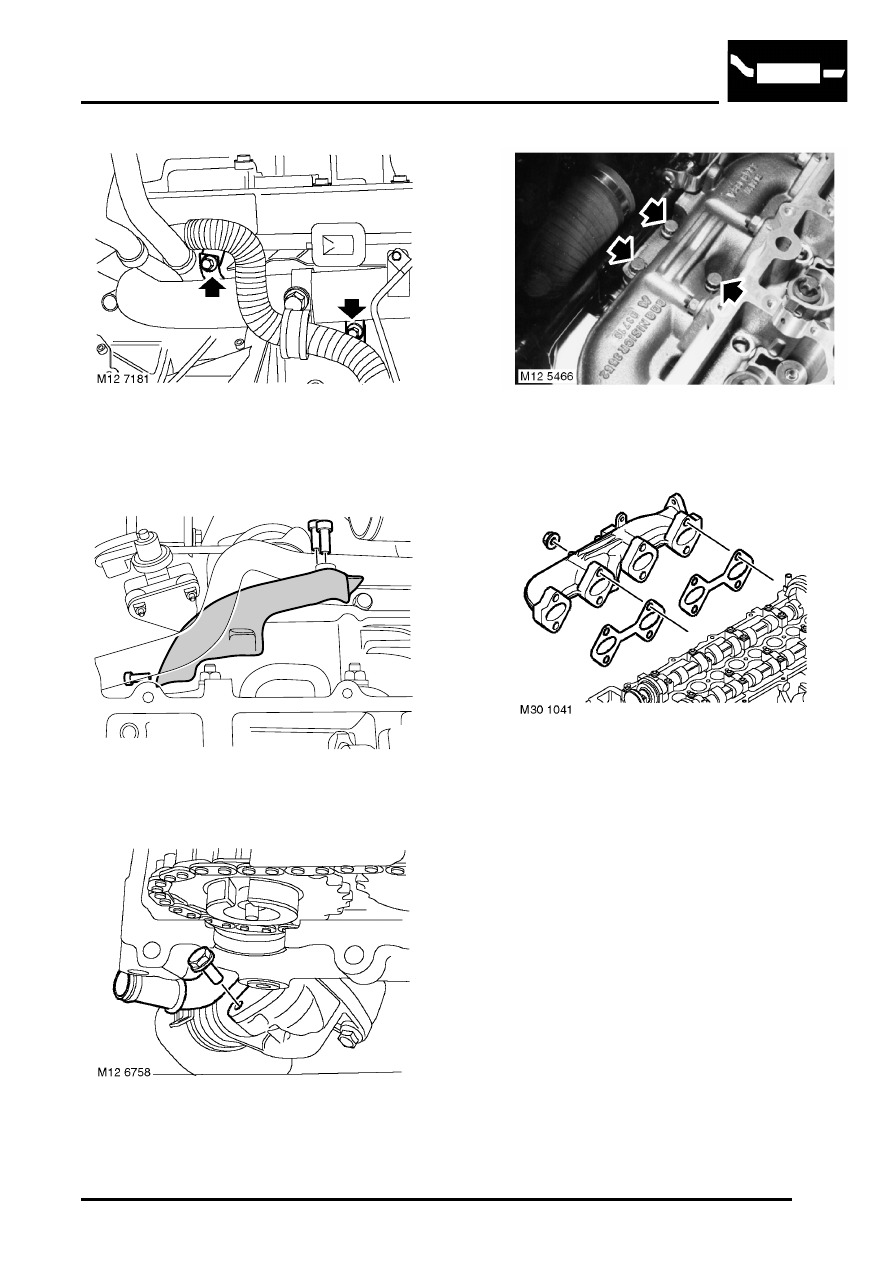
10. Remove bolt securing turbocharger outlet pipe 

to coolant rail.

11. Remove bolt, turbocharger outlet pipe to 

bracket on exhaust manifold.

12. Remove 3 Allen screws heat shield to coolant 

rail.

13. Remove bolt, release coolant rail from 

thermostat housing and discard seal.

14. Remove heat shield.

15. Remove 3 bolts, turbocharger to exhaust 

manifold. Discard gasket.

16. Remove 8 nuts and remove exhaust manifold. 

Discard gaskets.

Refit

1. Clean exhaust manifold and mating faces.
2. Use new gaskets and fit exhaust manifold to 

cylinder head.

3. Fit nuts securing exhaust manifold and tighten 

to 24 Nm (18 lbf.ft).

4. Use new gasket, align turbocharger and tighten 

bolts to 50 Nm (37 lbf.ft).

5. Clean EGR pipe and mating face.
6. Fit heat shield.
7. Clean coolant rail and thermostat housing 

mating face.

8. Fit new seal to coolant rail, fit rail to thermostat 

housing and tighten bolt to 8 Nm (6 lbf.ft).

9. Tighten Allen screws securing heat shield to 8 

Nm (6 lbf.ft).

10. Align EGR cooler and coolant rail, tighten bolts 

to 25 Nm (18 lbf.ft).

11. Fit EGR pipe clamp and tighten screw.

M12 6785

MANIFOLDS & EXHAUST SYSTEMS - TD4

30-1-8

REPAIRS

12. Align turbocharger outlet pipe and tighten 8 mm 

bolts to 25 Nm (18 lbf.ft) and 6 mm bolt to 10 
Nm (7.5 lbf.ft).

13. Fit bolt securing fuel rails to support bracket 

and tighten to 10 Nm (7.5 lbf.ft).

14. Connect expansion tank hose to coolant rail 

and secure with clip.

15. Fit turbocharger outlet hose and tighten clips.
16. Fit camshaft cover gasket.


 + 

 ENGINE - Td4, REPAIRS, Gasket - 

camshaft cover.

17. Connect battery earth lead.
18. Fill cooling system.


 + 

 COOLING SYSTEM - Td4, 

ADJUSTMENTS, Coolant - drain and refill.

MANIFOLDS & EXHAUST SYSTEMS - K SERIES 1.8

REPAIRS

30-2-1

MANIFOLDS & EXHAUST SYSTEMS - K SERIES 1.8

REPAIRS

Exhaust pipe - front

$% 30.10.09

Remove

1. Release clips securing gear lever gaiter to 

centre console.

2. Move gaiter aside and disconnect post catalyst 

HO2S multiplug.

3. Remove underbelly panel.


 + 

 EXTERIOR FITTINGS, REPAIRS, 

Panel - underbelly.

4. Release grommet and withdraw HO2S harness 

multiplug through grommet aperture.

5. Remove 2 nuts securing exhaust front pipe to 

exhaust manifold.

6. Release exhaust front pipe from exhaust 

manifold and collect gasket.

7. Remove 2 nuts and release front pipe from 

intermediate pipe/silencer.

8. Collect flange gasket.
9. Release front pipe from rubber mountings.

10. Remove exhaust front pipe.

M19  3325

M30 1061

M30 1059

MANIFOLDS & EXHAUST SYSTEMS - K SERIES 1.8

30-2-2

REPAIRS

11. Remove 4 nuts securing heat shield to front 

pipe.

12. Remove heat shield.
13. Remove HO2S.

Refit

1. Clean HO2S and mating face.
2. If refitting existing HO2S, apply anti-seize 

compound to HO2S threads.

3. Fit HO2S and tighten to 55 Nm (41 lbf.ft)  using 

tool LRT-19-014.

4. Fit heat shield to front pipe, fit nuts and tighten 

to 9 Nm (7 lbf.ft).

5. Clean mating faces of front pipe and 

intermediate pipe.

6. Position exhaust pipe to front rubber 

mountings.

7. Using new gasket, connect front pipe to 

intermediate pipe, fit nuts and tighten to 60 Nm 
(44 lbf.ft).  

8. Clean front pipe and manifold mating faces.
9. Using new gasket, connect front pipe to 

manifold, fit nuts and tighten to 60 Nm (44 
lbf.ft). 

10. Feed HO2S harness through grommet aperture 

and secure grommet.

11. Fit underbelly panel.


 + 

 EXTERIOR FITTINGS, REPAIRS, 

Panel - underbelly.

12. Connect HO2S multiplug.
13. Secure gaiter to console.

Exhaust pipe - intermediate

$% 30.10.11

Remove

1. Raise vehicle on 4 post ramp.

2. Loosen tail pipe clamp nut and release tail pipe 

from intermediate pipe.

3. Remove 2 nuts securing front pipe to 

intermediate pipe.

4. Release intermediate pipe from front pipe.
5. Remove and discard gasket.
6. With assistance release and remove 

intermediate pipe.


Content   ..  135  136  137  138   ..