Freelander 1. Manual - part 133


  Index      Land Rover     Freelander 1 - service manual 2002 year


Search            


Content   ..  131  132  133  134   ..


Freelander 1. Manual - part 133


COOLING SYSTEM - K SERIES 1.8

REPAIRS

26-2-7

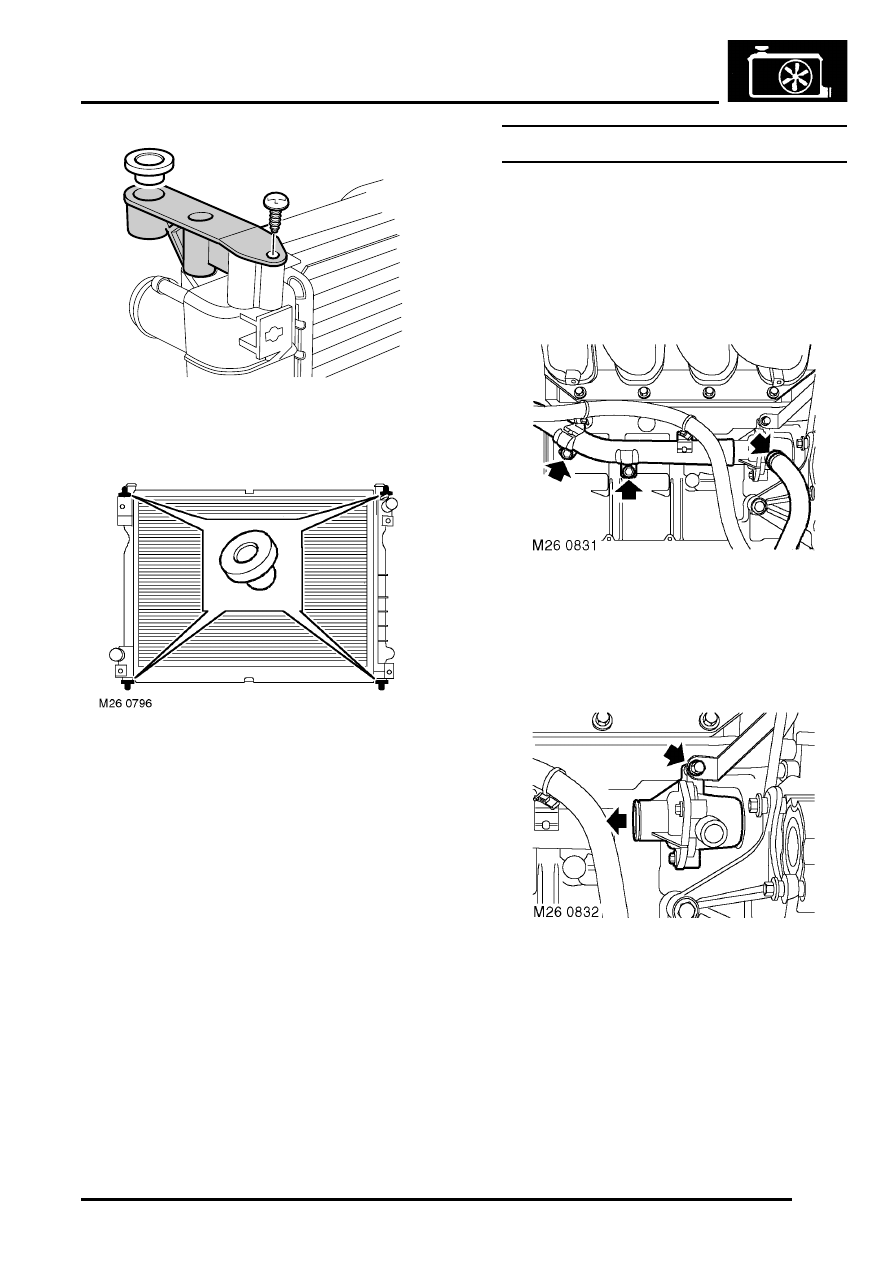
7. Remove radiator top mounting extension 

brackets.

8. Remove 4 rubber mountings from radiator.

Refit

1. Fit mounting rubbers to radiator.
2. Fit top support brackets to radiator.
3. Fit radiator and engage lower mountings in 

chassis.

4. Fit bolts securing condenser to radiator and 

tighten to 3 Nm (2.2 lbf.ft).

CAUTION: Ensure that bolts of the correct 
length are used on refit.

5. Connect expansion tank hose and secure with 

clip.

6. Fit cooling fan assembly.


 + 

 COOLING SYSTEM - K SERIES 1.8, 

REPAIRS, Cooling fan and motor - A/C.
 

 + 

 COOLING SYSTEM - K SERIES 1.8, 

REPAIRS, Cooling fan and motor - non A/C.

7. Fit front bumper assembly.


 + 

 EXTERIOR FITTINGS, REPAIRS, 

Bumper - assembly - front.

8. Connect battery earth lead.

Thermostat  

$% 26.45.01

Remove

1. Disconnect battery earth lead.
2. Drain cooling system.


 + 

 COOLING SYSTEM - K SERIES 1.8, 

ADJUSTMENTS, Coolant - drain & refill.

3. Loosen clip and disconnect heater hose from 

thermostat housing.

4. Remove 2 bolts securing coolant rail to cylinder 

block.

5. Release coolant rail from thermostat housing.

6. Remove bolt securing thermostat housing to 

cylinder block.

7. Release and remove thermostat housing from 

coolant pump.

M26 0797

COOLING SYSTEM - K SERIES 1.8

26-2-8

REPAIRS

8. Remove and discard 2 'O' rings from 

thermostat housing outlets.

9. Remove 3 bolts securing thermostat housing 

cover to thermostat housing.

10. Remove thermostat housing cover.
11. Remove thermostat from housing.
12. Remove rubber seal from thermostat.

Refit

1. Examine thermostat rubber seal for signs of 

deterioration or damage, renew if necessary.

2. Fit rubber seal to thermostat.
3. Clean mating faces of thermostat and cover.

4. Fit thermostat.
5. Align thermostat to shoulder in thermostat 

housing.

6. Fit thermostat housing cover and tighten bolts 

to 9 Nm (7 lbf.ft).

7. Clean 'O' ring grooves on thermostat housing 

outlets.

8. Lubricate new 'O' rings with rubber grease and 

fit to thermostat housing outlets.

9. Position thermostat housing to coolant pump 

and push into place.

10. Align dipstick tube bracket to thermostat 

housing.

11. Fit bolt securing thermostat housing to cylinder 

block and tighten to 9 Nm (7 lbf.ft).

12. Connect coolant rail to thermostat housing.
13. Align coolant rail to cylinder block, fit bolts and 

tighten to 9 Nm (7 lbf.ft).

14. Connect heater hose to thermostat housing 

and tighten clip.

15. Refill cooling system.


 + 

 COOLING SYSTEM - K SERIES 1.8, 

ADJUSTMENTS, Coolant - drain & refill.

16. Connect battery earth lead.

COOLING SYSTEM - K SERIES KV6

ADJUSTMENTS

26-3-1

COOLING SYSTEM - K SERIES KV6

ADJUSTMENTS

Coolant - drain and refill

$% 26.10.01

Drain

1. Remove engine acoustic cover.


 + 

 ENGINE - K SERIES KV6, REPAIRS, 

Cover - engine acoustic.

2. Visually check engine and cooling system for 

signs of coolant leaks.

WARNING: Since injury such as scalding 
could be caused by escaping steam or 
coolant, do not remove the filler cap from 
the coolant expansion tank while the 
system is hot.

3. Examine hoses for signs of cracking, distortion 

and security of connections.

4. Remove expansion tank filler cap.
5. Remove underbelly panel.


 + 

 EXTERIOR FITTINGS, REPAIRS, 

Panel - underbelly.

6. Position container to collect coolant.

7. Remove cylinder block drain plug.

8. Release clip and remove bottom hose from 

radiator.

9. Allow cooling system to drain.

Refill

1. Flush system with water under low pressure. 

Do not use water under high pressure as it 
could damage the radiator.

2. Clean cylinder block drain plug and apply 

Loctite 242 to first 3 threads.

3. Fit cylinder block drain plug and tighten to 20 

Nm (15 lbf.ft).

4. Fit bottom hose to radiator and secure with clip.
5. Prepare coolant to required concentration.


 + 

 CAPACITIES, FLUIDS AND 

LUBRICANTS, Fluids.

6. Remove bleed screw from heater return hose.
7. Slowly fill the system through the coolant 

expansion tank until a steady flow of coolant is 
emitted from the bleed hole.

8. Fit and close bleed screw in heater return hose.
9. Continue to fill system through the expansion 

tank until coolant reaches to the base of the 
expansion tank bleed hose.

10. Fit expansion tank filler cap.

COOLING SYSTEM - K SERIES KV6

26-3-2

ADJUSTMENTS

11. Start and run engine until coolant in expansion 

tank has dropped to bottom of tank.

CAUTION: DO NOT operate air conditioning

12. Switch off engine and allow to cool.
13. Remove expansion tank filler cap and add 

coolant until it reaches the base of the bleed 
hose.

14. Fit expansion tank filler cap.
15. Start and run engine until normal operating 

temperature is reached.

CAUTION: The bottom hose must be warm/
hot, this will ensure the thermostat is fully 
open.

16. Ensure warm air is available at vents.

NOTE: If warm air is not available, an air-lock 
may be present in heater matrix. If necessary, 
allow engine to cool, remove expansion tank 
filler cap and repeat bleed operation at heater 
hose

17. Switch off engine and allow to cool.
18. Check for leaks and top-up coolant to 'MAX' 

mark on expansion tank

19. Fit underbelly panel.


 + 

 EXTERIOR FITTINGS, REPAIRS, 

Panel - underbelly.

20. Fit engine acoustic cover.


 + 

 ENGINE - K SERIES KV6, REPAIRS, 

Cover - engine acoustic.


Content   ..  131  132  133  134   ..