Freelander 1. Manual - part 100


  Index      Land Rover     Freelander 1 - service manual 2002 year


Search            


Content   ..  98  99  100  101   ..


Freelander 1. Manual - part 100


ENGINE - K SERIES KV6

OVERHAUL 12-3-91

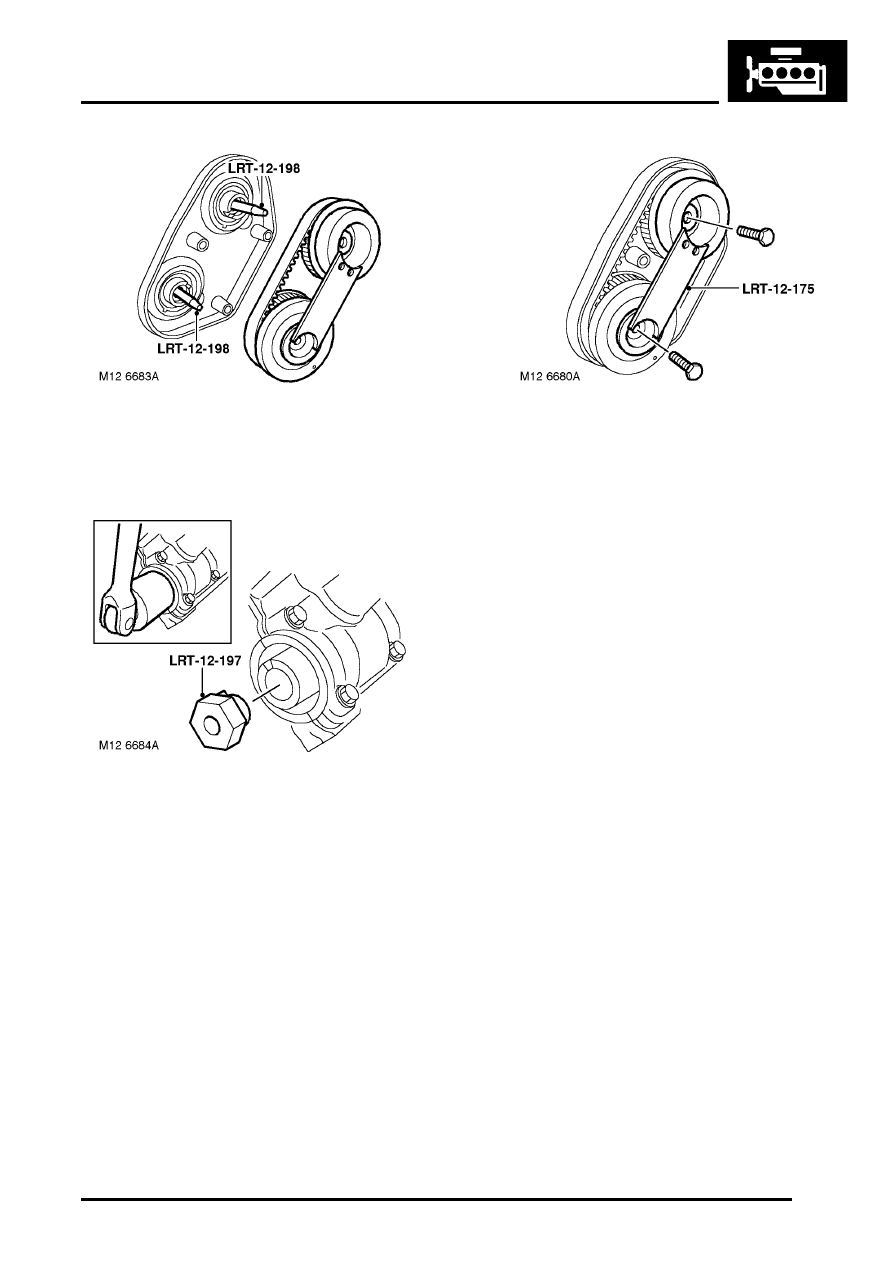
25. Fit  LRT-12-198 alignment pins into the end of 

each camshaft.

26. Position timing belt and gears over LRT-12-198  

and locate gears onto camshafts.

27. Position LRT-12-197 into the front end of the 

exhaust camshaft.

28. With assistance, using a 30 mm socket on LRT-

12-197, turn the exhaust camshaft sufficiently 
to align camshaft gears to the drive slots in 
each camshaft.

29. Remove LRT-12-198 alignment pins and fit 

new camshaft gear retaining bolts.

30. Tighten camshaft gear bolts to:  

l

Stage 1 - 27 Nm (20 lbf.ft)

l

Stage 2 - Further 90

°

31. Remove LRT-12-175 from camshaft gears.
32. Remove LRT-12-197 from front end of exhaust 

camshaft.

NOTE: Following front or rear timing belt 
refitment, it is possible that after rotating the 
engine and positioning the crankshaft pulley to 
the 'SAFE' position, the timing marks on the 
rear timing gears may be misaligned. This 
misalignment is acceptable provided that the 
timing belt refitting procedure was carried out 
correctly.

33. Fit timing belt rear cover and tighten bolts to 9 

Nm (7 lbf.ft).

Refit

1. Fit cylinder head gaskets.


 + 

 ENGINE - K SERIES KV6, 

OVERHAUL, Cylinder head gasket - LH.
 

 + 

 ENGINE - K SERIES KV6, 

OVERHAUL, Cylinder head gasket - RH.

ENGINE - K SERIES KV6

12-3-92 OVERHAUL

Oil pump

$% 12.60.26.02

Remove

1. Remove camshaft timing belt.


 + 

 ENGINE - K SERIES KV6, 

OVERHAUL, Camshaft timing belt.

2. Remove crankshaft gear.
3. If fitted: Disconnect multiplug from oil pressure 

switch.

4. Using a strap wrench, remove and discard oil 

filter.

5. Using sequence shown, remove and discard 16 

bolts securing oil pump to cylinder block.

6. Remove oil pump, remove and discard gasket.
7. Remove and discard crankshaft front oil seal 

from oil pump body.

Disassembly

1. Remove 4 Torx screws securing cover plate to 

oil pump body.

CAUTION: Do not allow cover to separate 
from pump body.

2. Invert oil pump.

ENGINE - K SERIES KV6

OVERHAUL 12-3-93

3. Carefully remove cover plate from oil pump 

body taking care to ensure that rotors are 
retained in pump body.

Note: Cover plate is dowel located.

4. Remove and discard cover plate sealing ring.
5. Make suitable alignment marks between inner 

and outer rotors and pump body.

6. Remove inner and outer rotors.
7. Clean inner and outer rotors and rotor housing.
8. Fit inner and outer rotors ensuring that 

reference marks are aligned.

Inspect

1. Check rotor clearances:

l

Outer rotor to body = 0.13 - 0.23 mm 
(0.0051 - 0.0091 in)

l

Inner rotor tip = 0.05 - 0.13 mm (0.002 - 
0.005 in)

l

Inner and outer rotor end-float = 0.04 - 0.09 
mm (0.0016 - 0.0035 in)

2. Renew oil pump as an assembly if clearances 

are excessive.

3. Remove oil pressure relief valve plug.

Note: If a hexagonal plug and sealing washer 
are fitted, discard washer.

ENGINE - K SERIES KV6

12-3-94 OVERHAUL

4. Remove spring and valve.
5. Check that valve and bore are free from scoring 

and corrosion.

Note: Light corrosion may be removed using 
grade 600 emery cloth soaked in engine oil.

6. Check free length of spring.


 + 

 GENERAL DATA, Engine – KV6 

Petrol.

7. Check that valve slides freely in bore.

CAUTION: If valve is scored, renew relief 
valve as an assembly. If valve bore is 
scored, renew oil pump as an assembly.

Reassembly

1. Clean cover plate and mating face of cylinder 

block; ensure bolt holes are clean and dry.

2. Clean running surface on crankshaft.
3. Remove all traces of Loctite from relief valve 

plug, Torx screws and tapped holes in pump 
body.

CAUTION: Do not use a tap.

4. Lubricate relief valve, spring and bore with 

clean engine oil.

5. Fit relief valve and spring.
6. If a hexagonal plug and sealing washer were 

fitted, fit new sealing washer to plug. 

7. Apply Loctite 577 to plug threads; fit plug and 

tighten to 25 Nm (18 lbf.ft).

8. Lubricate pump rotors and recess with clean 

engine oil.

9. Fit inner and outer rotors ensuring that 

identification mark on outer rotor is facing 
outwards and that reference marks are aligned.

10. Lubricate new cover plate sealing ring with 

clean engine oil.

11. Fit cover plate seal and cover plate.
12. Apply Loctite 577 to threads of Torx screws, fit 

and tighten screws.

13. Check that pump rotates freely.

Refit

1. Fit new oil pump gasket to cylinder block.

CAUTION: Gasket must be fitted dry.

2. Fit oil seal guide from crankshaft front oil seal 

kit over end of crankshaft.

3. Position oil pump, aligning flats on pump drive 

to flats on crankshaft.

4. Fit new Patchlok bolts and using sequence 

shown, tighten to :

l

Stage 1 - 5 Nm (4 lbf.ft)

l

Stage 2 - 9 Nm (7 lbf.ft)

5. Position new crankshaft front seal against oil 

pump housing, fit seal using tool LRT-12-202.

CAUTION: Oil seal must be fitted dry.

6. Remove oil seal guide.
7. If fitted: Connect multiplug to oil pressure 

switch.

8. Fill canister of replacement oil filter with clean 

engine oil.

9. Lubricate sealing ring on new oil filter with clean 

engine oil.

10. Fit oil filter and tighten by hand until it seats 

then tighten a further half turn.

11. Fit crankshaft gear.
12. Fit camshaft timing belt.


 + 

 ENGINE - K SERIES KV6, 

OVERHAUL, Camshaft timing belt.


Content   ..  98  99  100  101   ..