Freelander 1. Manual - part 99


  Index      Land Rover     Freelander 1 - service manual 2002 year


Search            


Content   ..  97  98  99  100   ..


Freelander 1. Manual - part 99


ENGINE - K SERIES KV6

OVERHAUL 12-3-87

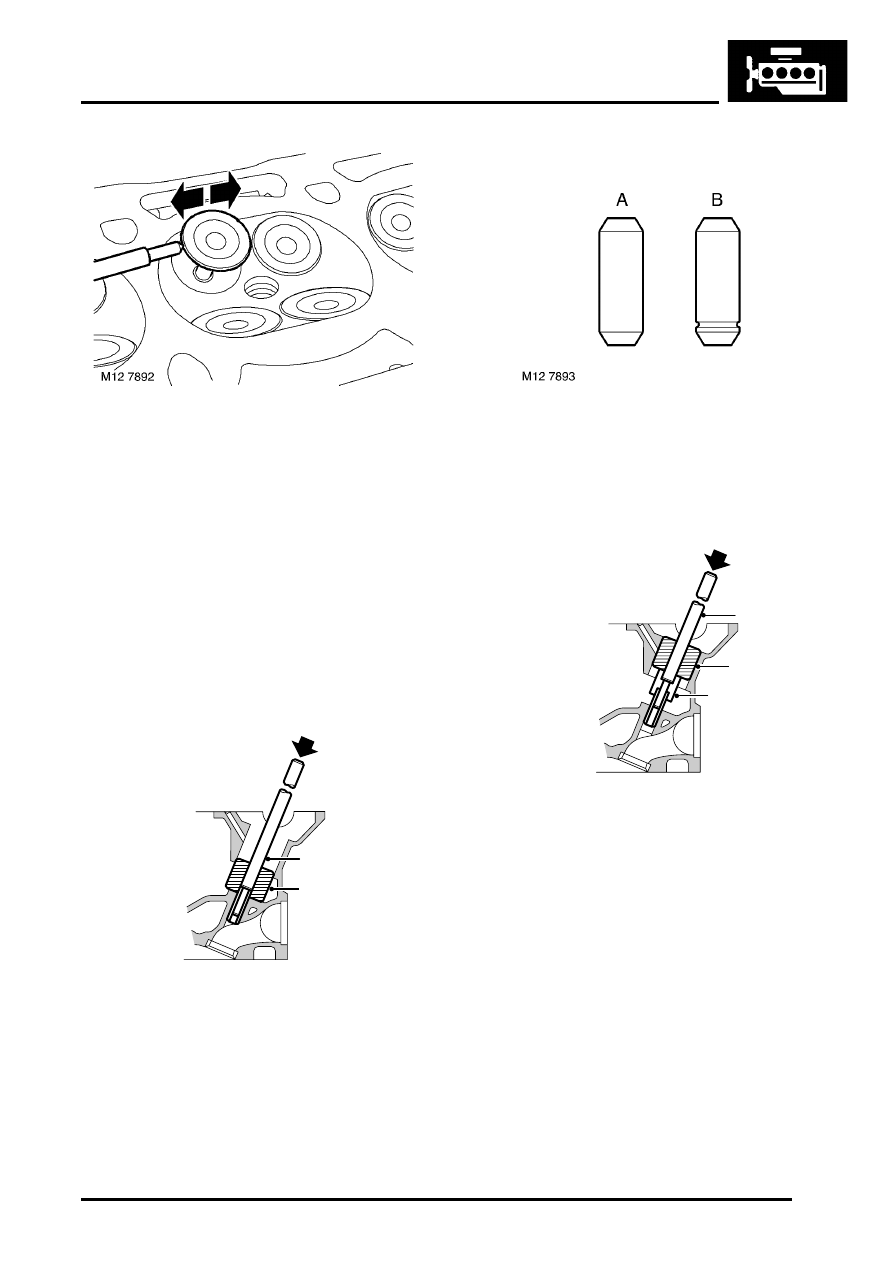
20. Insert each valve into its respective guide.
21. Extend valve head 15 mm (0.6 in) out of guide 

and position DTI gauge to rear of valve head.

22. Move valve towards front of cylinder head and 

zero gauge ensuring that stylus of gauge 
remains in contact with valve head.

23. Move valve towards rear of cylinder head, 

record gauge reading obtained to give valve 
stem to guide clearance 'B'.
 

 + 

 GENERAL DATA, Engine – KV6 

Petrol.

24. Remove valves ensuring they are retained in 

their fitted order.

25. Renew valves and/or guides as necessary.
26. To replace valve guides support cylinder head 

face down on wooden blocks.

27. Position LRT-12-519-3 in tappet bore and drift 

out valve guide using LRT-12-519-1.

CAUTION: Retain guides in their fitted 
order.

28. Identify type of valve guide fitted: 'A' - Standard 

production 'B' - Service replacement.

CAUTION: Standard production valve 
guides A must be replaced with service 
replacement guides B.

29. Locate valve guide in valve guide bore with 

identification groove towards valve seat and 
position depth gauge LRT-12-519-2 onto valve 
guide.

CAUTION: Cylinder head and valve guides 
must be at room temperature when fitting 
guides.

30. Position nylon guide LRT-12-519-3 in cylinder 

head, press guide into bore using driver LRT-
12-519-1
 until depth gauge contacts cylinder 
head.

M12 6890

LRT-12-519-1

LRT-12-519-3

M12 6892

LRT-12-519-2

LRT-12-519-1

LRT-12-519-3

ENGINE - K SERIES KV6

12-3-88 OVERHAUL

31. Check that fitted height of valve guide, 'A', is 

6.00 mm (0.24 in).

32. Check condition of valve seats and existing 

valves that are to be re-used.

33. Renew valve seat inserts as necessary.

CAUTION: Do not damage counterbore 
when removing insert.

34. Cool replacement valve seat inserts using 

liquid nitrogen and press into cylinder head in 
one continuous operation.

CAUTION: Do not heat cylinder head. 
Inserts must not stand proud of combustion 
face on completion of cutting operation.

35. Cut valve seats using a suitable pilot and the 

following cutters:

l

15

°

 - To cut first angle

l

45

°

 - Make final cut and remove any burrs

l

60

°

 - To narrow seat and obtain correct 

valve seat width

36. Check valve seat width and face angle:

l

Seat width - 'A' - Inlet = 1.2 mm (0.05 in); 
Exhaust = 1.6 mm (0.06 in)

l

Valve face angle - 'B' - Inlet and exhaust = 
45

°

37. Lap each valve to its seat using grinding paste.

38. Apply Prussian Blue to valve seat, insert valve 

and press it into position several times without 
rotating. Remove and check valve for even and 
central seating: seating position shown by 
Prussian Blue should be in the centre of valve 
face: a: High towards stem, increase 60

°

 cut 

and restore seat width. b: Low towards edge, 
increase 45

°

 cut and restore seat width. Lap 

and recheck valve seating.

39. Check valve stem fitted height - 'A'


 + 

 GENERAL DATA, Engine – KV6 

Petrol.

CAUTION: If valve stem fitted height is 
above service limit, fit new valve and re-
check. If still over limit, renew valve seat 
insert.

40. Clean valve springs and lubricate valves.

Reassembly

1. Lubricate new valve stem oil seals with clean 

engine oil.

2. Using tool LRT-12-071 fit new valve stem oil 

seals.

3. Fit valves.

M12 7894

A

ENGINE - K SERIES KV6

OVERHAUL 12-3-89

4. Fit spring and spring cap.

5. Position LRT-12-034  and adapter LRT-12-

034/1to spring cap and compress valve spring.

6. Fit collets.
7. Release valve spring and remove tool LRT-12-

034.

8. Using a wooden dowel and mallet, lightly tap 

top of each valve two or three times to seat 
valves and collets.

9. Thoroughly clean and lubricate hydraulic 

tappets with clean engine oil. Fit hydraulic 
tappets to original bores in cylinder head.

10. Ensure that mating faces of camshaft carrier 

and cylinder head are clean and dry.

11. Lubricate camshafts and bearing journals with 

clean engine oil.

12. Position camshafts in cylinder head with rear 

timing gear drive slots in each camshaft facing 
towards the centre as shown.

CAUTION: Ensure camshafts are in their 
correct fitted locations. Camshafts are 
colour coded - Inlet - Orange; Exhaust - 
Blue.

13. Apply continuous thin beads of sealant, Part 

No. STC 4600, to paths on camshaft carrier as 
shown. Spread sealant to an even film using a 
roller.

CAUTION: To avoid contamination, 
assembly should be completed immediately 
after application of sealant.

14. Position camshaft carrier, fit and progressively 

tighten bolts in the sequence shown to 10 Nm 
(7.5 lbf.ft).

ENGINE - K SERIES KV6

12-3-90 OVERHAUL

15. Noting that the front camshaft oil seals are 

black in colour and the rear oil seals are red, fit 
new camshaft oil seals using LRT-12-203 and 
LRT 12-148A 

CAUTION: Oil seals must be fitted dry. Do 
not use tool LRT-12-148 for fitting seals.

16. Clean camshaft timing belt cover backplate 

bolts and apply Loctite 242 to the first 3 threads.

17. Position camshaft timing belt rear cover 

backplates to cylinder head, fit and tighten bolts 
to 9 Nm (7.5 lbf.ft). 

18. Fit spark plugs.
19. Clean rear camshaft gears and mating faces on 

camshafts.

CAUTION: If sintered gears have been 
subjected to prolonged oil contamination, 
they must be soaked in solvent and then 
thoroughly washed in clean solvent before 
refitting. Because of the porous 
construction of sintered material, oil 
impregnated in the gears will emerge and 
contaminate the timing belts.

20. Place gears inverted on a flat surface, with the 

locating lugs on the gears positioned as 
illustrated.

21. Keeping the timing marks aligned, position 

timing belt onto gears.

22. Position LRT-12-195 between the gears, turn 

centre nut sufficiently to spread drive belt. 

23. Invert gears and timing belt and position  LRT-

12-175 to camshaft gears.

24. Check that locating lugs are still aligned and 

remove LRT-12-195  from between camshaft 
gears.


Content   ..  97  98  99  100   ..