Freelander 1. Manual - part 90


  Index      Land Rover     Freelander 1 - service manual 2002 year


Search            


Content   ..  88  89  90  91   ..


Freelander 1. Manual - part 90


ENGINE - K SERIES KV6

REPAIRS 12-3-51

40. With care, ease camshaft timing belt from 

gears using fingers only and remove timing 
belt.

CAUTION: Do not rotate crankshaft or 
camshafts with timing belt removed and 
cylinder heads fitted.

CAUTION: Camshaft timing belt must be 
replaced if cylinder head is to be removed or 
new drive gears, tensioner or coolant pump 
are to be fitted.  Camshaft timing belts must 
be stored and handled with care. Always 
store a camshaft timing belt on its edge with 
a bend radius greater than 50 mm (2.0 in). 
Do not use a camshaft timing belt that has 
been twisted or bent double as this will 
damage the reinforcing fibres. Do not use a 
camshaft timing belt if debris other than belt 
dust is found in timing belt covers. Do not 
use a camshaft timing belt if partial engine 
seizure has occurred. Do not use a 
camshaft timing belt if mileage exceeds 
72,000 km (45,000 miles). Do not use an oil 
or coolant contaminated timing belt, cause 
of contamination must be rectified.

41. Remove and discard LH and RH exhaust 

camshaft cap seals.

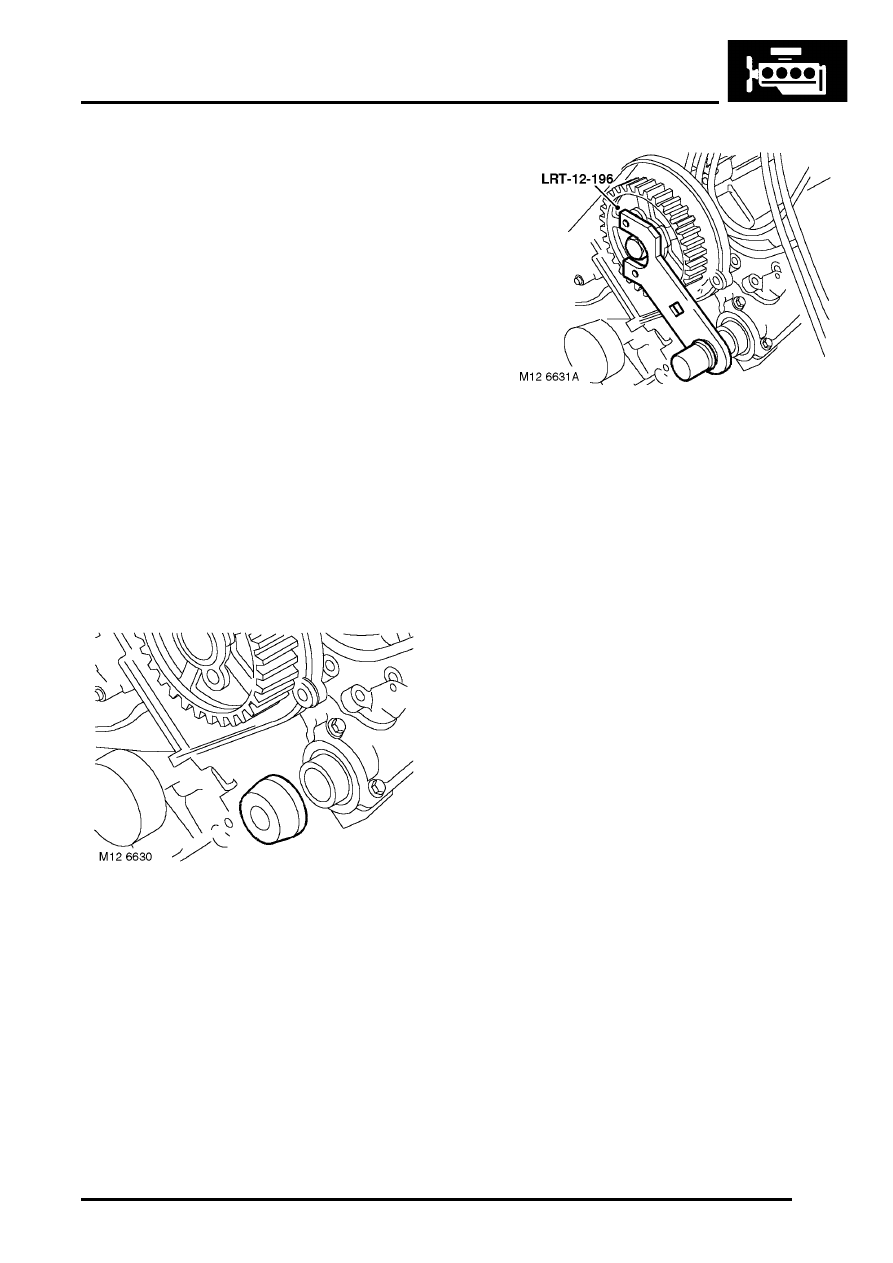
42. Position tools  LRT-12-196  to LH and RH front 

inlet camshaft gears and into the  end of each 
exhaust camshaft.

CAUTION: Special tools must be fitted when 
tightening or loosening gear retaining bolts, 
otherwise damage to camshafts may occur.

43. Remove and discard bolts retaining front inlet 

camshaft gears to camshafts.

44. Remove tools  LRT-12-196 from both inlet 

camshaft gears and exhaust camshafts.

45. Remove camshaft drive gears and hub 

assemblies.

Refit

NOTE: Following front or rear timing belt 
refitment, it is possible that, after rotating the 
engine and positioning the crankshaft pulley to 
the 'SAFE' position, the timing marks on the 
rear timing gears may be misaligned. This 
misalignment is acceptable provided that the 
timing belt refitting procedure was carried out 
correctly.

1. Clean camshaft gears and hubs, crankshaft 

gear, tensioner and water pump pulleys.

CAUTION: If the sintered gears have been 
subjected to prolonged oil contamination, 
they must be soaked in a solvent bath and 
then thoroughly washed in clean solvent 
before refitting. Because of the porous 
construction of sintered material, oil 
impregnated in the gears will emerge and 
contaminate the belt.

2. Fit hubs to camshaft gears and fit gears to 

camshafts. Fit new bolts and tighten sufficiently 
to allow gears to rotate without tipping.

ENGINE - K SERIES KV6

12-3-52 REPAIRS

3. Position timing belt to crankshaft gear.

NOTE: To prevent the timing belt from 
disengaging from the crankshaft gear when 
fitting, fit a suitable wedge between the belt and 
oil pump belt guard.

4. Fit tool LRT-12-197 into each exhaust 

camshaft in turn.

5. Using assistance, rotate each exhaust 

camshaft slightly and align timing marks on LH 
and RH rear camshaft gears.

6. Remove tool LRT-12-197 from exhaust 

camshaft.

7. Fit tools LRT-12-175 to LH and RH rear 

camshaft gears.

8. Rotate both front inlet camshaft gears fully 

clockwise as viewed from front of engine.

9. Using fingers only, fit timing belt to gears, 

starting at the crankshaft gear and working in 
an anti-clockwise direction, keeping the belt run 
as taut as possible and turning the camshaft 
gears only a minimum amount anti-clockwise to 
fit timing belt.

CAUTION: Gears must not be rotated anti-
clockwise more than one tooth.

10. Position an Allen key in tensioner backplate 

and hold tensioner pulley against timing belt.

11. With assistance, position  tensioner, fit new 

Patchlok bolts and tighten to 25 Nm (18 lbf.ft). 

CAUTION: Ensure tensioner plunger is 
contacting underside of tensioner 
backplate.

12. Remove tools LRT-12-175 from rear timing belt 

gears.

ENGINE - K SERIES KV6

REPAIRS 12-3-53

13. Fit tools  LRT-12-196  to both front inlet 

camshaft gears and into the end of  each 
exhaust camshaft.

CAUTION: Special tools must be fitted when 
tightening or loosening gear retaining bolts, 
otherwise damage to camshafts may occur.

14.  Tighten front inlet camshaft gear bolts to:

l

Stage 1 - 27 Nm (20 lbf.ft)

l

Stage 2 - Further 90

°

15. Remove tools  LRT-12-196 from both inlet 

camshaft gears and exhaust camshafts.

16. Remove wedge from between drive belt and oil 

pump belt guard.

17. Remove 1.5 mm diameter pin from tensioner.
18. Fit rubber blanking plug around tensioner.
19. Remove timing pin LRT-12-232.
20. Clean exhaust camshaft front cap seal 

locations and fit new cap seals.

CAUTION: The sealing edge of the cap seal 
and mating face must be clean and dry.

21. Position engine front mounting plate and 

manoeuvre plate into position. Fit bolts but do 
not tighten at this stage.

22. Fit bolts securing IRD support bracket to front 

mounting plate but do not tighten at this stage.

23. Tighten bolts in the sequence shown:

l

Bolt No. 1 - 25 Nm (18 lbf.ft)

l

Bolt No. 5 - 45 Nm (33 lbf.ft)

l

Bolts Nos. 2, 3, 4, 6 and 7 - 85 Nm (63 lbf.ft)

24. Position engine lifting bracket, fit bolts securing 

lifting bracket and front mounting plate to 
cylinder block and RH cylinder head. Tighten 
M10 bolts to 45 Nm (33 lbf.ft) and M8 bolt to 25 
Nm (18 lbf.ft).

25. Clean end of dipstick tube.
26. Position dipstick tube to sump and cylinder 

block, fit bolt and tighten to 9 Nm (7 lbf.ft).

27. Position A/C compressor to front mounting 

plate and cylinder block, align heat shield, fit 
and tighten bolts to 25 Nm (18 lbf.ft). 

28. Clean lower timing belt cover.
29. Position lower timing belt cover, fit and tighten 

bolts to 9 Nm (7 lbf.ft). 

30. Clean crankshaft pulley.
31. Fit crankshaft pulley to crankshaft gear and 

ensure that the indent on pulley locates over 
the lug on crankshaft gear.

32. Fit crankshaft pulley bolt and washer, position 

LRT-12-161 with LRT-12-199 into crankshaft 
pulley. Tighten pulley bolt to 160 Nm (118 
lbf.ft).

33. Remove tools LRT-12-161  and LRT-12-

199from crankshaft pulley. 

34. Clean ancillary drive belt tensioner.
35. Position ancillary belt tensioner, fit bolts and 

tighten to 25 Nm (18 lbf.ft).

36. Clean LH and RH front timing belt covers.
37. Position LH and RH front timing belt covers, fit 

and tighten bolts to 4 Nm (3 lbf.ft).

38. Clean idler pulley, position pulley to engine 

front mounting plate and tighten Allen bolt to 45 
Nm (33 lbf.ft).

39. Position alternator to front mounting plate.

ENGINE - K SERIES KV6

12-3-54 REPAIRS

40. Fit bolt and nut and bolt securing alternator to 

front mounting plate and tighten to 45 Nm (33 
lbf.ft).

41. Connect alternator multiplug.
42. Connect battery lead to alternator, fit and 

tighten nut to 8 Nm (6 lbf.ft), fit terminal cover.

43. Position PAS pump to front mounting plate, fit 

and tighten bolts to 25 Nm (18 lbf.ft).

44. Position PAS pipe to engine front mounting 

plate, fit and tighten bolt to 25 Nm (18 lbf.ft). 

45. Clean PAS pump pulley mating faces.
46. Position PAS pump pulley, fit and tighten Torx 

screws to 9 Nm (7 lbf.ft).

47. Position lower engine steady to sump 

mounting, fit and tighten bolt to 100 Nm (74 
lbf.ft).

48. Tighten bolt securing lower engine steady to 

subframe to 100 Nm (74 lbf.ft).

49. Clean LH rear timing belt cover.
50. Position LH rear timing belt cover, fit and 

tighten bolts to 4 Nm (3 lbf.ft).

51. Clean RH rear timing belt cover.
52. position RH rear timing belt cover, fit bolts and 

tighten to 4 Nm (3 lbf.ft).

53. Position heat shield, fit bolts and tighten M6 bolt 

to 9 Nm (7 lbf.ft) and M8 bolt to 25 Nm (18 lbf.ft).

54. Fit inlet manifold chamber.


 + 

 MANIFOLDS & EXHAUST SYSTEMS 

- K SERIES KV6, REPAIRS, Seals - inlet 
manifold chamber.

55. Fit RH road wheel and tighten nuts to 115 Nm 

(85 lbf.ft).

56. Fit ancillary drive belt.


 + 

 CHARGING AND STARTING, 

REPAIRS, Ancillary drive belt - KV6.

Camshaft timing belt cover - RH front

$% 12.65.39

Remove

1. Disconnect battery earth lead.
2. Remove ancillary drive belt.


 + 

 CHARGING AND STARTING, 

REPAIRS, Ancillary drive belt - KV6.

3. Remove 3 bolts securing camshaft timing belt 

RH front cover and remove cover.

Refit

1. Clean RH front timing belt cover.
2. Position RH front timing belt cover, fit and 

tighten bolts to 4 Nm (3 lbf.ft).

3. Fit ancillary drive belt.


 + 

 CHARGING AND STARTING, 

REPAIRS, Ancillary drive belt - KV6.

4. Connect battery earth lead.


Content   ..  88  89  90  91   ..