Freelander 1. Manual - part 43


  Index      Land Rover     Freelander 1 - service manual 2002 year


Search            


Content   ..  41  42  43  44   ..


Freelander 1. Manual - part 43


ENGINE - TD4

REPAIRS 12-1-15

Connecting rod bearings - engine set 

$% 12.17.16

Remove

1. Disconnect battery earth lead.
2. Remove oil pump.


 + 

 ENGINE - Td4, REPAIRS, Pump - oil.

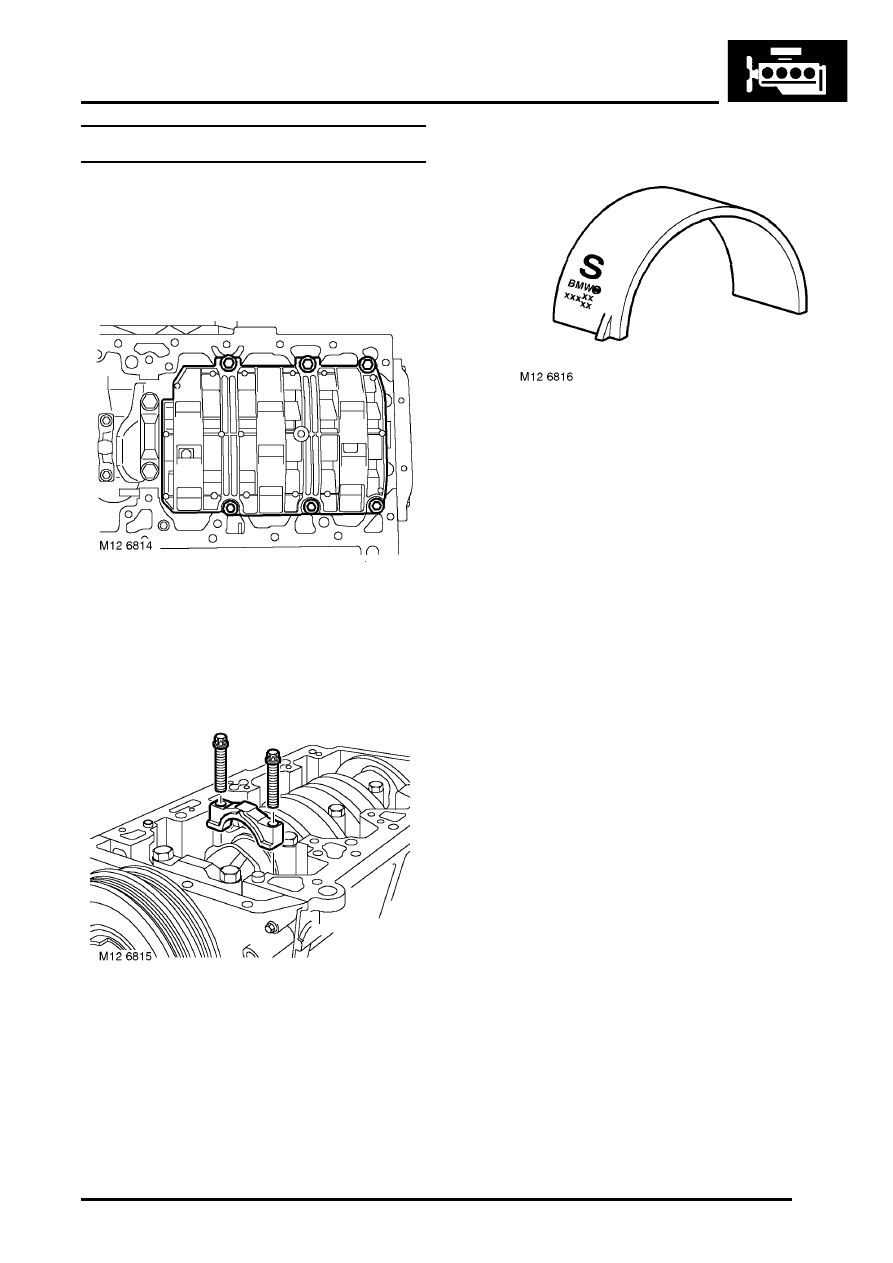
3. Remove 6 bolts securing reinforcing plate to 

cylinder block and remove plate.

4. Rotate crankshaft to gain access to connecting 

rod bearing bolts.

5. Mark connecting rod and bearing cap in relation 

to cylinder number.

6. Loosen and remove big-end bearing cap bolts, 

do not discard bolts at this stage.

CAUTION: The big-end bearing caps are 
dowel located, do not tap the bearing caps 
sideways.

7. Remove big-end bearing cap, remove and 

discard bearing shell.

8. Rotate crankshaft sufficiently to move 

connecting rod clear of crankshaft journal.

9. Remove and discard bearing shell from 

connecting rod noting the letter 'S' marked on 
the outside of the bearing shell.

CAUTION: The big-end bearing shell fitted 
in the connecting rod is of the 'sputter' type, 
and is identified by the letter 'S' or a series 
of xxx on the outside of the shell.

10. Repeat above procedure for remaining 

connecting rod bearings. Keep big-end bearing 
caps in fitted order.

Refit

1. Wipe big-end journals, new bearing shells, 

connecting rods and bearing caps.

2. Measure and record each crankshaft big-end 

journal diameter, taking 4 measurements at 90

°


intervals on each journal. 
 

 + 

 GENERAL DATA, Engine – Td4 

Diesel.

3. Clean connecting rod bolts and lubricate bolts 

with engine oil.

4. Position crankshaft with big-end journals 1 and 

4 at BDC.

ENGINE - TD4

12-1-16 REPAIRS

5. Fit the new BLUE colour coded big-end bearing 

shell, marked with the letter 'S', to numbers 1 
and 4 connecting rods.

6. Fit a new RED colour coded big-end bearing 

shell to numbers 1 and 4 big-end bearing caps.

7. Pull both connecting rods onto big-end 

journals.

8. Place a strip of Plastigauge across 1 and 4 big-

end journals.

9. Fit big-end bearing caps ensuring that the 

reference marks on connecting rod and bearing 
cap are aligned.

10. Fit original big-end bearing cap bolts and 

tighten to: Stage 1 - 5 Nm (3.5 lbf.ft). Stage 2 - 
25 Nm (18 lbf.ft). Stage 3 - Using an angle 
torque gauge, tighten a further 70

°

.

11. Remove bolts securing bearing caps to 

connecting rods and remove bearing caps.

12. Using the scale provided, measure width of 

Plastigauge on each journal and compare with 
bearing clearance. 
 

 + 

 GENERAL DATA, Engine – Td4 

Diesel.

13. If correct bearing clearance cannot be obtained 

with the available bearing shells, the crankshaft 
journals must be ground to the next undersize 
and appropriate oversize big-end bearing 
shells fitted.

14. Retain selected bearing shells with 1 and 4 

connecting rods and bearing caps.

15. Remove all traces of Plastigauge from big end 

journals using an oily cloth.

16. Repeat above procedure for number 2 and 3 

big-end bearings.

17. After completion of big-end bearing clearance 

checks, discard original bearing cap bolts.

18. Lubricate crankshaft journals and selected 

bearing shells with clean engine oil.

19. Fit selected big-end bearing shells to 

connecting rods and big-end bearing caps 
ensuring that the 'sputter' bearing, marked with 
the letter 'S', is fitted to the connecting rod.

20. Pull connecting rods down to crankshaft 

journals making sure that bearing shells are 
correctly located in connecting rods.

21. Fit big-end bearing caps ensuring that the 

reference marks on connecting rod and bearing 
cap are aligned.

22. Lubricate new big-end bearing cap bolts with 

clean engine oil.

23. Fit new big end bearing cap bolts and tighten to: 

Stage 1 - 5 Nm (3.5 lbf.ft). Stage 2 - 25 Nm (18 
lbf.ft). Stage 3 - Using an angle torque gauge, 
tighten a further 70

°

.

24. Clean reinforcing plate and mating face.
25. Position reinforcing plate, fit bolts and tighten 

evenly to 22 Nm (16 lbf.ft).

26. Fit oil pump.


 + 

 ENGINE - Td4, REPAIRS, Pump - oil.

27. Connect battery earth lead.

mm

.025

.038

.051

.076

M12 6817

ENGINE - TD4

REPAIRS 12-1-17

Pulley - crankshaft 

$% 12.21.01

Remove

1. Disconnect battery earth lead.
2. Remove ancillary drive belt.


 + 

 CHARGING AND STARTING, 

REPAIRS, Ancillary drive belt - Td4.

3. Models with A/C:Remove compressor drive 

belt.
 

 + 

 AIR CONDITIONING, REPAIRS, 

Drive belt - compressor - Td4.

4. Remove RH front road wheel.

WARNING: Do not work on or under a 
vehicle supported only by a jack. Always 
support the vehicle on safety stands.

5. Fit LRT-12-177 locking wrench with extension 

to crankshaft pulley.

6. Remove bolt securing pulley to crankshaft and 

collect washer.

7. Remove crankshaft pulley.

Refit

1. Clean crankshaft pulley and mating face.
2. Fit crankshaft pulley.
3. Fit washer and tighten new bolt securing 

crankshaft pulley initially to 100 Nm (74 lbf.ft), 
followed by 60

°

, then a further 60

°

 and finally by 

30

°

4. Models with A/C: Fit compressor drive belt.


 + 

 AIR CONDITIONING, REPAIRS, 

Drive belt - compressor - Td4.

5. Fit ancillary drive belt.


 + 

 CHARGING AND STARTING, 

REPAIRS, Ancillary drive belt - Td4.

6. Fit RH road wheel and tighten nuts to 115 Nm 

(85 lbf.ft).

7. Remove stand(s) and lower vehicle.
8. Connect battery earth lead.

ENGINE - TD4

12-1-18 REPAIRS

Crankshaft front oil seal 

$% 12.21.14

Remove

1. Disconnect battery earth lead.
2. Remove crankshaft pulley.


 + 

 ENGINE - Td4, REPAIRS, Pulley - 

crankshaft.

3. Fit thrust button LRT-12-165 to end of 

crankshaft.

4. Ensure bore of LRT-12-168 is free from burrs.

5. Fit LRT-12-168 to crankshaft front oil seal and 

tighten bolt to remove seal. 

6. Remove  thrust button LRT-12-165.

Refit

1. Clean oil seal recess in timing cover and 

running surface on crankshaft.

2. Fit oil seal guide LRT-12-166 to crankshaft.
3. Use LRT-12-167 with crankshaft pulley bolt to 

fit seal.

4. Remove bolt, LRT-12-167 and LRT-12-166.
5. Fit crankshaft pulley.


 + 

 ENGINE - Td4, REPAIRS, Pulley - 

crankshaft.

6. Connect battery earth lead.


Content   ..  41  42  43  44   ..