Discovery 2. Manual - part 426


  Index      Land Rover     Land Rover Discovery 2 - service manual 1999 year


Search            


Content   ..  424  425  426  427   ..


Discovery 2. Manual - part 426


ENGINE - TD5

OVERHAUL 12-1-101

11. Repeat above procedures for other pistons in 

turn ensuring that  pistons and connecting rods 
are fitted in cylinder bores from which  they 
were removed.

12. Fit connecting rod bearings. 


 + 

 ENGINE - Td5, OVERHAUL, 

Bearings - connecting rods.

CAUTION: If new pistons, connecting rods 
or crankshaft have been fitted, it will be 
necessary to select correct thickness of 
cylinder head gasket using the following 
procedures:

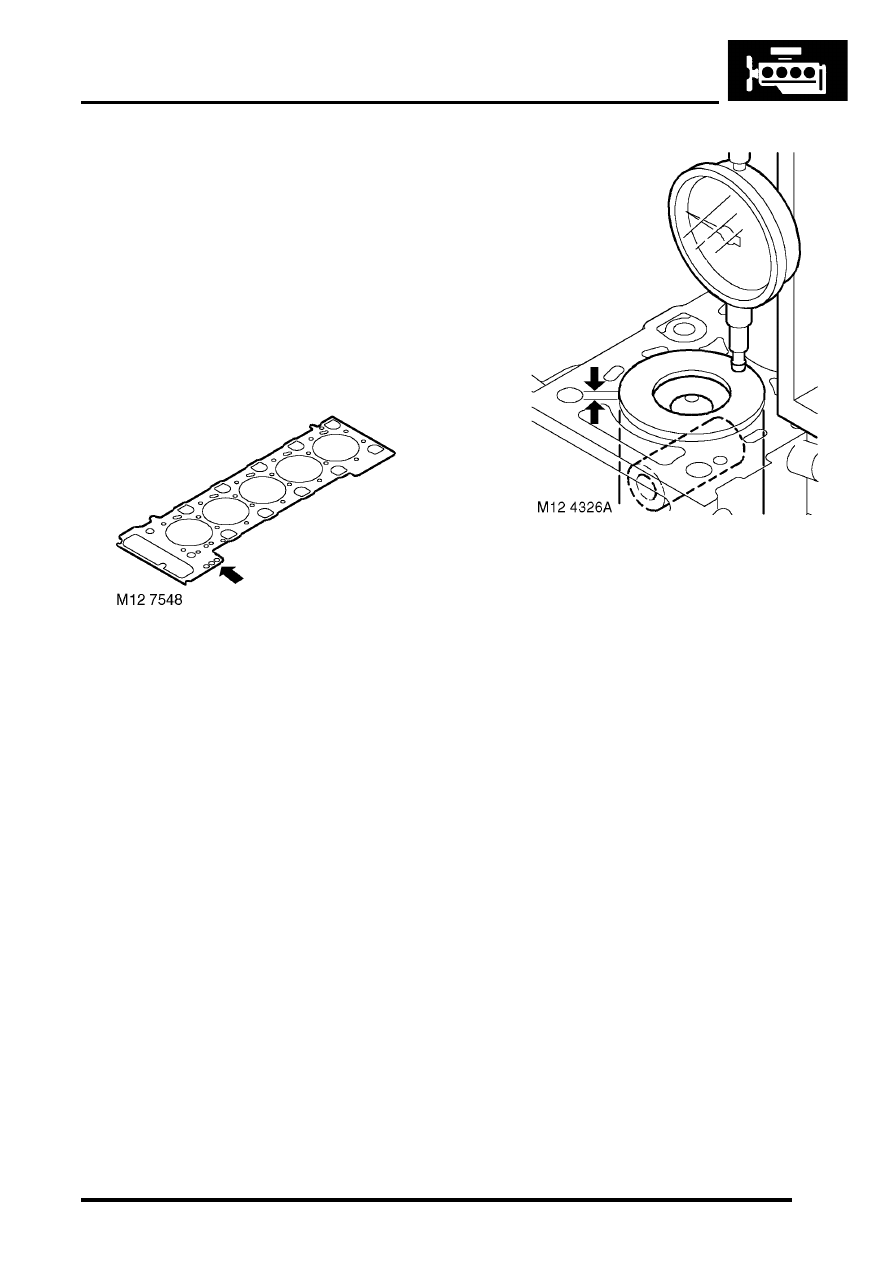
13. There are three thicknesses of cylinder 

head gasket  available and in order that the 
correct gasket is fitted, it is  necessary to 
determine the stand proud (protrusion) of 
each piston  above the top face of the 
cylinder block. Gaskets have either 1, 2 or 3  
identification holes and the following 
procedures must be followed  in order that 
the correct gasket is selected. 

14. Temporarily fit and lightly tighten new 

crankshaft pulley bolt. 

15. Assemble a magnetic base DTI to cylinder 

block top face adjacent  to No.1 cylinder bore.

16. Position stylus to cylinder block top face and 

zero gauge.

17. Using crankshaft pulley bolt, rotate crankshaft 

in a clockwise  direction until No. 1 piston is at 
TDC - Woodruff key slot in  crankshaft is at 12 
o'clock.

18. Position stylus of DTI at rear edge of piston and 

directly over  gudgeon pin axis. 

19. Measure and record No.1 piston protrusion. 
20. Repeat measurement at front edge of piston.
21. Establish average of 2 readings taken.
22. Repeat above procedures for remaining  

pistons. 

23. From readings obtained, determine  HIGHEST   

piston protrusion figure and select the 
appropriate cylinder head gasket:

l

Piston protrusion = 0.351 to 0.50 mm (0.014 
to 0.02 in) select the 2 hole gasket

l

Piston protrusion = 0.501 to 0.57 mm (0.021 
to 0.022 in) select the 1 hole gasket

l

Piston protrusion = 0.571 to 0.65 mm (0.022 
to 0.025 in) select the 3 hole gasket

24. Remove the DTI.
25. Remove and retain crankshaft pulley bolt.
26. Fit cylinder head gasket. 


 ENGINE - Td5, OVERHAUL, Gasket 

- cylinder head.

ENGINE - TD5

12-1-102 OVERHAUL

Crankshaft  

$% 12.21.33.01 

Disassembly

1. Remove timing chain and sprockets.  


 + 

 ENGINE - Td5, OVERHAUL, Timing 

chain and sprockets.

2. Remove crankshaft rear oil seal. 


 + 

 ENGINE - Td5, OVERHAUL, Seal - 

crankshaft - rear - manual models.

3. Remove connecting rod bearings


 + 

 ENGINE - Td5, OVERHAUL, 

Bearings - connecting rods.

4. Check that cylinder reference number is on 

each main bearing  cap and make alignment 
marks between each main bearing cap and  
cylinder block.

5. Starting at No.3 main bearing cap and working 

outwards,  progressively loosen, then remove 2 
bolts securing each cap.  Discard main bearing 
cap bolts. 

6. Fit 2 slave bolts into main bearing cap in turn 

and ease bearing  caps from cylinder block.  

7. Remove and discard plain bearing shells from 

each main bearing cap. 

8. Using assistance, remove crankshaft. 
9. Remove and discard grooved main bearing 

shells and 2 thrust washers  from cylinder 
block. 

10. Remove Torx screw securing each oil squirt jet 

to cylinder block,  remove squirt jets.

11. Clean main bearing shell and thrust washer 

locations in cylinder  block, ensure bolt holes 
are clean and dry.

12. Clean main bearing caps.
13. Clean crankshaft bearing journals, check 

oilways are clear.

14. Ensure drillings in oil squirt jets are clear.

ENGINE - TD5

OVERHAUL 12-1-103

15. Check core plugs in cylinder block for corrosion 

or signs of  leakage, seal replacement plugs 
with Loctite 243.

Crankshaft - Inspection

1. Check crankshaft main and big-end bearings 

for scoring, wear and  ovality, make 3 checks at 
120

°

 intervals in centre of journals. 

l

Main bearings = 62.0 mm 

±

 0.013 mm 

(2.441 in 

±

  0.001 in).

l

Big-end bearings = 54.000 mm 

±

 0.01 mm 

(2.125 in  

±

 0.0004 in).

2. Crankshafts may not be reground, only one 

size of main  and big-end bearing shell is 
available and if journals are found to be  
scored, oval or worn, crankshaft must be 
replaced. Main and big-end  bearing shells 
and thrust washers must be replaced 
whenever they are  removed.

3. Check crankshaft spigot bush for wear, replace 

if necessary using  the following procedures:

4. Secure crankshaft in a suitably padded vice.
5. Tap a thread in spigot bush to accommodate a 

suitable impulse  extractor.

6. Fit impulse extractor to spigot bush.
7. Remove spigot bush.
8. Clean spigot bush recess in crankshaft.
9. Fit new spigot bush to crankshaft using a 

suitable mandrel. 

Reassembly

1. Fit oil squirt jets, fit  Torx screws and tighten to  

8 Nm (6 lbf.ft).

2. Lubricate new, grooved, main bearing shells 

with engine oil and  fit to cylinder block.

3. Lubricate new thrust washers with engine oil 

and fit, grooved  side facing outward, to recess 
in each side of No.3 main bearing in  cylinder 
block. 

4. Lubricate crankshaft journals with engine oil 

and using assistance, position crankshaft in 
cylinder block.

5. Lubricate new, plain, main bearing shells with 

engine oil and fit  to main bearing caps.

6. Fit main bearing caps in their original fitted 

positions ensuring  reference marks are 
aligned.

7. Fit and lightly tighten new main bearing cap 

bolts. Do not lubricate bolt threads.

8. Starting with No.3 main bearing cap and 

working outwards, tighten  main bearing cap 
bolts to:

l

Stage 1 -  33 Nm (24 lbf.ft)

l

Stage 2 -  Further 90

°

CAUTION: Do not carry out stages 1 and 

2 in one  operation.

9. Check that crankshaft rotates smoothly.

10.  Attach a magnetic base DTI to front of cylinder 

block with  stylus of gauge on end of crankshaft.

ENGINE - TD5

12-1-104 OVERHAUL

11. Using suitably padded levers, move crankshaft 

rearwards  and zero DTI. 

12. Move crankshaft forwards and note end-float 

reading on gauge:

l

Crankshaft end-float = 0.02 to 0.025 mm 
(0.001 to 0.11 in)

CAUTION: Oversize thrust washers are 

not available, if end-float  exceeds figure 
given, crankshaft must be replaced.

13. Remove DTI.
14. Fit connecting rod bearings. 


 + 

 ENGINE - Td5, OVERHAUL, 

Bearings - connecting rods.

15. Fit timing chain and sprockets.   


 + 

 ENGINE - Td5, OVERHAUL, Timing 

chain and sprockets.

16. Fit crankshaft rear oil seal. 


 + 

 ENGINE - Td5, OVERHAUL, Seal - 

crankshaft - rear - manual models.


Content   ..  424  425  426  427   ..