Discovery 2. Manual - part 410


  Index      Land Rover     Land Rover Discovery 2 - service manual 1999 year


Search            


Content   ..  408  409  410  411   ..


Discovery 2. Manual - part 410


ENGINE - TD5

REPAIRS 12-1-37

REPAIRS

Pulley - crankshaft  

$% 12.21.01 

Remove

1. Remove fixings and underbelly panel.
2. Remove radiator.  


 + 

 COOLING SYSTEM - Td5, REPAIRS, 

Radiator.

3. Using a 15 mm ring spanner, release the 

auxiliary drive belt tensioner. 

4. Remove auxiliary drive belt. 
5. Remove 3 bolts and remove crankshaft  TV 

damper.

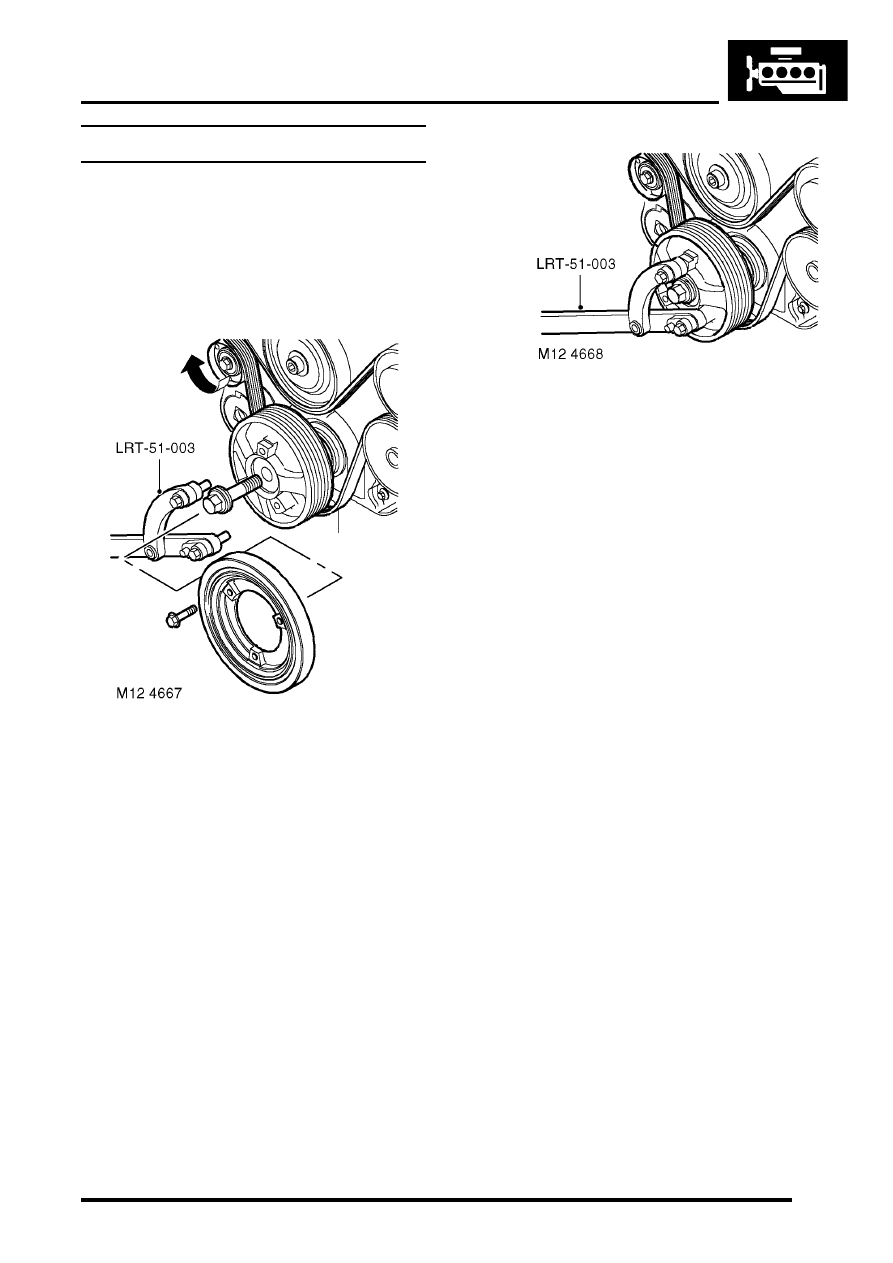
6. Position tool LRT-51-003 to  crankshaft pulley 

and secure with 2 bolts. 

7. Remove and discard crankshaft pulley  bolt. 

Remove crankshaft pulley. 

8. Remove 2 bolts and remove tool LRT-51-003  

Refit

1. Position new crankshaft pulley to vice.  
2. Remove 3 bolts and remove TV damper from  

new crankshaft pulley. 

3. Using a lint free cloth, thoroughly  clean oil seal 

recess and the running   surface on crankshaft 
pulley. 

4. Fit crankshaft pulley. 

5. Fit tool LRT-51-003 to crankshaft  pulley and 

secure with 2 bolts. 

6. Fit new  crankshaft pulley bolt  and tighten to 

460 Nm (340 lbf.ft), using a torque multiplier.

7. Remove 2 bolts and remove tool LRT-51-003   

from crankshaft pulley.

8. Fit TV damper to crankshaft pulley and tighten 

– TV damper bolts to  80 Nm (59 lbf.ft) . 

9. Fit auxiliary drive belt to pulleys. 

10. Fit radiator.


 + 

 COOLING SYSTEM - Td5, REPAIRS, 

Radiator.

11. Fit underbelly panel and secure with fixings. 

ENGINE - TD5

12-1-38 REPAIRS

Seal - crankshaft - rear  

$% 12.21.20 

Remove

1. Automatic models: Remove drive plate


 + 

 ENGINE - Td5, REPAIRS, Plate - 

drive - automatic.

2. Manual models: Remove flywheel.


 + 

 ENGINE - Td5, REPAIRS, Flywheel.

3. Remove sump gasket.  


 + 

 ENGINE - Td5, REPAIRS, Gasket - 

sump.

4. Remove 5 bolts securing crankshaft oil seal 

housing  to cylinder block. 

5. Remove crankshaft oil seal housing.

Refit

1. Clean interface between crankshaft oil seal 

housing and cylinder block.

2. Position seal protector, LRT-12-061 over 

crankshaft boss. Fit new seal and  remove tool  
LRT-12-061 
 .

CAUTION: Oil seal must be fitted dry.

3. Fit   crankshaft rear oil seal housing bolts  and 

using sequence shown, tighten to  9 Nm (7 
lbf.ft).

4. Fit new sump gasket.  


 + 

 ENGINE - Td5, REPAIRS, Gasket - 

sump.

5. Automatic models: Fit drive plate


 + 

 ENGINE - Td5, REPAIRS, Plate - 

drive - automatic.

6. Manual models:  Fit flywheel.


 + 

 ENGINE - Td5, REPAIRS, Flywheel.

ENGINE - TD5

REPAIRS 12-1-39

Gasket - cylinder head  

$% 12.29.02 

Remove

Note: The following procedures cover engines 
fitted with or without an EGR cooler. The EGR 
cooler is bolted to the front of the cylinder head.

1. Remove bonnet. 


 + 

 EXTERIOR FITTINGS, REPAIRS, 

Bonnet.

2. Release turnbuckles and remove battery cover. 
3. Disconnect battery earth lead.
4. Drain cooling system.  


 + 

 COOLING SYSTEM - Td5, 

ADJUSTMENTS, Drain and refill.

5. Remove camshaft cover gasket.  


 + 

 ENGINE - Td5, REPAIRS, Gasket - 

cover - camshaft.

6. Remove cooling fan coupling.  


 + 

 COOLING SYSTEM - Td5, REPAIRS, 

Fan - viscous.

7. Remove 3 bolts and remove exhaust  manifold 

heat shield. 

8. Remove turbocharger oil feed banjo bolt  and 

discard sealing washers. 

9. Remove 3 nuts, release turbocharger  from 

exhaust manifold, discard gasket and  tie 
turbocharger aside. 

10. Disconnect multiplugs from compressor,  MAF 

sensor, turbocharger wastegate modulator,  
and AAP & IAT sensor. 

11. Remove 2 bolts securing engine harness  to 

camshaft carrier. 

12. Disconnect multiplug from EUI's and coolant 

temperature sensor.

ENGINE - TD5

12-1-40 REPAIRS

13. Disconnect 4 glow plug connectors. 
14. Disconnect MAP sensor multiplug from  inlet 

manifold. 

15. Position engine harness clear of inlet  manifold. 
16. Disconnect vacuum hose from EGR valve. 

17. Release 3 clips and disconnect coolant  hoses 

from fuel cooler. 

18. Disconnect fuel hoses, tank to fuel cooler and 

connector block on cylinder head. 

CAUTION: Always fit plugs to open 
connections to prevent contamination.

19. Disconnect fuel hose from connector  block on 

cylinder head. 

20. Disconnect fuel hose from fuel cooler and 

secure to connector block on cylinder head. 
This is to prevent contamination of the fuel 
injection system.

Pre EU3 model shown

21. Loosen clip screw and disconnect air  intake 

hose from EGR valve. 

22. Loosen vacuum pump oil feed pipe union from 

cylinder head and discard 'O' ring.

23. Loosen 2 bolts and release alternator  support 

bracket from cylinder head. 

24. Pre EU3 model: Remove bolt securing EGR 

valve pipe clamp to cylinder head.

25. EU3 model: Release the clips and disconnect 

the coolant hoses from the EGR cooler.

26. Remove nut and bolt securing cylinder head to 

timing chain cover. 

27. Release clips and disconnect top hose,  heater 

hose and heater feed hose. 

28. Raise front of vehicle. 

WARNING: Do not work on or under a 
vehicle supported only by a jack. Always 
support the vehicle on safety stands.


Content   ..  408  409  410  411   ..