Discovery 2. Manual - part 224


  Index      Land Rover     Land Rover Discovery 2 - service manual 1999 year


Search            


Content   ..  222  223  224  225   ..


Discovery 2. Manual - part 224


RESTRAINT SYSTEMS

REPAIRS

75-21

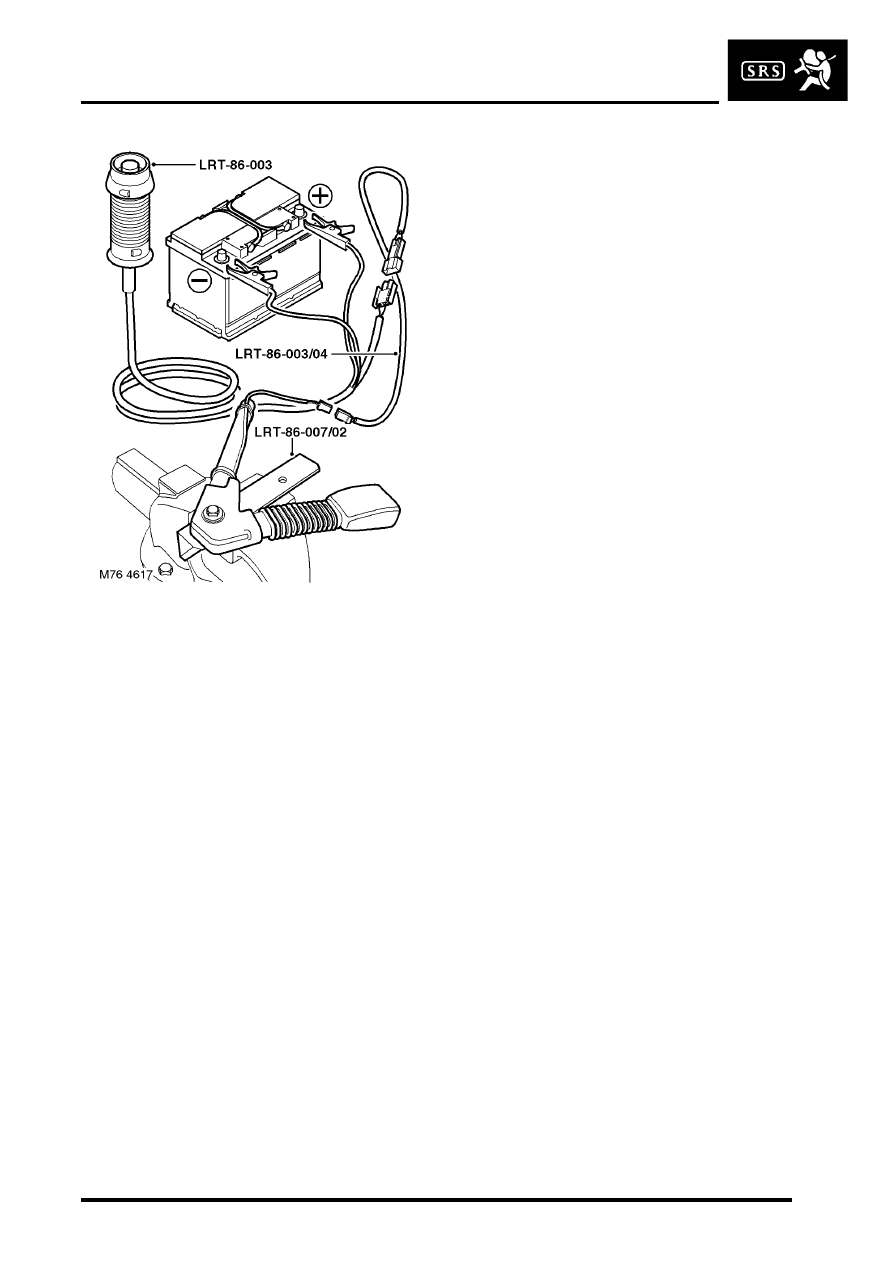
4. Connect deployment tool fly lead LRT-86-003/

04 to seat belt pre-tensioner.

5. Connect deployment tool LRT-86-003 to 

deployment tool fly lead LRT-86-003/04.

6. Connect deployment tool LRT-86-003 to 

battery.

7. Press deployment tool operating button to 

deploy seat belt pre-tensioner.

WARNING: Ensure all personnel are at least 
15 metres (50 feet) away from the air bag 
module.

8.
9. 
Disconnect deployment tool from battery.

WARNING: During deployment parts of the 
air bag module become hot enough to burn 
you. Wait 30 minutes after deployment 
before touching the air bag module.

10. Disconnect deployment tool fly lead from seat 

belt pre-tensioner.

11. Remove seat belt pre-tensioner from holding 

tool and place in a sealed bag, ready for 
disposal.

NOTE: Do not transport deployed SRS 
components in the vehicle passenger 
compartment.

12. Wipe down holding tools with a damp cloth and 

remove from vice.

13. Transport deployed seat belt pre-tensioner to 

designated area for incineration.

14. Do not re-use or salvage any parts of the 

SRS system.

RESTRAINT SYSTEMS

75-22

REPAIRS

Airbag module - drivers 

$% 76.74.01  

WARNING: It is imperative that before any work 
is undertaken on the SRS system the appropriate 
information is read thoroughly.

WARNING: Always disconnect both battery leads 
before beginning work on the SRS system. 
Disconnect the negative battery lead first. Never 
reverse connect the battery.

Remove

1. Remove the key from the starter switch. 

Disconnect both battery leads, negative lead 
first. Wait ten minutes before starting work. 

2. Remove 2 Torx bolts securing air bag module 

to steering wheel. 

3. Release air bag module from steering wheel. 

CAUTION: Do not allow the air bag module 
to hang by the air bag harness.

4. Disconnect multiplug from air bag module. 

5. Remove air bag module. 

WARNING: Store the airbag module with the 
deployment side uppermost. If it is stored 
deployment side down, accidental 
deployment will propel the airbag module 
with enough force to cause serious injury.

WARNING: Store the airbag module or seat 
belt pre-tensioner in a designated storage 
area. If there is no designated storage area 
available, store in the locked luggage 
compartment/loadspace of the vehicle and 
inform the workshop supervisor.

Refit

NOTE: If the airbag module is to be replaced, 
the bar code of the new module must be 
recorded.

1. Position air bag module and connect multiplug. 
2. Fit air bag module to steering wheel and tighten 

Torx bolts to 9 Nm (7 lbf.ft). 

3. Connect battery leads, earth lead last. 

RESTRAINT SYSTEMS

REPAIRS

75-23

Airbag module -  passenger 

$% 76.74.02 

WARNING: It is imperative that before any work 
is undertaken on the SRS system the appropriate 
information is read thoroughly.

WARNING: Always disconnect both battery leads 
before beginning work on the SRS system. 
Disconnect the negative battery lead first. Never 
reverse connect the battery.

Remove

1. Remove the key from the starter switch. 

Disconnect both battery leads, negative lead 
first. Wait ten minutes before starting work.

2. Release guides supporting glove box.
3. Lower glove box to gain access to air bag 

module.

4. Disconnect multiplug from air bag module.
5. Remove 4 Torx bolts securing air bag module 

to fascia.

6. Remove air bag module from fascia panel.

WARNING: Store the air bag module with 
the deployment side uppermost. If it is 
stored deployment side down, accidental 
deployment will propel the air bag module 
with enough force to cause serious injury.

WARNING: Store the air bag module or seat 
belt pre-tensioner in a designated storage 
area. If there is no designated storage area 
available, store in the luggage compartment 
of the vehicle and inform the workshop 
supervisor.

Refit

NOTE: If the air bag module is to be replaced, 
the bar code of the new module must be 
recorded.

1. Fit air bag module to fascia and tighten Torx 

bolts to 8 Nm (6 lbf.ft).

2. Connect multiplug to air bag module.
3. Position glove box and engage supporting 

guides. Close glove box.

4. Connect battery leads, earth lead last.

RESTRAINT SYSTEMS

75-24

REPAIRS

DCU

$% 76.74.06  

WARNING: It is imperative that before any work 
is undertaken on the SRS system the appropriate 
information is read thoroughly.

WARNING: Always disconnect both battery leads 
before beginning work on the SRS system. 
Disconnect the negative battery lead first. Never 
reverse connect the battery.

Remove

1. Remove the key from the starter switch. 

Disconnect both battery leads, negative lead 
first. Wait ten minutes before starting work.

2. Remove centre console. 

l

On manual gearbox models: 
 

 + 

 INTERIOR TRIM COMPONENTS, 

REPAIRS, Console - centre - manual 
models.

l

On automatic gearbox models: 
 

 + 

 INTERIOR TRIM COMPONENTS, 

REPAIRS, Console - centre - automatic 
models.

3. Disconnect multiplug from DCU. 
4. Remove 3 Torx bolts securing DCU to body and 

remove DCU. 

CAUTION: The SRS diagnostic control unit 
is a non-serviceable component and no 
attempt should be made to repair or modify 
the unit.

Refit

CAUTION: The SRS diagnostic control unit 
is a shock sensitive device and must be 
handled with extreme care.

1. Position DCU to body and connect multiplug.
2. Fit and tighten DCU Torx bolts to 10 Nm (7 

lbf.ft). 

3. Fit centre console. 

l

On manual gearbox models: 
 

 + 

 INTERIOR TRIM COMPONENTS, 

REPAIRS, Console - centre - manual 
models.

l

On automatic gearbox models
 

 + 

 INTERIOR TRIM COMPONENTS, 

REPAIRS, Console - centre - automatic 
models.

4. Connect battery leads, earth lead last. 


Content   ..  222  223  224  225   ..