Land Rover Discovery. Manual - part 184


  Index      Land Rover     Land Rover Discovery - service 1995-1996 year


Search            


Content   ..  182  183  184  185   ..


Land Rover Discovery. Manual - part 184


76

CHASSIS AND BODY

68

REPAIR

Dismantle

4. Remove interior lamp lens.
5. Remove 2 nuts securing lamp to stowage panel.
6. Remove lamp.
7. Remove alarm volumetric sensor/blanking plate.
8. Remove electric sun roof switch pack.
9. Remove electric sun roof manual opening plug.

Rebuild

10. Fit electric sun roof manual opening plug to

panel.

11. Fit alarm volumetric sensor.
12. Fit electric sun roof switch pack to panel.
13. Fit interior lamp to panel and secure with nuts.
14. Fit interior lamp lens.

Refit

15. Position stowage panel assembly and connect

Lucar and multiplugs.

16. Align panel to headlining and secure with

screws.

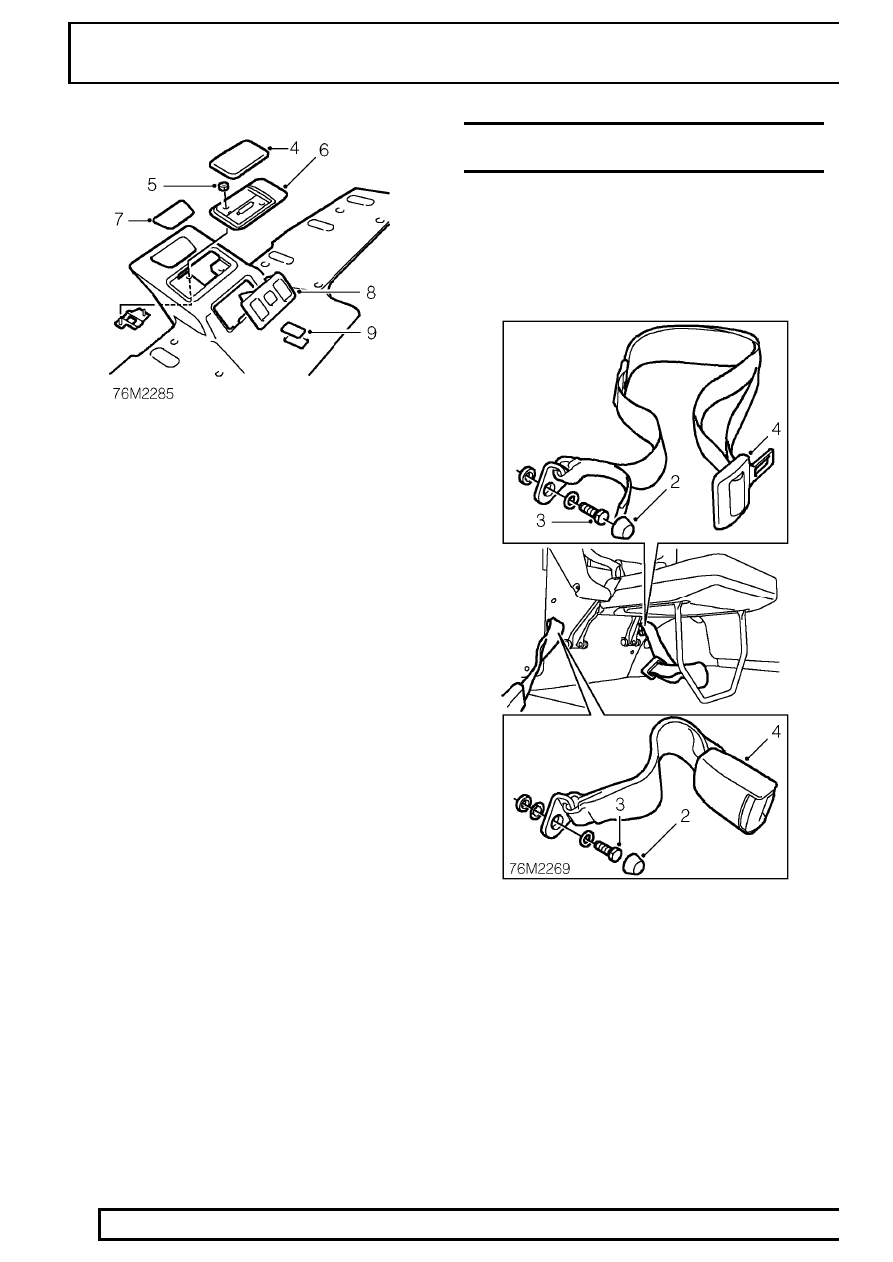
REAR FOLD DOWN SEAT BELTS - LH WITH REAR
AIR CONDITIONING FITTED

Service repair no - 76.73.28/20

Remove

1. Locate the seat in the down position, remove the

seat belt strap and buckle from their stowed
positions.

2. Remove seat belt strap and buckle retaining bolt

covers.

3. Remove bolts securing strap and buckle.
4. Remove seat belts and collect spacers.

Refit

5. Fit spacers to seat belt retaining bolts, position to

fixings and tighten to

32 Nm (24 lbf ft) .

6. Fit seat belt retaining bolt covers.
7. Secure seat belt strap and buckle to their stowed

positions and position seat in the up position.

CHASSIS AND BODY

69

REPAIR

FRONT SEAT BELTS - 5 DOOR (96 MODELS)

Service repair no - 76.73.10

Remove

1. Move the seat to gain access to the seat belt

mountings.

2. Remove the cover and securing bolt to release

the upper mounting and spacer from the ’B’ post
adjustable mounting.

3. Electric seats only: Release fixings securing

the seat side valance.

4. Remove the side valance.

5. Remove the Torx bolt securing the lower

mounting to the seat.

6. Detach the door seals from the ’B’ post

sufficiently to allow removal of the lower trim
panel from the post.

7. Release the seat belt from the split section at the

top of the trim panel and withdraw the panel.

76

CHASSIS AND BODY

70

REPAIR

8. Remove the securing bolt and detach the inertia

reel from the bottom of the ’B’ post.

9. Release the seat belt sensor connector (if fitted).

10. Release Torx bolt to allow removal of the seat

belt stalk assembly.

Refit

11. Reverse removal procedure.

NOTE: Ensure the seat belt is not twisted.

12. Re-connect the seat belt sensor connector (if

fitted).

13. Finally, tighten the seat belt fixings to

32 Nm (24

lbf ft) .

HEATING AND VENTILATION

1

DESCRIPTION AND OPERATION

HEATING AND VENTILATION UNIT

The heating and ventilation and blower units are
standard on all models. Air conditioning system is an
optional module, which when fitted provides fully
integrated climate control for the vehicle interior.

The heating and ventilation unit controls the air
distribution and heating to the vehicle interior. The
blower unit controls the volume of air supplied, while
the air conditioning module (when fitted) provides
refrigerated and dehumidified air.

1. Fresh air inlet
2. Recirculation air inlet
3. Air outlets screen de-mist
4. Air outlet face level vents
5. Air outlets front footwells
6. Air outlets to rear footwells

7. Fresh/recirculation air flap servo
8. Blower motor relay
9. Multiplug connector to main harness

10. Multiplug connector, blower to heater unit
11. Resistor unit - blower speed.


Content   ..  182  183  184  185   ..