Land Rover Discovery. Manual - part 171


  Index      Land Rover     Land Rover Discovery - service 1995-1996 year


Search            


Content   ..  169  170  171  172   ..


Land Rover Discovery. Manual - part 171


76

CHASSIS AND BODY

16

REPAIR

ALPINE LIGHT TRIM CASING

Service repair no - 76.13.20
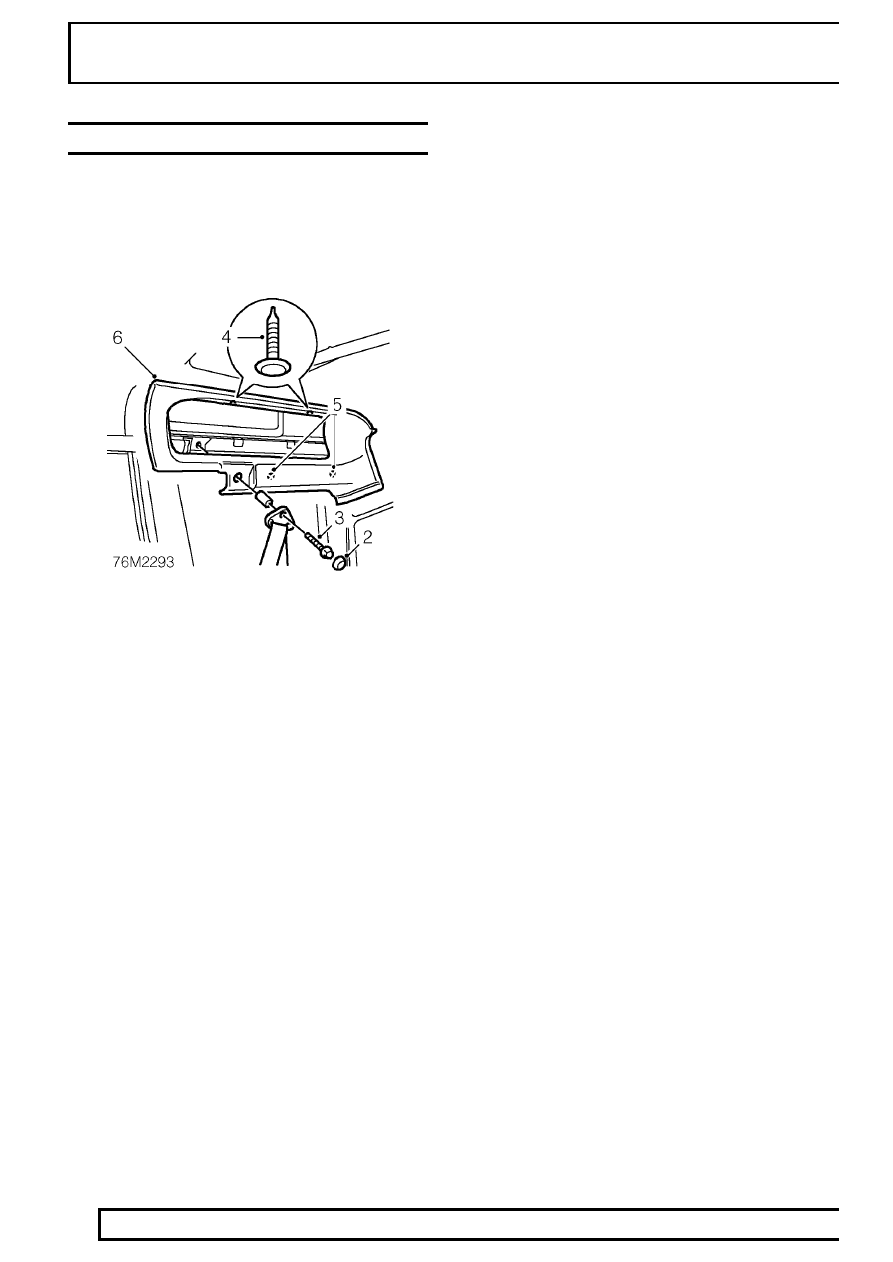
Remove

1. Remove RH ’E’ post trim casing.

See ’E’ post

trim casing - rh.

2. Remove rear seat belt anchorage retaining bolt

cover.

3. Remove bolt securing rear seat belt anchorage.
4. Remove 2 trim studs securing trim casing.
5. Release trim casing from 2 retaining studs.
6. Remove trim casing.

Refit

7. Fit and align trim casing and secure with studs.
8. Fit 2 trim studs securing trim casing.
9. Position seat belt anchorage, fit bolt and tighten

to

32 Nm (24 lbf ft) .

10. Fit cover to seat belt anchorage bolt.
11. Fit ’E’ post trim casing.

See ’E’ post trim

casing - rh.

CHASSIS AND BODY

17

REPAIR

FRONT BODYSIDE TRIM CASING

Service repair no - 76.13.01

Remove

1. Remove the grab handle.
2. Remove the rear compartment lower trim panel.

See rear compartment lower trim panels.

3. Remove the alpine light trim casing.

See alpine

light trim casing.

4. Remove the bolts securing the upper and lower

seat belt mountings.

5. Remove the finisher from its location over the

seat belt inertia reel.

6. Remove the front seat belt guide from the upper

aperture in the casing.

7. Open the side window, remove the catch

securing screws and withdraw the catch trim.

8. Remove the side window hinge finishers.
9. Release the casing from the window rubber.

10. Release the rear seat belt from the guide

attached to the casing.

11. Fold down the rear seats and carefully ease the

casing from the fastenings.

12. Pass the front seat belt through the upper

aperture and withdraw the casing from the
vehicle.

Refit

13. Reverse removal procedure.

NOTE: Ensure that the trim material glued
to the door post is not wrinkled when the
door seal is fitted.

14. Tighten upper and lower seat belt fixings to

32

Nm (24 lbf ft) .

76

CHASSIS AND BODY

18

REPAIR

HEADLINING

Service repair no - 76.64.01/14

Remove

1. Disconnect battery negative lead.
2. Remove the lower trim panels from the rear

compartment.

See rear compartment lower

trim panels.

3. Remove the alpine light trim casing.

See alpine

light trim casing.

4. Remove the front bodyside trim casing.

See

front bodyside trim casing.

5. Remove the roof lights from the headlining

pocket and from the headlining.

6. Remove the front grab handles.
7. Remove the sun visors and their retaining clips.
8. Remove the front headlining pocket.

9. Remove the finishers from the sun roof

apertures.

10. Release the headlining from the channel above

the rear door and manoeuvre it from the vehicle
through the rear door.

11. If the existing headlining is being replaced, if

fitted, remove the passenger net pockets and fit
them to the new headlining.

Refit

12. Reverse removal procedure.

CHASSIS AND BODY

19

REPAIR

’D’ POST TRIM CASING

Service repair no - 76.13.73

Remove

1. Remove the rear compartment lower trim panel.

See rear compartment lower trim panels.

2. Remove the alpine light trim casing.

See alpine

light trim casing.

3. Release the rear seat belt from the guide

attached to the casing.

4. Fold down the rear seats.
5. Release the D’ post casing from the rear side

window seal and carefully ease the casing from
the fasteners.

Refit

6. Reverse removal procedure.

BODY SIDE OPENING WINDOWS

Service repair no - 76.81.18

Remove

1. Remove the screws securing the catch to the

body and detach the catch trim.

2. Remove the hinge finishers from the hinges.
3. Remove the screws securing the glass to the

hinges, withdraw the glass and fixings taking
care not to lose the joint washers.

Refit

4. Reverse removal procedure.


Content   ..  169  170  171  172   ..