Land Rover Discovery. Manual - part 19


  Index      Land Rover     Land Rover Discovery - service 1995-1996 year


Search            


Content   ..  17  18  19  20   ..


Land Rover Discovery. Manual - part 19


MAINTENANCE

13

MAINTENANCE

RENEW AUTOMATIC GEARBOX FLUID AND OIL
SCREEN

1. Site vehicle on lift or level ground. Place

container to drain gearbox fluid into. Disconnect
battery negative lead.

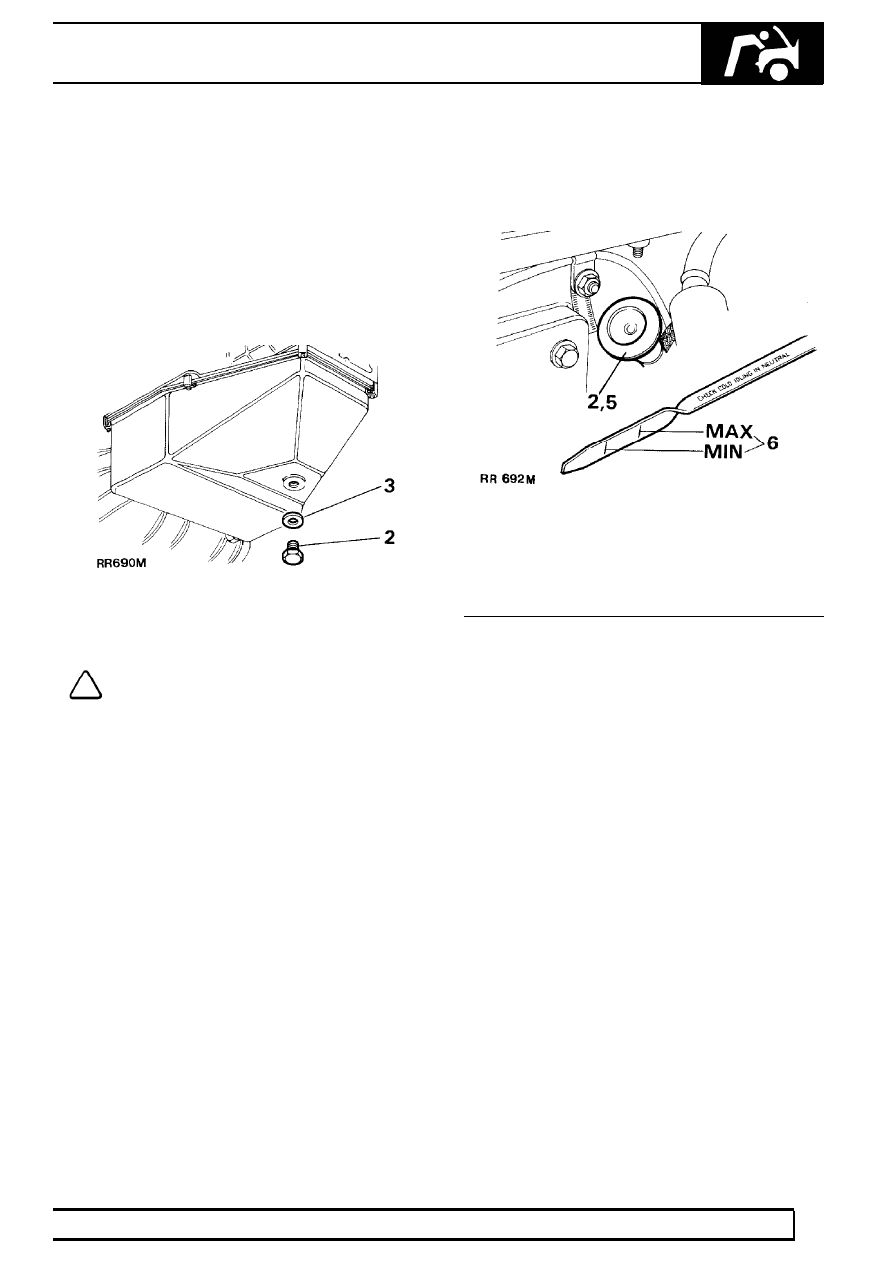
2. Remove gearbox dipstick, located at rear of right

hand rocker cover, to aid oil drainage. Release
plug from bottom of sump and allow fluid to drain
completely.

3. Refit plug using a new sealing washer. Tighten

to

10 Nm

Refill ZF Automatic Gearbox and Check Fluid
Level.

NOTE: The fluid level must checked when
fluid is cold and engine idling in park.

4. Ensure vehicle is on level ground.
5. Refill or top-up with correct quantity and grade of

fluid.

See LUBRICANTS, FLUIDS AND

CAPACITIES, Information, Recommended
Lubricants and Fluids

6. Start and run engine. Apply footbrake, select

position 1 then back to park. Check fluid level,
this must be between the two marks on the
dipstick.

Oil screen replacement ZF automatic gearbox.
See AUTOMATIC GEARBOX, Repair, Oil Screen

10

MAINTENANCE

14

MAINTENANCE

RENEW TRANSFER GEARBOX OIL

1. Site vehicle on lift or level ground.
2. Disconnect battery negative lead.
3. Clean immediate area around filler/level and

drain plugs.

WARNING: When draining gearbox care
should be taken to ensure that oil is not
hot as personal scalding could result.

4. Place a container under gearbox to drain oil into.
5. Remove filler/level plug to vent gearbox and

assist draining.

6. Remove drain plug and allow oil to drain.

7. Thoroughly clean drain plug threads prior to

applying fresh ’Hylomar’ sealant. Fit plug
Tighten to

30 Nm.

8. Fill gearbox with correct quantity and grade of oil

until oil seeps from filler level hole. Wipe away
any surplus oil.

9. Thoroughly clean filler/level plug threads prior to

applying fresh ’Hylomar’ sealant. Fit plug
Tighten to

30 Nm.

10. Reconnect battery negative lead.

CHECK/TOP UP TRANSFER GEARBOX OIL

1. Site vehicle on lift or level ground.
2. Disconnect battery negative lead.
3. Clean immediate area around filler/level plug.
4. Remove plug and fill gearbox with recommended

grade of oil, until oil starts to seep from filler/level
hole.

5. Clean any previously applied sealant from

filler/level plug.

6. Apply Hylomar sealant to threads of plug and

refit plug. Tighten to

30 Nm.

7. Wipe away any surplus oil.
8. Reconnect battery negative lead.

MAINTENANCE

15

MAINTENANCE

RENEW FRONT AND REAR AXLE OIL

1. Site vehicle on lift or level ground. Place

container under axle to be drained.

2. Using a 13mm square drive wrench, remove

drain and filler/level plugs from axle. Allow oil to
drain completely. Clean and refit drain plug.

3. Inject new oil of recommended make and grade

until it reaches level hole. Clean and refit
filler/level plug and wipe away surplus oil.

CHECK/TOP UP FRONT AND REAR AXLE OIL

1. Site vehicle on lift or level ground.
2. Using a 13mm square drive wrench, remove

filler/level plug from axle.

3. If necessary inject new oil of recommended

make and grade until it reaches level hole. Clean
and refit filler/level plug and wipe away surplus
oil.

CHECK/TOP UP SWIVEL PIN HOUSING OIL

RENEW SWIVEL PIN HOUSING OIL

1. Site vehicle on lift or level ground. Place

container under swivel to be drained.

2. Remove drain and level plugs, allow oil to drain

completely, clean and refit drain plug.

3. Remove filler plug and inject recommended

make and grade of oil it reaches level hole.

4. Clean and refit level and filler plugs, wipe away

any surplus oil.

10

MAINTENANCE

16

MAINTENANCE

LUBRICATE PROPELLER SHAFT SLIDING , AND
UNIVERSAL JOINTS

1. Clean all grease nipples on front and rear

propeller shafts.

2. Using a low pressure hand grease gun, apply

recommended grease, to grease nipples at front
and rear propeller shaft universal and sliding
joints.

NOTE: The rear propeller shaft flexible
coupling is not fitted with a grease nipple.

CHECK VISUALLY BRAKE, FUEL, CLUTCH
PIPES/UNIONS FOR CHAFING LEAKS AND
CORROSION

CHECK EXHAUST SYSTEM FOR LEAKS,
SECURITY AND DAMAGE

CHECK FOR FLUID LEAKS FROM POWER
STEERING AND SUSPENSION SYSTEMS,
HYDRAULIC PIPES AND UNIONS FOR CHAFING
AND CORROSION

CHECK/TIGHTEN STEERING UNIT AND STEERING
ROD BALL JOINT FIXINGS, CHECK CONDITION
OF OF BALL JOINTS AND DUST COVERS

Ball joints are lubricated for their normal life during
manufacture and require no further lubrication. This
applies ONLY if rubber boot has not been dislodged
or damaged. Joints should be checked at specified
mileage intervals but more frequently if vehicle is used
under arduous conditions.

1. Check for wear in joints by moving ball joint up

and down vigorously. If free movement is
apparent fit a new joint assembly.


Content   ..  17  18  19  20   ..