Defender 90 NAS. Manual - part 84
 

  Index      Land Rover     Defender 90 NAS - service manual 1997 year


Search            


Content   ..  82  83  84  85   ..


Defender 90 NAS. Manual - part 84


76

CHASSIS AND BODY

34

REPAIR

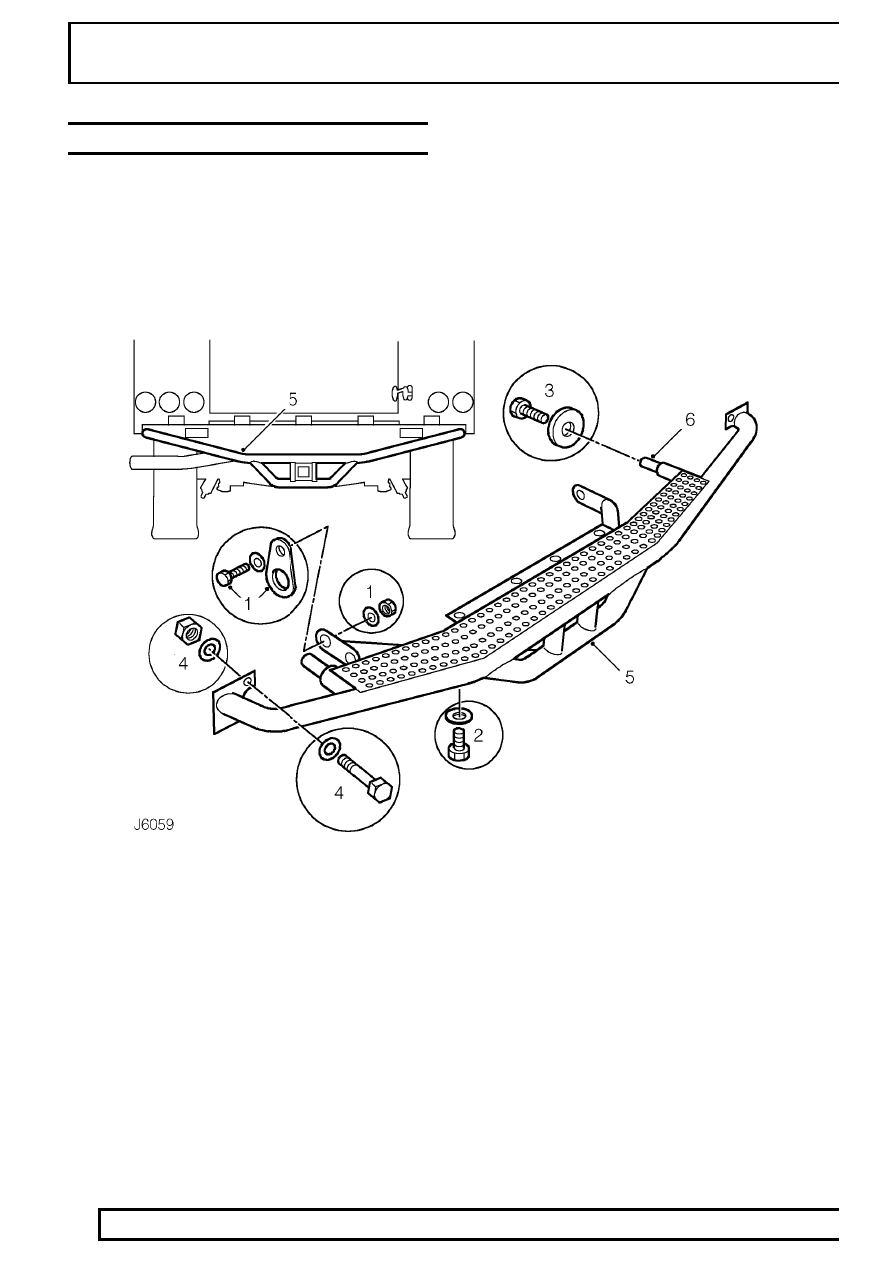
REAR TOW BAR

Service repair no - 76.11.41

Remove

1. Remove bolt, washer and nut from both sides,

securing tow bar lower mounting brackets and
towing [fender] eyes to chassis.

2. Remove 4 bolts and spring washers securing

tow bar centre mounting bracket to chassis.

3. Remove both bolts securing 2 tow bar locating

tubes in rear chassis cross member.

4. Remove 2 bolts securing tow bar top mounting

brackets to chassis.

5. With assistance, withdraw tow bar assembly

from chassis.

Refit

6. With assistance, lift tow bar assembly and locate

both tubes in chassis crossmember.

7. Secure top tow bar mounting brackets to chassis

but do not fully tighten fixings.

8. Secure tow bar locating tubes to rear of chassis

and tighten bolts to

25 Nm, 18 lbf ft.

9. Secure tow bar centre mounting bracket to

underside of chassis and tighten bolts to

25 Nm,

18 lbf ft.

10. Position towing [fender] eyes to lower mounting

brackets and secure to chassis and tighten bolts
to

25 Nm, 18 lbf ft.

11. Fully tighten tow bar top mounting bracket bolts

to

25 Nm, 18 lbf ft.

CHASSIS AND BODY

35

REPAIR

BONNET

Service repair no - 76.16.01/99

Remove

1. Remove split [cotter] pin from bonnet prop lower

pivot.

2. Remove washer and anti-rattle washer from

pivot.

3. Position suitable chock to support bonnet in a

position to gain access to hinge nuts.

4. Release bonnet prop from pivot, fold prop up into

bonnet and rest bonnet onto chock.

5. Mark outline of hinge on bonnet.
6. Remove 6 nuts and screws securing bonnet to

hinges.

7. With assistance, remove bonnet.

Refit

8. With assistance, position bonnet to hinges.
9. With assistance, fit screws through hinges and

bonnet and fit washers and nuts to screws.

10. Align hinges to bonnet markings.
11. Tighten hinge retaining screws.
12. Raise bonnet from chock and connect prop to

pivot.

13. Fit anti-rattle and plain washers to pivot and

secure with split [cotter] pin.

14. Release prop and close bonnet to check

alignment and operation.

76

CHASSIS AND BODY

36

REPAIR

CENTRE CONSOLE

Service repair no - 76.25.01

Remove

1. Open cubby box lid.
2. Remove in-car entertainment unit - if fitted.

3. Remove 6 screws securing cubby box to

console.

4. Remove cubby box.
5. Release rear edge of selector housing surround.
6. Remove surround.
7. Release hi-low gear lever gaiter from console.
8. Remove hi-low gear lever knob and gaiter

assembly.

9. Remove tray from console.

10. Remove screw securing front edge of console.
11. Remove 3 screws securing rear of console.
12. Remove console.

Refit

13. Fit and align console.
14. Fit and tighten screws securing console.
15. Fit tray to console.
16. Fit hi-low gear lever knob and gaiter assembly.
17. Secure hi-low gear lever gaiter to console.
18. Fit gear selector housing surround and secure.
19. Fit cubby box to console and secure with

screws.

20. Fit in-car entertainment unit - if fitted.
21. Close cubby box lid.

CHASSIS AND BODY

37

REPAIR

RADIATOR GRILLE

Service repair no - 76.55.03

Remove

1. Remove 8 screws securing grille to front panel.
2. Remove radiator grille

Refit

3. Position radiator grille to front panel.
4. Secure grille with screws.

GRILLE PANEL

Service repair no - 76.55.06

Remove

1. Remove radiator grille.

See radiator grille

2. Disconnect multiplug from condenser fan

fly-lead.

3. Loosen bolts securing top panel and grille panel

to fenders.

4. Remove bolts securing securing grille panel to

fenders.

5. Remove grille panel.

Refit

6. Position grille panel and fit bolts to fender, finger

tight.

7. Fit plastic nuts to lower fixing, each side
8. Fit screws to top panel.
9. Align grille panel and tighten all fixings.

10. Fit radiator grille.

See radiator grille


Content   ..  82  83  84  85   ..