Defender (1999-2002). Manual - part 97


  Index      Land Rover     Defender - service manual 1999-2002 year


Search            


Content   ..  95  96  97  98   ..


Defender (1999-2002). Manual - part 97


CHASSIS AND BODY

17

REPAIR

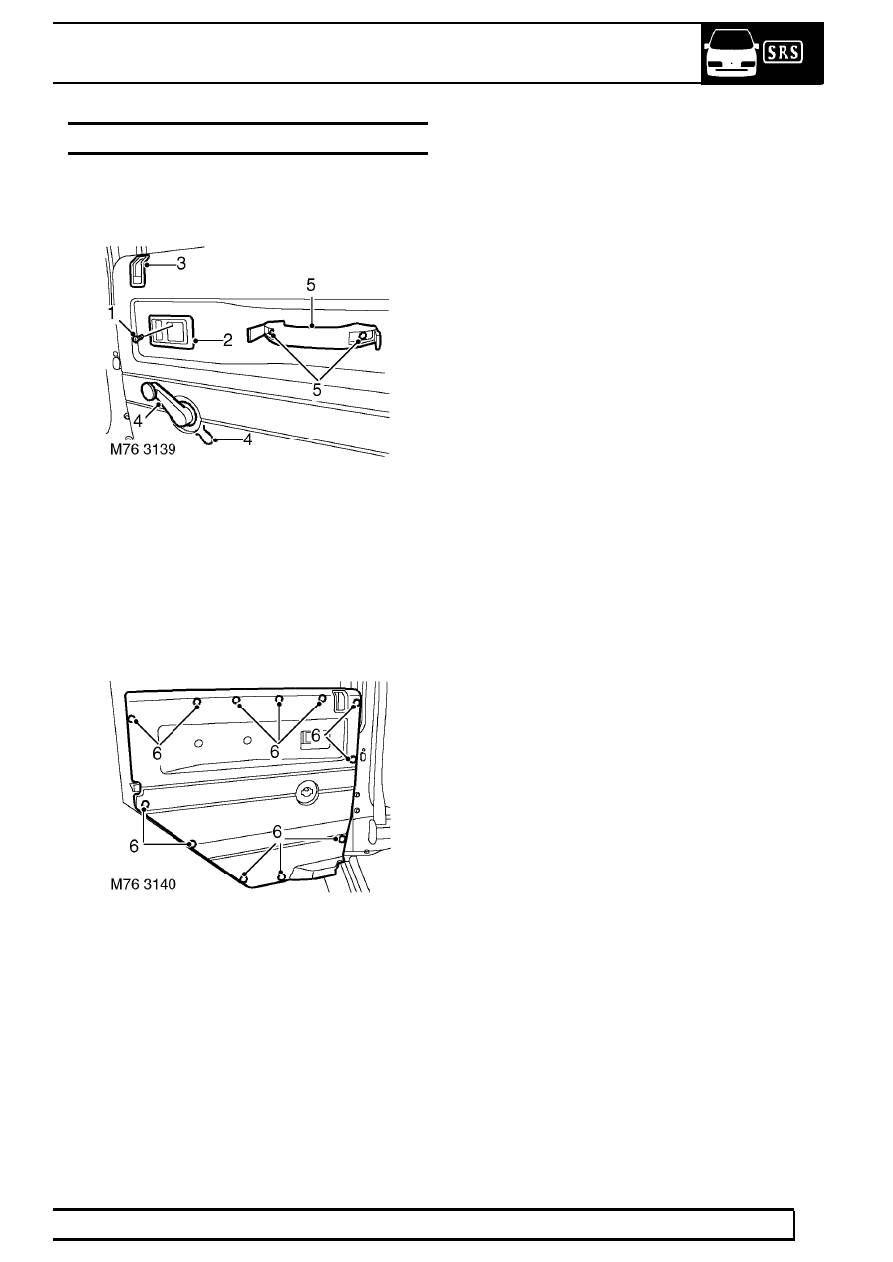
TRIM CASING - REAR DOOR

Service repair no - 76.34.04.99

Remove

1. Remove screw securing door handle

escutcheon.

2. Remove escutcheon.
3. Remove interior lock button bezel.
4. Remove retaining clip and remove door glass

regulator handle.

5. Release covers and remove 2 screws securing

door pull to door.

6. Carefully release 12 clips securing trim casing to

door and remove door casing.

Refit

7. Fit trim casing to door and secure with clips.
8. Fit door glass regulator handle.
9. Fit escutcheon to door handle and tighten screw.

10. Fit door lock button bezel.
11. Fit door pull and secure with screws.

76

CHASSIS AND BODY

18

REPAIR

AUXILLIARY SWITCH PANEL

Service repair no - 76.46.38

Remove

1. Remove 2 screws securing axilliary switch panel

to fascia and collect nuts and washers.

2. Disconnect multiplug from headlamp Levelling

switch.

3. Disconnect multiplug and Lucar from cigar

lighter.

4. Noting their fitted position, disconnect 4 Lucars

from rear wash wipe switch.

5. Remove switch panel.

Do not carry out further dismantling if
component is removed for access only.

6. Release pin securing rear wash wipe knob to

switch and remove knob.

7. Remove locknut securing rear wash wipe switch

to panel.

8. Remove rear wash wipe switch.
9. Remove knob from headlamp levelling switch.

10. Remove locknut securing headlamp switch to

panel.

11. Remove headlamp levelling switch.
12. Remove element from cigar lighter.
13. Release bulb holder from cigar lighter.
14. Release cigar lighter from tags and remove from

panel.

15. Fit cigar lighter to panel and locate tags.
16. Fit bulb holder to cigar lighter.
17. Fit element to cigar lighter.
18. Fit headlamp levelling switch to panel and

secure with locknut.

19. Fit knob to headlamp levelling switch.
20. Fit rear wash wipe switch to panel and secure

with locknut.

21. Fit knob to rear wash wipe switch, ensuring pin

is correctly located.

Refit

22. Position auxilliary switch panel to fascia and

connect 4 Lucars to rear wash wipe switch.

23. Connect multiplug and Lucar to cigar lighter.
24. Connect multiplug to headlamp levelling switch.
25. Fit auxilliary switch panel to fascia and secure

with screws.

CHASSIS AND BODY

19

REPAIR

LOWER FASCIA PANEL - UP TO 02MY

Service repair no - 76.46.05

Remove

1. Disconnect battery negative lead.
2. Remove steering wheel. See STEERING,

Repair.

3. Remove 7 screws securing nacelle to steering

column.

4. Remove 2 halves of nacelle from steering

column.

5. Remove instrument pack. See ELECTRICAL,

Repair.

6. Remove 3 screws securing heater control cable

assembly to end of fascia.

7. Release heater control cable assembly from

fascia and move aside.

8. Release HRW, Rear Fog Guard Lamp, and

Hazard Warning switches from fascia.

9. Disconnect multiplugs and Lucars from switches.

10. Collect switches.

11. Remove locking rings from both front speakers.
12. Remove 4 screws securing each speaker to

fascia.

13. Disconnect multiplugs from speakers and

remove both front speakers.

76

CHASSIS AND BODY

20

REPAIR

14. Carefully prise Land Rover decal from grab

handle.

15. Remove 2 screws securing grab handle to crash

pad and lower fascia panel.

16. Remove grab handle.

17. Remove 4 screws securing demister vents to

crash pad.

18. Remove both demister vents.
19. Remove 3 screws securing crash pad to

bulkhead.

20. Remove crash pad.
21. Release radio from fascia.
22. Disconnect 2 multiplugs and aerial from radio.

23. Remove radio.
24. Remove 2 trim studs securing radio housing to

fascia.

25. Remove radio housing.
26. Remove auxilliary switch panel. See this

Section.

27. Remove auxilliary switch panel cover.
28. Remove interior fuse box cover.


Content   ..  95  96  97  98   ..