Defender. Manual - part 288


  Index      Land Rover     Land Rover Defender - service manual 2007 year


Search            


Content   ..  286  287  288  289   ..


Defender. Manual - part 288


During application, ensure that the wax covers all flange and seam areas and that it is applied to all repaired areas of

both new and existing panels.

• NOTE: Apply cavity wax AFTER the final paint process and BEFORE refitting of any trim components.

It should also be noted that new panel assemblies and body shells are supplied without wax injection treatment which

must be carried out after repairs.

Effective cavity wax protection is vital. Always observe the following points:

Complete all finish paint operations before wax application.

Clean body panel areas and blow clean cavities if necessary, before treatment.

Maintain a temperature of 18°C (64°F) during application and drying.

Check the spray pattern of injection equipment.

Mask off all areas not to be wax coated and which could be contaminated by wax overspray.

Remove body fixings, such as seat belt retractors, if contamination is at all likely.

Move door glasses to fully closed position before treating door interiors.

Treat body areas normally covered by trim before refitting items.

Check that body and door drain holes are clear after the protective wax has dried.

Keep all equipment clean, especially wax injection nozzles.

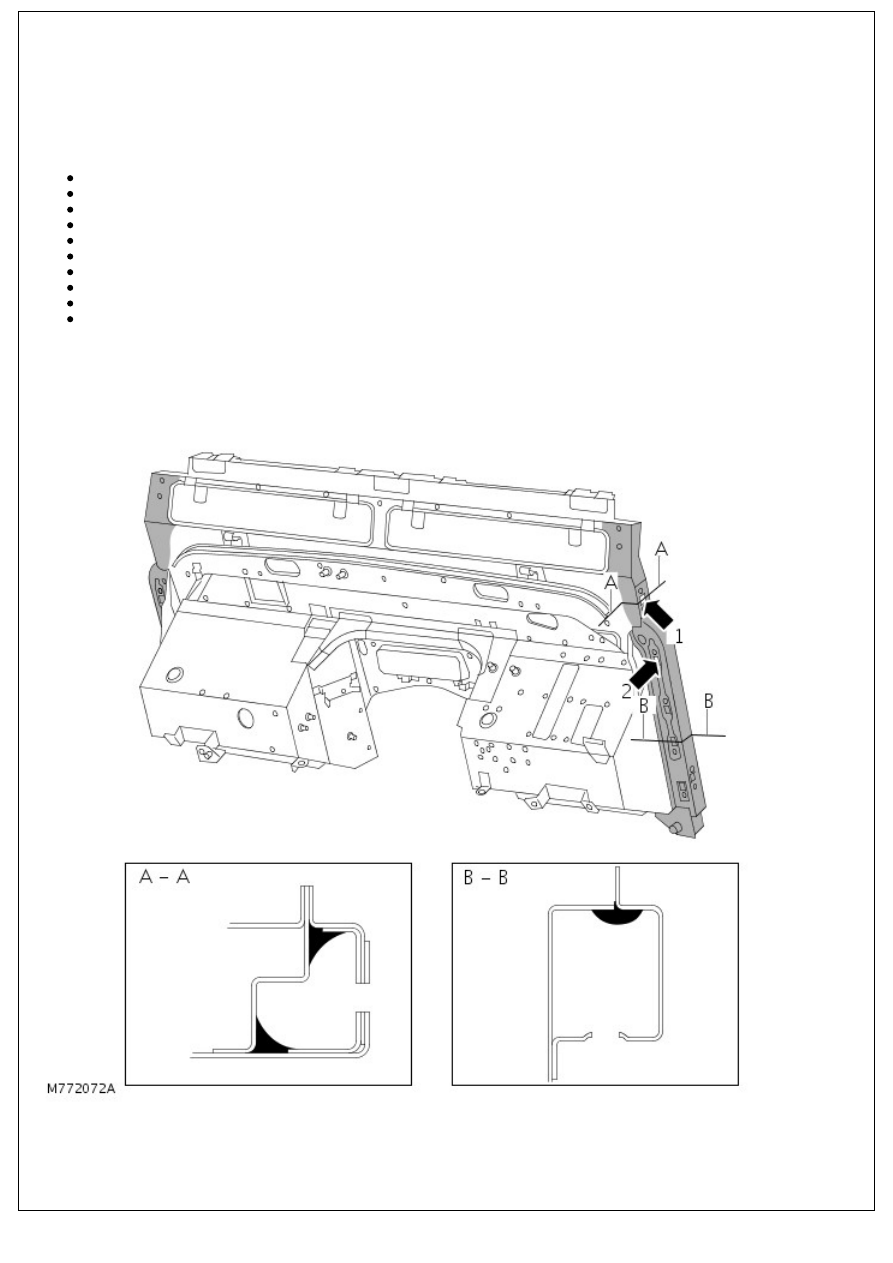
The following Illustrations show the treatment areas and Injection holes for Cavity Wax application.

All areas symmetrically opposite to those shown are also treated.

Bulkhead assembly

Section A-A and B-B show application areas of cavity wax. Arrows 1 and 2 show application holes.

'B/C' post assembly

Section A-A shows application area of cavity wax for the 'B/C' post. Arrow 1 shows application hole.

Section B-B shows application area of cavity wax for the 'D' post. Arrow 2 shows application hole.

Front door

Section A-A and B-B show application areas of cavity wax for the front door. Arrows 1 and 2 show the application holes.

Rear door

Section A-A and B-B show application areas of cavity wax for the rear door. Arrows 1 and 2 show the application holes.

SEALANTS AND ADHESIVES

Structural Adhesive

Metal-to-metal adhesive is applied to critical joint areas during factory assembly. The material used is a high-

temperature, heat cured, nitrile phenolic which serves both to bond two metal surfaces and also to seal the joint against

ingress of dust, water, petrol and fumes. This material is not suited for service use, and should be substituted in repair

using a suitable medium strength adhesive.

When separating a joint treated with metal-to-metal adhesive, to avoid distortion it is recommended that the joint be

gently heated until the bond weakens sufficiently to permit panel separation.

• NOTE: DO NOT carry out MIG welding on a joint area which has been treated with metal-to-metal adhesive until all

traces of adhesive have been removed.

The following Illustrations show the treatment areas for Structural Adhesive. All areas symmetrically opposite to those

shown are also treated.

Body side capping


Content   ..  286  287  288  289   ..