Defender. Manual - part 287


  Index      Land Rover     Land Rover Defender - service manual 2007 year


Search            


Content   ..  285  286  287  288   ..


Defender. Manual - part 287


PO Box 1

Market Place

Bracknell

Berks. RG12 1JU

Tel. (01344) 858611

All 3M equipment is available from local trade factors or 3M refinishing factors.

3M Caulking Gun 08002

A lightweight, robust metal skeleton gun designed to accommodate 325 mm (12.8 in) cartridge for dispensing sealants

etc. This gun facilitates rapid cartridge loading and features a quick-release lever for accurate material ejection and cut-

off control.

3M Pneumatic Cartridge Gun 08012

An air line fed gun for application of 3M cartridge products. Excellent ease of application for a smooth sealant bead, and

incorporates a regulator valve for additional control.

Other 3m applicator equipment available:

3M Pneumatic Applicator Guns

Air line fed gun for application of 3M sachet sealers (Part No. 08006 for 200 ml (6 fl oz) and 310 ml (9 fl oz) sachets,

and Part No. 08007 for all size sachets including 600 ml (18 fl oz).

3M Applicator Gun 08190

For application of 3M Structural Adhesive 08120.

3M Inner Cavity Wax Applicator Gun

Features 750 mm (29.6 in) flexible tube and using 1-litre (1.76 pt) canisters, this approved equipment is available from

all 3M refinishing factors.

Heavy Duty Manual Gun

Cavity wax application equipment and techniques
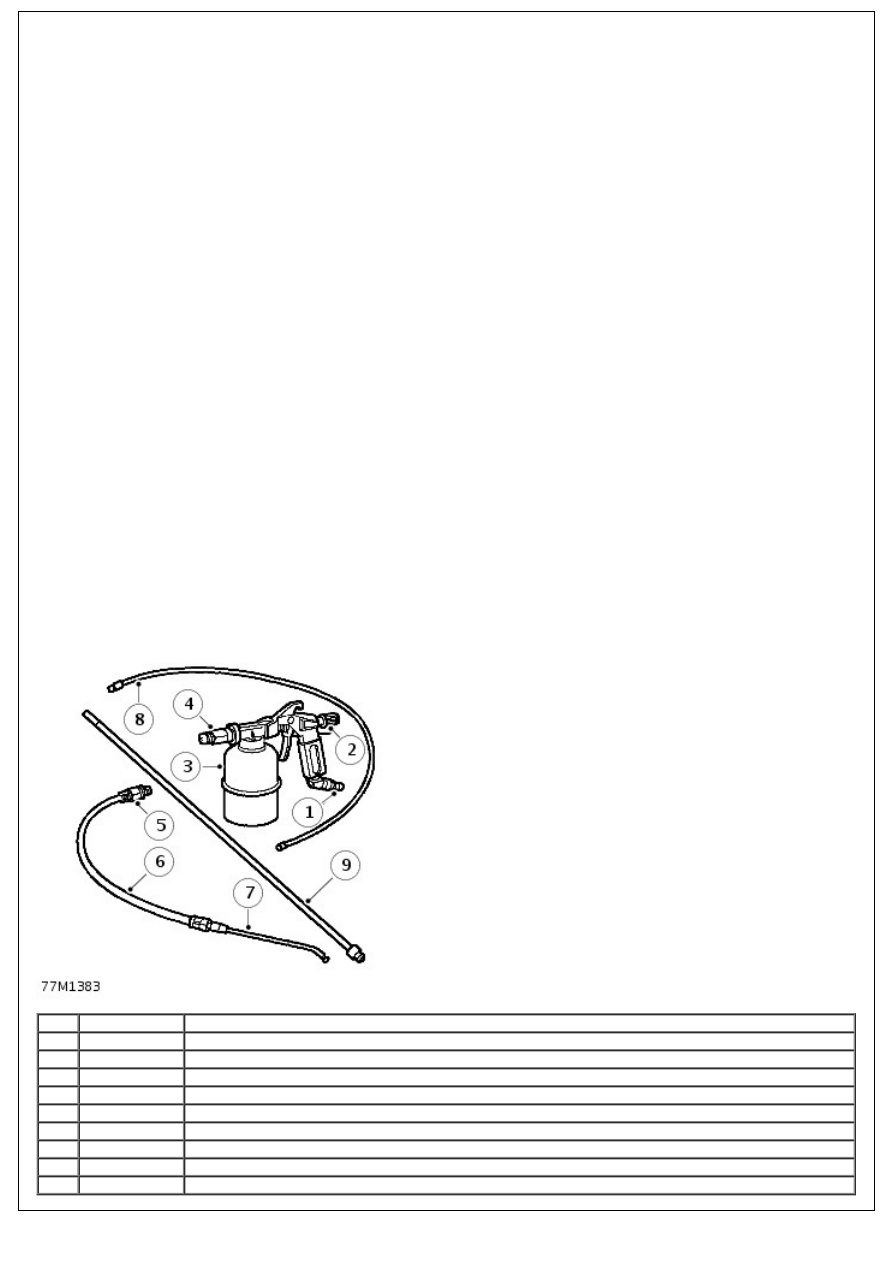
Item Part Number

Description

1.

-

Air inlet

2.

-

Flow control (spray pattern adjustment)

3.

-

Pressure cup (1 litre [1.7 pt] capacity). Maximum pressure 140 psi (9.7 bar, 9.8 kg/cm").

4.

-

Gun connector

5.

-

Lance nipple connection

6.

-

Flexible lance

7.

-

Rigid directional hook wand (forward cone spray pattern)

8.

-

Flexible nylon 1100mm (43.3in.) lance with 360° spray pattern

9.

-

Rigid 1100mm (43.3in.) lance with 360° spray pattern

When re-treating wax-injected areas which have been disturbed during repairs, it is necessary to use a compressed air

spray gun with integral pressure cup and a selection of interchangeable lances.

The following points must be observed during use, according to the attachments fitted:

Use the rigid or flexible lance attachments with 360° spray dispersal when treating enclosed areas, to ensure

maximum coverage.

Where openings are restricted, use the hook nozzle to provide a more directional spray

1100 mm (43.3in.) Rigid Lance: The nozzle on the rigid lance produces a 360° circular spray pattern combined with

a forward-directed spray. Although wax is distributed to all box section surfaces in a single stroke, effective and

complete coverage is best achieved in long, straight structures and box section cavities by spraying on both outbound

and return strokes of the lance.

The rigid lance also provides the positional accuracy required in shaped sections, by allowing visual assessment.

CAUTION: Do not force the lance into access holes when using this attachment.

1100 mm (43.3in.) Flexible Nylon Lance: This lance is similar in pattern to the rigid version, but provides the

additional penetration needed for curved sections or in places where access is difficult. Its main limitation is a lack of

positional accuracy inside box sections.

Carry out spraying on the outward stroke of the lance. Withdraw the lance slowly to ensure sufficient coverage. DO

NOT withdraw the lance too quickly.

Keep the nylon tube of the lance away from the edges of the access hole to eliminate abrasion and extend the life of the

tube. Take care to ensure that spraying ceases just before the nozzle emerges from the access hole. To assist this

process, apply RED paint to the final 30mm (1.2in.) of the nozzle.

Hook Nozzle on Flexible Lance: The rigid hook produces a highly atomised, forward-directed, fully conical spray

pattern having long range and good dispersion characteristics. This combination has good directional capabilities for the

treatment of short, narrow sections and may also be used for direct spraying of inner wheel arches etc.

Position the flat area at the end of the lance at 180° to the nozzle spray direction. This will help to guide the spray more

accurately when it is concealed in a box section or access hole.

• NOTE: Keep all wax injection/application equipment clean. Use white spirit for this purpose immediately after wax

injection operations.

For general spraying move the nozzle in an arc from side to side, to ensure full coverage.

Precautions during Body Repairs and Handling

Take care when handling the vehicle in the workshop. PVC underbody sealers, seam sealers, underbody wax and body

panels may be damaged if the vehicle is carelessly lifted.

Always follow the correct lifting, jacking and towing procedures as shown in GENERAL INFORMATION DATA, Information

section, paying particular attention to the following points:

Steam Cleaning and Dewaxing

Due to the high temperatures generated by steam cleaning equipment, there is a risk that certain trim items could be

damaged and some adhesives and corrosion prevention materials softened or liquified.

Adjust the equipment so that the nozzle temperature does not exceed 90°C (194°F). Take care not to allow the steam

jet to dwell on one area, and keep the nozzle at least 300mm (11.8in.) from panel surfaces.

Do NOT remove wax or lacquer from underbody or underbonnet areas during repairs. Should it be necessary to steam

clean these areas, apply a new coating of wax or underbody protection as soon as possible.

CORROSION PROTECTION

The following information details the materials that are applied during manufacture for corrosion protection.

Factory Treatments

The Defender is treated with the following anti-corrosion materials in production:

A PVC based underbody sealer material which is sprayed onto the underfloor, wheel arches and undersill areas.

An application of cavity wax which is sprayed into enclosed cavities and box sections.

A final coating of underbody wax to cover the complete underfloor including components but excluding brake

discs, exhaust system and propeller shafts.

A coat of protective lacquer applied to the whole body.

A coat of protective wax applied to the engine bay and wheel arch areas.

• NOTE: Do not apply wax to engine bay of Td5 models.

In addition to the above measures, all steel parts are zinc-coated both sides.

Underbody Sealer

Underfloor areas and outer sill panels are treated with a Plastisol PVC underbody sealer. This material is not suitable for

re-treatment.

When repairing areas of underbody sealer, strip the factory-applied material back to a suitable break point, ensuring

that a clean metal surface is exposed and that the edge of the existing material adheres soundly to the panel.

CAUTION: Ensure that suspension units, wheels, tyres, power unit, driveshafts, exhaust and brakes (including all

mounting points) are shielded prior to application of fresh underbody sealer

• NOTE: Application of new underbody sealer must be carried out between primer and surfacer paint operations. Areas

where seam sealer is used should be re-treated as necessary before application of underbody sealer.

Blanking plugs and grommets in the floor pan (except those used for wax injection) MUST be fitted before underbody

sealer application. Heat-fusible plugs which have been disturbed should either be refitted with the aid of a hot air blower

or replaced with rubber grommets.

Cavity Wax

Cavity wax is applied to certain box sections The information given on the following pages is intended as a guide and

shows the areas to be treated with cavity wax, as well as the access holes used during manufacture.

Underbody Wax

A coat of underbody wax is applied to the entire underbody inboard of the sill vertical flanges, and covers all moving and

flexible components EXCEPT for wheels and tyres, brakes and exhaust. The wax is applied over paints and underbody

sealers.

CAUTION: Old underbody wax must be completely removed from a zone extending at least 200 mm (7.9 in)

beyond the area where new underbody sealer is to be applied.

The underbody wax must be reinstated following all repairs affecting floor panels.

Engine Bay Wax

Reinstate protective engine bay wax disturbed during repairs using the approved material.

Wheel Arch Wax

Reinstate protective wheel arch wax disturbed during repairs using the approved material.

Stone Chip Resistant Paint/Primer

Re-treat all areas protected with factory-applied anti-chip primer with suitable approved material in repair.

Inspections during Maintenance Servicing

It is a requirement of the Land Rover Corrosion Warranty that the vehicle body is checked for corrosion by an authorised

Land Rover dealer at least once a year, to ensure that the factory-applied protection remains effective.

Service Job Sheets include the following operations to check bodywork for corrosion:

• NOTE: Wash the vehicle and ensure that it is free from deposits prior to inspection. It is part of the owner's

responsibility to ensure that the vehicle is kept free of accumulations of mud which could accelerate the onset of

corrosion. The Dealer MUST wash the vehicle prior to inspection of bodywork if the customer has offered it in a dirty

condition, and pay special attention to areas where access is difficult.

• NOTE: The checks described above are intended to be visual only. It is not intended that the operator should remove

trim panels, finishers, rubbing strips or sound deadening materials when checking the vehicle for corrosion and paint

damage.

With the vehicle on a lift, and using an inspection or spot lamp, visually check for the following:

• NOTE: The presence of small blisters in PVC underbody sealer is acceptable, providing they do not expose bare metal.

Special attention must be paid to signs of damage caused to panels or corrosion material by incorrect jack positioning.

It is essential to follow the correct jacking and lifting procedures. See GENERAL INFORMATION DATA, Information

section.

With the vehicle lowered, visually check for evidence of damage and corrosion on all painted areas, in particular the

following:

Where bodywork damage or evidence of corrosion is found during inspection, rectify this as soon as is practicable, both

to minimise the extent of the damage and to ensure the long term effectiveness of the factory-applied corrosion

protection treatment. Where the cost of rectification work is the owner's responsibility, the Dealer must advise the owner

and endorse the relevant documentation accordingly.

Where corrosion has become evident and is emanating from beneath a removable component (e.g. trim panel, window

glass, seat etc.), remove the component as required to permit effective rectification.

Underbody Protection Repairs

When body repairs are carried out, always ensure that full sealing and corrosion protection treatments are restored. This

applies both to the damaged area, and also to areas where protection has been indirectly impaired as a result of

accident damage or repair operations.

Prior to straightening out or panel beating, remove all corrosion protection material in the damaged area. This applies in

particular to panels coated with wax, PVC underbody sealer, sound deadening pads etc.

WARNING: DO NOT use oxy-acetylene gas equipment to remove corrosion prevention materials. Large amounts of

fumes and gases are liberated by these materials when they burn.

Equipment for the removal of tough anti-corrosion sealers offers varying degrees of speed and effectiveness. The

compressed air-operated scraper (NOT an air chisel) offers a relatively quiet mechanical method of removal using an

extremely rapid reciprocating action. During use, direct the operating end of the tool along the work surface.

The most common method is by the use of a hot air blower with integral scraper.

CAUTION: High temperatures can be generated with this equipment which may cause fumes. Always exercise care

in its use.

Another tool, and one of the most efficient methods, is the rapid-cutting 'hot knife'. This tool uses a wide blade and is

quick and versatile, able to be used easily in profiled sections where access is otherwise awkward.

Use the following procedure when repairing underbody coatings:

Underbody Wax

• NOTE: Where repairs include the application of finish paint coats in the areas requiring underbody wax, paint

operations must be carried out BEFORE wax application.

After refitting mechanical components, including hoses, pipes and small fixtures, mask off the brake discs and apply a

coat of approved underbody wax.

Underbonnet Wax

Where repairs have involved replacement of engine bay panels, treat the entire engine compartment including all

components, clips and small fixtures with an approved underbonnet lacquer or wax.

Proprietary Anti-Corrosion Treatments

The application of proprietary anti-corrosion treatments in addition to the factory-applied treatment could invalidate the

Corrosion Warranty and should be discouraged. This does not apply to approved, compatible, preservative waxes which

may be applied on top of existing coatings.

Fitting Approved Accessories

When fitting accessories it is important that the vehicle's corrosion protection is not affected, either by breaking the

protective coating or by introducing a moisture trap.

DO NOT screw self-tapping screws directly into the body panel but fit plastic inserts first. Protect the edges of holes

drilled into panels, chassis members and other body parts with a suitable zinc rich or acid etch primer, followed by a

protective wax coating brushed onto the surrounding area.

DO NOT affix unpainted metal surfaces of any accessory directly to the vehicle bodywork unless they are suitably

protected. Where metal faces are bolted together always interpose a suitable interface material such as weldable zinc

rich primer, extruded strip or zinc tape.

CAVITY WAX

Box sections treated with cavity wax are shown in this section. Repairs affecting these areas must include re-treatment

with an approved cavity wax, using the access points illustrated. In addition, all interior surfaces which have been

disturbed during repairs must be wax injected whether they have been treated in production or not. This includes all box

members, cavities, door interiors etc. It is permissible to drill extra holes for access where necessary, provided these are

not positioned in load-bearing members. Ensure that such holes are treated with a suitable zinc rich primer, brushed

with wax and then sealed with a rubber grommet.

Prior to wax injection, ensure that the cavity to be treated is free from any contamination or foreign matter. Where

necessary, clear out any debris using a compressed air supply.

Carry out wax injection after final paint operations.


Content   ..  285  286  287  288   ..