Defender. Manual - part 248


  Index      Land Rover     Land Rover Defender - service manual 2007 year


Search            


Content   ..  246  247  248  249   ..


Defender. Manual - part 248


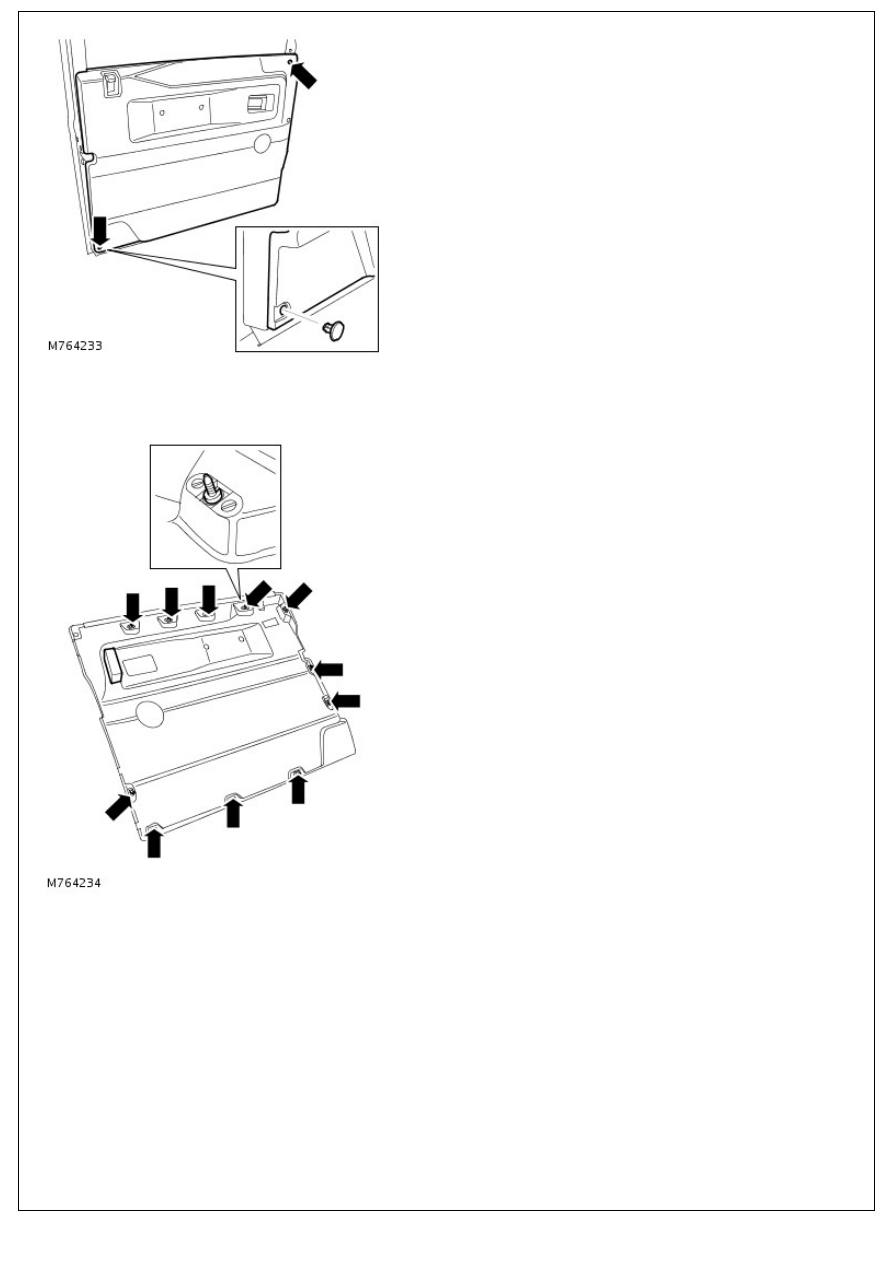
4. Remove 2 studs securing trim casing.

5. Using a trim removal tool, release 11 fasteners and remove

trim casing.

6. NOTE: Do not carry out further dismantling if component is

removed for access only.

Remove fasteners and anti-vibration pad from trim casing

Installation

1. Instal anti-vibration pad and fasteners to trim casing.
2. Position trim casing, align fasteners with holes in door and

press firmly into position.

3. Instal trim studs to casing.
4. Instal sill button guide.
5. Instal escutcheon to door handle and secure with screw.
6. Instal door pull and secure with screws.

Interior Trim and Ornamentation - Interior Rollover Bar

Removal and Installation

Removal

1. Remove rear seat cushions. 

For additional information, refer to: Rear Outer Seat Cushion

(501-10, Removal and Installation) / 

Rear Seat Cushion

 (501-10 Seating, Removal and

Installation).

2. Remove cowl side trim panels. 

For additional information, refer to: 

Cowl Side Trim Panel

(501-05 Interior Trim and Ornamentation, Removal and

Installation).

3. Remove C-pillar upper trim panel. 

For additional information, refer to: C-Pillar Upper Trim Panel

- 4.0L, 90 (501-05, Removal and Installation) / 

Cowl Side Trim Panel

 (501-05 Interior Trim and

Ornamentation, Removal and Installation).

4. Remove floor console extension. 

For additional information, refer to: Floor Console Extension

(501-12, Removal and Installation).

5. Remove 4 bolts securing centre section of rollover bar and

seat belt stalks to floor.

6. Remove 2 torx bolts and nuts from both sides and detach

centre section of rollover bar assembly.

7. Remove torx bolt, from both sides, securing rollover bar to

body side mounting brackets.

8. Remove 3 bolts and washers, from both sides, securing lower

rollover bar brackets to front of wheelarch.

9. Remove 2 torx bolts and washers, from both sides, securing

rollover bar upper mountings to roof fixing brackets and

carefully lower complete assembly to floor.

10. Unscrew retaining bolts, from both sides, and remove front

seat belt inertia reels and rear seat belts from rollover bar

mounting.

11. Supporting from both sides, raise and tilt rollover bar

rearwards to clear wheel arches.

12. NOTE: Assistance may be required to remove rollover bar.

Remove rollover bar from vehicle.

Installation

1. Supporting from both sides, position rollover bar, engage

struts in rear corners and front of side panels. Align on floor.

2. Secure front seat belt inertia reels and rear seat belts to

rollover bar mountings. Tighten bolts to 32 Nm (24 lbf.ft).

3. Raise rollover bar assembly and secure to roof mounting

brackets. Tighten bolts to 45 Nm (33 lbf.ft).

4. Secure rollover bar to wheel arches. Tighten bolts to 45 Nm

(33 lbf.ft).

5. Secure rollover bar to body side mounting brackets,

tightening bolts to 45 Nm (33 lbf.ft).

6. Secure centre section to main rollover bar, but do not fully

tighten fixing bolts at this stage.

7. Secure seat belt stalks and rollover bar floor mounting

brackets to chassis. Tighten bolts to 32 Nm (24 lbf ft.).

8. Fully tighten rollover bar centre section retaining bolts to 45

Nm (33 lbf.ft).

9. Fit floor console extension. 

For additional information, refer to: Floor Console Extension

(501-12, Removal and Installation).

10. Fit C-pillar upper trim panel. 

For additional information, refer to: C-Pillar Upper Trim Panel

- 4.0L, 90 (501-05, Removal and Installation) / 

Cowl Side Trim Panel

 (501-05 Interior Trim and

Ornamentation, Removal and Installation).

11. Fit cowl side trim panels. 

For additional information, refer to: 

Cowl Side Trim Panel

(501-05 Interior Trim and Ornamentation, Removal and

Installation).

12. Fit rear seat cushions. 

For additional information, refer to: Rear Outer Seat Cushion

(501-10, Removal and Installation) / 

Rear Seat Cushion

 (501-10 Seating, Removal and

Installation).


Content   ..  246  247  248  249   ..