Defender. Manual - part 112


  Index      Land Rover     Land Rover Defender - service manual 2007 year


Search            


Content   ..  110  111  112  113   ..


Defender. Manual - part 112


Engine Cooling - 2.4L Duratorq-TDCi HPCR (103kW/140PS) - Puma -

Cooling Fan Shroud

Removal and Installation

Removal

1. Disconnect the battery ground cable. 

For additional information, refer to: 

Battery Disconnect and

Connect

 (414-01 Battery, Mounting and Cables, General

Procedures).

2. Drain the cooling system. 

For additional information, refer to: 

Cooling System Draining,

Filling and Bleeding

 (303-03 Engine Cooling - 2.4L Duratorq-

TDCi HPCR (103kW/140PS) - Puma, General Procedures).

3. Remove the cooling fan. 

For additional information, refer to: 

Cooling Fan

 (303-03

Engine Cooling - 2.4L Duratorq-TDCi HPCR (103kW/140PS) -

Puma, Removal and Installation).
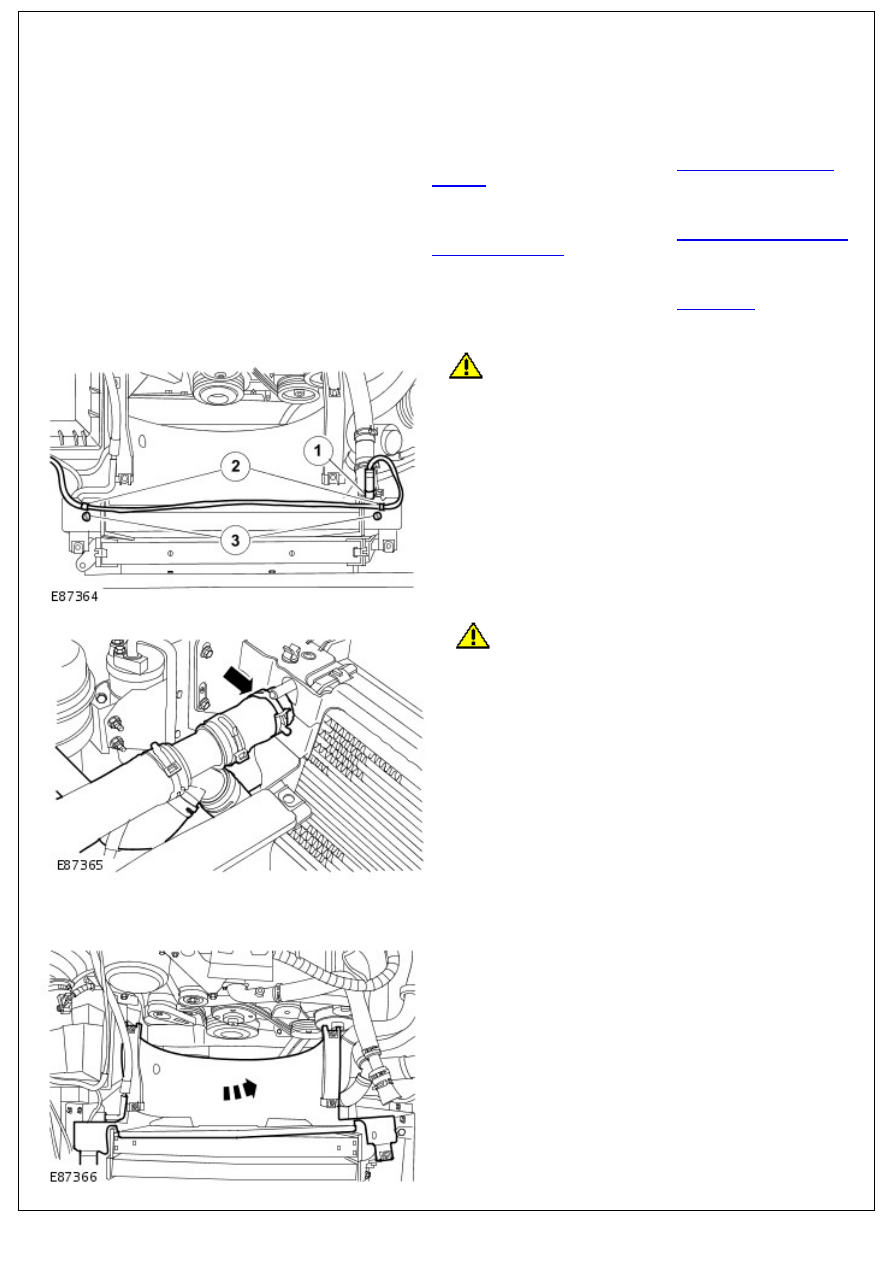
4. 

CAUTION: Make sure that all openings are sealed. Use

new blanking caps.

Release the cooling fan shroud.

1. Disconnect the coolant expansion tank hose.

2. Release the coolant expansion tank hose from the

cooling fan shroud.

3. Release the cooling fan shroud remove the 2

screws.

5. 

CAUTION: Make sure that all openings are sealed.

Use new blanking caps.

Disconnect the radiator top hose.

6. Release the thermostat from the cooling fan shroud.

7. Remove the cooling fan shroud.

Installation

1. To install, reverse the removal procedure.
2. Connect the battery ground cable. 

For additional information, refer to: 

Battery Connect

 (414-01

Battery, Mounting and Cables, General Procedures).

Engine Cooling - 2.4L Duratorq-TDCi HPCR (103kW/140PS) - Puma -

Coolant Pump

Removal and Installation

Removal

1. Disconnect the battery ground cable. 

For additional information, refer to: 

Battery Disconnect and

Connect

 (414-01 Battery, Mounting and Cables, General

Procedures).

2. 

WARNING: Do not work on or under a vehicle

supported only by a jack. Always support the vehicle on safety

stands.

Raise and support the vehicle.

3. Drain the cooling system. 

For additional information, refer to: 

Cooling System Draining,

Filling and Bleeding

 (303-03 Engine Cooling - 2.4L Duratorq-

TDCi HPCR (103kW/140PS) - Puma, General Procedures).

4. Remove the brake vacuum pump. 

For additional information, refer to: 

Brake Vacuum Pump

(206-07 Power Brake Actuation, Removal and Installation).

5. 

CAUTION: Make sure that all openings are sealed. Use

new blanking caps.

Disconnect the coolant hose from the coolant pump.

Release the clip.

6. 

CAUTION: Make sure that all openings are sealed. Use

new blanking caps.

Release the coolant pump outlet manifold.

Remove the 3 bolts.

Remove and discard the O-ring seal.

CAUTION: Make sure that all openings are sealed. Use

7. 

CAUTION: Make sure that all openings are sealed. Use

new blanking caps.

Remove the coolant pump.

Remove the 4 bolts.

Remove and discard the gasket.

Installation

1. NOTE: Remove and discard the blanking caps.

• NOTE: Clean the component mating faces.

• NOTE: Install a new gasket.

Install the coolant pump.

Tighten to 23 Nm (17 lb.ft).

2. NOTE: Remove and discard the blanking caps.

• NOTE: Clean the component mating faces.

• NOTE: Install a new O-ring seal.

Secure the coolant pump outlet manifold.

Tighten to 10 Nm (7 lb.ft).

3. NOTE: Remove and discard the blanking caps.

Connect the coolant hose to the coolant pump.

Tighten the clip to 3 Nm (2 lb.ft).

4. Install the brake vacuum pump. 

For additional information, refer to: 

Brake Vacuum Pump

(206-07 Power Brake Actuation, Removal and Installation).

5. Fill and bleed the cooling system. 

For additional information, refer to: 

Cooling System Draining,

Filling and Bleeding

 (303-03 Engine Cooling - 2.4L Duratorq-

TDCi HPCR (103kW/140PS) - Puma, General Procedures).

6. Connect the battery ground cable. 

For additional information, refer to: 

Battery Connect

 (414-01

Battery, Mounting and Cables, General Procedures).


Content   ..  110  111  112  113   ..