Jeep Wrangler (2024 year). Manual in english - page 2
 

  Index      Manuals     Jeep Wrangler (2024 year). Manual in english


Search            copyright infringement  


Content      ..      1      2      3      ..


Jeep Wrangler (2024 year). Manual in english - page 2


CAUTION!

Do not close the door before reattaching the door
check to the body. Damage may occur to the door
check.

Do not overtighten Torx fasteners, damage to the
vehicle’s parts will occur.

Hinge pins can break if overtightened during door
install (Max Torque: 6.0 ft· lb/8.1 N·m).

Replacing The Wiring Connector Into The Wiring Harness

To reinstall the wiring connector on the vehicle’s door into
the harness just inside the vehicle, proceed as follows:

NOTE:

Make sure there is plenty of slack on the wiring connec-
tor during installation. Close the door slightly to provide
more slack if needed.

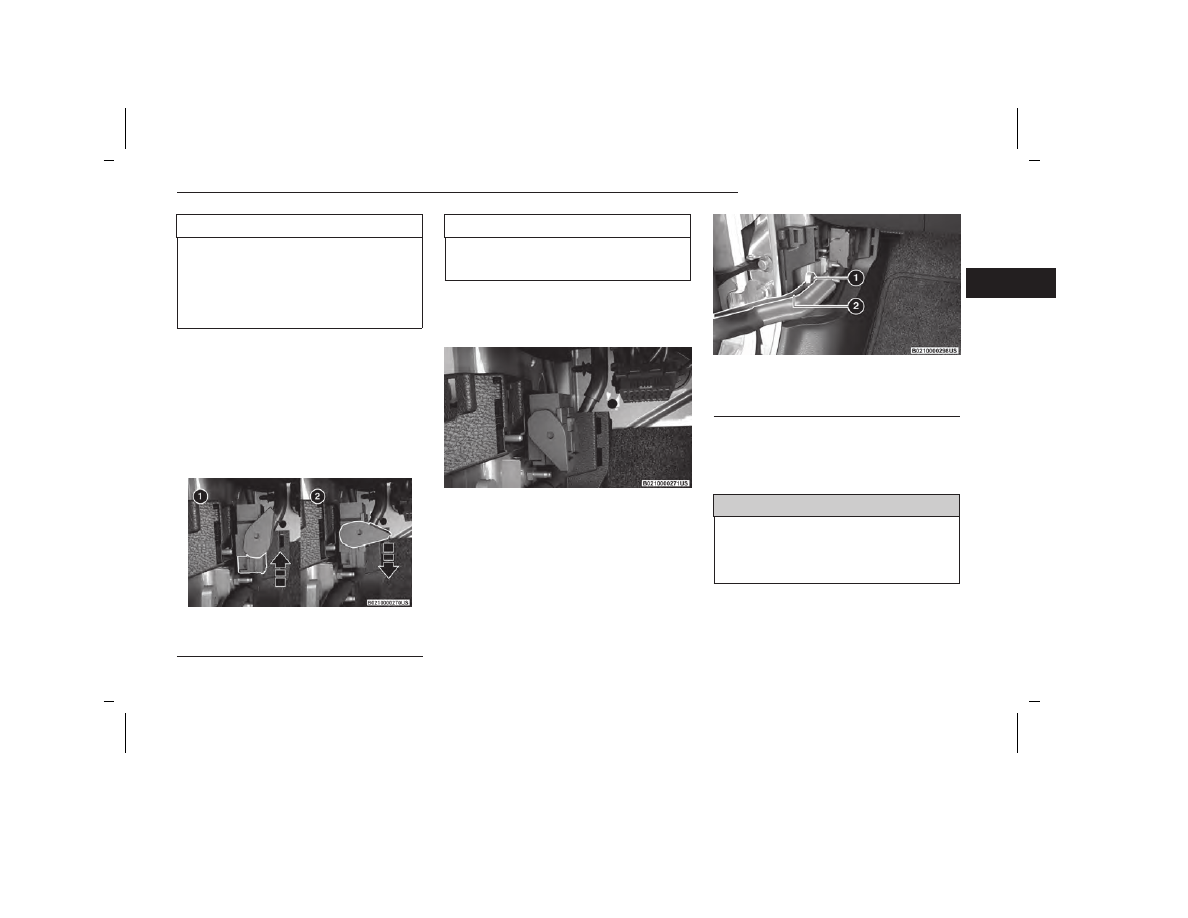
1. With light finger pressure, seat the wiring connector

straight

into the wiring harness until the wiring har-

ness lever starts to lower with the latching pin.

CAUTION!

Failure to correctly reconnect the wiring connector
into the harness will result in damage that is not cov-
ered by the New Vehicle Warranty.

2. After the harness lever has started to move with the

pressure of seating the wiring connector, continue
by lowering the wiring harness lever to the fully
closed position.

3. Push the red locking tab downward to lock into

place.

4. Attach the cloth strap of the door onto the metal

hook just inside the vehicle.

5. Replace wiring access doors.

REAR DOOR REMOVAL
(FOUR-DOOR MODELS)

WARNING!

Do not drive your vehicle on public roads with the
doors removed as you will lose the protection they
can provide. This procedure is furnished for use dur-
ing off-road operation only. Failure to follow this
warning can result in death or serious personal injury.

Connecting The Wiring Harness

1 — Seat Connector Straight Into Harness
2 — Wiring Harness Lever Starts To Lower

Fully Closed Position

Cloth Strap Attachment

1 — Metal Hook
2 — Cloth Strap

GETTING TO KNOW YOUR VEHICLE

47

2

5538906_24_JL_OM_EN_USC_t_E1.pdf   47

5/22/2023   9:02:18 AM

WARNING!

All occupants must wear seat belts during off-road
operation with doors removed. For off-road driving
tips, see

page 195.

Do not store detached doors inside of the vehicle,
as they may fly around and cause personal injury
or death in the event of a sudden stop, rough ter-
rain, or a collision.

NOTE:

Doors are heavy; use caution when removing them.

Hinge pin can break if overtightened during door
reinstall (Max Torque: 7.5 ft· lb / 10 N·m). For off-
road driving tips, see

page 195.

To remove the rear doors, proceed as follows:

1. Roll down the glass window to prevent any damage.

2. Remove the hinge pin screws from the upper and

lower outside hinges (using a #T50 Torx head driver).

NOTE:

The hinge pin screws and nuts can be stowed in the
rear cargo tray located under the rear load floor.

3. Slide the front seat(s) fully forward.

4. Pry open and remove the plastic wiring access door

from the bottom of the B-pillar.

5. Unplug the wiring connector.

NOTE:

Squeeze the tab on the base of the wiring harness.
This will unlock the connector tab, allowing the wir-
ing connector to be unplugged.

6. With the door in the open position, remove the

check screw from the door check attachment on the
body (using a #T40 Torx head driver).

NOTE:

Keep the check arm in the extended position for
easier reinstallation.

Door Removal Warning Label

Hinge Pin Scre5

Wiring Access Door

Wiring Connector

48

GETTING TO KNOW YOUR VEHICLE

5538906_24_JL_OM_EN_USC_t_E1.pdf   48

5/22/2023   9:02:18 AM

7. With the door open, lift the door with the help of

another person, to clear the hinge pins from their
hinges and remove the door.

To reinstall the door(s), perform the previous steps in
the reverse order.

NOTE:

The upper hinge has a longer pin, which can be used to
assist in guiding the door into place when reinstalling.

DOOR OFF MIRROR KIT —
IF EQUIPPED

If equipped with the Door Off Mirror Kit, exterior rear-
view mirrors can be installed on to the upper body door
hinges after the front doors have been removed.

WARNING!

All occupants must wear seat belts during off-road
operation with doors removed. For off-road driving
tips, see

page 195.

(Continued)

WARNING!

Do not store detached doors inside of the vehicle,
as they may fly around and cause personal injury
or death in the event of a sudden stop, rough ter-
rain, or a collision.

Use this QR code to access your digital
experience.

To install the Door Off Mirrors, proceed
as follows:

1. Remove both front doors see

page 45.

2. Remove the cowl bolt closest to the door opening

using a #40 Torx head driver, and store in a safe
location.

3. Push the mirror bracket forward onto the A-pillar,

making sure to align the bottom of the bracket with
the upper door hinge, and the hole from the
removed cowl bolt.

Door Check Arm

Scan me

Door Off Mirror

Cowl Bolt Location

Push Bracket Onto A-pillar

GETTING TO KNOW YOUR VEHICLE

49

2

5538906_24_JL_OM_EN_USC_t_E1.pdf   49

5/22/2023   9:02:18 AM

4. Place the bracket bushing behind the mirror bracket

(over the cowl bolt hole), then insert the bracket bolt
into the mirror bracket, through the bracket bushing.

5. Insert the hinge shoulder bolt through the bottom of

the upper door hinge up into the mirror bracket,
then rotate the bracket knob toward the rear of the
vehicle to secure the mirror bracket to the A-pillar.

6. Tighten both the bracket bolt and the hinge shoul-

der bolt with a #40 Torx head driver. Recommended
torque specification for the bracket bolt is 6 ft-lb
(8 N·m), and 7.5 ft-lb (10 N·m) for the hinge shoulder
bolt.

7. Lower the mirror assembly onto the mirror bracket.

8. Insert the three mirror screws into the mirror assem-

bly, and tighten into the mirror bracket using a
#30 Torx head driver. Recommended torque specifi-
cation for the mirror screws is 4 ft-lb (5.5 N·m).

9. Repeat the steps on the other side of the vehicle.

NOTE:

If this kit is being installed with the optional lamp
bracket, the bracket bushing from step 4 is not needed.
Use the spacer from the lamp bracket.

HALF-DOOR INSTALLATION —
IF EQUIPPED

CAUTION!

Do not run half-doors through an automatic car
wash. This may result in scratches and wax
buildup on the windows.

(Continued)

Attaching Mirror Bracket To The Vehicle

1 — Bracket Bushing
2 — Bracket Bolt

Attaching Mirror Bracket To The Vehicle

1 — Bracket Knob
2 — Hinge Shoulder Bolt

Lower Mirror Assembly Onto Bracket

Mirror Screw Locations

50

GETTING TO KNOW YOUR VEHICLE

5538906_24_JL_OM_EN_USC_t_E1.pdf   50

5/22/2023   9:02:18 AM

CAUTION!

Careless handling and storage of the half-doors
may damage the seals resulting in water leaks into
the interior of the vehicle.

The upper half-doors must be positioned properly
to ensure sealing. Improper installation can cause
water leaks into the interior of the vehicle.

Store the zipper pulls of the upper half-door win-
dows at the upper B-pillar area for both front and
rear doors to avoid damage to the windows when
not in use.

Do not attempt to operate the half-door zipper in
temperatures of 41°F (5°C) or below. Damage to
the window may occur.

Use this QR code to access your digital
experience.

This vehicle may be equipped with half-
doors. To install the half-doors in the
vehicle, follow the instruction sheet
packaged in the box the doors were
received in. Replacement parts may be
purchased through Mopar® Service.

To install the front or rear half-doors, proceed as
follows:

1. Remove the full doors from the vehicle. For front

door removal, see

page 45. For rear door

removal, see

page 47.

2. Locate the upper and lower hinge pins on the lower

half-door, and lower them into the body hinges on
the vehicle.

NOTE:

The upper hinge pin is longer, which can be used to
assist in guiding the door into place during
installation.

3. Insert the upper and lower hinge pin screws into the

body hinges. Tighten the screws using a #T50 Torx
head driver to 3.8 ft· lb / 5.2 N·m.

CAUTION!

Do not close the door before reattaching the door
check to the body. Damage may occur to the door
check.

Do not overtighten Torx fasteners, damage to the
vehicle’s parts will occur.

(Continued)

CAUTION!

Hinge pins can break if overtightened during door
install (Max Torque: 6.0 ft· lb/8.1 N·m).

4. Attach the cloth strap of the lower half-door to the

metal hook just inside the vehicle.

Scan me

Lower Half-Door Hinge Pins

Cloth Strap Attachment

1 — Metal Hook
2 — Cloth Strap

GETTING TO KNOW YOUR VEHICLE

51

2

5538906_24_JL_OM_EN_USC_t_E1.pdf   51

5/22/2023   9:02:18 AM

5. Connect the wiring harness on the lower half-door to

the connection just inside the vehicle.

NOTE:

For front doors, make sure the wiring harness is
closed completely.

6. Replace wiring access doors.

7. When the half-doors are shipped with the vehicle,

the lower half-doors will have plugs in the post holes
that must be removed prior to upper half-door instal-
lation. To remove these plugs, proceed as follows:

a. Locate the service hole in the center of each

plug of the lower half-door (two on each front and
rear door).

b. Place a tool (hook tool or trim stick is recom-

mended) in the service hole.

c. Using the tool, slowly pull upwards from the cen-

ter of the plug to remove.

8. Making sure the window on the upper half-door is

completely zipped closed, insert the upper half-door
into the lower half-door by placing the posts into the
post holes.

9. Push down firmly on the inside of the upper half-

door until it is fully seated in the lower half.

Door Latch Alignment

CAUTION!

Upon first installation of the half-doors, slowly set the
door almost to the closing position and check how
the door latch aligns with the body striker. Touch con-
dition between these components can result in dam-
age to both the door and the striker.

Front Door Wiring Harness

1 — Open Wiring Harness
2 — Closed Wiring Harness

Place Tool Into Service Hole Of Plug To Remove

Lower The Upper Half-Door Into Post Holes

Push Down To Fully Seat Upper Half-Door

Check Door Latch And Striker Alignment

52

GETTING TO KNOW YOUR VEHICLE

5538906_24_JL_OM_EN_USC_t_E1.pdf   52

5/22/2023   9:02:18 AM

NOTE:

Only adjust the door to fit correctly against the striker.
DO NOT adjust the striker, as this could affect the posi-
tioning of the full door.

If the door does not center align between the latch and
the striker, proceed as follows:

1. Loosen (do not remove) the four bolts on the door

hinges using the provided #T50 Torx head driver.

2. With the bolts loose, hold the door in the almost closed

position, and check that the latch and striker align.

3. With the latch and striker aligned, proceed to close the

door softly and tighten the hinge bolts to 20.3 ft· lb /
27.5 N·m (Max Torque: 27.3 ft· lb / 37 N·m).

Lower Door Adjustment

CAUTION!

Upon first installation of the half-doors, slowly close
each door to check for body contact. Improper setting of
the door hinges can cause extreme non-uniform condi-
tions, and result in damage to the body around the door.

If the door does not latch properly after installation, if
there is interference between the panels, or if a non-
uniform gap around the door is observed when the door
is closed (example: door position appears to be low and
too far rearward), the position of the door on its hinges
may need to be adjusted. To do this, proceed as follows:

1. Loosen (do not remove) the four bolts on the door

hinges using the provided #T50 Torx head driver.

NOTE:

Do not adjust the body mounted hinges, or any part
of the door latch, as modifications to these parts will
affect installation of the full door.

2. With the bolts loose, the door can be moved forward

by pushing the door handle toward the front of the
vehicle, and/or upward by grabbing the door handle
and lifting towards the roof.

3. Once the gaps between the door and vehicle body

are uniform around the entire door, tighten the door
hinge bolts to 20.3 ft· lb / 27.5 N·m (Max Torque:
27.3 ft· lb / 37 N·m).

Upper Door Adjustment

After installation of the half-doors, if water leaks or wind
noise is observed, the seal of the upper half-door to the
door opening may need to be adjusted.

To determine if the upper half-door needs to be
adjusted, proceed as follows:

1. Determine which door is affected.

2. Open the affected door and hold a dollar-size piece

of paper along the top of the door opening against
the vehicle near where the leak/noise was
observed. Make sure half of the paper is above the
area where the door seal contacts the door opening,
while the other half is below.

3. Close the door on the paper, then pull the paper

upward. If the paper moves with little to no effort,
the upper half-door will need to be adjusted in that
area to increase seal compression.

There is another optional test that can be performed
using a flashlight and the help of another person.

Hinge Bolt Locations

Hinge Bolt Locations

Performing A Paper Test

GETTING TO KNOW YOUR VEHICLE

53

2

5538906_24_JL_OM_EN_USC_t_E1.pdf   53

5/22/2023   9:02:18 AM

One person should be inside the vehicle, and move the
flashlight around the periphery of the door seal, shining
outward. The other person should stand outside of the
vehicle and check for light passing by the seal. If light is
seen through the seal area, the door will need to be
adjusted.

To adjust the seal compression, proceed as follows:

1. Open the door and lift the upper half-door up and

away from the lower half. Lay the upper half-door on
a clean, dry surface.

2. Using an 8 mm open-end wrench (not provided),

loosen the nut located inside the bottom of the
upper half-door post, closest to where the “paper
test” detected a gap.

3. Using a 3 mm Allen wrench (not provided), rotate

the screw on the side of the post counterclockwise
(while holding the wrench on the loosened bolt) to
increase the seal compression. If needed, rotate
clockwise to reduce seal compression.

4. Tighten the nut inside the bottom of the post using

the wrench and make sure the screw head is flush
to the post. Reinstall the upper half-door.

5. Close the door and repeat the “paper test”. Repeat

the adjustment procedure if needed.

6. If needed, add the provided shim to a lower half-

door pocket to seal the upper half-door to the roof:

a. Lift upper half-door up and away from lower half.

b. Clean the bottom of the door pocket.

c. Slide the shim onto a pencil or similar tool.

d. Remove the paper backing from the adhesive

side of the shim and place the shim with pencil
into the pocket.

e. Press the shim firmly to the bottom of the pocket,

and remove the pencil once the shim is firmly in
place.

Nut Location Inside Bottom Of Post

Rotate Screw For Seal Compression

1 — 3 mm Allen Wrench
2 — 8 mm Open-End Wrench

Screw Head Flush To Post

Remove Upper Half-Door & Clean Bottom Of Door Pocket

54

GETTING TO KNOW YOUR VEHICLE

5538906_24_JL_OM_EN_USC_t_E1.pdf   54

5/22/2023   9:02:18 AM

f. Replace upper half-door.

NOTE:

If the compression is increased too much on the front
upper corner of the rear doors, deformation of the seal
will occur.

Half-Door Removal

To remove the half-doors, repeat the installation steps
in reverse order.

NOTE:

When removing the upper half-doors, push upward
firmly on the middle of the upper half-door until the
posts detach from the lower half.

Half-Door Mirror Installation — PHEV Only

In PHEV models, the exterior mirrors for the half-doors
are shipped separately and will need to be installed.

To install the front door exterior mirrors on the half-
doors, proceed as follows:

1. Locate the wiring harness on the outside of the front

half-door.

2. Insert the wiring harness firmly into the connection

on the driver’s side exterior mirror.

Press Shim Firmly Into Bottom Of Pocket

1 — Remove Paper Backing From Shim
2 — Slide Pencil through Hole In Shim
3 — Press Pencil With Shim Into Pocket

Push Upward On Middle Of Upper Half Door To Remove

Wiring Harness Location

Connect Wiring Harness To Exterior Mirror

1 — Wiring Harness
2 — Exterior Mirror

GETTING TO KNOW YOUR VEHICLE

55

2

5538906_24_JL_OM_EN_USC_t_E1.pdf   55

5/22/2023   9:02:18 AM

3. Place the base of the exterior mirror into the hole on

the door, and support it while attaching the three
mirror bolts through the inside of the door using a
#T40 Torx head driver.

NOTE:

Recommended torque for the mirror bolts is
5.9 ft· lb / 8.0 N·m.

4. Repeat steps 1-3 on the opposite side front door.

STEERING WHEEL

TILT/TELESCOPING STEERING
COLUMN

This feature allows you to tilt the steering column
upward or downward. It also allows you to lengthen or
shorten the steering column. The tilt/telescoping lever
is located on the steering column.

To unlock the steering column, push the control handle
downward (toward the floor). To tilt the steering column,
move the steering wheel upward or downward as
desired. To lengthen or shorten the steering column,
pull the steering wheel outward or push it inward as
desired. To lock the steering column in position, push
the control handle upward until fully engaged.

WARNING!

Do not adjust the steering column while driving.
Adjusting the steering column while driving or driving
with the steering column unlocked, could cause the
driver to lose control of the vehicle. Failure to follow
this warning may result in serious injury or death.

HEATED STEERING WHEEL —
IF EQUIPPED

The steering wheel contains a heating ele-
ment that helps warm your hands in cold
weather. The heated steering wheel has only
one temperature setting. Once the heated

steering wheel has been turned on, it will stay on until
the operator turns it off. The heated steering wheel may
not turn on when it is already warm.

The heated steering wheel button is located within the
Uconnect system and, if equipped, on the instrument
panel below the radio. You can access the button
through the Climate or Controls menu of the
touchscreen.

Press the heated steering wheel button once to turn
the heating element on.

Press the heated steering wheel button a second
time to turn the heating element off.

NOTE:

The engine must be running for the heated steering
wheel to operate.

For information on use with the Remote Start system,
see

page 38.

Attach Exterior Mirror

1 — Support Mirror From Outside
2 — Attach Three Mirror Bolts From Inside

Tilt/Telescoping Steering Column Lever

56

GETTING TO KNOW YOUR VEHICLE

5538906_24_JL_OM_EN_USC_t_E1.pdf   56

5/22/2023   9:02:18 AM

WARNING!

Persons who are unable to feel pain to the skin
because of advanced age, chronic illness, diabe-
tes, spinal cord injury, medication, alcohol use,
exhaustion, or other physical conditions must exer-
cise care when using the steering wheel heater. It
may cause burns even at low temperatures, espe-
cially if used for long periods.

Do not place anything on the steering wheel that
insulates against heat, such as a blanket or steer-
ing wheel covers of any type or material. This may
cause the steering wheel heater to overheat.

SEATS

Seats are a part of the Occupant Restraint system of
the vehicle.

WARNING!

It is dangerous to ride in a cargo area, inside or
outside of a vehicle. In a collision, people riding in
these areas are more likely to be seriously injured
or killed.

Do not allow people to ride in any area of your
vehicle that is not equipped with seats and seat
belts. In a collision, people riding in these areas
are more likely to be seriously injured or killed.

Be sure everyone in your vehicle is in a seat and
using a seat belt properly.

POWER ADJUSTMENT FRONT
SEATS — IF EQUIPPED

WARNING!

Adjusting a seat while driving may be dangerous.
Moving a seat while driving could result in loss of
control which could cause a collision and serious
injury or death.

Seats should be adjusted before fastening the seat
belts and while the vehicle is parked. Serious
injury or death could result from a poorly adjusted
seat belt.

Some models may be equipped with a power driver's
seat and/or power passenger seat. The power seat
switch and power seat recliner switch are located on
the outboard side of the seat near the floor. Use the
power seat switch to adjust seat height, angle, or
forward/rearward position. Use the power seat recline
switch to adjust the angle of the seatback.

Forward Or Rearward Adjustment

The seat can be adjusted both forward and rearward.
Push the seat switch forward or rearward, the seat will
move in the direction of the switch. Release the switch
when the desired position has been reached.

Height Adjustment

The height of the seats can be adjusted up or down.
Pull upward or push downward on the seat switch, the
seat will move in the direction of the switch. Release
the switch when the desired position is reached.

Tilt Adjustment

The angle of the seat cushion can be adjusted up or
down. Pull upward or push downward on the front of the
seat switch and the front of the seat cushion will move
in the direction of the switch.

Reclining The Seatback Forward Or

Rearward

The seatback can be reclined both forward and rear-
ward. Push the power recline switch forward or rear-
ward. The seatback will move in the direction of the
switch. Release the switch when the desired position
has been reached.

WARNING!

Do not ride with the seatback reclined so that the
shoulder belt is no longer resting against your chest.
In a collision you could slide under the seat belt,
which could result in serious injury or death.

Power Seat Switches

1 — Power Seat Switch
2 — Power Recline Switch

GETTING TO KNOW YOUR VEHICLE

57

2

5538906_24_JL_OM_EN_USC_t_E1.pdf   57

5/22/2023   9:02:18 AM

Power Lumbar — If Equipped

Vehicles equipped with power driver or passenger seats
may be equipped with power lumbar. The power lumbar
switch is located on the outboard side of the power
seat. Push the switch forward to increase the lumbar
support. Push the switch rearward to decrease the lum-
bar support. Pushing upward or downward on the
switch will raise and lower the position of the support.

MANUAL ADJUSTMENT FRONT
SEATS — IF EQUIPPED

Manual Front Seat Forward/Rearward

Adjustment

The seat can be adjusted forward or rearward by using
a bar located by the front of the seat cushion, near the
floor. While sitting in the seat, lift up on the bar located
under the seat cushion and move the seat forward or
rearward. Release the bar once you have reached the
desired position. Then, using body pressure, move for-
ward and rearward on the seat to be sure that the seat
adjusters have latched.

WARNING!

Adjusting a seat while driving may be dangerous.
Moving a seat while driving could result in loss of
control which could cause a collision and serious
injury or death.

Seats should be adjusted before fastening the seat
belts and while the vehicle is parked. Serious
injury or death could result from a poorly adjusted
seat belt.

Manual Seat Height Adjustment

The driver's seat height can be raised or lowered by
using the ratcheting handle, located on the outboard
side of the seat. Pull upward on the handle to raise the
seat, push downward on the handle to lower the seat.
Several strokes may be necessary to achieve the
desired position.

Manual Front Seat Recline Adjustment

To recline the seat, pull on the recline strap and lean
forward or backward, depending on the direction you
would like the seatback to move. Release the strap
when the desired position is reached and the seatback
will lock into place.

Power Lumbar Switch

Adjustment Bar Location

Seat Height Adjustment

Recline Strap

58

GETTING TO KNOW YOUR VEHICLE

5538906_24_JL_OM_EN_USC_t_E1.pdf   58

5/22/2023   9:02:18 AM

WARNING!

Do not ride with the seatback reclined so that the
shoulder belt is no longer resting against your chest.
In a collision you could slide under the seat belt,
which could result in serious injury or death.

Lumbar Support

The lumbar control knob is located on the outboard
side of the front driver seat. Rotate the control forward
to increase and rearward to decrease the desired
amount of lumbar support.

Front Easy Entry Seat — Two Door Models

Pull upward on the easy entry lever located on the out-
board side of the seatback, and slide the entire seat
forward.

To return the seat to a sitting position, fold the seatback
upright until it locks and push the seat rearward until
the track locks.

NOTE:

Front seats equipped with power adjustment will not
be equipped with an easy entry lever.

The front seats (if equipped with manual adjust-
ment) have a track memory, which returns the seat
to its original position.

The recline strap and easy entry lever should not be
used during the automatic returning of the seat to
its sitting position.

MANUAL ADJUSTMENT REAR SEATS

WARNING!

Do not place luggage or cargo higher than the top of
the seatback. This could impair visibility or become a
dangerous projectile in a sudden stop or collision.

60/40 Split Folding Rear Seat — Four

Door Models

To provide additional storage area, each rear seat can
be folded flat to allow for extended cargo space.

NOTE:

Be sure that the front seats are fully upright and
positioned forward. This will allow the rear seat to
fold down easily.

The center head restraints must be in the lowest
position to avoid contact with the center console
when folding the seat.

WARNING!

It is extremely dangerous to ride in a cargo area,
inside or outside of a vehicle. In a collision, people
riding in these areas are more likely to be seriously
injured or killed.

Do not allow people to ride in any area of your
vehicle that is not equipped with seats and seat
belts.

Be sure everyone in your vehicle is in a seat and
using a seat belt properly.

Lumbar Control Knob

Easy Entry Lever

GETTING TO KNOW YOUR VEHICLE

59

2

5538906_24_JL_OM_EN_USC_t_E1.pdf   59

5/22/2023   9:02:18 AM

TO FOLD DOWN THE REAR SEAT

There are two release levers located on each upper
outboard side of the rear seat. The larger of the two
release levers folds down the seat and the head
restraint simultaneously. The smaller lever folds down
the head restraint independently for improved visibility.

To fold the seat, lift upward on the large release lever
and slowly fold down the seatback. The head restraint
will fold automatically with the seat when this lever is
pulled.

NOTE:

You may experience deformation in the seat cushion
from the seat belt buckles if the seats are left folded for
an extended period of time. This is normal. By simply
unfolding the seats to the open position, the seat cush-
ion will return to its normal shape over time.

TO RAISE THE REAR SEAT

Raise the seatback and lock it into place. Then, raise
the head restraint until it locks into place. If interfer-
ence from the cargo area prevents the seatback from
fully locking, you will have difficulty returning the seat to
its proper position.

WARNING!

Be certain that the seatback is securely locked into
position. If the seatback is not securely locked into
position the seat will not provide the proper stability
for child seats and/or passengers. An improperly
latched seat could cause serious injury.

Flip And Fold Rear Seat — PHEV Only

The 60/40 split rear seat can be folded down for added
cargo space. To fold the rear seat, proceed as follows:

1. Lift the seat cushion by grabbing the outer edges of

the cushion and pulling upward.

2. Flip the seat cushion up and forward.

3. Pull the seatback release lever upward fully (located

on the outboard side of the rear seatback).

NOTE:

Pulling the lever partway will fold the head restraint
forward. Pulling it all the way up will release the
seatback.

Seatback Release Lever

Lift Seat Cushion

Flip Seat Bottom Forward

Lift Seatback Release Lever Up

60

GETTING TO KNOW YOUR VEHICLE

5538906_24_JL_OM_EN_USC_t_E1.pdf   60

5/22/2023   9:02:19 AM

4. Fold the seatback forward against the floor.

5. Repeat on the other side if desired.

To Raise The Rear Seat

1. Raise the seatback and lock it into place.

NOTE:

If interference from the cargo area prevents the
seatback from fully locking, you will have difficulty
returning the seat to its proper position.

2. Raise the head restraint until it locks into place.

3. Return the seat cushion to its original position.

WARNING!

Be certain that the seatback is securely locked
into position. If the seatback is not securely locked
into position the seat will not provide the proper
stability for child seats and/or passengers. An
improperly latched seat could cause serious injury.

(Continued)

WARNING!

Do not store items on top of the battery underneath
the seat cushion. The rear seat bottom must not
have any obstruction that prevents it from being in
the fully lowered position, otherwise the bottom may
not lock during frontal impact. If the seat cushion is
not fully lowered, serious injury could occur.

FOLD AND TUMBLE REAR SEAT —
TWO DOOR MODELS

NOTE:

Prior to folding the rear seat, it may be necessary to
reposition the front seats.

Be sure that the front seats are fully upright and
positioned forward. This will allow the rear seat to
fold down easily.

Folding The Rear Seat

1. Lift the seatback release lever and fold the seat-

back forward.

2. Slowly flip the entire seat forward.

Using The Retention Straps

1. There are two retention straps located on the back

of the rear seat and two corresponding wire loops
located on the back of each B-pillar. Open the hook-
and-loop fastener on the strap and thread through
the wire loop. Fold the hook-and-loop fastener over
to keep the seat in the folded position. This should
be done on both sides.

2. To return the seat to its normal upright position,

reverse these steps.

Fold Seatback Down

Rear Seatback Release Lever

Rear Seat Tumble Position Retention Strap

GETTING TO KNOW YOUR VEHICLE

61

2

5538906_24_JL_OM_EN_USC_t_E1.pdf   61

5/22/2023   9:02:19 AM

Removing The Rear Seat

1. Push down on the release bar on each side, and pull

the seat out and away from the lower bracket.

2. Remove the seat from the vehicle.

3. To reinstall the rear seat, just reverse these steps.

NOTE:

Do not drive the vehicle without reattaching the rear
seat latches.

WARNING!

It is extremely dangerous to ride in a cargo area,
inside or outside of a vehicle. In a collision, people
riding in these areas are more likely to be seriously
injured or killed.

Do not allow people to ride in any area of your vehicle
that is not equipped with seats and seat belts.

Be sure everyone in your vehicle is in a seat and
using a seat belt properly.

(Continued)

WARNING!

In a collision, you or others in your vehicle could be
injured if seats are not properly latched to their floor
attachments. Always be sure that the seats are fully
latched.

REAR SEAT ARMREST —
IF EQUIPPED

The center part of the rear seat can also be used as a
rear armrest with cupholders. To unfold it, grab the pull
strap under the head restraint and pull it forward.

NOTE:

The cupholder liner can be removed for cleaning.

WARNING!

Be certain that the seatback is securely locked into
position. If the seatback is not securely locked into
position the seat will not provide the proper stability
for child seats and/or passengers. An improperly
latched seat could cause serious injury.

UNFOLDING THE REAR ARMREST —
PHEV ONLY

Raise the rear center head restraint, then pull the rear
armrest tab to release it from the seat and pull forward.

Pull the rear armrest tab to release it from the seat and
pull forward.

The center part of the rear seat can also be used as a
rear armrest with cupholders.

HEATED SEATS — IF EQUIPPED

The heated seat control buttons are located
on the center instrument panel below the
touchscreen and also in the Climate Control
touchscreen menu.

Press the heated seat button once to turn the HI
setting on.

Press the heated seat button a second time to turn
the MED setting on.

Release Bar Location

Rear Seat Armrest

Armrest Tab Location

62

GETTING TO KNOW YOUR VEHICLE

5538906_24_JL_OM_EN_USC_t_E1.pdf   62

5/22/2023   9:02:19 AM

Press the heated seat button a third time to turn the
LO setting on.

Press the heated seat button a fourth time to turn
the heating elements off.

NOTE:

The engine must be running for the heated seats to
operate.

The level of heat selected will stay on until the
operator changes it.

For information on use with the Remote Start system,
see

page 38.

WARNING!

Persons who are unable to feel pain to the skin
because of advanced age, chronic illness, diabe-
tes, spinal cord injury, medication, alcohol use,
exhaustion or other physical condition must exer-
cise care when using the seat heater. It may cause
burns even at low temperatures, especially if used
for long periods of time.

Do not place anything on the seat or seatback that
insulates against heat, such as a blanket or cush-
ion. This may cause the seat heater to overheat.
Sitting in a seat that has been overheated could
cause serious burns due to the increased surface
temperature of the seat.

HEAD RESTRAINTS

Head restraints are designed to reduce the risk of injury
by restricting head movement in the event of a rear
impact. Head restraints should be adjusted so that the
top of the head restraint is located above the top of
your ear.

WARNING!

All occupants, including the driver, should not oper-
ate a vehicle or sit in a vehicle’s seat until the
head restraints are placed in their proper positions
in order to minimize the risk of neck injury in the
event of a crash.

Head restraints should never be adjusted while the
vehicle is in motion. Driving a vehicle with the head
restraints improperly adjusted or removed could
cause serious injury or death in the event of a
collision.

Front Head Restraints

To raise the head restraint, pull upward on the head
restraint. To lower the head restraint, push the adjust-
ment button located on the base of the head restraint,
and push downward on the head restraint. The release
button does not need to be pushed to adjust the head
restraint.

To remove the head restraint, raise it as far as it can go
then push the adjustment button and the release but-
ton at the base of each post while pulling the head
restraint up. To reinstall the head restraint, put the
head restraint posts into the holes and push downward.
Then adjust it to the appropriate height.

WARNING!

A loose head restraint thrown forward in a collision
or hard stop could cause serious injury or death to
occupants of the vehicle. Always securely stow
removed head restraints in a location outside the
occupant compartment.

ALL the head restraints MUST be reinstalled in the
vehicle to properly protect the occupants. Follow
the reinstallation instructions prior to operating the
vehicle or occupying a seat.

NOTE:

Do not reposition the head restraint 180 degrees to the
incorrect position in an attempt to gain additional clear-
ance to the back of the head.

Front Head Restraint

1 — Release Button
2 — Adjustment Button

GETTING TO KNOW YOUR VEHICLE

63

2

5538906_24_JL_OM_EN_USC_t_E1.pdf   63

5/22/2023   9:02:19 AM

Rear Head Restraints — Two Door

Models

The rear seat is equipped with non-adjustable, but fold-
able head restraints.

To fold the outboard head restraint, pull on the release
strap located on the upper outboard side of each rear
seat.

To return the head restraint to its upward position, lift
up on the head restraint until it locks into place.

For information on child seat tether routing, see

page 239.

WARNING!

Do not drive the vehicle without the rear seat head
restraints installed while passengers are occupying
the rear seat. In a collision, people riding in this
area without the head restraints installed are more
likely to be seriously injured or killed.

A loose head restraint thrown forward in a collision
or hard stop could cause serious injury or death to
occupants of the vehicle. Always securely stow
removed head restraints in a location outside the
occupant compartment.

ALL the head restraints MUST be reinstalled in the
vehicle to properly protect the occupants. Follow
the reinstallation instructions prior to operating the
vehicle or occupying a seat.

Rear Head Restraints — Four Door

Models

The rear seat is equipped with nonadjustable, but fold-
able, outboard head restraints, as well as an adjust-
able, removable center head restraint.

To fold the outboard head restraint, pull on the inner
release lever, located on the upper part of the rear
seat.

To return the head restraint to its upward position, lift
up on the head restraint until it locks into place.

To raise the center head restraint, lift up on the head
restraint. To lower the center head restraint, push the
adjustment button, located at the base of the head
restraint, and push down on the head restraint.

Rear Head Restraint Folding Strap Locations

Rear Head Restraints Folded

Rear Head Restraint Lever

Rear Head Restraint Folded

64

GETTING TO KNOW YOUR VEHICLE

5538906_24_JL_OM_EN_USC_t_E1.pdf   64

5/22/2023   9:02:19 AM

To remove the center head restraint, push the release
button, located on the base of the head restraint, and
pull upward on the head restraint.

To install the head restraint, hold the release button
while pushing downward on the head restraint. For
information on child seat tether routing, see

page 239.

NOTE:

Lower the center head restraint to avoid contact with
the center console when folding the seat down.

WARNING!

Do not drive the vehicle without the rear seat head
restraints installed while passengers are occupying
the rear seat. In a collision, people riding in this
area without the head restraints installed are more
likely to be seriously injured or killed.

A loose head restraint thrown forward in a collision
or hard stop could cause serious injury or death to
occupants of the vehicle. Always securely stow
removed head restraints in a location outside the
occupant compartment.

ALL the head restraints MUST be reinstalled in the
vehicle to properly protect the occupants. Follow
the reinstallation instructions prior to operating the
vehicle or occupying a seat.

UCONNECT VOICE RECOGNITION

INTRODUCING VOICE
RECOGNITION

Start using Uconnect Voice Recognition with these help-
ful quick tips. It provides the key Voice Commands and
tips you need to know to control your vehicle’s Voice
Recognition (VR) system.

BASIC VOICE COMMANDS

The following basic Voice Commands can be given at
any point while using your Uconnect system.

Push the VR button on the steering wheel. After the
beep, say:

Cancel

” to stop a current voice session.

Help

” to hear a list of suggested Voice Commands.

Repeat

” to listen to the system prompts again.

Notice the visual cues that inform you of your Voice
Recognition system’s status.

GET STARTED

The

VR button is used to activate/deactivate your

Voice Recognition system.

Helpful hints for using Voice Recognition:

Reduce background noise. Wind noise and passen-
ger conversations are examples of noise that may
impact recognition.

Speak clearly at a normal pace and volume while
facing straight ahead.

Each time you give a Voice Command, first push the
VR button, wait until after the beep, then say your
Voice Command.

You can interrupt the help message or system
prompts by pushing the VR button and saying a
Voice Command from the current category.

ADDITIONAL INFORMATION

© 2023 FCA US LLC. All rights reserved. Mopar and
Uconnect are registered trademarks and Mopar Owner
Connect is a trademark of FCA US LLC. SiriusXM® and
all related marks and logos are trademarks of
SiriusXM® Radio Inc.

page 352.

For Uconnect system support, call 1-877-855-8400
(24 hours a day 7 days a week) or visit
DriveUconnect.com (US) or DriveUconnect.ca (Canada).

Uconnect Voice Command Buttons

1 — Push To Start Or Answer A Phone Call And Send Or
Receive A Text
2 — Push The Voice Recognition Button To Begin Radio,
Media, Navigation, And Climate Functions
3 — Push To End Call

GETTING TO KNOW YOUR VEHICLE

65

2

5538906_24_JL_OM_EN_USC_t_E1.pdf   65

5/22/2023   9:02:19 AM

MIRRORS

INSIDE REARVIEW MIRROR

Manual Mirror — If Equipped

The rearview mirror can be adjusted up, down, left, and
right. The mirror should be adjusted to center on the
view through the rear window.

Headlight glare from vehicles behind you can be
reduced by moving the small control under the mirror to
the night position (toward the rear of the vehicle). The
mirror should be adjusted while set in the day position
(toward the windshield).

Automatic Dimming Mirror —

If Equipped

The rearview mirror can be adjusted up, down, left, and
right. The mirror should be adjusted to center on the
view through the rear window.

The mirror automatically adjusts to headlight glare from
vehicles behind you.

NOTE:

The Automatic Dimming feature is disabled when the
vehicle is in REVERSE to improve the driver’s view.

The Automatic Dimming feature can be turned on or off
through Uconnect Settings

page 201.

CAUTION!

To avoid damage to the mirror during cleaning, never
spray any cleaning solution directly onto the mirror.
Apply the solution onto a clean cloth and wipe the
mirror clean.

ILLUMINATED VANITY MIRRORS

To access an illuminated vanity mirror, flip down one of
the visors and lift the cover.

OUTSIDE MIRRORS

The outside mirror(s) can be adjusted to the center of
the adjacent lane of traffic to achieve the optimal view.

WARNING!

Vehicles and other objects seen in the passenger
side convex mirror will look smaller and farther away
than they really are. Relying too much on your pas-
senger side mirror could cause you to collide with
another vehicle or other object. Use your inside mirror
when judging the size or distance of a vehicle seen in
the passenger side mirror.

Adjusting Rearview Mirror

Automatic Dimming Mirror

Vanity Mirror

Outside Rearview Mirror

66

GETTING TO KNOW YOUR VEHICLE

5538906_24_JL_OM_EN_USC_t_E1.pdf   66

5/22/2023   9:02:19 AM

OUTSIDE MIRRORS WITH TURN
SIGNAL — IF EQUIPPED

Driver and passenger outside mirrors with turn signal
lighting contain LEDs, which are located in the upper
outer corner of each mirror.

The LEDs are turn signal indicators, which flash with
the corresponding turn signal lights in the front and
rear of the vehicle. Turning on the Hazard Warning
flashers will also activate these LEDs.

POWER MIRRORS — IF EQUIPPED

The power mirror controls are located on the door panel
next to the door handle.

The power mirror controls consist of mirror select but-
tons and a four-way mirror control switch. To adjust a
mirror, push either the L (left) or R (right) button to
select the mirror that you want to adjust.

Using the mirror control switch, push any of the four
arrows for the direction that you want the mirror to
move.

HEATED MIRRORS — IF EQUIPPED

These mirrors are heated to melt frost or ice.
This feature will be activated whenever you
turn on the rear window defroster
(if equipped)

page 74.

UNIVERSAL GARAGE DOOR OPENER
(HomeLink®) — IF EQUIPPED

Use this QR code to access your digital
experience.

HomeLink® replaces up to three
hand-held transmitters that operate
devices such as garage door open-
ers, motorized gates, lighting, or
home security systems. The
HomeLink® unit is powered by your vehicle’s 12 Volt
battery.

The HomeLink® buttons that are located in the
overhead console or sun visor designate the three
different HomeLink® channels.

To operate HomeLink®, push and release any of the
programmed HomeLink® buttons. These buttons
will activate the devices they are programmed to
with each press of the corresponding HomeLink®
button.

The HomeLink® indicator light is located above the
center button.

NOTE:

HomeLink® is disabled when the Vehicle Security sys-
tem is active

page 352.

BEFORE YOU BEGIN
PROGRAMMING HOMELINK®

For efficient programming and accurate transmission of
the Radio Frequency (RF) signal, it is recommended
that a new battery be placed in the hand-held transmit-
ter of the device that is being programmed to the
HomeLink® system. Make sure your hand-held trans-
mitter is programmed to activate the device you are
trying to program your HomeLink® button to.

Ensure that your vehicle is parked outside of the garage
before you begin programming.

It is recommended that you erase all the channels of
your HomeLink® before you use it for the first time.

Power Mirror Switch

HomeLink® Buttons On Sun Visor

Scan me

GETTING TO KNOW YOUR VEHICLE

67

2

5538906_24_JL_OM_EN_USC_t_E1.pdf   67

5/22/2023   9:02:19 AM

ERASING ALL THE HOMELINK®
CHANNELS

To erase the channels, follow this procedure:

1. Place the ignition switch into the ON/RUN position.

2. Push and hold the two outside HomeLink® buttons

(I and III) for up to 20 seconds, or until the
HomeLink® indicator light flashes.

NOTE:

Erasing all channels should only be performed when
programming HomeLink® for the first time. Do not
erase channels when programming additional buttons.

IDENTIFYING WHETHER YOU HAVE
A ROLLING CODE OR NON-ROLLING
CODE DEVICE

Before programming a device to one of your
HomeLink® buttons, you must determine whether the
device has a rolling code or non-rolling code.

Rolling Code Devices

To determine if your device has a rolling code, a good
indicator is its manufacturing date. Typically, devices
manufactured after 1995 have rolling codes. A device
with a rolling code will also have a “LEARN” or “TRAIN”
button located where the antenna is attached to the
device. The button may not be immediately visible when
looking at the device. The name and color of the button
may vary slightly by manufacturer.

NOTE:

The “LEARN” or “TRAIN” button is not the button you
normally use to operate the device.

Non-rolling Code Devices

Most devices manufactured before 1995 will not have a
rolling code. These devices will also not have a “LEARN”
or “TRAIN” button.

PROGRAMMING HOMELINK® TO A
GARAGE DOOR OPENER

To program any of the HomeLink® buttons to activate
your garage door opener motor, proceed as follows:

NOTE:

All HomeLink® buttons are programmed using this pro-
cedure. You do not need to erase all channels when
programming additional buttons.

1. Place the ignition switch in the ON/RUN position.

2. Place the garage door opener transmitter 1 to

3 inches (3 to 8 cm) away from the HomeLink® but-
ton you wish to program, while keeping the
HomeLink® indicator light in view.

3. Push and hold the HomeLink® button you want to

program while you push and hold the garage door
opener transmitter button you are trying to replicate.

4. Continue to hold both buttons and observe the

HomeLink® indicator light. The HomeLink® indica-
tor light will flash slowly and then rapidly. Once this
happens, release both buttons.

NOTE:

Make sure the garage door opener motor is plugged in
before moving on to the rolling code/non-rolling code
final steps.

Rolling Code Garage Door Opener Final Steps

NOTE:

You have 30 seconds in which to initiate rolling code
final step 2, after completing rolling code final step 1.

1. At the garage door opener motor (in the garage),

locate the “LEARN” or “TRAIN” button. This can usu-
ally be found where the hanging antenna wire is
attached to the garage door opener motor. Firmly
push and release the “LEARN” or “TRAIN” button.

2. Return to the vehicle and push the programmed

HomeLink® button three times (holding the button
for two seconds each time). If the garage door
opener motor operates, programming is complete.

3. Push the programmed HomeLink® button to con-

firm that the garage door opener motor operates.
If the garage door opener motor does not operate,
repeat the final steps for the rolling code procedure.

Non-Rolling Code Garage Door Opener Final Steps

1. Push and hold the programmed HomeLink® button

and observe the HomeLink® indicator light. If the
HomeLink® indicator light stays on constantly, pro-
gramming is complete.

2. Push the programmed HomeLink® button to con-

firm that the garage door opener motor operates.
If the garage door opener motor does not operate,
repeat the steps from the beginning.

WARNING!

Your motorized door or gate will open and close
while you are programming the universal transmit-
ter. Do not program the transmitter if people or
pets are in the path of the door or gate.

(Continued)

68

GETTING TO KNOW YOUR VEHICLE

5538906_24_JL_OM_EN_USC_t_E1.pdf   68

5/22/2023   9:02:19 AM

WARNING!

Do not run your vehicle in a closed garage or con-
fined area while programming the transmitter.
Exhaust gas from your vehicle contains carbon mon-
oxide which is odorless and colorless. Carbon monox-
ide is poisonous when inhaled and can cause you
and others to be severely injured or killed.

PROGRAMMING HOMELINK® TO A
MISCELLANEOUS DEVICE

The procedure on how to program HomeLink® to a mis-
cellaneous device follows the same procedure as pro-
gramming to a garage door opener

page 68. Be

sure to determine if the device has a rolling code, or
non-rolling code before beginning the programming
process.

NOTE:

Canadian Radio Frequency (RF) laws require transmitter
signals to time-out (or quit) after several seconds of trans-
mission, which may not be long enough for HomeLink® to
pick up the signal during programming. Similar to this
Canadian law, some U.S. gate operators are designed to
time-out in the same manner. The procedure may need to
be performed multiple times to successfully pair the
device to your HomeLink® buttons.

REPROGRAMMING A SINGLE
HOMELINK® BUTTON

To reprogram a single HomeLink® button that has been
previously trained, without erasing all the channels,
proceed as follows. Be sure to determine whether the
new device you want to program the HomeLink® button
to has a rolling code, or non-rolling code.

1. Place the ignition in the ON/RUN position, without

starting the engine.

2. Push and hold the desired HomeLink® button until

the HomeLink® Indicator light begins to flash after
20 seconds.

Do not release the button.

3.

Without releasing the button

, proceed with Step 2

in “Programming HomeLink® To A Garage Door
Opener” and follow all remaining steps.

CANADIAN/GATE OPERATOR
PROGRAMMING

For programming transmitters in Canada/United States
that require the transmitter signals to “time-out” after
several seconds of transmission.

Canadian Radio Frequency (RF) laws require transmitter
signals to time-out (or quit) after several seconds of trans-
mission, which may not be long enough for HomeLink® to
pick up the signal during programming. Similar to this
Canadian law, some U.S. gate operators are designed to
time-out in the same manner.

It may be helpful to unplug the device during the cycling
process to prevent possible overheating of the garage
door or gate motor.

1. Place the ignition in the ON/RUN position.

NOTE:

For vehicles equipped with Keyless Enter ‘n Go™,
place the ignition in the RUN position. Make sure
while programming HomeLink® with the engine on
that your vehicle is outside of your garage, or that
the garage door remains open at all times.

2. Place the hand-held transmitter 1 to 3 inches (3 to

8 cm) away from the HomeLink® button you wish to
program while keeping the HomeLink® indicator
light in view.

3. Continue to push and hold the HomeLink® button

while you push and release (cycle) your hand-held
transmitter every two seconds until HomeLink® has
successfully accepted the frequency signal. The indi-
cator light will flash slowly and then rapidly when
fully trained.

4. Watch for the HomeLink® indicator to change flash

rates. When it changes, it is programmed. It may take
up to 30 seconds or longer in rare cases. The garage
door may open and close while you are programming.

5. Push and hold the programmed HomeLink® button

and observe the indicator light.

NOTE:

If the indicator light stays on constantly, program-
ming is complete and the garage door/device
should activate when the HomeLink® button is
pushed.

To program the two remaining HomeLink® but-
tons, repeat each step for each remaining but-
ton. DO NOT erase the channels.

If you unplugged the garage door opener/device for
programming, plug it back in at this time.

Reprogramming A Single HomeLink® Button
(Canadian/Gate Operator)

To reprogram a channel that has been previously
trained, follow these steps:

1. Place the ignition in the ON/RUN position.

2. Press and hold the desired HomeLink® button until

the indicator light begins to flash after 20 seconds.
Do not release the button.

3. Without releasing the button, proceed with

“Canadian/Gate Operator Programming” step 2 and
follow all remaining steps.

GETTING TO KNOW YOUR VEHICLE

69

2

5538906_24_JL_OM_EN_USC_t_E1.pdf   69

5/22/2023   9:02:19 AM

SECURITY

It is advised to erase all channels before you sell or turn
in your vehicle.

To do this, push and hold the two outside buttons for
20 seconds until the indicator flashes. Note that all
channels will be erased. Individual channels cannot be
erased.

The HomeLink® universal transmitter is disabled when
the Vehicle Security system is active.

TROUBLESHOOTING TIPS

If you are having trouble programming HomeLink®,
here are some of the most common solutions:

Replace the battery in the garage door opener hand-
held transmitter.

Push the LEARN button on the garage door opener
to complete the training for a rolling code.

Did you unplug the device for programming and
remember to plug it back in?

If you have any problems, or require assistance, please
call toll-free 1-800-355-3515 or visit HomeLink.com for
information or assistance.

WARNING!

Vehicle exhaust contains carbon monoxide, a dan-
gerous gas. Do not run your vehicle in the garage
while programming the transmitter. Exhaust gas
can cause serious injury or death.

Your motorized door or gate will open and close
while you are programming the universal transmit-
ter. Do not program the transmitter if people, pets
or other objects are in the path of the door or gate.
Only use this transmitter with a garage door

(Continued)

WARNING!

opener that has a “stop and reverse” feature as
required by Federal safety standards. This includes
most garage door opener models manufactured
after 1982. Do not use a garage door opener with-
out these safety features.

EXTERIOR LIGHTS

HEADLIGHT SWITCH

The headlight switch is located on the left side of the
instrument panel. This switch controls the operation of
the headlights, parking lights, automatic headlights
(if equipped), instrument panel lights, interior lights,
and fog lights (if equipped).

NOTE:

Vehicles sold in Canada are equipped with a headlight
switch with an AUTO and ON detent but without an OFF
detent. Headlights will be deactivated when the headlight
switch is placed in the parking lights position. However,
the Daytime Running Lights (DRLs) will be activated along
with the front and rear marker lights. The DRLs may be
deactivated when the parking brake is engaged.

Rotate the headlight switch clockwise to the first detent
for parking light and instrument panel light operation.
Rotate the headlight switch to the second detent for head-
light, parking light, and instrument panel light operation.

NOTE:

For vehicles sold in Canada, rotate the headlight switch
clockwise from the parking lights and instrument panel
lights position to the first detent to turn on headlights,
parking lights, and instrument panel lights. Rotate the
headlight switch to the second detent for the AUTO
position.

Headlight Switch

1 — Headlight Control
2 — Fog Light Switch
3 — Dimmer Control

Headlight Switch (Vehicles Sold In Canada)

1 — Headlight Control
2 — Fog Light Switch
3 — Dimmer Control

70

GETTING TO KNOW YOUR VEHICLE

5538906_24_JL_OM_EN_USC_t_E1.pdf   70

5/22/2023   9:02:19 AM

DAYTIME RUNNING LIGHTS
(DRLS) — IF EQUIPPED

The Daytime Running Lights are active when the low
beams are not on, and the engine is running. DRLs may
be deactivated by applying the parking brake.

NOTE:

For vehicles sold in Canada, the Daytime Running
Lights will automatically deactivate when the front
fog lights are turned on.

On some vehicles, the Daytime Running Lights may
deactivate, or reduce intensity, on one side of the
vehicle (when a turn signal is activated on that
side), or on both sides of the vehicle (when the haz-
ard warning lights are activated).

HIGH/LOW BEAM SWITCH

Push the multifunction lever toward the instrument
panel to switch the headlights to high beams. The lever
will return to the centered position. To return the head-
lights to low beam, pull the lever toward the steering
wheel, or push the lever toward the instrument panel.

AUTOMATIC HIGH BEAM
HEADLAMP CONTROL —
IF EQUIPPED

The Automatic High Beam Headlamp Control system
provides increased forward lighting at night by auto-
matically controlling the high beams through the use of
a camera mounted on the vehicle’s header. This cam-
era detects vehicle specific light and automatically
switches from high beams to low beams until the
approaching vehicle is out of view.

NOTE:

The Automatic High Beam Headlamp Control can be
turned on or off by selecting “ON” under “Auto High
Beam” within your Uconnect Settings

page 201,

as well as turning the headlight switch to the AUTO
position and placing the multifunction lever in the
high beam position.

Broken, muddy, or obstructed headlights and tail-
lights of vehicles in the field of view will cause head-
lights to remain on longer (closer to the vehicle).
Also, dirt, film, and other obstructions on the wind-
shield or camera lens will cause the system to func-
tion improperly.

FLASH-TO-PASS

You can signal another vehicle with your headlights by
lightly pulling the multifunction lever toward you. This
will cause the high beam headlights to turn on, and
remain on, until the lever is released.

AUTOMATIC HEADLIGHTS —
IF EQUIPPED

This system automatically turns the headlights on or off
according to ambient light levels. To turn the system on,
rotate the headlight switch clockwise to the last detent for
automatic headlight operation. When the system is on,
the headlight time delay feature is also on. This means
the headlights will stay on for up to 90 seconds after you
place the ignition into the OFF position. To turn the auto-
matic system off, move the headlight switch out of the
AUTO position.

NOTE:

The engine must be running before the headlights will
come on in the automatic mode.

LIGHTS-ON REMINDER

If the headlights, parking lights, or cargo lights are left
on after the ignition is placed in the OFF position, a
chime will sound when the driver’s door is opened.

Multifunction Lever

GETTING TO KNOW YOUR VEHICLE

71

2

5538906_24_JL_OM_EN_USC_t_E1.pdf   71

5/22/2023   9:02:19 AM

FRONT FOG LIGHTS — IF EQUIPPED

To activate the Front Fog Lights, turn on the parking
lights or low beam headlights and push the fog light
switch. Pushing the fog light switch a second time will
turn the front fog lights off.

TURN SIGNALS

Move the multifunction lever up or down to activate the
turn signals. The arrows on each side of the instrument
cluster flash to show proper operation.

NOTE:

If either light remains on and does not flash, or there is
a very fast flash rate, check for a defective outside light
bulb.

LANE CHANGE ASSIST —
IF EQUIPPED

Lightly push the multifunction lever up or down, without
moving beyond the detent, and the turn signal will flash
three times then automatically turn off.

INTERIOR LIGHTS

INTERIOR COURTESY LIGHTS

The courtesy lights will turn on when the front doors are
opened, by rotating the dimmer control on the headlight
switch fully upward, or, if equipped, when the unlock
button is pushed on the key fob.

The interior courtesy lights are located in the center of
the vehicle’s sport bar, and consist of one large center
light and four smaller reading lights. Each reading light
can be turned on by pushing the lens. Pushing the lens
a second time will turn the light off.

When a door is open and the interior lights are on,
rotating the dimmer control to the extreme bottom posi-
tion will cause all the interior lights to turn off. This
allows the doors to stay open for extended periods of
time without discharging the vehicle’s battery.

DIMMER CONTROL

The dimmer control is part of the headlight switch and
is located on the left side of the instrument panel.

Front Fog Light Switch

Front Fog Light Switch (Vehicles Sold In Canada)

Dome Lights

Dimmer Control

72

GETTING TO KNOW YOUR VEHICLE

5538906_24_JL_OM_EN_USC_t_E1.pdf   72

5/22/2023   9:02:19 AM

With the parking lights or headlights on, rotating the
dimmer control upward will increase the brightness of
the instrument panel lights. Rotating the dimmer con-
trol will also adjust the interior and ambient light levels
(e.g. courtesy lights in the footwell, illuminated cuphold-
ers, and front door handles).

WINDSHIELD WIPERS AND WASHERS

The windshield wiper/washer control lever is located on
the right side of the steering column. The front wipers
are operated by rotating a switch, located at the end of
the lever.

WINDSHIELD WIPER OPERATION

Rotate the end of the lever upward to the first detent
past the intermittent settings for low-speed wiper
operation. Rotate the end of the lever upward to the
second detent past the intermittent settings for high-
speed wiper operation.

CAUTION!

In cold weather, always turn off the wiper switch and
allow the wipers to return to the park position before
turning off the engine. If the wiper switch is left on and
the wipers freeze to the windshield, damage to the
wiper motor may occur when the vehicle is restarted.

Intermittent Wipers

Use the intermittent wiper when weather conditions
make a single wiping cycle, with a variable pause
between cycles, desirable. Rotate the end of the lever
to the first detent position for one of four intermittent
settings. The delay cycle can be set anywhere between
1 to 18 seconds.

NOTE:

The wiper delay times depend on vehicle speed. If the
vehicle is moving less than 10 mph (16 km/h), delay
times will be doubled.

Windshield Washers

To use the washer, pull the lever toward you and hold
while spray is desired. If the lever is pulled while in the
delay range, the wiper will start and continue to operate
for two or three wipe cycles after the lever is released.
Then, the intermittent interval previously selected will
resume.

If the lever is pulled while in the off position, the wipers
will operate for two or three wipe cycles. Then, the wip-
ers will turn off.

NOTE:

As a protective measure, the washer will stop if the
switch is held for more than 20 seconds. Once the
switch is released the washer will resume normal
operation.

WARNING!

Sudden loss of visibility through the windshield could
lead to a collision. You might not see other vehicles or
other obstacles. To avoid sudden icing of the windshield
during freezing weather, warm the windshield with the
defroster before and during windshield washer use.

Dimmer Control (Vehicles Sold In Canada)

Windshield Wiper/Washer Operation

1 — Pull For Front Washer
2 — Rotate For Rear Wiper Operation (If Equipped)
3 — Rotate For Front Wiper Operation
4 — Push Forward For Rear Washer
5 — Push Up For Mist

GETTING TO KNOW YOUR VEHICLE

73

2

5538906_24_JL_OM_EN_USC_t_E1.pdf   73

5/22/2023   9:02:19 AM

Mist

Push upward on the wiper lever to activate a single
wipe to clear off-road mist or spray from a passing
vehicle. As long as the lever is held up, the wipers will
continue to operate.

NOTE:

The mist feature does not activate the washer pump;
therefore, no washer fluid will be sprayed on the wind-
shield. The washer function must be used in order to
spray the windshield with washer fluid.

For information on wiper care and replacement, see

page 298.

REAR WINDOW WIPER/WASHER —
IF EQUIPPED

A rotary switch on the center portion of the windshield
wiper/washer lever controls the operation of the rear
wiper/washer function.

Rotate the switch upward to the first detent
position for intermittent operation and to the
second detent for continuous rear wiper
operation.

Push the wiper lever toward the instrument
panel to activate the rear washer. The
washer pump and wiper will continue to
operate as long as the lever is held.

NOTE:

As a protective measure, the washer will stop if the switch
is held for more than 20 seconds. Once the switch is
released the washer will resume normal operation.

If the rear wiper is operating when the ignition is placed
in the OFF position, the wiper will automatically return
to the parked position. When the vehicle is restarted,
the wiper will resume function at whichever position the
switch is set at.

CLIMATE CONTROLS

The Climate Control system allows you to regulate the tem-
perature, air flow, and direction of air circulating through-
out the vehicle. The controls are located on the touch-
screen and on the instrument panel below the radio.

AUTOMATIC CLIMATE CONTROL
DESCRIPTIONS AND FUNCTIONS

MAX A/C Button

Press and release the MAX A/C button on the
touchscreen to change the current setting to
the coldest output of air. The MAX A/C indica-
tor illuminates when MAX A/C is on. Pressing

the button again will cause the MAX A/C operation to exit.

NOTE:

The MAX A/C button is only available on the touchscreen.

MAX A/C sets the control for maximum cooling perfor-
mance. The button illuminates when MAX A/C is on. In
MAX A/C, the blower level and mode position can be
adjusted to desired user settings. Pressing other set-
tings will cause the MAX A/C to turn off.

A/C Button

Press and release this button on the touch-
screen, or push the button on the faceplate
to change the current setting. The A/C indi-
cator illuminates when A/C is on.

The A/C button allows the operator to manually activate
or deactivate the A/C system. When the A/C system is
turned on, cool dehumidified air will flow through the
outlets into the cabin.

Recirculation Button

Press and release this button on the touch-
screen, or push the button on the faceplate,
to change the system between recirculation
mode and outside air mode. The Recircula-

tion indicator and the A/C indicator illuminate when the
Recirculation button is pressed. Recirculation can be
used when outside conditions, such as smoke, odors,
dust, or high humidity are present. Recirculation can be
used in all modes. Recirculation may be unavailable
(button on the touchscreen greyed out) if conditions

Uconnect 5 NAV With 12.3-inch Display Automatic

Climate Controls

74

GETTING TO KNOW YOUR VEHICLE

5538906_24_JL_OM_EN_USC_t_E1.pdf   74

5/22/2023   9:02:19 AM

exist that could create fogging on the inside of the wind-
shield. The A/C can be deselected manually without
disturbing the mode control selection. Continuous use
of the Recirculation mode may make the inside air
stuffy and window fogging may occur. Extended use of
this mode is not recommended. Recirculation mode
may automatically adjust to optimize customer experi-
ence for warming, cooling, dehumidification, etc.

In cold weather, use of Recirculation mode may lead to
excessive window fogging.

AUTO Button

Set your desired temperature and press and
release the AUTO button on the touchscreen,
or push the button on the faceplate. AUTO will
achieve and maintain your desired tempera-

ture by automatically adjusting the blower speed and air
distribution. Air Conditioning (A/C) may be active during
AUTO operation to improve performance. AUTO mode is
highly recommended for efficiency. You can press and
release this button on the touchscreen, or push the but-
ton on the faceplate, to turn AUTO on. The AUTO indicator
illuminates when AUTO is on. Toggling this function will
cause the system to switch between manual mode and
automatic mode

page 76.

Front Defrost Button

Press and release this button on the touch-
screen, or push and release the button on
the faceplate, to change the current airflow
setting to Defrost mode. The Front Defrost

indicator illuminates when Front Defrost is on. Air
comes from the windshield and side window demist
outlets. When the defrost button is selected, the blower
level may increase. Use Defrost mode with maximum

temperature settings for best windshield and side win-
dow defrosting and defogging. When toggling the front
defrost mode button, the climate system returns to the
previous setting.

Rear Defrost Button

Press and release the Rear Defrost button on
the touchscreen, or push and release the but-
ton on the faceplate, to turn on the rear win-
dow defroster and the heated outside mirrors

(if equipped). The Rear Defrost indicator illuminates when
the rear window defroster is on. The rear window defroster
automatically turns off after 10 minutes.

CAUTION!

Failure to follow these cautions can cause damage to
the heating elements:

Use care when washing the inside of the rear win-
dow. Do not use abrasive window cleaners on the
interior surface of the window. Use a soft cloth and
a mild washing solution, wiping parallel to the
heating elements. Labels can be peeled off after
soaking with warm water.

Do not use scrapers, sharp instruments, or abra-
sive window cleaners on the interior surface of the
window.

Keep all objects a safe distance from the window.

Driver And Passenger Temperature Up

And Down Buttons

Provides the driver and passenger with independent
temperature control.

Push the red button on the faceplate or touch-
screen or press and slide the temperature bar
towards the red arrow button on the touch-
screen for warmer temperature settings.

Push the blue button on the faceplate or
touchscreen or press and slide the tempera-
ture bar towards the blue arrow button on the
touchscreen for cooler temperature settings.

NOTE:

The numbers within the temperature display will only
appear if your vehicle is equipped with an Automatic
Climate Control system.

SYNC Button

Press the SYNC button on the touchscreen
to toggle the SYNC feature on/off. The SYNC
indicator illuminates when SYNC is on. SYNC
synchronizes the passenger temperature

setting with the driver temperature setting. Changing
the passenger’s temperature setting while in SYNC will
automatically exit this feature.

NOTE:

The SYNC button is only available on the touchscreen.

GETTING TO KNOW YOUR VEHICLE

75

2

5538906_24_JL_OM_EN_USC_t_E1.pdf   75

5/22/2023   9:02:19 AM

Blower Control

Blower Control regulates the amount of air
forced through the Climate Control system.
Adjusting the blower will cause automatic
mode to switch to manual operation. There

are seven blower speeds available. The speeds can be
selected using either the blower control knob on the
faceplate or the buttons on the touchscreen.

Faceplate:

The blower speed increases as you turn

the blower control knob clockwise from the lowest
blower setting. The blower speed decreases as you
turn the blower control knob counterclockwise.

Touchscreen:

Use the small blower icon to reduce

the blower setting and the large blower icon to
increase the blower setting. The blower can also be
selected by pressing the blower bar area between
the icons.

Mode Control

Select one of the Mode buttons on the
touchscreen or press the Mode button on
the faceplate to adjust the airflow distribu-
tion. The airflow distribution can be adjusted

so air comes from the instrument panel outlets, floor
outlets, defrost outlets, and demist outlets.

Panel Mode

Air comes from the outlets in the instrument
panel. Each of these outlets can be individu-
ally adjusted to direct the flow of air. The air
vanes of the center outlets and outboard

outlets can be moved up and down or side to side to
regulate airflow direction. There is a shut-off wheel
located below the air vanes to shut off or adjust the
amount of airflow from these outlets.

Bi-Level Mode

Air comes from the instrument panel outlets
and floor outlets. A slight amount of air is
directed through the defrost and side win-
dow demister outlets.

NOTE:

Bi-Level mode is designed under comfort conditions to
provide cooler air out of the panel outlets and warmer
air from the floor outlets.

Floor Mode

Air comes from the floor outlets. A slight
amount of air is directed through the defrost
and side window demister outlets.

Mix Mode

Air is directed through the floor, defrost, and
side window demister outlets. This setting
works best in cold or snowy conditions that
require extra heat to the windshield. This

setting is good for maintaining comfort while reducing
moisture on the windshield.

Climate Control OFF Button

Press and release the OFF button on the
touchscreen, or push the OFF button on the
faceplate to turn the Climate Control
ON/OFF.

AUTOMATIC TEMPERATURE
CONTROL (ATC) — IF EQUIPPED

Automatic Operation

1. Push the AUTO button on the faceplate, or the AUTO

button on the touchscreen on the Automatic Tem-
perature Control (ATC) Panel.

2. Next, adjust the temperature that you would like the

system to maintain by adjusting the driver and pas-
senger temperature control buttons. Once the
desired temperature is displayed, the system will
achieve and automatically maintain that comfort
level.

3. When the system is set up for your comfort level, it

is not necessary to change the settings. You will
experience the greatest efficiency by simply allowing
the system to function automatically.

NOTE:

It is not necessary to move the temperature settings
for cold or hot vehicles. The system automatically
adjusts the temperature, mode, and blower speed
to provide comfort as quickly as possible.

The temperature can be displayed in US or Metric
units by selecting the US/Metric customer-
programmable feature within Uconnect Settings

page 201.

To provide you with maximum comfort in the Automatic
mode during cold start-ups, the blower fan will remain
on low until the engine warms up. The blower will
increase in speed and transition into Auto mode.

76

GETTING TO KNOW YOUR VEHICLE

5538906_24_JL_OM_EN_USC_t_E1.pdf   76

5/22/2023   9:02:19 AM

Manual Operation Override

This system offers a full complement of manual override
features. The AUTO symbol in the front ATC display will be
turned off when the system is being used in the manual
mode.

CLIMATE VOICE COMMANDS

Adjust vehicle temperatures hands-free and keep every-
one comfortable while you keep moving ahead.

Push the VR button on the steering wheel. After the
beep, say one of the following commands:

Set the driver temperature to

70

degrees

Set the passenger temperature to

70

degrees

Did You Know:

Voice Command for Climate may only be

used to adjust the interior temperature of your vehicle.
Voice Command will not work to adjust the heated
seats or steering wheel if equipped.

OPERATING TIPS

Refer to the chart at the end of this section for sug-
gested control settings for various weather conditions.

Summer Operation

The engine cooling system must be protected with a high-
quality antifreeze coolant to provide proper corrosion pro-
tection and to protect against engine overheating. OAT
coolant (conforming to MS.90032) is recommended.

Winter Operation

To ensure the best possible heater and defroster perfor-
mance, make sure the engine cooling system is function-
ing properly and the proper amount, type, and concentra-
tion of coolant is used. Use of the Air Recirculation mode
during Winter months is not recommended, because it
may cause window fogging.

Vacation/Storage

For information on maintaining the Climate Control sys-
tem when the vehicle is being stored for an extended
period of time, see

page 333.

Window Fogging

Vehicle windows tend to fog on the inside in mild, rainy,
and/or humid weather. To clear the windows, select
Defrost or Mix mode and increase the front blower
speed. Do not use the Recirculation mode without A/C
for long periods, as fogging may occur.

Outside Air Intake

Make sure the air intake, located directly in front of the
windshield, is free of obstructions, such as leaves.
Leaves collected in the air intake may reduce airflow,
and if they enter the plenum, they could plug the water
drains. In Winter months, make sure the air intake is
clear of ice, slush, and snow.

Cabin Air Filter

The Climate Control system filters out dust and pollen
from the air. Contact an authorized dealer to service
your cabin air filter, and to have it replaced when
needed.

Stop/Start System — If Equipped

While in an Autostop, the Climate Control system may
automatically adjust airflow to maintain cabin comfort.
Customer settings will be maintained upon return to an
engine running condition.

Operating Tips Chart

The following chart is for Manual Override Operation.

WEATHER

CONTROL SETTINGS

Hot Weather And

Vehicle Interior Is

Very Hot

Set the mode control to
(Panel Mode),

(A/C) on,

and blower on high. Roll down

the windows for a minute to

flush out the hot air. Adjust the

controls as needed to achieve

comfort.

Warm Weather

Turn

(A/C) on and set the

mode control to

(Panel Mode).

Cool Sunny

Operate in

(Bi-Level Mode).

Cool & Humid

Conditions

Set the mode control to

(Floor Mode) and turn

(A/C)

on to keep windows clear.

Cold Weather

Set the mode control to

(Floor Mode). If windshield fog-

ging starts to occur, move the

control to

(Mix Mode).

GETTING TO KNOW YOUR VEHICLE

77

2

5538906_24_JL_OM_EN_USC_t_E1.pdf   77

5/22/2023   9:02:19 AM

INTERIOR STORAGE AND EQUIPMENT

STORAGE

Glove Compartment

The glove compartment is located on the passenger
side of the instrument panel.

To open the glove compartment, pull the release
handle.

WARNING!

Do not operate this vehicle with a glove compartment
in the open position. Driving with the glove compart-
ment open may result in injury in a collision.

Console Storage Compartment

The center console has both an upper and lower stor-
age compartment.

To open the upper storage compartment, lift the top
latch. To access the lower storage compartment, lift the
bottom latch.

If equipped, the center console storage may have a
locking mechanism.

Rear Storage Compartment —

If Equipped

The rear cargo area storage compartment is located
underneath the load floor.

To access the storage compartment, lift up on the cargo
strap/handle at the rear of the cargo area.

Glove Compartment

Console Storage Latches

1 — Upper Compartment Latch
2 — Lower Compartment Latch

Console Storage Lock

Rear Storage Cover (Four Door Models)

Rear Storage Cover (Two Door Models)

78

GETTING TO KNOW YOUR VEHICLE

5538906_24_JL_OM_EN_USC_t_E1.pdf   78

5/22/2023   9:02:19 AM


Content      ..      1      2      3      ..