Jeep Gladiator (2022 year). Manual in english - page 5
 

  Index      Manuals     Jeep Gladiator (2022 year). Manual in english


Search            copyright infringement  


Content      ..     3      4      5      6     ..


Jeep Gladiator (2022 year). Manual in english - page 5


GETTING TO KNOW YOUR VEHICLE

75

NOTE:

Charge unsupported devices with the Charge Only 

USB ports. If an unsupported device is plugged into 

a Media USB port, a message will display on the 

touchscreen that the device is not supported by 

the system.

J

EEP

® W

IRELESS

 S

PEAKER

 —

I

F

 E

QUIPPED

Your vehicle may be equipped with a wireless 

Bluetooth® speaker.

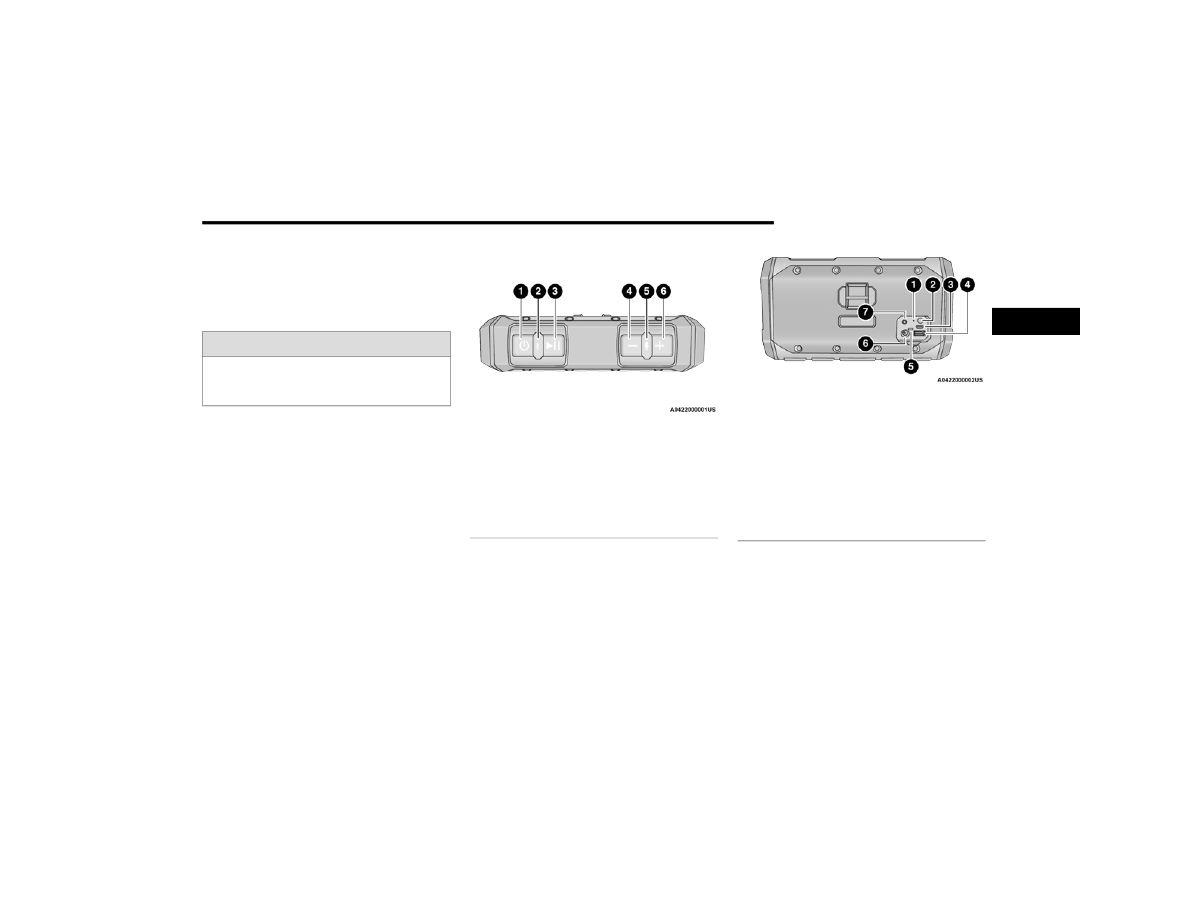
Getting To Know Your Speaker

Speaker Buttons

Rear Speaker Outlets

WARNING!

Do not plug in or remove the external device 

while driving. Failure to follow this warning could 

result in a collision.

1 — Power ON/OFF
2 — Bluetooth®/App Pairing
3 — Play/Pause
4 — Volume Down/Skip Back
5 — Voice Control/Call Control
6 — Volume Up/Skip Forward

1 — Reset Button
2 — Battery Status Button
3 — Service/Diagnostic Port (Non-charging, 

Non-customer use port)
4 — Type A USB Charging Port
5 — Battery Status LED
6 — Speaker Charging Port
7 — AUX Port

2

76

GETTING TO KNOW YOUR VEHICLE


Jeep® Wireless Speaker Location

Wireless Speaker Location

The Jeep® wireless speaker is located behind the 

right rear passenger seat. In order to access the 

Jeep® wireless speaker, the seat will need to be 

folded down or tilted forward.
To remove the Jeep® wireless speaker, pull on the 

strap located on top of the mount for the speaker. 

When the strap is pulled, the Jeep® wireless 

speaker can easily be lifted from the mount.
When placing the Jeep® wireless speaker back in 

the mount, simply put the speaker back in the 

mount.

Placement of the Wireless Speaker

Then push/rotate forward on the front of the 

speaker until the speaker locks in place.

Rotating the Wireless Speaker

Charging External Devices

The Jeep® wireless speaker is capable of charging 

most USB-enabled smartphones and tablets using 

the type A USB charging port.
To use the external charging feature:
1. Turn the speaker on.
2. Plug the USB power cable into the type A USB 

charging port on the back of the speaker.

3. Insert the other end of the USB power cable 

into your device to immediately begin 

charging.

Charging The Speaker

Before using the Jeep® wireless speaker for the 

first time, fully charge your Jeep® wireless speaker 

until the battery indicator light stays solid green.
The Jeep® wireless speaker in-vehicle dock is the 

most ideal way to fully charge the speaker with the 

ignition in ON/RUN or ACC. The speaker can also 

be charged with a power adapter.

NOTE:

Jeep® wireless speaker will not charge within 

vehicle dock while the ignition is fully off.

GETTING TO KNOW YOUR VEHICLE

77

To charge the Jeep® wireless speaker with a 

power adapter, insert the power adapter into a wall 

outlet. Next, plug the power adapter into the Jeep® 

wireless speaker charging port on the back of the 

speaker.

NOTE:

Power adapter needed for the Jeep® wireless 

speaker has to have a range of 14 VDC to 16.5 

VDC, with a minimum of 2.7A and a barrel 

connector dimension of 5.5 mm by 2.5 mm. Power 

adapter is not included.

Operating Temperature

The Jeep® wireless speaker contains a lithium-ion rechargeable battery. Typical charging temperatures for these types of batteries are from

0 to 45°C (32 to 113°F).

NOTE:

The functions described are for when the Jeep® wireless speaker is undocked from the vehicle. When plugged into the docking station, the Jeep® wireless 

speaker functions as part of the vehicle’s sound system.

Monitoring Battery Level Status LED Light

Red

40% or lower

Yellow

40% to 70%

Green

70% to 100%

Temperature

<-4°F

(< -20°C)

-4 to 32°F 

(< -20 to 0°C)

32 to 113°F 

(0 to 45°C)

115 to 140°F

(46 to 60°C)

>140°F 

(>60°C)

Speaker state (docked or Direct Current [DC] 

plugged in)

Off

On

On

On

Off

Speaker state (undocked and running off 

battery)

Off

On

On

On

Off

Speaker’s Internal Battery Charging

No

No

Yes

No

No

2

78

GETTING TO KNOW YOUR VEHICLE


Phone & Bluetooth® Pairing

A feature of the Jeep® wireless speaker is the 

ability for the Jeep® wireless speaker to connect to 

devices using Bluetooth®. Follow these simple 

steps to connect a Bluetooth®-enabled device to 

the Jeep® wireless speaker:
1. Press and hold the power button for

2-3 seconds to turn the Jeep® wireless 

speaker on.

2. Turn “on” Bluetooth® for the device you desire 

to be connected to the Jeep® wireless 

speaker. For instructions on how to turn on 

and off Bluetooth® settings for the desired 

device, refer to the device’s user manual.

3. When powered on, the Jeep® wireless 

speaker will automatically enter pairing mode. 

To pair a second device, press and hold the 

Bluetooth® button for 2-3 seconds, until an 

audio cue is heard. Then go to the devices’ 

Bluetooth® settings and select “Jeep® 

Speaker” from the list.

The Jeep® wireless speaker will remember the last 

eight devices it has paired with.

NOTE:

If the Jeep® wireless speaker is left on with an 

inactive Bluetooth® connection for 30 minutes, it 

will automatically turn off. The Jeep® wireless 

speaker can be turned on again by pressing and 

holding the power button for 2-3 seconds.

Resetting Your Jeep® Wireless Speaker

To reset the Jeep® wireless speaker to its original 

factory setting, press and hold the reset button 

under the back cover for 8-10 seconds.

Speakerphone

The speakerphone feature can be used by 

pressing the “Voice Control” button on the Jeep® 

wireless speaker. This feature can be used to 

answer and end calls over the speakerphone.

Volume And Playback Control

Volume can be increased or decreased by briefly 

pressing the + button or - button. When the 

maximum volume is reached, an audio cue will 

sound.
To skip to the next track, press and hold the + 

button. To go to the previous track, press the - 

button.

Qualcomm TrueWireless™ Stereo

A feature of the Jeep® wireless speaker is being 

able to pair two Jeep® wireless speakers together 

for Qualcomm TrueWireless™ Stereo. This feature 

allows for two Jeep® wireless speakers to play left 

and right stereo sound.

Below are the steps needed for Qualcomm 

TrueWireless™ Stereo:
1. Push and hold the power button on both 

Jeep® wireless speakers until both speakers 

turn on.

2. Place both speakers into Qualcomm 

TrueWireless™ Stereo pairing mode. This can 

be achieved by pressing and holding the 

Battery Status button on both speakers until 

an audio notification is heard from both 

speakers.

3. Connect one of the Jeep® wireless speakers 

to the Bluetooth® source. Refer to previous 

section “Phone & Bluetooth® Pairing” for 

additional information.

4. Once the Jeep® wireless speaker is connected 

to the Bluetooth® device, audio will be played 

from both speakers.

NOTE:

While in Qualcomm TrueWireless™ Stereo mode, 

the volume will not have independent speaker 

control. Pushing the Up or Down Volume button on 

either Jeep® wireless speaker will affect the audio 

output on both, as well as volume adjustments on 

the Bluetooth® device.

GETTING TO KNOW YOUR VEHICLE

79

Waterproof Features

The Jeep® wireless speaker is IP67 waterproof 

certified with design in mind to withstand rainfall, 

waterjets, splashing and being submerged in up to 

3 ft (1 m) of water for up to 30 minutes.

Warnings, Caution & Legal Information

To reduce the risk of fire or electric shock, do not 

expose the Jeep® wireless speaker to rain or 

moisture while charging. The Jeep® wireless 

speaker should not be exposed to dripping or 

splashing, and objects filled with liquids, such as 

vases, should not be placed on or near it while 

being charged or charging other devices. As with 

any electronic products, use care not to spill liquids 

into any part of the product. Liquids can cause a 

failure and/or a fire hazard. The power supply must 

be used indoors only. Make no modifications to the 

product or accessories. Unauthorized alterations 

may compromise safety, regulatory compliance, 

and system performance, and will void the 

warranty. Do not place any flame sources, such as 

lighted candles, on or near the Jeep® wireless 

speaker. The Jeep® wireless speaker contains 

small parts that may be a choking hazard and is 

not suitable for children under age 3. Do not 

continue charging the battery if it does not reach 

full charge within the specified charging time. 

Overcharging may cause the battery to become 

hot, rupture, or ignite. If you see any heat 

deformation or leakage, properly dispose of the 

battery. Do not attempt to charge the battery in 

temperatures outside the range of 32°- 104°F 

(0° - 40°C). If the battery begins to leak, do not 

allow the liquid to come in contact with your skin or 

eyes. If contact has been made, wash the affected 

area with plenty of water and seek medical 

attention immediately. Do not expose the Jeep® 

wireless speaker or battery to excessive heat, 

including direct sunlight or fire. Do not store or use 

inside cars in hot weather, where it can be exposed 

to temperatures in excess of 115°F (60°C). Doing 

so may cause the battery and power supply to 

generate heat, rupture, or ignite. Using the Jeep® 

wireless speaker in this manner also may result in 

a loss of performance and a shortened life 

expectancy. Extended exposure to direct sunlight 

may damage the external appearance and 

material qualities. Do not step on, throw, or drop 

batteries or the power supply or device, or expose 

them to a strong shock. Do not pierce, crush, dent, 

or deform the batteries or power supply in any way. 

If either becomes deformed, properly dispose of it. 

Do not short-circuit batteries. Do not attempt to 

service the Jeep® wireless speaker yourself. 

Opening or removing covers may expose you to 

dangerous voltages or other hazards and will void 

the manufacturer’s warranty. To prevent risk of fire 

or electric shock, avoid overloading wall outlets, 

extension cords, or integral convenience 

receptacles. Your Bluetooth® device (mobile 

phone, music player, tablet, laptop, etc.) must 

support the A2DP Bluetooth® profile in order to 

work wirelessly with your Jeep® wireless speaker. 

The A2DP profile is supported by most recent 

mobile products with built-in Bluetooth® 

capability. Please refer to your device’s user 

manual for details and instruction regarding the 

Bluetooth® profiles it supports. This device 

complies with part 15 of the FCC Rules. Operation 

is subject to the following two conditions: (1) This 

device may not cause harmful interference, and 

(2) this device must accept any interference 

received, including interference that may cause 

undesired operation.
Jeep® follows Safety Instruction for CE- LV. Do not 

operate products in temperatures outside the 

range of -5 to 40°C. Operating Frequency Band: 

2402 MHz to 2480 MHz. Maximum RF power: 

6 dBm EIRP. Do not install this equipment in a 

confined space or building, such as a bookcase or 

similar unit that is not well-ventilated. 

CAUTION!

Ensure the Jeep® Wireless Speaker is prepared 

for use in wet environments by removing all 

cable connections and making sure all port 

covers are sealed tightly. If the cover is not 

secured properly, the Jeep® Wireless Speaker 

may sustain water damage.

2

80

GETTING TO KNOW YOUR VEHICLE


The ventilation should not be impeded by covering 

the ventilation openings with items such as 

newspaper, tablecloths, curtains etc.

NOTE:

Please refer to the information on the bottom of 

the Jeep® wireless speaker for electrical and 

safety information before installing or operating 

the Jeep® wireless speaker.
Directive 2014/53/EU Article 10 Obligations of 

Manufacturers
2. Manufacturers shall ensure that radio 

equipment shall be so constructed that it can be 

operated in at least one Member State without 

infringing applicable requirements on the use of 

radio spectrum.
10. In cases of restrictions on putting in to service 

or of requirements for authorization of use, 

information available on the packaging shall allow 

the identification of the Member States or the 

geographical area within a Member State where 

restrictions on putting into service or requirements 

for authorization of use exist. The Commission may 

adopt implementing acts specifying how to present 

that information. Those implementing acts shall be 

adopted in accordance with the advisory 

procedure referred to in Article 45 (2).

The Bluetooth® word mark and logos are 

registered trademarks owned by Bluetooth SIG, 

Inc. and any use of such marks by FCA US LLC is 

under license. Other trademarks and trade names 

are those of their respective owners.

P

OWER

 O

UTLETS


There is a 12 Volt (13 A) auxiliary power outlet that 

can provide power for accessories designed for 

use with the standard power outlet adapters.
The front power outlet is located in the center of 

the instrument panel below the climate controls, 

and is powered from the ignition switch. Power is 

available when the ignition switch is in the ACC or 

ON/RUN position.

Front Power Outlet

WARNING!

To reduce the risk of fire or electric shock, do not 

expose this apparatus to rain or moisture. Do 

not place objects filled with liquids, such as 

vases, on the apparatus.

WARNING!

There is danger of explosion if battery is 

incorrectly replaced. Replace only with the same 

or equivalent type. If the battery or battery pack 

is exposed to excessive heat or fire, personal 

injury may occur.

CAUTION!

If needed, Jeep® wireless speaker should be 

cleaned using a damp cloth and water. Do not 

use alkaline products like soap or abrasive 

chemicals to clean the Jeep® wireless speaker 

as it could cause damage to it.

GETTING TO KNOW YOUR VEHICLE

81

(Continued)

P

OWER

 I

NVERTERS

 — I

F

 E

QUIPPED


There is a 115 V (400 W) maximum inverter outlet 

located on the back of the center console to 

convert Direct Current (DC) to Alternating Current 

(AC).
This outlet can power cellular phones, electronics 

and other low power devices requiring power up to 

400 W. Certain video game consoles exceed this 

power limit, as will most power tools.

Power Inverter

WARNING!

To avoid serious injury or death:

Do not insert any objects into the receptacles.

Do not touch with wet hands.

Close the lid when not in use.

If this outlet is mishandled, it may cause an 

electric shock and failure.

CAUTION!

Do not exceed the maximum power of 160 W 

(13 A) at 12 Volts. If the 160 W (13 A) power 

rating is exceeded, the fuse protecting the 

system will need to be replaced.

Power outlets are designed for accessory 

plugs only. Do not insert any other object in 

the power outlets as this will damage the 

outlet and blow the fuse. Improper use of the 

power outlet can cause damage not covered 

by your New Vehicle Limited Warranty.

Many accessories that can be plugged in draw 

power from the vehicle's battery, even when 

not in use (i.e., cellular phones, etc.). Eventu

-

ally, if plugged in long enough, the vehicle's 

battery will discharge sufficiently to degrade 

battery life and/or prevent the engine from 

starting.

Accessories that draw higher power (i.e., 

coolers, vacuum cleaners, lights, etc.), will 

degrade the battery even more quickly. Only 

use these intermittently and with greater 

caution.

After the use of high power draw accessories, 

or long periods of the vehicle not being started 

(with accessories still plugged in), the vehicle 

must be driven a sufficient length of time to 

allow the alternator to recharge the vehicle's 

battery.

Power outlets are designed for accessory 

plugs only. Do not hang any type of accessory 

or accessory bracket from the plug. Improper 

use of the power outlet can cause damage.

CAUTION!

2

82

GETTING TO KNOW YOUR VEHICLE


There may also be a second 115 V (400 W) 

maximum exterior power inverter located on the 

rear right side of the truck bed near the tailgate. 

This inverter can be turned on by the Instrument 

Panel Power Inverter switch located to the left of 

the steering wheel. This inverter can power cellular 

phones, electronics and other low power devices 

requiring power up to 400 W. Certain video game 

consoles exceed this limit, as will most power 

tools. The indicator light on the power inverter 

switch will be illuminated when the inverter is 

turned on.

Power Inverter Switch (If Equipped)

Exterior Truck Bed Power Inverter (If Equipped)

NOTE:

400 W is the maximum for the inverter, not each 

outlet. If two outlets are in use, 400 W is shared 

amongst the devices plugged in.
The power inverter is designed with built-in 

overload protection. If the power rating of 400 W is 

exceeded, the power inverter automatically shuts 

down. Once the electrical device has been 

removed from the outlet, the inverter should 

automatically reset.

NOTE:

The Power Inverter will only turn on if the ignition 

is in the ACC or ON/RUN position.

Due to built-in overload protection, the power 

inverter will turn off if the power rating is 

exceeded.

WARNING!

To avoid serious injury or death:

Do not insert any objects into the receptacles.

Do not touch with wet hands.

Close the lid when not in use.

If this outlet is mishandled, it may cause an 

electric shock and failure.

GETTING TO KNOW YOUR VEHICLE

83

A

UXILIARY

 S

WITCHES

 — I

F

 E

QUIPPED


Four auxiliary switches are located in the lower 

switch bank of the instrument panel and can be 

used to power various electrical devices.
The functionality of the auxiliary switches can be 

changed via the Uconnect Settings. All switches 

can be configured for setting the switch type 

operation to latching or momentary, power source 

of either battery or ignition, and ability to hold last 

state across key cycles.

Auxiliary Switches

NOTE:

Holding last state conditions are met when switch 

type is set to latching and power source is set to 

ignition within Uconnect Settings  

Ú

page 228.

The auxiliary switches manage the relays that 

power four blunt cut wires. These wires are located 

under the instrument panel in the passenger 

compartment and under the hood to the right, near 

the battery.

Auxiliary Switch Connections — Under Hood

Auxiliary Switch Connections – Under Instrument Panel

In addition to the four auxiliary switch wires, a 

fused battery wire and ignition wire are also 

located in the interior, on the passenger side under 

the instrument panel.
A kit of splices and heat shrink tubing are provided 

with the auxiliary switches to aid in the connection/

installation of your electrical devices.

2

84

GETTING TO KNOW YOUR VEHICLE


Wire Color Chart

Circuit Function

Fuse

Wire Color

Locations

Aux Switch 1

F93 – 40 Amp

Beige/Pink

Interior (passenger side 

under instrument panel) & 

Underhood (right side near 

battery)

Aux Switch 2

F92 – 40 Amp

Green/Pink

Interior (passenger side 

under instrument panel) & 

Underhood (right side near 

battery)

Aux Switch 3

F103 – 15 Amp

Orange/Pink

Interior (passenger side 

under instrument panel) & 

Underhood (right side near 

battery)

Aux Switch 4

F108 – 15 Amp

Dark Blue/Pink

Interior (passenger side 

under instrument panel) & 

Underhood (right side near 

battery)

Battery

F72 – 10 Amp

Red/White

Interior (passenger side 

under instrument panel)

Ignition

F50 – 10 Amp

Pink/Orange

Interior (passenger side 

under instrument panel)

GETTING TO KNOW YOUR VEHICLE

85

POWER WINDOWS — IF EQUIPPED  

The power windows feature allows for movement 

of the windows with the push of a button. The 

power window switches are located on the 

instrument panel below the climate controls. Push 

the switch downward to open the window and pull 

upward to close the window.
The top left switch controls the left front window 

and the top right switch controls the right front 

window. The bottom left switch controls the left 

rear window and the bottom right switch controls 

the right rear window.

Power Window Switches

NOTE:

The power window switches will remain active 

for up to 10 minutes after the ignition is placed 

in the OFF position. Opening either front door 

will cancel this feature.

There are window switches located on the rear 

of the center console for the rear passenger 

windows.

A

UTO

-D

OWN

 F

EATURE


The driver door power window switch and the front 

passenger door power window switch have an 

Auto-Down feature. Push the window switch down, 

past the detent, and release and the window will go 

down automatically.
To open the window part way, push the window 

switch down briefly, without going past the detent, 

and release it when you want the window to stop.
To stop the window from going all the way down 

during the Auto-Down operation, pull up on the 

switch briefly.

WARNING!

Never leave children unattended in a vehicle, 

and do not let children play with power windows. 

Do not leave the key fob in or near the vehicle, or 

in a location accessible to children. Occupants, 

particularly unattended children, can become 

entrapped by the windows while operating the 

power window switches. Such entrapment may 

result in serious injury or death.

WARNING!

There is no anti-pinch protection when the 

window is almost closed. Be sure to clear all 

objects from the window before closing.

2

86

GETTING TO KNOW YOUR VEHICLE


M

ANUAL

 S

LIDING

 R

EAR


W

INDOW

 — I

F

 E

QUIPPED

To open the rear sliding window, push the release 

button inward while sliding the window into the 

open position.

Release Button Location

W

INDOW

 L

OCKOUT

 S

WITCH

Window Lockout Switch

The window lockout switch allows you to disable 

the window controls on the rear passenger doors. 

To disable the window controls, rotate the switch 

downward. To enable the window controls, rotate 

the switch upward.

W

IND

 B

UFFETING


Wind buffeting can be described as the perception 

of pressure on the ears or a helicopter-type sound 

in the ears. Your vehicle may exhibit wind buffeting 

with the windows down, or the sunroof (if 

equipped) in certain open or partially open 

positions. This is a normal occurrence and can be 

minimized. If the buffeting occurs with the rear 

windows open, open the front and rear windows 

together to minimize the buffeting. If the buffeting 

occurs with the sunroof open, adjust the sunroof 

opening to minimize the buffeting or open any 

window.

GLADIATOR TOPS 

P

ROVIDED

 T

OOLS

For your convenience, a tool kit is provided with 

your vehicle located in the center console. This kit 

includes the necessary tools required for the 

operations described in the following sections. All 

pieces fit into the ratchet for easy use.

GETTING TO KNOW YOUR VEHICLE

87

NOTE:

The soft top and the hard top are to be used inde

-

pendently. Your vehicle warranty will not cover 

damage resulting from both tops being installed at 

the same time.

Provided Tools

If your vehicle is equipped with a Dual Top, the soft 

top system will be provided in a separate box 

located in the bed of the vehicle for shipping 

purposes only.

L

OWERING

 T

HE

 S

OFT

 T

OP

Use this QR code to access your 

digital experience.

If the temperature is below 72°F (24°C) and/or 

the top has been folded down for a period of time, 

the top will appear to have shrunk when you raise 

it, making it difficult to put up. This is caused by a 

natural contraction of the vinyl or acrylic materials 

of the fabric top.
Place the vehicle in a warm area. Pull steadily on 

the top fabric. The vinyl will stretch back to its 

original size and the top can then be installed. If 

the temperature is 41°F (5°C) or below, do not 

attempt to put the top down or roll the rear or side 

curtains.

1 — Ratchet
2 — #T50 Torx Head Driver
3 — #T40 Torx Head Driver
4 — 15 mm Socket

WARNING!

Do not drive the vehicle with the rear window 

up/removed unless the quarter windows are 

also removed. Dangerous exhaust gases 

could enter the vehicle causing harm to the 

driver and passengers.

The fabric quarter windows and fabric top are 

designed only for protection against the 

elements. Do not rely on them to contain occu

-

pants within the vehicle or to protect against 

injury during an accident. Remember, always 

wear seat belts.

Make sure hands and fingers are clear of all 

pinch points when installing and removing the 

soft top. The lift assist mechanism and side 

bows may cause serious injury if fingers or 

hands get caught in between.

CAUTION!

The soft top is not designed to carry any 

additional loads such as roof racks, spare tires, 

building, hunting or camping supplies, and/or 

luggage, etc. Also, it was not designed as a 

structural member of the vehicle and, thus, 

cannot properly carry any additional loads other 

than environmental (rain, snow, etc.).

2

88

GETTING TO KNOW YOUR VEHICLE


(Continued)

(Continued)

CAUTION!

Do not run a fabric top through an automatic 

car wash. Window scratches and wax buildup 

may result.

Do not lower the top when the temperature is 

below 41°F (5°C). Damage to the top may 

result.

Do not move your vehicle until the top has 

been either fully attached to the windshield 

frame, or fully lowered.

Follow the proper steps for cleaning and 

caring for your vehicle’s fabric top  

Ú

page 445.

Do not use any tools (screwdrivers, etc.) to pry 

or force any of the clamps, clips, or retainers 

securing the soft top. Do not force or pry the 

soft top framework when opening or closing. 

Damage to the top may result.

CAUTION!

Failure to follow these cautions may cause 

interior water damage, stains, or mildew on the 

top material:

It is recommended that the top be free of 

water prior to opening it. Operating the top, 

opening a door or lowering a window while the 

top is wet may allow water to drip into the 

vehicle's interior.

Careless handling and storage of the soft top 

may damage the seals, causing water to leak 

into the vehicle's interior.

The soft top must be positioned properly to 

ensure sealing. Improper installation can 

cause water to leak into the vehicle's interior.

CAUTION!

GETTING TO KNOW YOUR VEHICLE

89

Side View Top And Components

1 — #1 Bow

6 — Quarter Panel Upper Hook And Loop

2 — #2 Bow

7 — Quarter Panel Vertical Retainer

3 — #3 Bow

8 — Rear Window Vertical Retainer

4 — #4 Bow

9 — Quarter Panel Cover Assembly

5 — #5 Bow

2

90

GETTING TO KNOW YOUR VEHICLE


Rear Window View And Components

1 — Top Retainer

4 — Pull Tabs

2 — Left Vertical Retainer

5 — Lower Center Retainer

3 — Lower Retainers

6 — Right Vertical Retainer


Content      ..     3      4      5      6     ..