Jeep Compass (2022 year). Manual in english - page 16
 

  Index      Manuals     Jeep Compass (2022 year). Manual in english


Search            copyright infringement  


Content      ..     14      15      16      17     ..


Jeep Compass (2022 year). Manual in english - page 16


IN CASE OF EMERGENCY

249

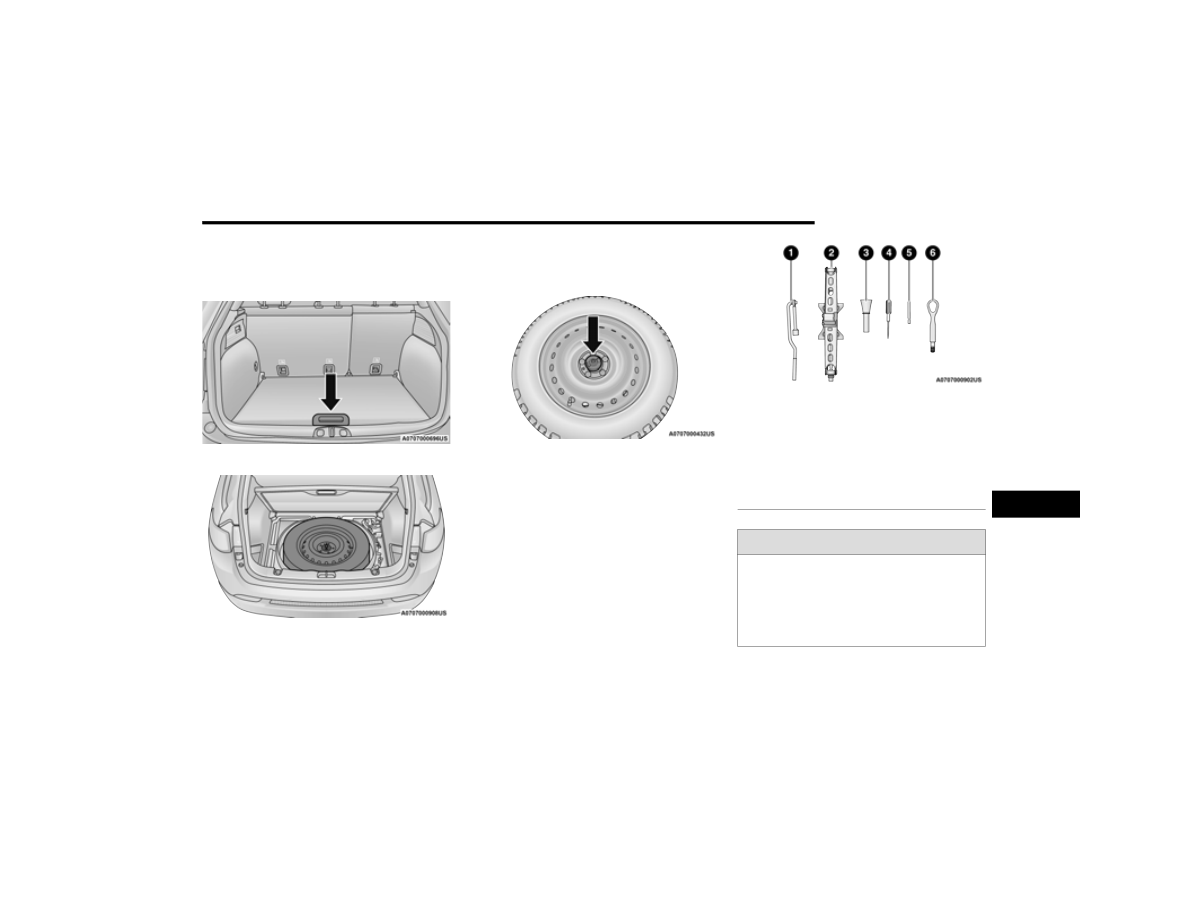
1. Open the liftgate.
2. Lift the access cover using the load floor 

handle.

Load Floor Handle

Spare Tire Removal

3. Remove the fastener securing the spare tire, 

and remove the spare wheel from the vehicle. 

The jack will be found beneath.

Spare Tire Fastener

4. Remove the alignment pin from the middle, 

rotate the jack counterclockwise, and lift it 

from the foam tray.

5. Remove the jack and wheel bolt wrench.

Jack And Tools

1 — Wheel Bolt Wrench
2 — Jack
3 — Emergency Funnel
4 — Screwdriver
5 — Alignment Pin
6 — Tow Eye (If Equipped)

WARNING!

A loose tire or jack thrown forward in a collision 

or hard stop could endanger the occupants of 

the vehicle. Always stow the jack parts and the 

spare tire in the places provided. Have the 

deflated (flat) tire repaired or replaced 

immediately.

7

250

IN CASE OF EMERGENCY


(Continued)

J

ACKING

 I

NSTRUCTIONS


Jack Warning Label

1. Remove the spare tire, jack, and wheel bolt 

wrench.

2. If equipped with aluminum wheels where the 

center cap covers the wheel bolts, use the 

wheel bolt wrench to pry the center cap off 

carefully before raising the vehicle.

3. Before raising the vehicle, use the wheel bolt 

wrench to loosen, but not remove, the wheel 

bolts on the wheel with the flat tire. Turn the 

wheel bolts counterclockwise one turn while 

the wheel is still on the ground.

NOTE:

Placement for the front and rear jack locations are 

critical. See below images for proper jacking loca

-

tions.

Jacking Locations

WARNING!

Carefully follow these tire changing warnings to 

help prevent personal injury or damage to your 

vehicle:

Always park on a firm, level surface as far from 

the edge of the roadway as possible before 

raising the vehicle.

Turn on the Hazard Warning Flashers.

Apply the parking brake firmly and set the 

transmission in PARK.

Block the wheel diagonally opposite the wheel 

to be raised.

Never start or run the engine with the vehicle 

on a jack.

Do not let anyone sit in the vehicle when it is 

on a jack.

Do not get under the vehicle when it is on a 

jack. If you need to get under a raised vehicle, 

take it to a service center where it can be 

raised on a lift.

Only use the jack in the positions indicated 

and for lifting this vehicle during a tire change.

If working on or near a roadway, be extremely 

careful of motor traffic.

To ensure that spare tires, flat or inflated, are 

securely stowed, spares must be stowed with 

the valve stem facing the ground.

WARNING!

CAUTION!

Do not attempt to raise the vehicle by jacking on 

locations other than those indicated in the 

Jacking Instructions for this vehicle.

IN CASE OF EMERGENCY

251

4. Jack lifting points can be identified by a 

triangular symbol on the outer rocker panel. 

Place the jack underneath the lift area that is 

closest to the flat tire. Turn the jack screw 

clockwise to firmly engage the jack saddle with 

the lift area of the sill flange, centering the jack 

saddle inside the cutout in the sill cladding.

Front Lifting Point

Front Jacking Location

Rear Lifting Point

Rear Jacking Location

5. Raise the vehicle just enough to remove the 

flat tire.

6. Remove the wheel bolts and tire.
7. Remove the alignment pin from the jack 

assembly and thread the pin into the wheel 

hub to assist in mounting the spare tire.

8. Mount the spare tire.

Mounting Spare Tire

WARNING!

Raising the vehicle higher than necessary can 

make the vehicle less stable. It could slip off the 

jack and hurt someone near it. Raise the vehicle 

only enough to remove the tire.

CAUTION!

Be sure to mount the spare tire with the valve 

stem facing outward. The vehicle could be 

damaged if the spare tire is mounted incorrectly.

7

252

IN CASE OF EMERGENCY


NOTE:

For vehicles equipped, do not attempt to 

install a center cap or wheel cover on the 

compact spare.

For additional warnings, cautions, and infor

-

mation about the spare tire, its use, and 

operation  

Ú

page 298.

9. Install and lightly tighten the wheel bolts.

10. Lower the vehicle to the ground by turning the 

jack handle counterclockwise.

11. Finish tightening the wheel bolts. Push down 

on the wrench while at the end of the handle 

for increased leverage. Tighten the wheel bolts 

in a star pattern until each wheel bolt has been 

tightened twice  

Ú

page 319. If in doubt about 

the correct tightness, have them checked with 

a torque wrench by an authorized dealer or at 

a service station.

12. Lower the jack until it is free. Remove the 

wheel blocks. Reassemble the lug wrench to 

the jack assembly and stow it in the spare tire 

area. Secure the assembly using the means 

provided. Release the parking brake before 

driving the vehicle.

Damaged Tire Stowage

13. After 25 miles (40 km), check the wheel bolt 

torque with a torque wrench to ensure that all 

wheel bolts are properly seated against the 

wheel.

14. Place the jack on the foam tray and open it far 

enough so that it is secured. Once placed in 

position, rotate it clockwise to lock it in. 

Replace the alignment pin in the center hole to 

lock the jack in place.

TIRE SERVICE KIT — IF EQUIPPED

Your vehicle may be equipped with a Tire Service 

Kit. Small punctures up to 1/4 inch (6 mm) in the 

tire tread can be sealed with Tire Service Kit. 

Foreign objects (e.g., screws or nails) should not be 

removed from the tire. Tire Service Kit can be used 

in outside temperatures down to approximately 

-4°F (-20°C). This kit will provide a temporary tire 

seal, allowing you to drive your vehicle up to 

100 miles (160 km) with a maximum speed of 

50 mph (80 km/h).

WARNING!

To avoid the risk of forcing the vehicle off the 

jack, do not tighten the wheel nuts fully until the 

vehicle has been lowered. Failure to follow this 

warning may result in serious injury.

WARNING!

A loose tire or jack thrown forward in a collision 

or hard stop could endanger the occupants of 

the vehicle. Always stow the jack parts and the 

spare tire in the places provided. Have the 

deflated (flat) tire repaired or replaced 

immediately.

IN CASE OF EMERGENCY

253

Tire Service Kit Storage
The Tire Service Kit is stowed under the load floor 

behind the rear seat.
1. Open the liftgate.
2. Lift the access cover using the load floor 

handle.

Load Floor Handle

Tire Service Kit Location

Tire Service Kit And Components And Operation

Tire Service Kit Components

Using The Mode Select Knob And Hoses
Your Tire Service Kit is equipped with the following 

symbols to indicate the air or sealant mode.

Selecting Air Mode 

Push in the Mode Select Knob and 

turn to this position for air pump

operation only.

Selecting Sealant Mode 

Push in the Mode Select Knob and 

turn to this position to inject the 

Tire Service Kit Sealant and to 

inflate the tire.

Using The Power Button 

Push and release the Power Button 

once to turn the Tire Service Kit on. 

Push and release the Power Button 

again to turn the Tire Service Kit off.

Using The Deflation Button 

Push the Deflation Button to reduce 

the air pressure in the tire if it 

becomes overinflated.

1 — Sealant/Air Hose
2 — Hose Accessories
3 — Mode Select Knob
4 — Pressure Gauge
5 — Deflation Button
6 — Power Switch
7 — Sealant Bottle
8 — Power Plug

7

254

IN CASE OF EMERGENCY


(Continued)

Tire Service Kit Usage Precautions

Replace the Tire Service Kit Sealant Bottle prior 

to the expiration date (printed at the lower right 

hand corner on the bottle label) to ensure 

optimum operation of the system.

The Sealant Bottle is a one tire application use 

and needs to be replaced after each use. Always 

replace these components immediately at your 

original equipment vehicle dealer.

When the Tire Service Kit sealant is in a liquid 

form, clean water, and a damp cloth will remove 

the material from the vehicle or tire and wheel 

components. Once the sealant dries, it can 

easily be peeled off and properly discarded.

For optimum performance, make sure the valve 

stem on the wheel is free of debris before 

connecting the Tire Service Kit.

You can use the Tire Service Kit air pump to 

inflate bicycle tires. The kit also comes with two 

needles, located in the Accessory Storage 

Compartment (on the bottom of the air pump) 

for inflating sport balls, rafts, or similar inflat

-

able items. However, use only the Air Pump and 

make sure the Mode Select Knob is in the Air 

Mode when inflating such items to avoid 

injecting sealant into them. The Tire Service Kit 

Sealant is only intended to seal punctures less 

than 1/4 inch (6 mm) diameter in the tread of 

your vehicle.

Do not lift or carry the Tire Service Kit by the 

hoses.

WARNING!

Do not attempt to seal a tire on the side of the 

vehicle closest to traffic. Pull far enough off 

the road to avoid the danger of being hit when 

using the Tire Service Kit.

Do not use Tire Service Kit or drive the vehicle 

under the following circumstances:

If the puncture in the tire tread is approxi

-

mately 1/4 inch (6 mm) or larger.

If the tire has any sidewall damage.

If the tire has any damage from driving 

with extremely low tire pressure.

If the tire has any damage from driving on 

a flat tire.

If the wheel has any damage.

If you are unsure of the condition of the 

tire or the wheel.

Keep Tire Service Kit away from open flames 

or heat source.

A loose Tire Service Kit thrown forward in a 

collision or hard stop could endanger the 

occupants of the vehicle. Always stow the Tire 

Service Kit in the place provided. Failure to 

follow these warnings can result in injuries 

that are serious or fatal to you, your passen

-

gers, and others around you.

Take care not to allow the contents of Tire 

Service Kit to come in contact with hair, eyes, 

or clothing. Tire Service Kit sealant is harmful 

if inhaled, swallowed, or absorbed through the 

skin. It causes skin, eye, and respiratory irrita

-

tion. Flush immediately with plenty of water if 

there is any contact with eyes or skin. Change 

clothing as soon as possible, if there is any 

contact with clothing.

Tire Service Kit Sealant solution contains 

latex. In case of an allergic reaction or rash, 

consult a physician immediately. Keep Tire 

Service Kit out of reach of children. If swal

-

lowed, rinse mouth immediately with plenty of 

water and drink plenty of water. Do not induce 

vomiting! Consult a physician immediately.

WARNING!

IN CASE OF EMERGENCY

255

Sealing A Tire With Tire Service Kit

Whenever You Stop To Use Tire Service Kit:

1. Pull over to a safe location and turn on the 

vehicle’s Hazard Warning Flashers.

2. Verify that the valve stem (on the wheel with 

the deflated tire) is in a position that is near to 

the ground. This will allow the Tire Service Kit 

Hose to reach the valve stem and keep the Tire 

Service Kit flat on the ground. This will provide 

the best positioning of the kit when injecting 

the sealant into the deflated tire and running 

the air pump. Move the vehicle as necessary to 

place the valve stem in this position before 

proceeding.

3. Place the transmission in PARK and cycle the 

ignition in the OFF position.

4. Apply the parking brake.

Setting Up To Use Tire Service Kit:

1. Uncoil the Sealant Hose and then remove the 

cap from the fitting at the end of the hose.

2. Place the Tire Service Kit flat on the ground 

next to the deflated tire.

3. Remove the cap from the valve 

stem and then screw the fitting at the 

end of the Sealant Hose onto the 

valve stem.
4. Uncoil the Power Plug and insert 

the plug into the vehicle’s 12 Volt 

power outlet.

NOTE:

Do not remove foreign objects (e.g., screws or 

nails) from the tire.
Injecting Tire Service Kit Sealant Into The Deflated 

Tire:

1. Always start the vehicle before 

turning the Tire Service Kit on.

2. Ensure the Mode Select Knob is to 

the Sealant Mode position.

3. After pushing the Power Button, 

the sealant (white fluid) will flow from 

the Sealant Bottle through the 

Sealant Hose and into the tire.

NOTE:

Sealant may leak out through the puncture in

the tire.

If the sealant (white fluid) does not flow within 

0 – 10 seconds through the Sealant Hose:
1. Push the Power Button to turn the Tire Service 

Kit off. Disconnect the Sealant Hose from the 

valve stem. Make sure the valve stem is free 

of debris. Reconnect the Sealant Hose to the 

valve stem. Check that the Mode Select Knob 

is in the Sealant Mode position and not Air 

Mode. Push the Power Button to turn the Tire 

Service Kit on.

2. Connect the Power Plug to a different 12 Volt 

power outlet in your vehicle or another vehicle, 

if available. Make sure the vehicle is running 

before turning the Tire Service Kit on.

3. The Sealant Bottle may be empty due to 

previous use. Call for assistance.

If the sealant (white fluid) does flow through the 

Sealant Hose:

1. Continue to operate the pump 

until sealant is no longer flowing 

through hose (typically takes 

30 - 70 seconds). As the sealant 

flows through the Sealant Hose, the Pressure 

Gauge can read as high as 70 psi (4.8 Bar). 

The Pressure Gauge will decrease quickly 

from approximately 70 psi (4.8 Bar) to the 

actual tire pressure when the Sealant Bottle 

is empty.

7

256

IN CASE OF EMERGENCY


2. The pump will start to inject air into 

the tire immediately after the 

Sealant Bottle is empty. Continue to 

operate the pump and inflate the tire 

to the cold tire inflation pressure found on the 

tire and loading information label located in 

the driver-side door opening. Check the tire 

pressure by looking at the Pressure Gauge.

If the tire does not inflate to at least 26 psi 

(1.8 Bar) pressure within 15 minutes:

The tire is too badly damaged. Do not attempt to 

drive the vehicle further. Call for assistance.

If the tire inflates to the recommended pressure or 

is at least 26 psi (1.8 Bar) pressure within 

15 minutes:
NOTE:

If the tire becomes overinflated, push the Deflation 

Button to reduce the tire pressure to the recom

-

mended inflation pressure before continuing.

1. Push the Power Button to turn off 

the Tire Service Kit.

2. Remove the speed limit label from 

the Tire Service Kit and place sticker 

on the steering wheel.

3. Immediately disconnect the Sealant Hose 

from the valve stem, reinstall the cap on the 

fitting at the end of the hose, and place the Tire 

Service Kit in the vehicle storage location.

Drive Vehicle:

Immediately after injecting sealant 

and inflating the tire, drive the vehicle 

5 miles (8 km) or 10 minutes to ensure 

distribution of the Tire Service Kit Sealant 

within the tire. Do not exceed 50 mph (80 km/h).

After Driving:

Pull over to a safe location.
1. Uncoil the Sealant Hose, and then remove the 

cap from the fitting at the end of the hose.

2. Place the Tire Service Kit flat on the ground 

next to the deflated tire.

3. Remove the cap from the valve 

stem, and then screw the fitting at 

the end of the Sealant Hose onto the 

valve stem.

4. Uncoil the power plug and insert 

the plug into the vehicle's 12 Volt 

power outlet.

5. Uncoil the Hose and screw the 

fitting at the end of the hose onto the 

valve stem.

6. Turn the Mode Select Knob and 

turn to the Air Mode position.

7. Check the pressure in the tire by reading the 

Pressure Gauge.

WARNING!

The Tire Service Kit is not a permanent flat tire 

repair. Have the tire inspected and repaired or 

replaced after using the Tire Service Kit. Do not 

exceed 50 mph (80 km/h) until the tire is 

repaired or replaced. Failure to follow this 

warning can result in injuries that are serious or 

fatal to you, your passengers, and others around 

you. Have the tire checked as soon as possible 

at an authorized dealer.

IN CASE OF EMERGENCY

257

If tire pressure is less than 19 psi (1.3 Bar):
The tire is too badly damaged. Do not attempt to 

drive the vehicle further. Call for assistance.
If the tire pressure is 19 psi (1.3 Bar) or higher:

1. Push the Power Button to turn on 

Tire Service Kit and inflate the tire to 

the cold tire inflation pressure found 

on the tire and loading information 

label located in the driver-side door opening.

NOTE:

If the tire becomes overinflated, push the Deflation 

Button to reduce the tire pressure to the recom

-

mended inflation pressure before continuing.
2. Disconnect the Tire Service Kit from the valve 

stem, reinstall the cap on the valve stem and 

unplug from 12 Volt outlet.

3. Place the Tire Service Kit in its proper storage 

area in the vehicle.

4. Have the tire inspected and repaired or 

replaced at the earliest opportunity at an 

authorized dealer or tire service center.

5. Remove the Speed Limit sticker from the 

steering wheel after the tire has been repaired.

6. Replace the Sealant Bottle at an authorized 

dealer as soon as possible.

NOTE:

When having the tire serviced, advise the autho

-

rized dealer or service center that the tire has been 

sealed using the Tire Service Kit.

Sealant Bottle Replacement:

1. Unwrap the power cord.
2. Unwrap the hose.

Unwrap The Hose

3. Remove the bottle cover.

Remove The Bottle Cover

4. Rotate the bottle up beyond vertical to release.

Rotate The Bottle Up

7

258

IN CASE OF EMERGENCY


5. Pull the bottle away from the Compressor.

Remove The Bottle

NOTE:

For sealant bottle installation, follow these 

steps in reverse order.

Replacement sealant bottles are available at 

authorized service centers.

JUMP STARTING

If your vehicle has a discharged battery, it can be 

jump started using a set of jumper cables and a 

battery in another vehicle or by using a portable 

battery booster pack. Jump starting can be 

dangerous if done improperly, so please follow the 

procedures in this section carefully.
NOTE:

When using a portable battery booster pack, follow 

the manufacturer’s operating instructions and 

precautions.

P

REPARATIONS

 F

OR

 J

UMP

 S

TART

The battery in your vehicle is located in the front of 

the engine compartment, behind the left headlight 

assembly.

Positive (+) Battery Post

NOTE:

The positive (+) battery post is covered with a 

protective cap. Lift up on the cap to gain access to 

the post.
See below steps to prepare for jump starting:
1. Apply the parking brake, shift the automatic 

transmission into PARK (P) and turn the 

ignition to OFF.

2. Turn off the heater, radio, and all electrical 

accessories.

3. Pull upward and remove the protective cover 

over the positive (+) battery post.

WARNING!

Do not attempt jump starting if the battery is 

frozen. It could rupture or explode and cause 

personal injury.

CAUTION!

Do not use a portable battery booster pack or 

any other booster source with a system voltage 

greater than 12 Volts or damage to the battery, 

starter motor, alternator or electrical system 

may occur.

IN CASE OF EMERGENCY

259

4. If using another vehicle to jump start the 

battery, park the vehicle within the jumper 

cables reach, set the parking brake and make 

sure the ignition is OFF.

J

UMP

 S

TARTING

 P

ROCEDURE

Connecting The Jumper Cables
1. Connect the positive (+) end of the jumper 

cable to the positive (+) post of the discharged 

vehicle.

2. Connect the opposite end of the positive (+) 

jumper cable to the positive (+) post of the 

booster battery.

3. Connect the negative (-) end of the jumper 

cable to the negative (-) post of the booster 

battery.

4. Connect the opposite end of the negative (-) 

jumper cable to a good engine ground. A 

“ground” is an exposed metallic/unpainted 

part of the engine, frame or chassis, such as 

an accessory bracket or large bolt. The ground 

must be away from the battery and the fuel 

injection system.

Jump Starting Label

5. Start the engine in the vehicle that has the 

booster battery, let the engine idle for a few 

minutes, and then start the engine in the 

vehicle with the discharged battery.

6. Once the engine is started, follow the discon

-

necting procedure below.

WARNING!

Take care to avoid the radiator cooling fan 

whenever the hood is raised. It can start 

anytime the ignition switch is ON. You can be 

injured by moving fan blades.

Remove any metal jewelry such as rings, 

watch bands and bracelets that could make 

an inadvertent electrical contact. You could be 

seriously injured.

Batteries contain sulfuric acid that can burn 

your skin or eyes and generate hydrogen gas 

which is flammable and explosive. Keep open 

flames or sparks away from the battery.

WARNING!

Do not allow vehicles to touch each other as this 

could establish a ground connection and 

personal injury could result.

WARNING!

Failure to follow this jump starting procedure 

could result in personal injury or property 

damage due to battery explosion.

CAUTION!

Failure to follow these procedures could result in 

damage to the charging system of the booster 

vehicle or the discharged vehicle.

WARNING!

Do not connect the jumper cable to the 

negative (-) post of the discharged battery. The 

resulting electrical spark could cause the battery 

to explode and could result in personal injury.

7

260

IN CASE OF EMERGENCY


Disconnecting The Jumper Cables
1. Disconnect the negative (-) end of the jumper 

cable from the engine ground of the vehicle 

with the discharged battery.

2. Disconnect the opposite end of the negative (-) 

jumper cable from the negative (-) post of the 

booster battery.

3. Disconnect the positive (+) end of the jumper 

cable from the positive (+) post of the booster 

battery.

4. Disconnect the opposite end of the positive (+) 

jumper cable from the positive (+) post of the 

vehicle with the discharged battery.

If frequent jump starting is required to start your 

vehicle, you should have the battery and charging 

system inspected at an authorized dealer.

REFUELING IN EMERGENCY

The vehicle is equipped with a refueling funnel for 

a Capless Fuel System. If refueling is necessary, 

while using an approved gas can, insert the 

refueling funnel into the filler neck opening. Take 

care to open both flappers with the funnel to avoid 

spills.
NOTE:

In certain cold conditions, ice may prevent the fuel 

door from opening. If this occurs, lightly push on 

the fuel door to break the ice buildup and 

re-release the fuel door using the inside release 

button. Do not pry on the door.

Fuel Funnel Location

Emergency Gas Can Refueling
Most gas cans will not open the flapper doors. A 

funnel is provided to allow emergency refueling 

with a gas can.
See below steps for refueling:
1. Retrieve funnel from the spare tire storage 

area.

2. Insert funnel into same filler pipe opening as 

the fuel nozzle.

Inserting Funnel

3. Ensure funnel is inserted fully to hold flapper 

doors open.

4. Pour fuel into funnel opening.

CAUTION!

Accessories plugged into the vehicle power 

outlets draw power from the vehicle’s battery, 

even when not in use (i.e., cellular devices, etc.). 

Eventually, if plugged in long enough without 

engine operation, the vehicle’s battery will 

discharge sufficiently to degrade battery life 

and/or prevent the engine from starting.

CAUTION!

To avoid fuel spillage and overfilling, do not

“top off” the fuel tank after filling.

IN CASE OF EMERGENCY

261

5. Remove funnel from filler pipe, clean off prior 

to putting back in the spare tire storage area.

IF YOUR ENGINE OVERHEATS 

If the vehicle is overheating, it will need to be 

serviced by an authorized dealer.
In any of the following situations, you can reduce 

the potential for overheating your engine by taking 

the appropriate action.

On highways — slow down.

In city traffic — while stopped, place the trans

-

mission in NEUTRAL, but do not increase engine 

idle speed.

NOTE:

There are steps that you can take to slow down an 

impending overheat condition: 

If your Air Conditioner (A/C) is on, turn it off. The 

A/C system adds heat to the engine cooling 

system and turning the A/C off can help remove 

this heat.

You can also turn the temperature control to 

maximum heat, the mode control to floor and 

the blower control to high. This allows the heater 

core to act as a supplement to the radiator and 

aids in removing heat from the engine cooling 

system.

WARNING!

Never have any smoking materials lit in or 

near the vehicle when the fuel door is open or 

the tank is being filled.

Never add fuel when the engine is running. 

This is in violation of most state and federal 

fire regulations and may cause the Malfunc

-

tion Indicator Light to turn on.

A fire may result if fuel is pumped into a 

portable container that is inside of a vehicle. 

You could be burned. Always place fuel 

containers on the ground while filling.

CAUTION!

Driving with a hot cooling system could damage 

your vehicle. If the temperature gauge reads

“H,” pull over and stop the vehicle. Idle the 

vehicle with the air conditioner turned off until 

the pointer drops back into the normal range. 

If the pointer remains on the “H” and you hear 

continuous chimes, turn the engine off 

immediately and call for service.

WARNING!

You or others can be badly burned by hot engine 

coolant (antifreeze) or steam from your radiator. 

If you see or hear steam coming from under the 

hood, do not open the hood until the radiator 

has had time to cool. Never try to open a cooling 

system pressure cap when the radiator or 

coolant bottle is hot.

7

262

IN CASE OF EMERGENCY


GEAR SELECTOR OVERRIDE 

If a malfunction occurs, and the gear selector 

cannot be moved out of the PARK position, you can 

use the following procedure to temporarily move 

the gear selector:
1. Turn the engine OFF.
2. Apply the parking brake.
3. Grab the boot material rearward of the gear 

selector and pull up to carefully separate the 

gear selector bezel and boot assembly from 

the center console.

Gear Selector Bezel

4. Press and maintain firm pressure on the brake 

pedal.

5. Insert a small screwdriver or similar tool down 

into the gear selector override access hole (at 

the right rear corner of the gear selector 

assembly), and push and hold the override 

release lever down.

Gear Selector Override Access Hole

6. Move the gear selector to the NEUTRAL (N) 

position.

7. The vehicle may then be started in NEUTRAL.
8. Reinstall the gear selector boot.

FREEING A STUCK VEHICLE   

If your vehicle becomes stuck in mud, sand or 

snow, it can often be moved using a rocking 

motion. Turn the steering wheel right and left to 

clear the area around the front wheels. Push and 

hold the lock button on the gear selector. Then 

shift back and forth between DRIVE (D) and 

REVERSE (R) while gently pressing the accelerator.
NOTE:

Shifts between DRIVE (D) and REVERSE (R) can 

only be achieved at wheel speeds of 5 mph 

(8 km/h) or less. Whenever the transmission 

remains in NEUTRAL (N) for more than two 

seconds, you must press the brake pedal to 

engage DRIVE (D) or REVERSE (R).

IN CASE OF EMERGENCY

263

(Continued)

Use the least amount of accelerator pedal 

pressure that will maintain the rocking motion 

without spinning the wheels or racing the engine.

NOTE:

Push the ESC OFF button (if necessary), to place 

the Electronic Stability Control (ESC) system in 

“Partial Off” mode, before rocking the vehicle  

Ú

page 189. Once the vehicle has been freed, 

push the ESC OFF button again to restore “ESC On” 

mode.

WARNING!

Fast spinning tires can be dangerous. Forces 

generated by excessive wheel speeds may 

cause damage, or even failure, of the axle and 

tires. A tire could explode and injure someone. 

Do not spin your vehicle's wheels faster than 

30 mph (48 km/h) or for longer than 30 

seconds continuously without stopping when 

you are stuck and do not let anyone near a 

spinning wheel, no matter what the speed.

CAUTION!

Racing the engine or spinning the wheels may 

lead to transmission overheating and failure. 

Allow the engine to idle with the transmission 

in NEUTRAL for at least one minute after every 

five rocking-motion cycles. This will minimize 

overheating and reduce the risk of clutch or 

transmission failure during prolonged efforts 

to free a stuck vehicle.

When “rocking” a stuck vehicle by shifting 

between DRIVE/SECOND gear and REVERSE, 

do not spin the wheels faster than 15 mph 

(24 km/h), or drivetrain damage may result.

Revving the engine or spinning the wheels too 

fast may lead to transmission overheating and 

failure. It can also damage the tires. Do not 

spin the wheels above 30 mph (48 km/h) 

while in gear (no transmission shifting occur

-

ring).

CAUTION!

7

264

IN CASE OF EMERGENCY


TOWING A DISABLED VEHICLE

This section describes procedures for towing a disabled vehicle using a commercial towing service.

Proper towing or lifting equipment is required to 

prevent damage to your vehicle. Use only tow bars 

and other equipment designed for this purpose, 

following equipment manufacturer’s instructions. 

Use of safety chains is mandatory. Attach a tow bar 

or other towing devices to main structural 

members of the vehicle, not to fascia/bumper or 

associated brackets. State and local laws 

regarding vehicles under tow must be observed.
NOTE:

You must ensure that the Auto Park Brake 

feature is disabled before towing this vehicle to 

avoid inadvertent Electric Park Brake engage

-

ment. The Auto Park Brake feature is enabled or 

disabled via the customer programmable 

features in the Uconnect Settings.

Vehicles with a discharged battery, or total elec

-

trical failure when the Electric Park Brake (EPB) 

is engaged, will need a wheel dolly or jack to 

raise the rear wheels off the ground when 

moving the vehicle onto a flatbed.

If you must use the accessories (wipers, 

defrosters, etc.) while being towed, the ignition 

must be in the ON/RUN mode.
Note that the Safehold feature will engage the 

Electric Park Brake whenever the driver's door is 

opened (if the battery is connected, ignition is ON, 

transmission is not in PARK, and brake pedal is 

released). If you are towing this vehicle with the 

ignition in the ON/RUN mode, you must manually 

disable the Electric Park Brake each time the 

driver's door is opened by pressing the brake pedal 

and then releasing the EPB.

If the vehicle’s battery is discharged, instructions 

on shifting the automatic transmission out of PARK 

so that the vehicle can be moved  

Ú

page 262.

Towing Condition

Wheels OFF The Ground

FWD MODELS

4X4 MODELS

Flat Tow

NONE

NOT ALLOWED

NOT ALLOWED

Wheel Lift Or Dolly Tow

Rear

NOT ALLOWED

NOT ALLOWED

Front

OK

NOT ALLOWED

Flatbed

ALL

BEST METHOD

ONLY METHOD

CAUTION!

Do not use sling-type equipment when towing. 

Vehicle damage may occur.

When securing the vehicle to a flatbed truck, 

do not attach to front or rear suspension 

components. Damage to your vehicle may 

result from improper towing.

Ensure that the Electric Park Brake is 

released, and remains released, while being 

towed.

Do not use a fascia/bumper mounted 

clamp-on tow bar on your vehicle. The fascia/

bumper face bar will be damaged.


Content      ..     14      15      16      17     ..