Jeep Wrangler Unlimited (2012 year). Instruction - part 16


  Index      Jeep     Jeep Wrangler Unlimited - instruction 2012 year in english


Search            


Content   ..  14  15  16  17   ..


Jeep Wrangler Unlimited (2012 year). Instruction - part 16


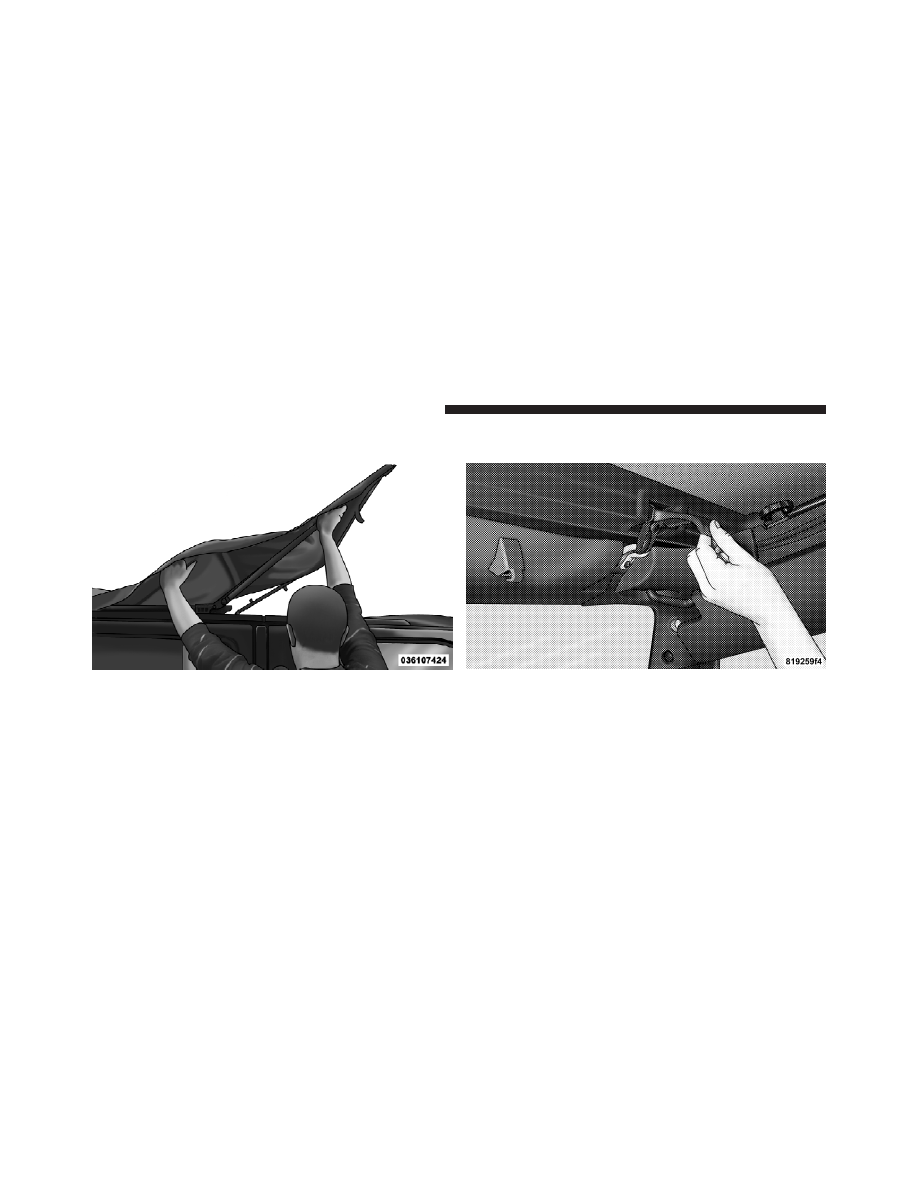
8. Standing on the side of the vehicle, lift the top by the
side bow until it rests on the windshield frame.

9. Open the header latches and engage the hook on each
side onto the windshield loops (do not close the latches).

240

UNDERSTANDING THE FEATURES OF YOUR VEHICLE

10. If the swing gate brackets were removed, install them
by hooking the rear edge of the bracket on the interior
side of the body channel. Then, rotate it rearward and
over the channel until it snaps onto the exterior part of
the rail. To be properly located, the bracket must only be
clipped to the shortened rail edge.

11. Ensure that the straps are positioned correctly before
pulling the sail panels over the rear roof bow (4–bow).

3

UNDERSTANDING THE FEATURES OF YOUR VEHICLE

241

Partially install the sail panel retainers into the body side
channel, leaving the last 3 in (7.6 cm) toward the rear
window loose (on both sides). Pulling down on the rear
roof bow (4–bow) will aid in reaching the channel with
the retainers.

12. To install the side windows, affix the window tem-
porarily by attaching it to the Velcro

威 in the upper rear

corner. Start the zipper but close only about 1 in (2.5 cm).

242

UNDERSTANDING THE FEATURES OF YOUR VEHICLE

13. Insert the front retainer of the window into the door
channel, making sure the retainer is fully seated and
properly positioned on the door frame. Failure to do so
can result in wind and water leaks or damage to the
window.

1 — Incorrect Insertion
2 — Correct Insertion

3

UNDERSTANDING THE FEATURES OF YOUR VEHICLE

243

14. Insert the retainer along the bottom edge of the
window into the bottom side channel, beginning at the
front and working to the rear of the vehicle. Finish by
closing the zipper completely and attaching the Velcro

along the top and rear of the window. Repeat this step for
the opposite side.

15. Locate the black swing gate bar. Slide the swing gate
bar over the receiver at the bottom inside of the rear
window. The spongy part of the seal should be down and
pointed outward to seal with the swing gate when closed.

244

UNDERSTANDING THE FEATURES OF YOUR VEHICLE

16. Install the rear window by starting both zipper ends
at the lower left corner of the rear window opening.
Ensure that the zippers are properly started and aligned
before zipping to prevent damage.

17. Run the first zipper fully around to the right side of
the window.

3

UNDERSTANDING THE FEATURES OF YOUR VEHICLE

245

18. Grasp the swing gate bar and position it into the
swing gate brackets.

19. Insert the rear window retainer into the swing gate
bracket on both the left and right sides.

20. Complete the installation of the sail panel by insert-
ing the rest of the retainer into the body channel.

21. Close the header latches and return the sun visors to
their secured position.

246

UNDERSTANDING THE FEATURES OF YOUR VEHICLE

SUNRIDER

姞 (TWO-DOOR MODELS) — IF

EQUIPPED

CAUTION!

Operating the top, opening a door or lowering a
window while the top is wet may allow water to drip
into the vehicle’s interior.

NOTE:

If you are going to be driving faster than 40 mph

(64 km/h) with the Sunrider

威 feature open, it is recom-

mended that you remove the rear window of the vehicle.

3

UNDERSTANDING THE FEATURES OF YOUR VEHICLE

247

Opening The Sunrider

1. Unclip and move the sun visors to the side.

2. Release the header latches from the loops on the
windshield frame.

3. Slide the plastic sleeve forward.

4. Grasp the header and lift the top back. Make sure the
material is folded back as shown.

NOTE:

The Sunrider

威 latch on the door rail should not

be activated for Sunrider

威 use. If activated, the soft top

must be reinstalled starting from the sail panels.

248

UNDERSTANDING THE FEATURES OF YOUR VEHICLE

5. Locate the straps to secure the side bows. Wrap the
straps around the bows as shown. Repeat on the other
side.

6. Reposition the sun visors.

3

UNDERSTANDING THE FEATURES OF YOUR VEHICLE

249

Closing The Sunrider

1. Remove the straps from the side bows.

2. Unclip and move the sun visors to the side.

3. Grasp the front header and pull it to the front of the
vehicle.

4. Hook the header latches to the loops on the wind-
shield frame, close latches, and return the sun visors to
their original positions.

5. Slide the plastic sleeve rearward over the Sunrider

link.

SUNRIDER

姞 (FOUR-DOOR MODELS) — IF

EQUIPPED

CAUTION!

Operating the top, opening a door or lowering a
window while the top is wet may allow water to drip
into the vehicle’s interior.

NOTE:

If you are going to be driving faster than 40 mph

(64 km/h) with the Sunrider

威 feature open, it is recom-

mended that you remove the rear window of the vehicle.

250

UNDERSTANDING THE FEATURES OF YOUR VEHICLE

Opening The Sunrider

1. Unclip and move the sun visors to the side.

2. Release the header latches from the loops on the
windshield frame.

3. Grasp the front side bow behind the header, and lift
the top.

3

UNDERSTANDING THE FEATURES OF YOUR VEHICLE

251

4. Fold back the front section of the top and gently rest
the header on top of the rear portion of the deck.

5. Fold the top so that the material forms a

⬙W⬙ as shown.

Enter the vehicle and move the material into two folds.

6. Secure the top by using the two provided straps. Each
strap will wrap around the side bow and Velcro

威 to itself;

use one strap on each side of the vehicle.

252

UNDERSTANDING THE FEATURES OF YOUR VEHICLE

Closing The Sunrider

Perform the above steps in the opposite order.

NOTE:

Failure to fold the fabric rearward will allow the

material to sag and may block the rearview mirror.

FOLDING WINDSHIELD
The fold-down windshield and removable side bars on
your vehicle are structural elements that can provide
some protection in some accidents. The windshield also
provides some protection against weather, road debris
and intrusion of small branches and other objects.

Do not drive your vehicle on-road with the windshield
down and the side bars removed as you lose the protec-
tion these structural elements can provide.

If required for certain off-road uses, the side bars can be
removed and the windshield folded down. However, the
protection afforded by these features is then lost. If you
remove the side bars and fold down the windshield,
drive slowly and cautiously. It is recommended that the
speed of the vehicle be limited to 10 mph (16 km/h), with
low range operation preferred if you are driving off-road
with the windshield folded down.

3

UNDERSTANDING THE FEATURES OF YOUR VEHICLE

253

Raise the windshield and reinstall the side bars as soon as
the task that required their removal is completed and
before you return to on-road driving. Both you and your
passenger should wear seat belts at all times, on-road and
off-road, regardless of whether the windshield is raised
or folded down.

Outside rearview mirrors are mounted on the doors. If
you choose to remove the doors, see your authorized
dealer for a replacement cowl-mounted outside mirror.
Federal law requires outside mirrors on vehicles for
on-road use.

WARNING!

Carefully follow these warnings to help protect
against personal injury:
• Do not drive your vehicle on-road with the wind-

shield down.

(Continued)

WARNING! (Continued)

• Do not drive your vehicle unless the windshield is

securely fastened, either up or down.

• Eye protection, such as goggles, should be worn at

all times when the windshield is down.

• Be sure that you carefully follow the instructions

for raising the windshield. Make sure that the
folding windshield, windshield wipers, side bars,
and all associated hardware and fasteners are
correctly and tightly assembled before driving
your vehicle. Failure to follow these instructions
may prevent your vehicle from providing you and
your passengers protection in some accidents.

• If you remove the doors, store them outside the

vehicle. In the event of an accident, a loose door
may cause personal injury.

254

UNDERSTANDING THE FEATURES OF YOUR VEHICLE

Lowering The Windshield And Removing Side
Bars

1. Lower the fabric top or remove the hard top following
the instructions in this manual.

NOTE:

To assist in properly reinstalling side bars, mark

the original locations prior to removing.

2. Remove the two top hex bolts (13 mm), and the one
side hex bolt (13 mm) visible through the trim (Do not
remove plastic corner trim, sun visor bolts, or sport bar
covering).

3. Remove the sun visor.

4. Remove the A-pillar cap.

5. Disconnect microphone (if equipped with Uconnect™
phone).

6. Open the sport bar Velcro covering.

3

UNDERSTANDING THE FEATURES OF YOUR VEHICLE

255


Content   ..  14  15  16  17   ..