Jeep TJ (2006 year). Instruction - part 7


  Index      Jeep     Jeep TJ - instruction 2006 year in english


Search            


Content   ..  5  6  7  8   ..


Jeep TJ (2006 year). Instruction - part 7


NOTE:

Stow half doors carefully outside of the vehicle,

never inside to avoid scratches.

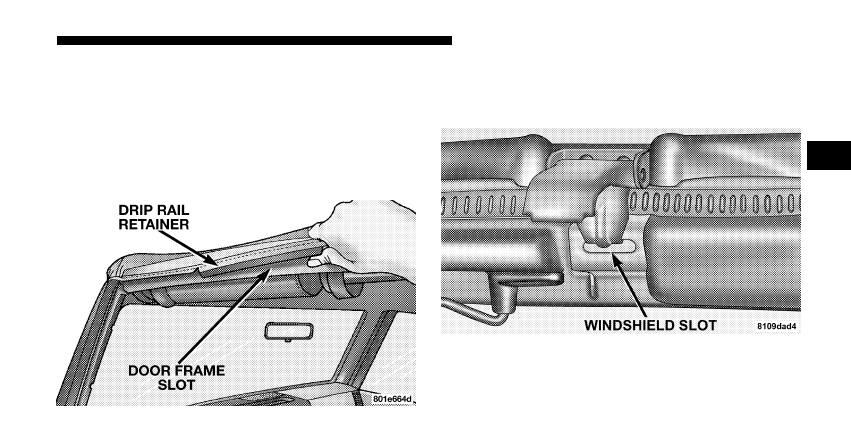
2. Grasp the fabric of the top above the door frame. Pull
down and out on the fabric to untuck the drip rail
retainers from the door frame slot. Start with the rear
retainer and work forward towards the windshield.
Repeat this on the other side.

3. Unclip and move the sun visor to the side.

4. Release the header latches and leave the hooks in the
windshield slots.

UNDERSTANDING THE FEATURES OF YOUR VEHICLE

97

3

5. Open the tailgate, partially unzip the rear window on
each side, and untuck the lower retainers on the window
from the tailgate clips on both sides of the tailgate
opening.

6. Pull the retainer bar straight out from the tailgate clips.

• Remove the rear window entirely. This is done by

unzipping the window by bringing both the right
zipper and left zipper tabs all the way to the end of
the zipper track at the bottom left corner. Both zipper
tabs will remain on the zipper track attached to the
top. Pull up on the window to disengage zipper end.
Stow the windows carefully to avoid scratching.

98

UNDERSTANDING THE FEATURES OF YOUR VEHICLE

7. Beginning from the rear, moving forward, partially
unzip the side window and untuck the bottom retainers.

8. Finish unzipping the window and untuck from the
door frame retainer at the front of the window, repeat this
step on the other side.

NOTE:

Stow clean windows carefully outside of the

vehicle to avoid scratches.

9. Untuck the sail panels from the bodyside retainer.

NOTE:

If difficulty is experienced with fabric tension,

place your hand on the rear upper corner of the top and
pull down to help untuck the sail panels.

UNDERSTANDING THE FEATURES OF YOUR VEHICLE

99

3

10. Completely release the hooks on the rear side of the
windshield. Grasp the side bow behind the header and
lift top back.

11. As you begin to lower the top, wrap the sail panels so
that they rest on the roof of the vehicle.

NOTE:

If your vehicle is equipped with a Dual Top,

prevent connector damage by ensuring that the hard top
wire harness is folded back and secured to the main
harness, using the attached Velcro

威 strap.

12. Make sure the sides of the top are folded inward as
the top continues to fold, and that the check straps are
clear of the vehicle.

100

UNDERSTANDING THE FEATURES OF YOUR VEHICLE

Tuck the top material between the 2 bow and the 3 bow
as it folds.

13. Tuck the top material between the 2 bow and the
header.

UNDERSTANDING THE FEATURES OF YOUR VEHICLE

101

3

14. After the top is folded down, ensure that the drip rail
retainers are tucked in inward as shown. This is to avoid
unnecessary wear to the fabric.

15. After the top is folded down, tuck the check straps so
that they are not hanging and flapping outside the
vehicle.

102

UNDERSTANDING THE FEATURES OF YOUR VEHICLE

Putting Up The Soft Top

NOTE:

Be sure the wire harness is not attached to the

soft top bows before you lift the top.

1. Begin working from the rear of the vehicle, with the
tailgate open. Lift the plastic header (with latches) up and
over the sport bar. As the header reaches the top, locate
the 2 bow and push it up and over the sport bar.

2. Move to the side of the vehicle and pull the side bow
forward and down. Be sure the check straps are not
tangled around the 2 bow. You will see the 3 bow rise
from the rear of the vehicle.

UNDERSTANDING THE FEATURES OF YOUR VEHICLE

103

3

3. Unclip and move the sun visor to the side.

4. Open the header latches and engage the hook on each
side into the windshield slot.

104

UNDERSTANDING THE FEATURES OF YOUR VEHICLE

5. Grasp the drip rail retainer and untuck them from the
door frame.

NOTE:

Do not tuck the drip rails into the door frame at

this time.

6. Move to the rear of the vehicle and gently pull the sail
panels over the 3 bow letting them hang down.

UNDERSTANDING THE FEATURES OF YOUR VEHICLE

105

3

7. Align the sail panel retainer to the edge of the bodys-
ide retainer at the rear. Tuck the sail panel into the
bodyside retainer beginning from the rear and working
to the corner. Tuck the retainer around the corner and
continue forward.

NOTE:

This may be difficult due to fabric tension. If

difficulty is experienced with fabric tension, place your
hand on top of the 3 bow and gently pull down to help
tuck in the sail panel retainers.

106

UNDERSTANDING THE FEATURES OF YOUR VEHICLE

8. To install the quarter window, affix the rear corner of
the window temporarily to the Velcro

威. Start and zip the

zipper only about 1 inch (2.5 cm). At this time it is
necessary to tuck in the door frame retainer.

9. After the door frame retainer has been completely
tucked in, finish zipping in the window. Then affix the
Velcro

威 flaps around the window.

UNDERSTANDING THE FEATURES OF YOUR VEHICLE

107

3

10. Tuck the bottom retainer of the quarter window into
the bottom retainer, beginning from the rear and working
to the front of the vehicle. Repeat this step for the other
side.

11. To assist in getting the zipper started, lay the retainer
bar inside the vehicle on the wheel wells and uninstall
half of the left sail panel from the bodyside retainer
beginning at the tailgate to expose zipper ends.

108

UNDERSTANDING THE FEATURES OF YOUR VEHICLE

12. Zip in the rear window beginning from the left using
both zipper ends. Run the upper zipper around the
window leaving the lower zipper at the start.

13. Tuck the retainer bar into the tailgate clips.

UNDERSTANDING THE FEATURES OF YOUR VEHICLE

109

3

14. Tuck the lower retainers of the rear window under
the tailgate clips. Reinstall the left corner if it was
untucked to get the rear window zipper started.

15. Tuck the drip rail retainers into the door frame slot
above the door on both sides.

110

UNDERSTANDING THE FEATURES OF YOUR VEHICLE

16. Close the header latches and return the sun visor to
it’s secured position.

SOFT TOP — SUNRIDER EQUIPPED MODELS

CAUTION!

• The soft top is not designed to carry any addi-

tional loads such as roof racks, spare tires, build-
ing, hunting, or camping supplies, and/or lug-
gage, etc. Also, it was not designed as a structural
member of the vehicle, and thus cannot properly
carry any additional loads other than environmen-
tal (rain, snow, etc.).

If the temperature is below 72°F (24°C) and/or the top
has been folded down for a period of time, the top will
appear to have shrunk when you raise it, making it
difficult to put up. This is caused by a natural contraction
of the vinyl coating on the fabric top.

UNDERSTANDING THE FEATURES OF YOUR VEHICLE

111

3

Place the vehicle in a warm area. Pull steadily on the top
fabric. The vinyl will stretch back to its original size and
the top can then be snapped into place. If temperature is
41°F (5°C) or below, do not attempt to put the top down
or roll the rear or side curtains.

CAUTION!

• Do not run a fabric top through an automatic car

wash. Window scratches and wax build up may
result.

• Do not lower the top when the temperature is

below 41°F (5°C). Damage to the top may result.

• Do not lower the top when the windows are dirty.

Grit may scratch the window.

• Do not move your vehicle until the top has been

either fully attached to the windshield frame, or
fully lowered.

• Do not lower the top with the windows installed.

Window and top damage may occur.

• Refer to “Appearance Care for Fabric Top Mod-

els” in Section 7 of this manual. It contains
important information on cleaning and caring for
your vehicle’s fabric top.

112

UNDERSTANDING THE FEATURES OF YOUR VEHICLE


Content   ..  5  6  7  8   ..