Jeep Renegade (2018 year). Instruction - part 14


  Index      Jeep     Jeep Renegade - instruction 2018 year in english


Search            


Content   ..  12  13  14  15   ..


Jeep Renegade (2018 year). Instruction - part 14


fully depress the brake pedal and hold

it down;

insert the screwdriver supplied

perpendicularly in hole B fig. 184 and
adjust the release lever;

place the gear lever in N (Neutral)

position;

refit the gear lever gaiter and panel

correctly;

start the engine.

EMERGENCY REMOVAL OF THE
IGNITION KEY

81)

The ignition key (versions with
mechanical key) can be removed only if
the gear lever is in position P (Park).
If the vehicle battery is flat and the key
is engaged, the latter is locked in
position.
To remove the key manually, proceed as
follows:

stop the vehicle in safety conditions,

engage a gear and the electric parking
brake;

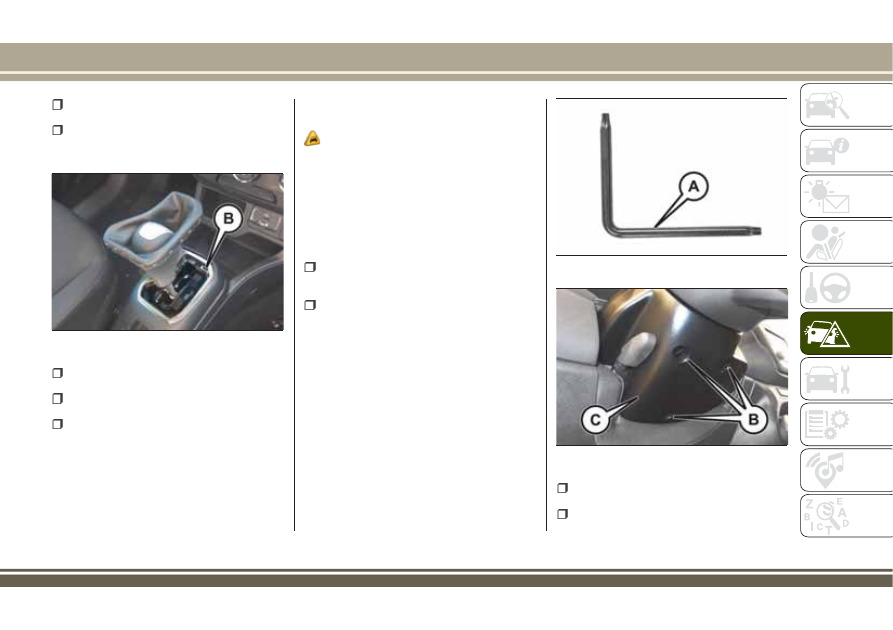
using the wrench A fig. 185 (located

in the casing containing the on-board
documents), undo the fixing screws B
fig. 186 for the lower cover C;

remove the lower steering wheel cover

C by releasing it from its housing;

pull tab D fig. 187 downwards using

one hand and with the other one remove

184

J0A0964C

185

J0A0393C

186

J0A0247C

221

the key, sliding it outwards;

once the key has been removed, refit

lower cover C, make sure it locks
correctly and tighten the fixing screws B
firmly.

IMPORTANT

81) It is advisable to contact a Jeep
Dealership to have the refitting procedure
carried out. If you would like to proceed
autonomously, special attention must be
paid to the correct coupling of the
retaining clips. Otherwise, noise might be
heard due to an incorrect fastening of the
lower cover with the upper cover.

TWIN CLUTCH AUTOMATIC
TRANSMISSION LEVER
UNLOCK

In case of failure or flat battery, to
unlock the gear lever, proceed as follows:

stop the engine and engage the

electric parking brake;

working carefully in the point

indicated by the arrow, remove the
transmission trim A fig. 188 (complete
with gaiter) lifting it upwards;

fully depress the brake pedal and hold

it down;

insert the screwdriver supplied

perpendicularly in hole B fig. 189 and
adjust the release lever;

187

J0A0251C

188

J0A0963C

222

IN

AN

EMERGENCY

place the gear lever in N (Neutral)

position;

refit the gear lever gaiter and panel

correctly;

start the engine.

EMERGENCY REMOVAL OF THE
IGNITION KEY

82)

The ignition key (for versions with key
without remote control) can be removed
only if the gear lever is in position P
(Park).
If the vehicle battery is flat and the
ignition key is engaged, the latter is
locked in position.

To remove the key manually, proceed as
follows:

stop the vehicle in safety conditions,

engage a gear and the electric parking
brake;

using the wrench A fig. 190 (located

in the casing containing the on-board
documents), undo the fixing screws B
fig. 191 for the lower cover C;

remove the lower steering wheel cover

C by releasing it from its housing;

pull tab D fig. 192 downwards using

one hand and with the other one remove
the key, sliding it outwards;

once the key has been removed, refit

lower cover C, make sure it locks
correctly and tighten the fixing screws B
firmly.

189

J0A0964C

190

J0A0393C

191

J0A0247C

223

IMPORTANT

82) It is advisable to contact a Jeep
Dealership to have the refitting procedure
carried out. If you would like to proceed
autonomously, special attention must be
paid to the correct coupling of the
retaining clips. Otherwise, noise might be
heard due to an incorrect fastening of the
lower cover with the upper cover.

BROKEN-DOWN VEHICLE
TOWING

It is recommended to tow the vehicle
with all four wheels lifted from the
ground on the platform of a rescue
vehicle.

VERSIONS WITH FOUR-WHEEL DRIVE (4WD)
AND AUTOMATIC TRANSMISSION

IMPORTANT Avoid lifting the front (or
rear) wheels only. Lifting the front (or
rear) wheels only while towing might
damage the transmission or the
transfer unit.

IMPORTANT If a vehicle is towed
without complying with the above
requirements, the transmission and/or
the transfer unit might be seriously
damaged. Damage due to an incorrect
towing will not be covered by the
warranty.

192

J0A0251C

224

IN

AN

EMERGENCY

TOWING THE VEHICLE

ATTACHING THE TOW RING

174) 175) 176)

The tow ring provided with the car is
located in the tool box inside the boot.

Front

Release cap A fig. 193 by pressing the
lower part, take tow ring B from its
housing in the tool support and tighten it
securely on the front threaded pin.

Rear

Remove cap A fig. 194, take tow ring B
from its housing in the tool support and

tighten it securely on the rear threaded
pin.

Trailhawk versions: tow hook A fig. 195,
fixed type, is secured to the car body.

WARNING

174) For versions with key without remote
control, before towing, turn the ignition
key to MAR and then to STOP without
removing it. The steering column will
automatically lock when the key is
removed and the wheels cannot be
steered. Also check that the gearbox is in
neutral (on versions equipped with
automatic transmission, check that the
gear lever is in N position). For versions
with electronic key, move the ignition
device to MAR and then to STOP, without
opening the door.

193

J0A0160C

194

J0A0961C

195

J0A0962C

225

175) The brake servo and the
electromechanical power steering will not
work while the vehicle is being towed. You
will therefore need to apply more force on
the brake pedal and steering wheel. Do
not use flexible ropes when towing, and
avoid jerky movements. During towing,
make sure that the trailer hitch does not
damage any components it is touching.
When towing the car, you must comply
with all specific traffic regulations and
adopt an appropriate driving behaviour. Do
not start the engine while towing the car.
Before tightening the ring, clean the
threaded housing thoroughly. Make sure
that the ring is fully screwed into the
housing before towing the car.

176) The front and rear tow hooks should
be used only for emergencies on the road.
You are allowed to tow the vehicle for
short distances using an appropriate
device in accordance with the highway
code (a rigid bar), to move the vehicle on
the road in readiness for towing or
transport via a breakdown vehicle. Tow
hooks MUST NOT be used to tow vehicles
off the road or where there are obstacles
and/or for towing operations using cables
or other non-rigid devices. In compliance
with the above conditions, towing must
take place with the two vehicles (one
towing, the other towed) aligned as much
as possible along the same centre line.

226

IN

AN

EMERGENCY

SERVICING AND MAINTENANCE

Correct maintenance permits the
performance of the vehicle to be
maintained over time, as well as limited
running costs and safeguarding the
efficiency of the safety systems.

This chapter explains how.

SCHEDULED SERVICING . . . . . . .228
ENGINE COMPARTMENT . . . . . . .243
BATTERY RECHARGING . . . . . . . .251
SERVICING PROCEDURES . . . . . .252
LIFTING THE VEHICLE . . . . . . . . .254
WHEELS AND TYRES . . . . . . . . . .255
BODYWORK. . . . . . . . . . . . . . . .256

227

SCHEDULED SERVICING

Correct servicing is crucial for
guaranteeing a long life for the car under
the best conditions. For this reason, Jeep
has planned a series of checks and
services at fixed distance intervals and,
where provided, at fixed time intervals,
as described in the Scheduled Servicing
Plan.
Before each coupon however you always
need to pay attention to what is written
in the Scheduled Servicing Plan (e.g.
periodically check liquid levels, tire
pressure, etc.).
The Scheduled Servicing is carried out
by the Jeep Assistance Network at
pre-set times. If, during each operation,
in addition to the ones scheduled, the
need arises for further replacements or
repairs, these may be carried out with the
owner's explicit agreement only. If your
car is used frequently for towing, the
interval between one scheduled servicing
operation and the next should be
reduced.

IMPORTANT Scheduled Servicing
interventions are set out by the
Manufacturer. Failure to have them
carried out may invalidate the
warranty. It is advisable to inform a

Jeep Dealership of any small operating
irregularities without waiting for the
next service.

PERIODIC CHECKS

Every 1,000 km or before long trips
check and, if necessary, top up:

engine coolant level;
brake fluid level;
windscreen washer fluid level;
tyre inflation pressure and condition;
operation of lighting system

(headlights, direction indicators, hazard
warning lights, etc.);

operation of screen washer/wiper

system and positioning/wear of
windscreen/rear window wiper blades.
Every 3,000 km, check and top up if
required: engine oil level.

DEMANDING USE OF THE CAR

If the vehicle is used in one of the
following conditions:

Law enforcement (or security service),

taxi service

towing a trailer or caravan;
dusty roads;
short, repeated journeys (less than

7-8 km) at sub-zero outside
temperatures;

engine often idling or driving long

distances at low speeds or long periods
of inactivity;

the following checks must be carried out
more often than indicated in the
Scheduled Service Plan:

check front disc brake pad condition

and wear;

check cleanliness of bonnet and

luggage compartment locks, cleanliness
and lubrication of linkage;

visually inspect conditions of: engine,

gearbox, transmission, pipes and hoses
(exhaust/fuel system/brakes) and rubber
elements (gaiters/sleeves/bushes, etc.);

check battery charge and battery fluid

level (electrolyte);

visually inspect conditions of the

accessory drive belts;

check and, if necessary, change

engine oil and replace oil filter;

check and, if necessary, replace pollen

filter;

check and, if necessary, replace air

cleaner.

228

SER

VICING

AND

MAINTENANCE

SERVICE SCHEDULE (1.4 T-Jet 120 HP LPG / 1.4 Turbo Multi Air / 2.4 Tigershark versions)

IMPORTANT Once you have carried out the last intervention in the table, continue with the scheduled servicing, maintaining the
frequency indicated in the plan by marking each operation with a dot or dedicated note. Warning: simply restarting the maintenance
from the start of the plan may cause the allowed interval to be exceeded for some operations!

Thousands of miles

9

18

27

36

45

54

63

72

81

90

Thousands of kilometres

15

30

45

60

75

90

105

120

135

150

Years

1

2

3

4

5

6

7

8

9

10

Check the conditions/wear of tires and any pressure
adjustment; check conditions/expiry of the TireKit
recharge (where there is one)

Check operation of lighting system (headlights, direction
indicators, hazard warning lights, boot, passenger
compartment, glove compartment, instrument panel
warning lights, etc.)

Check and, if necessary, top up fluid levels(1)

Visually inspect the condition of: LPG pipes and
connectors, LPG tank fixing (1.4 T-Jet 120 HP LPG
versions)

(1) Always only use the liquids shown in the handbook for topping up after having checked that the system is not damaged.

229

Thousands of miles

9

18

27

36

45

54

63

72

81

90

Thousands of kilometres

15

30

45

60

75

90

105

120

135

150

Years

1

2

3

4

5

6

7

8

9

10

Check exhaust emissions

Use the diagnosis socket to check supply/engine
management system operation, emissions and, where
provided, engine oil degradation

Visually inspect conditions of: exterior bodywork,
underbody protection, pipes and hoses (exhaust, fuel
system, brakes), rubber elements (gaiters, sleeves,
bushes, etc.)

Check windscreen/rear window wiper blade position/wear

Check operation of the windscreen wiper/washer system
and adjust jets, if necessary

Check cleanliness of bonnet and luggage compartment
locks, cleanliness and lubrication of linkage

Visually inspect conditions and wear of front and rear
disc brake pads and operation of pad wear indicator

230

SER

VICING

AND

MAINTENANCE

Thousands of miles

9

18

27

36

45

54

63

72

81

90

Thousands of kilometres

15

30

45

60

75

90

105

120

135

150

Years

1

2

3

4

5

6

7

8

9

10

Visually inspect condition of the accessory drive belt(s)
(2)

Check tension of accessory drive belt (versions without
automatic tensioner)

Visually inspect conditions of toothed timing drive belt
(1.4 Turbo Multi Air and 1.4 T-Jet 120 HP LPG
versions)(2)

Check drive transmission idler unit (PTU) oil level
(4x4 versions)

Check rear differential fluid level (4x4 versions)

Check oil level of electro-hydraulic actuator and top up if
necessary (1.4 Turbo Multi Air versions with dual-clutch
automatic transmission) (3)

(2) The maximum mileage is 120,000 km. Regardless of the mileage, the belt must be replaced every 6 years. If the vehicle is used in

heavy conditions (dusty areas, cold climates, urban driving, long periods of idling), the maximum mileage is 60,000 km. The belt must
be replaced every 4 years regardless of the mileage.

(3) Check to be carried out every year for cars on the road in countries with particularly severe climates (cold countries).

231

Thousands of miles

9

18

27

36

45

54

63

72

81

90

Thousands of kilometres

15

30

45

60

75

90

105

120

135

150

Years

1

2

3

4

5

6

7

8

9

10

Check pressure regulator and seal of the corresponding
heating pipes (1.4 T-Jet 120 HP LPG versions)

Check correct fitting of injectors (positioning, clip
retention) (1.4 T-Jet 120 HP LPG versions)

Change engine oil and replace oil filter (1.4 T-Jet 120 HP
LPG and 1.4 Turbo Multi Air versions) (4) (O) (•)

Replace engine oil and oil filter (2.4 Tigershark versions -
where there is one) (5)

Replace spark plugs (1.4 T-Jet 120 HP LPG and
1.4 Turbo Multi Air versions) (6)

(4) If the car's annual mileage is less than 10,000 km, the engine oil and filter must be replaced every year.
(O) Recommended operations
(•) Obligatory operations
(5) The engine oil and oil filter must be replaced when the warning light on the instrument panel switches on or, in any case, every year.
(6) For 1.4 Turbo MultiAir and 1.4 T-Jet versions, to guarantee correct operation and prevent serious damage to the engine, it is essential to:

only use spark plugs specifically certified for these engines; all spark plugs should be of the same type and brand (see the "Engine"
paragraph in the "Technical specifications" chapter); strictly comply with the spark plugs replacement intervals on the Service Schedule.
It is advisable to contact a Jeep Dealership for plug replacement.

232

SER

VICING

AND

MAINTENANCE

Thousands of miles

9

18

27

36

45

54

63

72

81

90

Thousands of kilometres

15

30

45

60

75

90

105

120

135

150

Years

1

2

3

4

5

6

7

8

9

10

Replace starter spark plug (2.4 Tigershark versions -
where there is one)

Replace accessory drive belt/s

(2)

Replace timing belt (1.4 T-Jet 120 HP LPG and
1.4 Turbo Multi Air versions)

(2)

Replace air cleaner cartridge (7)

Replace the filter inside the pressure regulator (1.4 T-Jet
120 HP LPG versions)

Replace the paper filter (gaseous LPG) (1.4 T-Jet 120 HP
LPG versions)

(2) The maximum mileage is 120,000 km. Regardless of the mileage, the belt must be replaced every 6 years. If the vehicle is used in

heavy conditions (dusty areas, cold climates, urban driving, long periods of idling), the maximum mileage is 60,000 km. The belt must
be replaced every 4 years regardless of the mileage.

(7) If the vehicle is used in dusty areas, this cleaner must be replaced every 15,000 km.

233

Thousands of miles

9

18

27

36

45

54

63

72

81

90

Thousands of kilometres

15

30

45

60

75

90

105

120

135

150

Years

1

2

3

4

5

6

7

8

9

10

Change the brake fluid

(8)

Replace the passenger compartment cleaner (7) (O) (•)

(8) Brake fluid is to be replaced every 2 years regardless of the distance travelled.
(7) If the vehicle is used in dusty areas, this cleaner must be replaced every 15,000 km.
(O) Recommended operations
(•) Obligatory operations

NOTE change automatic transmission oil and replace oil filter every 240,000 km.

234

SER

VICING

AND

MAINTENANCE

SCHEDULED SERVICING PLAN (1.6 E.Torq versions)

IMPORTANT Once you have carried out the last intervention in the table, continue with the scheduled servicing, maintaining the
frequency indicated in the plan by marking each operation with a dot or dedicated note. Warning: simply restarting the maintenance
from the start of the plan may cause the allowed interval to be exceeded for some operations!

Thousands of miles

9

18

27

36

45

54

63

72

81

90

Thousands of kilometres

15

30

45

60

75

90

105

120

135

150

Years

1

2

3

4

5

6

7

8

9

10

Check the conditions/wear of tires and any pressure
adjustment; check conditions/expiry of the TireKit
recharge (where there is one)

Check operation of lighting system (headlights, direction
indicators, hazard warning lights, boot, passenger
compartment, glove compartment, instrument panel
warning lights, etc.)

Check and, if necessary, top up fluid levels(1)

Check exhaust emissions

(1)Always only use the liquids shown in the handbook for topping up after having checked that the system is not damaged.

235

Thousands of miles

9

18

27

36

45

54

63

72

81

90

Thousands of kilometres

15

30

45

60

75

90

105

120

135

150

Years

1

2

3

4

5

6

7

8

9

10

Use the diagnosis socket to check supply/engine
management systems operation, emissions and, for
versions/markets, where provided, engine oil degradation

Visually inspect conditions of: exterior bodywork,
underbody protection, pipes and hoses (exhaust, fuel
system, brakes), rubber elements (gaiters, sleeves,
bushes, etc.)

Check windscreen/rear window wiper blade position/wear

Check operation of the windscreen wiper/washer system
and adjust jets, if necessary

Check cleanliness of bonnet and luggage compartment
locks, cleanliness and lubrication of linkage

Visually inspect conditions and wear of front and rear
disc brake pads and operation of pad wear indicator

Visually inspect condition of the accessory drive belt(s)

236

SER

VICING

AND

MAINTENANCE


Content   ..  12  13  14  15   ..