Jeep Renegade (2018 year). Instruction - part 10


  Index      Jeep     Jeep Renegade - instruction 2018 year in english


Search            


Content   ..  8  9  10  11   ..


Jeep Renegade (2018 year). Instruction - part 10


FOUR WHEEL DRIVE -
JEEP ACTIVE DRIVE (4WD)
and JEEP ACTIVE DRIVE
LOW (4WD LOW)

FOUR-WHEEL DRIVE

The four wheel drive (4WD) is fully
automatic in standard driving mode.

IMPORTANT Changing mode is not
possible when the vehicle speed is
over 120 km/h.

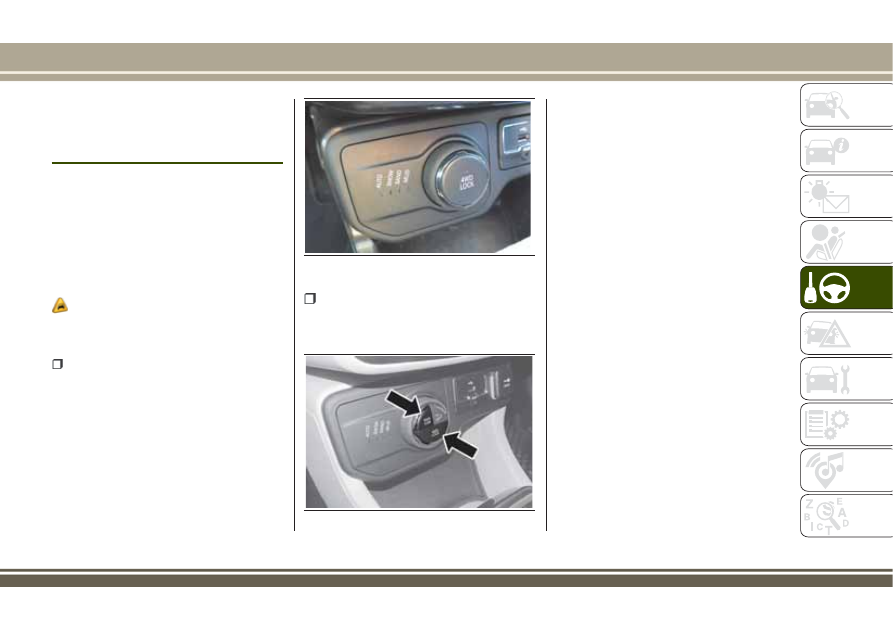
Four-wheel-drive activation

51) 52)

The buttons to activate the four-wheel
drive are located on the Selec-Terrain™
device and can select:

4WD LOCK (fig. 109 versions with

manual gearbox and automatic
transmission): deactivates the function
for disconnecting the propeller shaft,
guaranteeing the immediate availability
of the torque to the rear coupling. This
function can be selected in AUTO mode
and is automatic in the other driving
modes.

4WD LOW (fig. 110 versions with

automatic transmission): it enhances the
"off-road" performance of the vehicle in
all driving modes;

The 4WD LOCK function can be
activated by pressing the dedicated
button or when the selector is rotated
from AUTO to SNOW/SAND/MUD or
ROCK (Trailhawk versions) and 4WD LOW
was not selected before.
The engagement of one function (e.g.
4WD LOW) deactivates the other one
automatically.

IMPORTANT On some versions,
pressing the button 4WD LOW the
4WD LOCK function is automatically
activated as well. If the 4WD LOW
button is pressed again, the 4WD
LOCK function will be activated. If,
however, the 4WD LOCK button is
pressed again, both functions will be
deactivated.

IMPORTANT The 4WD LOW function is
recommended for irregular and
slippery terrain only.

4WD LOW MODE ENGAGEMENT/
RELEASE

4WD LOW mode engagement

With vehicle at a standstill, ignition
device in MAR position or with engine
on, move the gear lever to position D
(Drive), R (Reverse) or N (Neutral) and
press the 4WD LOW button.

109

J0A0908C

110

J0A0909C

157

On some versions, with mode engaged,
the display shows "4WD LOW". The LED
on the Selec-Terrain™ device may flash
until the end of the engagement.

4WD LOW mode release

The release can occur at any speed
ranging from 0 to 120 km/h.
On some versions, "4WD LOW" on the
display switches off at the end of the
release procedure.
In this case, the LED on the 4WD LOW
button is off.

IMPORTANT

51) The correct operation of the 4WD
function depends on the tyres: all of them
must have the same size, the same type
and the same circumference. Using tyres
with different sizes has negative effects on
the gear change and damages the
components of the transmission.
52) Do not drive at speeds exceeding those
that the road conditions allow for.

SELEC-TERRAIN

DRIVING MODE SELECTION

Turn knob A fig. 111 to select the
desired mode.

IMPORTANT Changing mode is not
possible when the vehicle speed is
over 120 km/h.

AUTO (Automatic): the 4WD mode with

continuous and automatic operation can
be used while driving on road and
off-road. This mode reduces fuel
consumption, because the propeller shaft
can be disconnected, whenever required.

SNOW: this mode can achieve more

stability on slippery or snow-covered
grounds. To be used for driving on-road
and off-road in the case of grounds with
poor grip, such as roads covered by snow.

SAND: off-road driving mode to be

used on surfaces with poor grip, such as
sandy surfaces. The transmission is set
to offer a maximum traction.

MUD: off-road driving mode for

surfaces with poor grip, such as
mud-covered grounds or wet grass.

ROCK (where provided, for Trailhawk

versions only): this mode is only available
if the 4WD LOW mode is activated. The
device sets the car to maximise traction
and give the highest steering capacity on
off-road surfaces featuring a high grip.
This mode guarantees the best "off-road"
performance. This mode must be used to
pass over obstacles at slow speed, such
as large rocks, deep cracks, etc.
When the engine is started, the AUTO
mode is automatically selected (LED on
close to the AUTO wording).
Turning the knob A fig. 111 the LED
close to the AUTO wording comes on

111

J0A0920C

158

ST

AR

TING

AND

DRIVING

solid. The other LEDs switch on
sequentially, depending on the positions
set on the knob, so that the driver can
understand which is the new required
mode.
Once the required mode is set (LED close
to the wording switched on), just keep
the knob in that position so that the
Selec-Terrain™ system actuates to
engage the wished mode.

STOP/START SYSTEM

The Stop/Start system automatically
stops the engine each time the vehicle is
stationary and starts it again when the
driver wants to move off.
In this way, the vehicle efficiency is
increased, by reducing consumption,
dangerous gas emissions and noise
pollution.

129) 130)

53)

OPERATING MODES

Engine stopping mode

Versions with manual gearbox
With the vehicle stopped, the engine
stops with gearbox in neutral and clutch
pedal released.

Versions with automatic transmission
With vehicle at a standstill and brake
pedal pressed, the engine switches off if
the gear lever is in a position other than
R.
In the event of stops uphill, the engine
switching off is disabled to activate the
"Hill Start Assist" function (works only
with running engine).
The

warning light on the instrument

panel switches on to signal that the
engine was stopped.

Engine restarting mode

Versions with manual gearbox
To restart the engine, press the clutch
pedal.
If the vehicle does not start pressing the
clutch, place the gear lever in neutral
and repeat the procedure. If the problem
persists, contact a Jeep Dealership.

Versions with automatic transmission
To restart the engine, release the brake
pedal.
With brake pressed, if the gear lever is in
automatic mode - D (Drive) - the engine
can be restarted moving the lever to R
(Reverse) or N (Neutral) or "AutoStick".
With brake pressed, if the gear lever is in
"AutoStick" mode, the engine can be
restarted moving the lever to "+" or "–", or
R (Reverse) or N (Neutral).
When the engine has been stopped
automatically, keeping the brake pedal
pressed, the brake can be released
keeping the engine off by quickly shifting
the gear lever to P (Park).
To restart the engine, just move the lever
out of position P.

159

SYSTEM MANUAL ACTIVATION/
DEACTIVATION

To activate/deactivate the system
manually, press the

button on the

central tunnel fig. 112.

LED off: system deactivated;
LED on: system deactivated.

WARNING

129) When replacing the battery, always
contact a Jeep Dealership. Replace the
battery with one of the same type (HEAVY
DUTY) and with the same specifications.

130) Before opening the bonnet, make
sure that the engine is off and that the
ignition device is in the STOP position.
Follow the indications on the plate
underneath the bonnet. We recommend
that you remove the key from the ignition
if other people remain in the vehicle. The
vehicle should always be left after the key
has been removed or turned to the STOP
position. During refuelling, make sure that
the engine is off (ignition device in the
STOP position).

IMPORTANT

53) If climate comfort is to be favoured,
the Stop/Start system can be deactivated,
for a continuous operation of the climate
control system.

SPEED LIMITER

DESCRIPTION

This device allows the speed of the
vehicle to be limited to values which can
be set by the driver.
The maximum speed can be set both
with vehicle stationary and in motion.
The minimum speed that can be set is
30 km/h.
When the device is active, the vehicle
speed depends on the pressure at the
accelerator pedal, until the set speed
limit is reached.

ACTIVATING THE DEVICE

To activate the device press button A

fig. 113 on the steering wheel.

112

J0A0134C

160

ST

AR

TING

AND

DRIVING

The buttons on the steering wheel
operate as follows:

SET +: limit speed programming

(storage of a higher speed value);

SET –: limit speed programming

(storage of a lower speed value);

RES: device activation (the actuation

of the device is signalled by the
displaying of symbol

(green on

versions with reconfigurable
multifunction display).

CANC: deactivation of the device (the

deactivation of the device is signalled by
the displaying of symbol

(white);

Automatic deactivation of device

The device deactivates automatically in
the event of fault in the system. In this
case, contact a Jeep Dealership.

ELECTRONIC CRUISE
CONTROL

DESCRIPTION

This is an electronically controlled
driving assistance device that allows the
desired vehicle speed to be maintained,
without having to press the accelerator
pedal.
This device can be used at a speed above
40 km/h on long stretches of dry, straight
roads with few variations (e.g.
motorways). It is therefore not
recommended to use this device on
extra-urban roads with traffic. Do not use
it in town.

ACTIVATING THE DEVICE

131) 132) 133)

To activate the Cruise Control press
button

fig. 114. If the Speed Limiter

is activated, button

must be pressed

twice to activate the device (the first
press deactivates the Speed Limiter, the
second press activates the Cruise
Control).
For versions equipped with four wheel
drive system, the device cannot be
inserted when the 4WD LOW (if

available) or the Hill Descent Control
functions are activated.

The device cannot be engaged in 1

st

or

reverse gear: it is advisable to engage it
in 3

rd

gear or higher.

IMPORTANT It is dangerous to leave
the device on when it is not used.
There is a risk of inadvertently
activating it and losing control of the
vehicle due to unexpected excessive
speed.

113

J0A0137C

114

J0A0144C

161

SETTING THE DESIRED SPEED

Activate the device and then, when the
vehicle has reached the desired speed,
press button SET + (or SET –) and
release it to activate the device. When
the accelerator is released, the vehicle
will proceed at the selected speed.
If needed (when overtaking for instance),
you can accelerate simply by pressing the
accelerator; when you release the pedal,
the vehicle goes back to the speed stored
previously.
When travelling downhills with the device
active, the vehicle speed may slightly
exceed the stored one.

IMPORTANT Before pressing buttons
SET + (or SET –) the vehicle must be
travelling at a constant speed on a flat
surface.

INCREASING/DECREASING
SPEED

Once the electronic Cruise Control has
been activated, the speed can be
increased by pressing button SET + or
decreased by pressing button SET – .

ACCELERATING WHEN
OVERTAKING

Depress the accelerator pedal: when this
is released the vehicle will gradually go
back to the stored speed.

IMPORTANT The device keeps the
speed stored even uphill and downhill.
A slight variation in the speed on slight
rises is completely normal.

RECALLING THE SPEED

Versions with automatic
transmission(operating in Drive mode -
automatic)
: press and release the RES
button.
Versions with manual gearbox or
automatic transmission in Autostick
(sequential) mode
: before recalling the
previously set speed you should
accelerate until getting close to it, then
press and release the RES button.

DEACTIVATING THE DEVICE

Pressing the CANC button or pressing the
brake pedal as the vehicle is slowing
down deactivates the electronic Cruise
Control without deleting the stored
speed.
The Cruise Control can also be
deactivated if the electric parking brake

(EPB) is activated or if the braking
system intervenes (e.g. the ESC system).

DEACTIVATING THE DEVICE

The device is deactivated by pressing
button

or bringing the ignition device

to STOP.

WARNING

131) When travelling with the device
active, never move the gear lever to
neutral.
132) In case of a malfunction or failure of
the device, contact a Jeep Dealership.
133) The electronic Cruise Control can be
dangerous if the system cannot keep a
constant speed. In specific conditions
speed may be excessive, resulting in the
risk of losing control of the vehicle and
causing accidents. Do not use the device
in heavy traffic or on winding, icy, snowy
or slippery roads.

162

ST

AR

TING

AND

DRIVING

ADAPTIVE CRUISE
CONTROL (ACC)

(where provided)

134) 135) 136) 137) 138) 139)

54) 55) 56) 57) 58) 59) 60)

DESCRIPTION

The Adaptive Cruise Control (ACC) is a
driver assist device which combines the
Cruise Control functions with one for
controlling the distance from the vehicle
ahead.
The Adaptive Cruise Control (ACC) uses a
radar sensor, located behind the front
bumper fig. 115 and a camera, located
in the middle of the windscreen fig. 116,
to detect the presence of a vehicle close
ahead.

There are two operating modes:

“Adaptive Cruise Control”

mode to

maintain an adequate distance between
vehicles (the message “Adaptive Cruise

Control” is shown on the instrument
panel display);

electronic “Cruise Control” mode

to hold the vehicle at a constant

preset speed.
To change the operation mode, use the
button on the steering wheel (see that
described on the following pages).

ADAPTIVE CRUISE CONTROL
ACTIVATION/DEACTIVATION

Activation

To activate the device, press and release
the

button. fig. 117

The device cannot be activated when
4WD LOW is engaged.

115

J0A0334C

116

J0A0241C

117

J0A0917C

163

IMPORTANT It is dangerous to leave
the device activated when it is not
used. There is a risk of inadvertently
activating it and losing control of the
vehicle due to unexpected excessive
speed.

Deactivation

With the device active, to deactivate it
press and release the

button. The

display will show a dedicated message.

SETTING THE DESIRED SPEED

The device can be set only with speeds
above 30 km/h (or 20 mph for markets
with instrument panels giving mph) and
under 160 km/h (or 100 mph for
markets with instrument panels
giving mph).
When the vehicle reaches the desired
speed, press and release the button SET
+ or SET to set the speed to the current
speed. The display will show the set
speed. Then take your foot off the
accelerator pedal.
The system cannot be set

when pressing the brake pedal;
when the brakes are overheated;
when the electric parking brake is

engaged;

when the shift lever is in the P (park),

R (reverse) or N (neutral) positions
(versions with automatic transmission or

automatic transmission with double
clutch);

when the shift lever is in the R

(reverse), neutral or in 1st (first gear
engaged) positions (versions with manual
transmission);

when the clutch is pressed (versions

with manual transmission);

when the engine speed exceeds a

maximum threshold (versions with
manual transmission and versions with
automatic transmission/automatic
transmission with double clutch) or goes
below a minimum threshold (only
versions with manual transmission);

when the car speed is not within the

settable speed range;

when the ESC (or ABS or other

stability control systems) are operating or
have just operated;

when the ESC system is off;
during automatic braking by the

Forward Collision Warning Plus system
(where provided);

when the Speed Limiter is active;
when the electronic Cruise Control is

active;

in case of failure of the device;
when the engine is off;
in case of obstruction of the radar

sensor (in this case the bumper area
where it is located must be cleaned).

IMPORTANT The device does not
deactivate on reaching speeds higher
than those that can be set (160 km/h
or 100 mph for instrument panel set
to mph) with the accelerator pedal
pressed. In these conditions, the
device may not work correctly and it is
advisable to deactivate it.

CHANGING SPEED

Speed increase
After having set the device, the stored
speed can be stored by holding the SET
+ button pressed.

Press the SET + button once: the set

speed will increase by 1 km/h (or by
1 mph when the measurement unit is set
to mph). Each touch of the button once
will increase the speed by 1 km/h (or by
1 mph, the latter for instrument panels
set to miles per hour).

Hold the SET + button pressed: the set

speed will increase in 10 km/h steps (or
in 5 mph steps when the measurement
unit is set to mph) until the button is
released. The set speed increase is
shown on the display.
Decreasing speed
After having set the device, the stored
speed can be reduced by holding the
SET – button pressed.

164

ST

AR

TING

AND

DRIVING

Press the SET – button once: the set

speed will be reduced by 1 km/h (or by
1 mph when the measurement unit is set
to mph). Each subsequent press of the
button will reduce the speed by 1 km/h
(or by 1 mph when the measurement unit
is set to mph).

Hold the SET – button pressed: the set

speed will decrease in 10 km/h steps (or
in 5 mph steps when the measurement
unit is set to mph) until the button is
released. The set speed decrease is
shown on the display.

ACCELERATING WHEN
OVERTAKING

When driving with the device active and
following a vehicle, the device provides
additional acceleration to facilitate
overtaking, when travelling over a given
speed and switches on the left direction
indicator (of the right indicator for
right-hand drive versions).

RECALLING THE SPEED

Once the system has been cancelled but
not deactivated, if a speed was previously
set simply press the RES button and
remove your foot from the accelerator to
recall it.
The system will be set to the last stored
speed.
Before returning to the previously set
speed, bring the speed close to that
value, then press the RES button and
release it.

SETTING THE DISTANCE
BETWEEN VEHICLES

The distance between your vehicle and
the vehicle ahead may be set to 1 bar
(short), 2 bars (medium), 3 bars (long),
4 bars (maximum) fig. 118

The distances from the vehicle ahead are
proportional to speed. The interval of
time with respect to the vehicle ahead
remains constant and varies from
1 second (for the short distance 1-bar
setting) to 2 seconds (for the maximum
distance 4-bar setting).

118

J0A0918C

165

The setting is 4 (maximum) the first time
the device is used. After the distance has
been modified by the driver, the new
distance will be stored also after the
system is deactivated and reactivated.

To decrease the distance

Press and release the

button to

decrease the distance setting.
The distance setting decreases by one
bar (shorter) every time the button is
pressed.
The set speed is held if there are no
vehicles ahead. Once the shortest
distance has been reached, a further
press of the button will set the longest
distance.
The vehicle holds the set distance until:

the vehicle ahead accelerates to a

speed higher than the set speed;

the vehicle ahead leaves the lane or

the detection field of the Adaptive Cruise
Control device sensor;

the distance setting is changed;
the Adaptive Cruise Control device is

deactivated/cancelled.

IMPORTANT The maximum breaking
applied by the device is limited. The
driver may apply the brakes in all
cases, if needed.

IMPORTANT If the device predicts that
the braking level is not sufficient to
hold the set distance, the warning
message “BRAKE!” will blink on the
display while approaching the vehicle
ahead. An acoustic signal is also
emitted. In this case, it is advisable to
brake immediately as necessary to hold
a safe distance from the vehicle ahead.

IMPORTANT The driver is responsible
for ensuring that there are no
pedestrians, other vehicles or
objectives along the direction of the
vehicle. Failure to comply with these
precautions may cause serious
accidents and injuries.

IMPORTANT The driver is fully
responsible for holding a safe distance
from the vehicle ahead respecting the
highway code in force in the respective
country.

DEACTIVATION

The device is deactivated and the set
speed is cancelled if:

the

button is pressed on the

Adaptive Cruise Control;

the

button is pressed on the

electronic Cruise Control;

the Speed Limiter button is pressed;

the ignition device is in the STOP

position;

4WD LOW mode is activated.

The device is cancelled (the set speed
and distance are stored):

when the CANC button is pressed;
when the conditions shown in the

“Setting the desired speed” paragraph
occur;

when the vehicle speed drops under

the minimum set speed (e.g. in presence
of slow vehicles).
If these conditions occur while the
system is decelerating with respect to a
vehicle ahead, the system could continue
the deceleration, if necessary, also after
it is cancelled or deactivated within the
minimum speed settable on the system.

ELECTRONIC CRUISE CONTROL
MODE

Electronic Cruise Control mode is
available for travelling at constant speed
in addition to the Adaptive Cruise Control
(ACC) mode.
If the Adaptive Cruise Control (ACC)
function is implemented on the vehicle,
the electronic Cruise Control works in the
same manner as the ACC (by pressing
the

button of the Cruise Control) with

the difference that:

it does not hold the distance from the

vehicle ahead;

166

ST

AR

TING

AND

DRIVING

the device keeps working if the radar

sensor is obstructed.
Before returning to the previously set
speed, bring the speed close to that
value, then press the RES button and
release it.

WARNING

134) Pay the utmost attention while
driving at all times and be always ready to
press the brakes if needed.
135) The system is an aid for the driver,
who must always pay full attention while
driving. The responsibility always rests
with the driver, who must take into
account the traffic conditions in order to
drive in complete safety. The driver must
always maintain a safe distance from the
vehicle in front.
136) The device is not activated in
presence of pedestrians, oncoming
vehicles in the opposite direction of travel
or moving in the crosswise direction and
stationary objects (e.g. a vehicle standing
in a queue or a broken down vehicle).
137) The device cannot take account of
road, traffic and weather conditions, and
conditions of poor visibility (e.g. fog).

138) The device does not always fully
recognise complex driving conditions that
could cause it to determine the safe
distance to be held incorrectly or not at
all.
139) The device cannot apply the
maximum braking force: the car will not
be stopped completely.

IMPORTANT

54) The system may have limited or absent
operation due to weather conditions such
as: heavy rain, hail, thick fog, heavy snow.
55) The section of the bumper before the
sensor must not be covered with
adhesives, auxiliary headlights or any other
object.
56) Operation can be adversely affected by
any structural change made to the vehicle,
such as a modification to the front
geometry, tyre change, or a heavier load
than the standard load of the vehicle.
57) Incorrect repairs made on the front
part of the vehicle (e.g. bumper, chassis)
may alter the position of the radar sensor,
and adversely affect its operation. Go to a
Jeep Dealership for any operation of this
type.

58) Do not tamper with nor carry out any
intervention on the radar sensor or on the
camera on the windscreen. In the event of
a sensor failure, contact a Jeep
Dealership.
59) Do not wash with high-pressure jets in
the bumper lower area: in particular do not
operate on the system's electrical
connector.
60) Be careful in the case of repairs and
new paintings in the area around the
sensor (panel covering the sensor on the
left side of the bumper). In the event of a
frontal impact the sensor may
automatically deactivate and display a
warning to indicate that the sensor needs
to be repaired. Even without a malfunction
warning, deactivate the system operation if
you think that the position of the radar
sensor has changed (e.g. due to low-speed
frontal impact as during parking
manoeuvres). In these cases, go to a Jeep
Dealership to have the radar sensor
realigned or replaced.

167

PARKSENSE SYSTEM

(where provided)

VERSIONS WITH 4 SENSORS

140)

61) 62)

The parking sensors, located in the rear
bumper fig. 119, are used to detect the
presence of any obstacles near the rear
part of the car.

The sensors warn the driver with acoustic
signals and, where provided, with visual
signals on the instrument panel screen.

On/off

To disengage the system press button
fig. 120.
Changing the system's status, from
engagement to disengagement and vice
versa, is always accompanied by a visual
message on the instrument panel screen.
System on: LED off.
System off: LED lighted continuously.

The LED lights up even if the
ParkSense® system does not. If the
button is pressed with a system failure,
the LED flashes for about 5 seconds,
then it stays on constantly.

IMPORTANT After the

ParkSense

® has

been disengaged, it will stay in this
condition until the following
engagement, even if the ignition
device passes from MAR to STOP and
then again to MAR.

IMPORTANT Using wheels with
different sizes from those mounted at
the time the car was purchased could
affect the system, not allowing it to
function properly.

System activation/deactivation

If it was engaged correctly, the system is
enabled by putting the gear into reverse
while it deactivates by moving the gear to
a different position to reverse.

Operation with a trailer

The operation of the sensors is
automatically deactivated when the
trailer electric cable plug is inserted in
the tow hook socket of the car. The
sensors are automatically reactivated
when the trailer's cable plug is removed.

119

J0A0926C

120

J0A0927C

168

ST

AR

TING

AND

DRIVING

VERSIONS WITH 12 SENSORS

The parking sensors, located in the front
(fig. 121 ) and rear (fig. 122 ) bumpers,
are used to detect the presence of any
obstacles near the front and rear part of
the vehicle.

The sensors warn the driver about the
presence of obstacles with an
intermittent acoustic signal and, where
provided, also with visual indications on
the instrument panel display.

On/off

To disengage the system press button
fig. 120.
When the system passes from engaged to
disengaged and vice versa, it is always
accompanied by a dedicated message on
the instrument panel display.
System on: LED off.
System off: LED lighted continuously.
The LED lights up even if the
ParkSense® system does not. If the
button is pressed with a system failure,

the LED flashes for about 5 seconds,
then it stays on constantly.

IMPORTANT After the

ParkSense

® has

been disengaged, it will stay in this
condition until the following
engagement, even if the ignition
device passes from MAR to STOP and
then again to MAR.

System activation/deactivation

When the reverse gear is engaged and
the system is on, the front and rear
sensors are activated. If a different gear
is engaged, the rear sensors are
deactivated, while the front sensors
remain active until a speed of 15 km/h is
exceeded.

Operation with a trailer

The operation of the rear sensors is
automatically deactivated when the
trailer's electric cable plug is inserted in
the tow hook socket of the car, while the
front sensors stay active and can provide
acoustic and visual warnings. The rear
sensors are automatically reactivated
when the trailer's cable plug is removed.

121

J0A0164C

122

J0A0699C

169

GENERAL WARNINGS

Some conditions may influence the
performance of the parking system:

reduced sensor sensitivity and a

reduction in the parking assistance
system performance could be due to the
presence of: ice, snow, mud, thick paint,
on the surface of the sensor;

the sensor may detect a non-existent

obstacle ("echo interference") due to
mechanical interference, for example
when washing the vehicle, in rain (strong
wind), hail;

the signals sent by the sensor can

also be altered by the presence of
ultrasonic systems (e.g. pneumatic brake
systems of trucks or pneumatic drills)
near the vehicle;

Parking assistance system

performance can also be influenced by
the position of the sensors, for example
due to a change in the ride setting
(caused by wear to the shock absorbers,
suspension), or by changing tyres,
overloading the vehicle or carrying out
specific tuning operations that require
the vehicle to be lowered.

the presence of a tow hook without

trailer, which may interfere with the
correct operation of the parking sensors.
Before using the ParkSense® system, it
is recommended to remove the
removable tow hook ball assembly and

the relevant attachment from the vehicle
when the latter is not used for towing
operations. Failure to comply with this
prescription may cause personal injuries
or damage to vehicles or obstacles since,
when the continuous acoustic signal is
emitted, the tow hook ball is already in a
position that is much closer to the
obstacle than the rear bumper. If you
wish to leave the tow hook fitted without
towing a trailer, it is advisable to contact
a Jeep Dealership for the relevant system
update operations because the tow hook
could be detected as an obstacle
ParkSense®by the central sensors.

the presence of adhesives on the

sensors. Thus take care not to place
adhesives on the sensors.

WARNING

140) Parking and other potentially
dangerous manoeuvres are, however,
always the driver’s responsibility. When
performing these operations, always make
sure that there are no other people
(especially children) or animals on the
route you want to take. The parking
sensors are an aid for the driver, but the
driver must never allow their attention to
lapse during potentially dangerous
manoeuvres, even those executed at low
speeds.

170

ST

AR

TING

AND

DRIVING

IMPORTANT

61) The sensors must be clean of mud,
dirt, snow or ice in order for the system to
operate correctly. Be careful not to scratch
or damage the sensors while cleaning
them. Avoid using dry, rough or hard
cloths. The sensors should be washed
using clean water with the addition of car
shampoo if necessary. When using special
washing equipment such as high pressure
jets or steam cleaning, clean the sensors
very quickly keeping the jet more than
10 cm away.
62) Only have interventions on the bumper
in the area of the sensors carried out by a
Jeep Dealership. Interventions on the
bumper that are not carried out properly
may compromise the operation of the
parking sensors.
63) Only have the bumpers repainted or
any retouches to the paintwork in the area
of the sensors carried out by a Jeep
Dealership. Incorrect paint application
could affect the operation of the parking
sensors.

ACTIVE PARKSENSE
SYSTEM

(where provided)

141) 142) 143)

64) 65)

The system helps the driver to find a
suitable free parallel parking spot
according to the length of the car and
then during parking manoeuvres to drive
the car out of it.

Sensors

The system uses the front, rear and side
sensors located in the front fig. 123 and
rear bumper fig. 124.

123

J0A0164C

171

ACTIVATION/DEACTIVATION

To insert the system, press the button
fig. 125: the instructions needed to carry
out the manoeuvre are shown on the
instrument panel screen.

System on: LED light on steady/ System
off
: LED off.
The LED lights up also in the case of a
failure to the Active ParkSense® system.
If the button is pressed with the system
faulty, the LED flashes for about
5 seconds, then it stays off.

IMPORTANT The use of wheels of a
different size to those at the time of
vehicle purchase could affect the
system and prevent correct operation.

OPERATION OF THE SYSTEM

When searching for a parking place, the
system uses the side sensors (fig. 126),
which are automatically activated with
engine on and speed below 30 km/h.

During the manoeuvre the driver is also
assisted by information from the parking
sensors (4 front and 4 rear) which
provide further distance information
when approaching obstacles in front of
and behind the vehicle.
If the Active ParkSense® function is
activated after having previously
deactivated the ParkSense® function, the
sensors are activated once more and stay
in this condition only during the parking
movement.

124

J0A0928C

125

J0A0929C

126

J0A0218C

172

ST

AR

TING

AND

DRIVING


Content   ..  8  9  10  11   ..