JAC Medium duty truck. Service Manual - part 4
just the clearance.
1. Apply chocks to the tires before
the wheel to be adjusted is jacked
up.
2. Strongly push the outer periph鄄
ery of tire to check for wheel loose鄄
ness. If the wheel is loose, it can鄄
not be correctly adjusted. Take the
vehicle to your nearest service
shop for correction.
3. Start the engine to increase the
compressed air pressure to more
than 6.4 kgf/cm
2
(625kPa). Leave
the engine running at idle.
4. Push the knob of the cab control
valve to release the emergency
brakes.
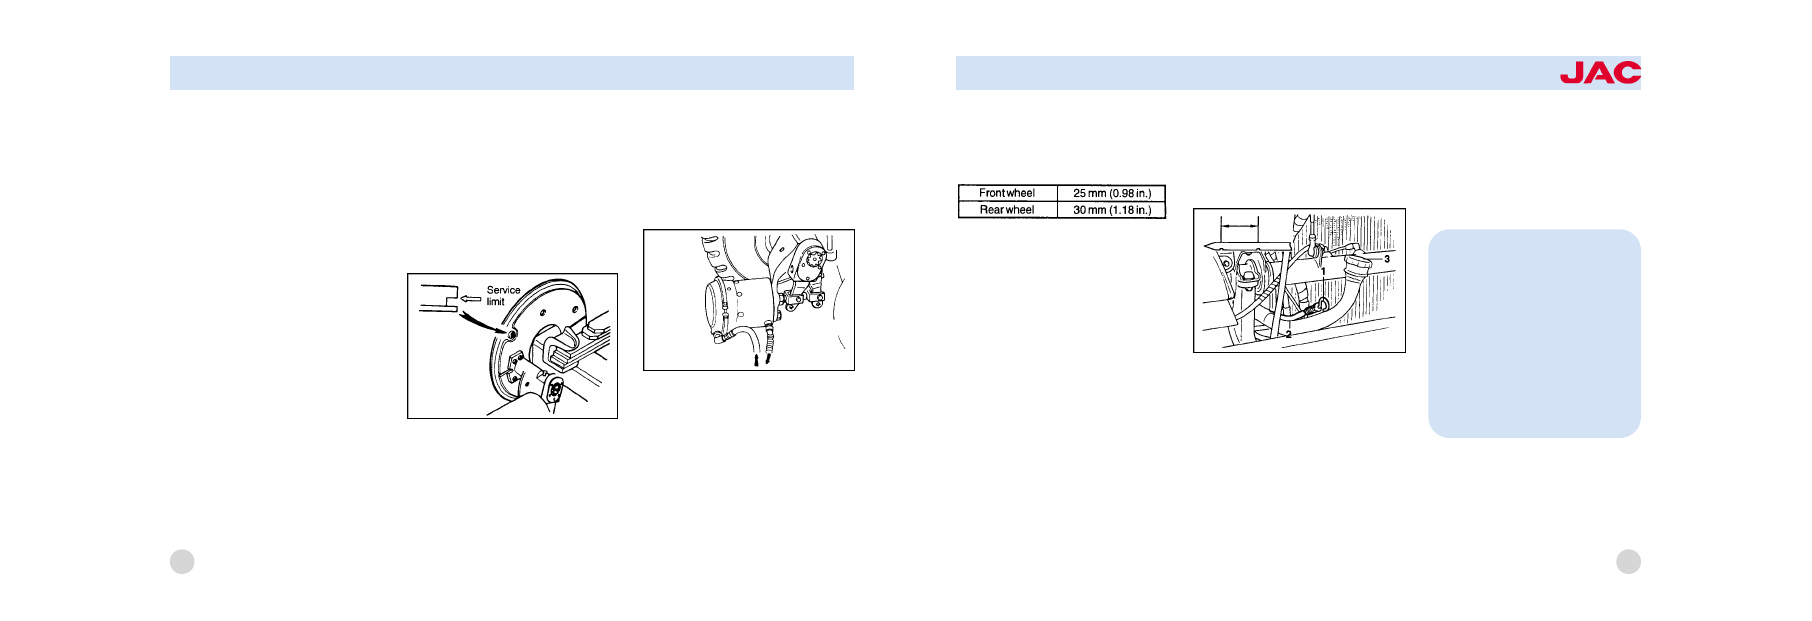
5. Remove the dust cap from the
wheel brake inspection hole and
check the lining thickness. If the
lining is worn down to the notch
shown in illustration, it is worn be鄄
yond the service limit. Have your
nearest service shop replace the
linings. Make sure that the dust
cap is reinstalled after inspection.
6. Turn the worm shaft of the slack
adjuster in the direction that the
push rod extends until the worm
shaft touches the stopper.
7. Back off the worm shaft 3 or 4
notches on the front wheels or 4 or
5 notches on the rear wheels.
The notches are indicated by the
clocks the worm shaft makes when
turned.
8. Measure the stroke made by the
push red of the brake chamber
when the brake pedal is de鄄
pressed all the way. Verify that the
stroke is up to specifications given
in the following table if it is out of
specification, adjust with the worm
100
VEHICLE MAINTENANCE REQUIREMENTS
shaft.
Standard stroke of brake chamber
push rod
9. Turn the wheel in the forward
direction by hand and depress
the brake pedal to stop rotation of
the wheel. Turn the wheel to check
for dragging. With slight foot pres鄄
sure on the brake pedal, turn each
wheel by hand to check that the
front wheels are slightly lighter to
turn than the rear wheels or there
is not great difference and that
right and left wheels are about e鄄
qual.
10. As a final step, install the dust
plug. Operate the vehicle at a slow
speed and perform brake tests to
check for brake performance, un鄄
even braking and other troubles.
ENGINE OIL LEVEL
Position the vehicle on a level sur鄄
face. The best time to check the oil
level is before operating the engine
or about 30 minutes after stop of
engine.
The checking procedure is as fol鄄
lows:
1. Wipe the level gauge 1 well with
a cloth, insert it into the level
gauge guide 2 and remove the
gauge to check the oil level. The
oil level should be between "FULL"
and "LOW" inscribed lines.
2. If the level is Iow, add engine oil
through the filler cap 3. After ad鄄
dition of engine oil, allow more
than six minutes and then recheck
101
CAUTION:
If the oil level is checked when
the engine is stopped before
sufficient rise of oil temperature,
the detected level will be lower
than the actual level, because
some oil accumulation in the
engine does not flow back into
the oil pan.