Isuzu N-Series. Manual - part 947


  Index      Isuzu     Isuzu N-Series - service repair manual


Search            


Content   ..  945  946  947  948   ..


Isuzu N-Series. Manual - part 947


7B-24 Automatic Transmission (Smoother)

Smoother Transmission Assembly

Removal

The transmission case and clutch housing are made of
aluminum, to be sure to exercise sufficient care to
ensure they are not damaged. A particularly high level of
care is required to protect against rib damage, which
can affect the strength of the case. 
Also take care to avoid personal injury when working
with cases and other heavy items. 

• Chock the tires.
• Tilt the cab. 
• Disconnect the battery (

−) cable.

• Use a lifter to raise the vehicle. 

1. Remove the transmission side cover and bracket.
2. Remove the Smoother oil pan drain plug and O-

ring (if disassembling). 

• Drain the oil (transmission fluid). When draining

the oil, check the oil amount, and check for
metal bits and foreign matter. 

3. Remove the transmission filler plug and O-ring (if

disassembling). 

4. Remove the transmission drain plug and O-ring (if

disassembling). 

• Drain the transmission oil. When draining the

oil, check the oil amount, and check for metal
bits and foreign matter. 

5. Remove the propeller shaft guard.
6. Disconnect the rear propeller shaft at the

transmission, and fasten it at a point where it will
not interfere with work. 

• Refer to “Rear Drive Propeller Shaft.” 

7. Remove the parking brake cable.

• Refer to “Parking Brake.” 

8. Disconnect the two starter harness connectors. 
9. Remove the starter ground cable.

10. Remove the upper oil filler tube.

11. Remove the starter motor assembly.
12. Disconnect the speed sensor connector.
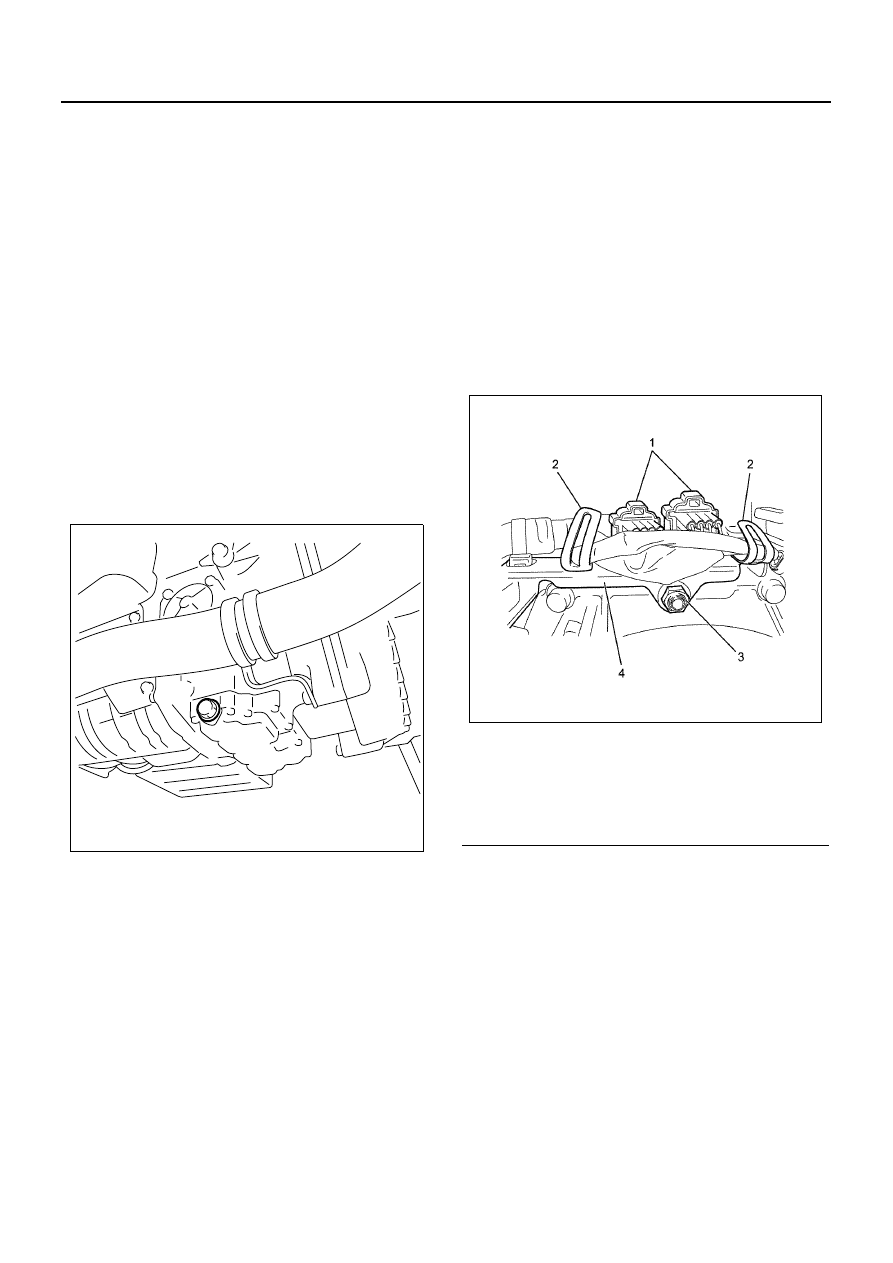
13. Disconnect the two transmissions harness

connectors from the frame harness. 
a. Remove the connector bracket nut, and

remove the two transmission harness
connectors from the connector bracket. 

b. Remove the two connector bracket frame

harness clips and the one transmission
harness clip. 

c. Disconnect the two transmissions harness

connectors from the frame harness. 


14. Remove the connector bracket.

a. Remove the reverse switch connector from the

connector bracket. 

b. Remove the frame harness clip from the

connector bracket, and remove the connector
bracket from the transmission. 

15. Remove the battery cable clip, and disconnect the

neutral switch connector. 

N7A1287E

Legend

1. Transmission Harness Connector 
2. Frame Harness Clips
3. Connector Bracket Nut
4. Connector Bracket

N7A1030E

Automatic Transmission (Smoother) 7B-25

16. Remove the parking brake cable clip from the

gearshift control box.

17. Remove the exhaust pipe clamp bolt (1) from the

exhaust pipe bracket (2). 

18. Remove the exhaust pipe bracket (2) from the

clutch housing. 

19. Remove the under cover of the work hole for the

fluid coupling tightening bolt, which is located in the
lower portion of the clutch housing. 

20. From the hole under clutch housing rotate the

flywheel as you remove the six bolts that links the
flexible plate with fluid couplings. 

21. Disconnect the outlet (1) and inlet (2) transmission

fluid cooler hose. 

22. Set a transmission jack in place, and use a chain

or some other means to secure the transmission. 

23. Remove the three fuel pipe brackets (3) from the

top of the cross member. 

N7A1032E

N7A1033E

N7A1034E

N7A1036E

7B-26 Automatic Transmission (Smoother)

24. Remove the installation nuts (4) between the

transmission mounting and the cross member.

25. Set an engine jack in place and support the engine. 
26. Remove the bolt that links the transmission and

engine. 

27. Taking care that the fluid coupling does not fall out,

pull out the Smoother transmission assembly. 

Installation

1. After applying a light coating of grease around the

entire circumference of the fluid coupling pilot hub,
carefully operate the transmission jack to link the
engine and the Smoother transmission assembly. 
At this time, match the phase of the engine’s
flexible plate (1) knock pin and the fluid coupling (2)
groove. 

2. Tighten the engine and transmission installation

bolts to their specified torque.

Tighten:
40 N

⋅m (4.1 kg⋅m / 29.5 lb⋅ft)

3. Install the installation nuts (4) between the

transmission mounting to the cross member. 

Tighten:
40 N

⋅m (4.1 kg⋅m / 29.5 lb⋅ft)

4. Install the three fuel pipe brackets (3) on the top of

the cross member to cross member. 

• Remove the transmission jack and engine jack. 

!

"

N7A1286E

N7A1038E 

Automatic Transmission (Smoother) 7B-27

5. Connect the outlet (1) and inlet (2) transmission

fluid cooler hose. 

Tighten:
44 N

⋅m (4.5 kg⋅m / 32.5 lb⋅ft)

6. After temporarily assembling the six flexible plate

and fluid coupling installation bolts, tighten them to
their specified torque. 

Tighten:
40 N

⋅m (4.1 kg⋅m / 29.5 lb⋅ft)

7. Install the under cover of the work hole for the

flexible coupling link bolt. 

Tighten:
8 N

⋅m (0.8 kg⋅m / 5.9 lb⋅ft)

8. Install the exhaust pipe bracket (2) on the clutch

housing. 

Tighten:
46 N

⋅m (4.7 kg⋅m / 33.9 lb⋅ft)

9. Install the exhaust pipe clamp bolt (1) on the

exhaust pipe bracket. 

!

"

N7A1286E

N7A1036E

N7A1034E

N7A1033E


Content   ..  945  946  947  948   ..