Isuzu N-Series. Manual - part 948


  Index      Isuzu     Isuzu N-Series - service repair manual


Search            


Content   ..  946  947  948  949   ..


Isuzu N-Series. Manual - part 948


7B-28 Automatic Transmission (Smoother)

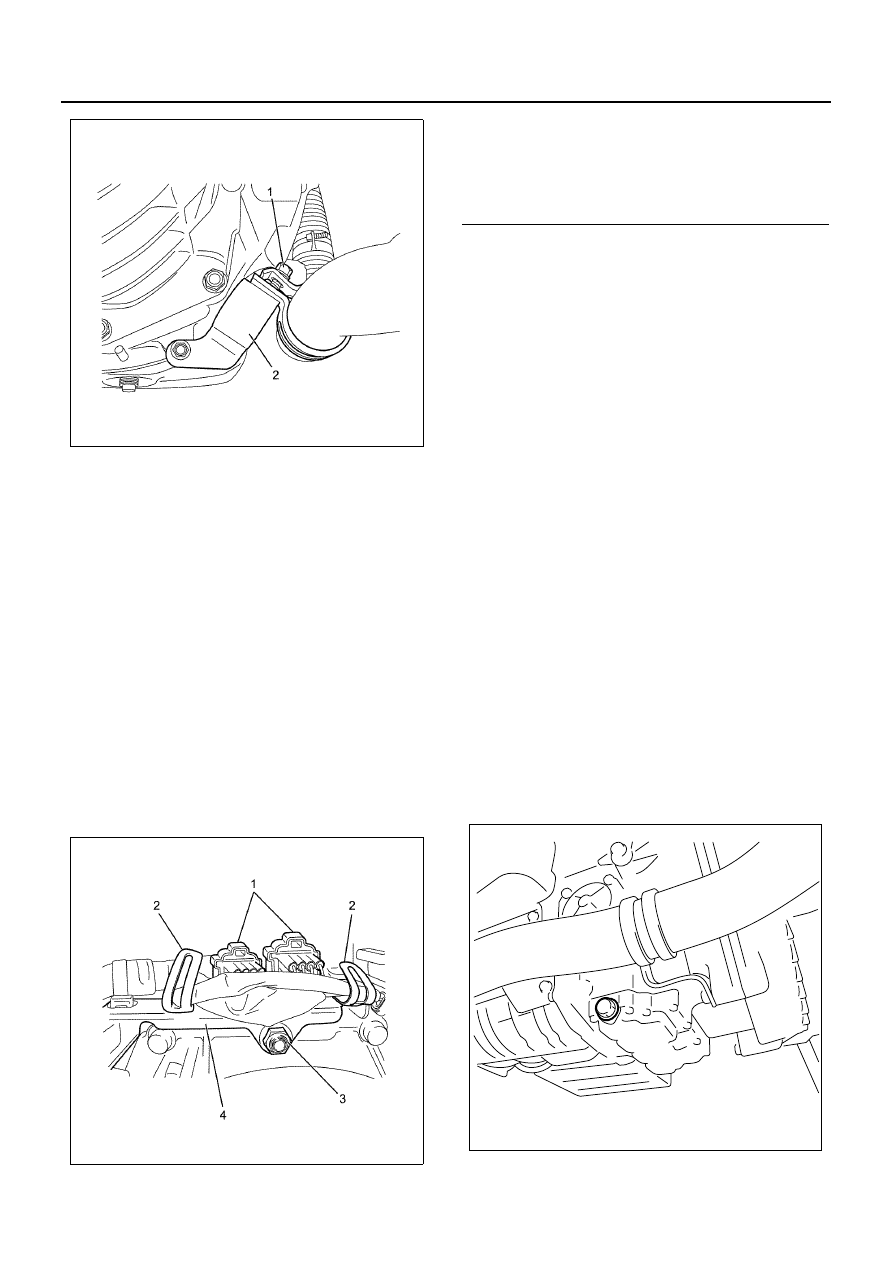
10. Install the parking brake cable clip on the gearshift

control box. 

11. Connect the neutral switch connector, and install

the battery cable clip. 

12. Install the connector bracket.

a. Install the frame harness clip on the connector

bracket, and install the connector bracket on
the transmission. 

b. Install the reverse switch connector on the

connector bracket. 

13. Connect the two transmission harness connectors

to the frame harness. 
a. Connect the two transmission harness

connectors to the frame harness. 

b. Install one transmission harness clip and two

frame harness clips on the connector bracket. 

c. Install the transmission harness connectors at

two points on the connector bracket, and install
the connector bracket nut. 


14. Connect the speed sensor connector.
15. Install the starter motor assembly.

Tighten:
76 N

⋅m (7.7 kg⋅m / 56.1 lb⋅ft)

16. Install the upper oil filler tube. (Use a new O-ring.) 

Tighten:
41 N

⋅m (4.2 kg⋅m / 30.2 lb⋅ft)

17. Install the starter ground cable.

Tighten:
39 N

⋅m (4.0 kg⋅m / 28.8 lb⋅ft)

18. Install the two starter harnesses.
19. Install the parking brake cable.

• Refer to “Parking Brake.” 

20. Install the rear propeller shaft.

• Refer to “Rear Drive Propeller Shaft”. 

21. Install the propeller shaft guard.
22. Apply engine oil to the O-ring, and then install the

transmission drain plug and the O-ring (after
disassembly). 

Tighten:
39 N

⋅m (4.0 kg⋅m / 28.8 lb⋅ft)

23. Apply oil (Besco ATF III) to the O-ring, and then

install the Smoother oil pan drain plug and the O-
ring (after disassembly). 

Tighten:
40 N

⋅m (4.1 kg⋅m / 29.5 lb⋅ft)

24. Supply transmission fluid (Besco ATF III) from the

oil filler tube to the Smoother (after disassembly). 

N7A1032E

N7A1030E

Legend

1. Transmission Harness Connector 
2. Frame Harness Clips
3. Connector Bracket Nut
4. Connector Bracket

N7A1287E

Automatic Transmission (Smoother) 7B-29

25. Fill transmission oil (5W-30) from the filler hole

(after disassembly). 

26. Apply engine oil to the O-ring, and then install the

transmission filler plug and the O-ring (after
disassembly). 

Tighten:
39 N

⋅m (4.0 kg⋅m / 28.8 lb⋅ft)

27. Install the transmission side cover and bracket.
28. Connect the battery (

−) cable.

29. If you replaced switches, etc., perform gear shift

position learning and half-clutch position learning. 

• For the learning procedure, refer to

“Transmission Control System Smoother.” 

30. Start the engine and use the level gauge to check

the transmission fluid level.

Tightening Torques

N7A1048E

7B-30 Automatic Transmission (Smoother)

Oil Filter

Components


Removal

1. Remove the bolt, and then remove the filler tube

and O-ring. 

2. Remove the bolt and remove the cover and

gascket. (Removal is not required if the filter is
replaced.)

3. Remove the drain plug and remove the O-ring. 
4. Remove the 13 bolts, and remove the oil pan and

lower gasket. 

5. Remove the one bolt, and remove the strainer

cover, upper gasket, and oil filter. 

6. If the filter is clogged, dirty, or otherwise abnormal,

replace it. 
When re-assembling, clean and then assemble. 

Installation

1. Apply oil (Besco ATF III) to the bottom of the clutch

housing (except the oil pan installation surface). 

2. Insert the oil filter in the clutch housing, install a

new upper gasket, and then use the installation
bolt to install the strainer cover.

Tighten:
10 N

⋅m (1.0 kg⋅m / 7.4 lb⋅ft)

• Position the tab of the upper gasket as shown

in the illustration, and take care that the top-
bottom orientation is correct. 

3. Install the oil pan with a new lower gasket, and

tighten with the installation bolts. Check the
tightening torque twice. 

Tighten:
10 N

⋅m (1.0 kg⋅m / 7.4 lb⋅ft)

• Position the tab of the lower gasket as shown in

the illustration, and take care that the top-
bottom orientation is correct. 

4. Apply oil (Besco ATF III) to the O-ring, assemble

the drain plug, and tighten it. 

Tighten:
40 N

⋅m (4.1 kg⋅m / 29.5 lb⋅ft)

5. Insert a new gasket, and tighten the cover with the

bolt. 

Tighten:
10 N

⋅m (1.0 kg⋅m / 7.4 lb⋅ft)

Legend

1. Bolt
2. Cover
3. Gasket
4. Oil Filter
5. Upper Gasket
6. Strainer Cover
7. Lower Gasket
8. Drain Plug
9. O-ring

10. Oil Pan

11. Bolt

12. Bolt
13. Gasket Tab

N7A1049E

Automatic Transmission (Smoother) 7B-31

Smoother

Components


Caution:

• The interior of the Smoother does not stand up to

dust, so be sure to clean all components before
assembly. In addition, never use cloth rags, knit
gloves, or air tools during assembly. Do not apply
any paint, etc. 

• In the case of disassembly, re-assemble using new

O-rings, D-rings, and seal rings. 

Legend

1. Fluid Coupling

7. Input Shaft Speed Sensor

2. Oil Pump Assembly

8. Cover

3. Clutch Assembly

9. Oil Pan Assembly

4. Brake Band

10. Oil Filler Tube Assembly

5. Clutch Housing 

11. Turbine Speed Sensor 

6. Top Gear Shaft

12. Plunger and Piston Assembly

N7A1050E


Content   ..  946  947  948  949   ..