Hyundai Tucson Plug-in Hybrid (2024 year). Manual in english - page 20
 

  Index      Manuals     Hyundai Tucson Plug-in Hybrid (2024 year). Manual in english


Search            copyright infringement  


Content      ..     18      19      20      21     ..


Hyundai Tucson Plug-in Hybrid (2024 year). Manual in english - page 20


Emergency Situations

8-14

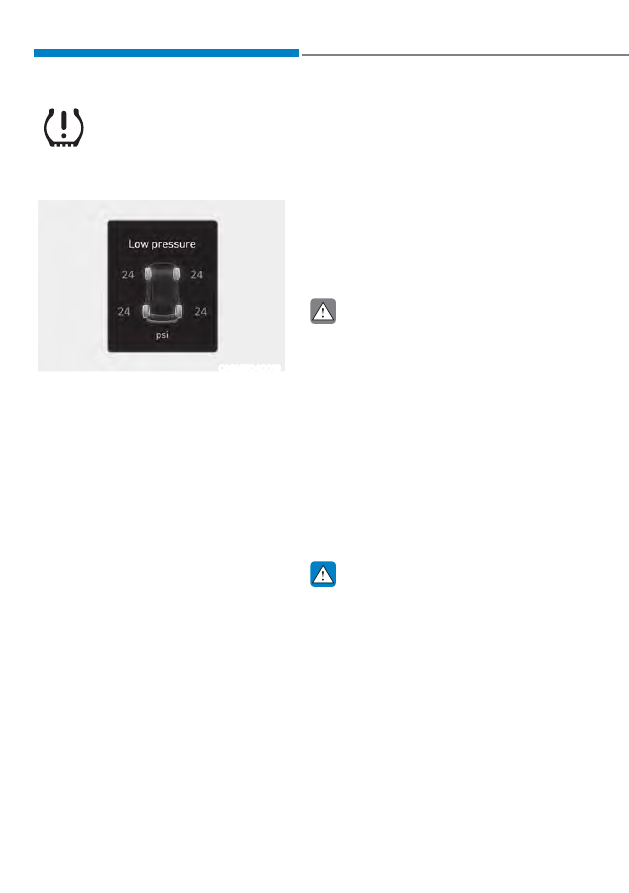
Low Tire Pressure 

Warning Light

Low Tire Pressure Position and 

Tire Pressure Telltale

ONX4E040019

When the tire pressure monitoring 

system warning indicators are 

illuminated and a warning message 

displayed on the cluster LCD display, 

one or more of your tires is significantly 

under-inflated. The Low Tire Pressure 

Position Telltale will indicate which 

tire is significantly underinflated by 

illuminating the corresponding position 

light.
If either telltale illuminates, immediately 

reduce your speed, avoid hard cornering 

and anticipate increased stopping 

distances. You should stop and check 

your tires as soon as possible. Inflate the 

tires to the proper pressure as indicated 

on the vehicle’s placard or tire inflation 

pressure label located on the driver’s 

side center pillar outer panel.

If you cannot reach a service station or 

if the tire cannot hold the newly added 

air, replace the low pressure tire with the 

spare tire.
The Low Tire Pressure Telltale will remain 

on and the TPMS Malfunction Indicator 

may blink for one minute and then 

remain illuminated (when the vehicle 

is driven approximately 10 minutes at 

speed above 15.5 mph (25 km/h)) until 

you have the low pressure tire repaired 

and replaced on the vehicle.

 CAUTION

In winter or cold weather, the Low Tire 

Pressure Telltale may be illuminated if 

the tire pressure was adjusted to the 

recommended tire inflation pressure 

in warm weather. It does not mean 

your TPMS is malfunctioning because 

the decreased temperature leads to a 

proportional lowering of tire pressure.
When you drive your vehicle from a 

warm area to a cold area or from a cold 

area to a warm area, or the outside 

temperature is greatly higher or lower, 

you should check the tire inflation 

pressure and adjust the tires to the 

recommended tire inflation pressure.

 WARNING

Low pressure damage
Significantly low tire pressure makes 

the vehicle unstable and can contribute 

to loss of vehicle control and increased 

braking distances.
Continued driving on low pressure tires 

can cause the tires to overheat and fail.

08

8-15

TPMS (Tire Pressure 

Monitoring System) 

malfunction indicator

The TPMS Malfunction Indicator 

will illuminate after it blinks for 

approximately one minute when there 

is a problem with the Tire Pressure 

Monitoring System.
Have the system checked by an 

authorized HYUNDAI dealer as soon as 

possible.

NOTICE

If there is a malfunction with the TPMS, 

the Low Tire Pressure Position Indicator 

will not be displayed even though the 

vehicle has an under-inflated tire.

NOTICE

The TPMS Malfunction Indicator may 

illuminate after blinking for one minute 

if the vehicle is near electric power 

supply cables or radio transmitters 

such as police stations, government 

and public offices, broadcasting 

stations, military installations, airports, 

transmitting towers, etc.
Additionally, the TPMS Malfunction 

Indicator may illuminate if snow chains 

are used or electronic devices such as 

computers, chargers, remote starters, 

navigation, etc. This may interfere with 

normal operation of the TPMS.

Changing a Tire with TPMS

If you have a flat tire, the Low Tire 

Pressure and Position indicators will 

come on. Have the flat tire repaired by an 

authorized HYUNDAI dealer as soon as 

possible or replace the flat tire with the 

spare tire.

NOTICE

It is recommended that you do not 

use a puncture-repairing agent not 

approved by HYUNDAI dealer or the 

equivalent specified for your vehicle to 

repair and/or inflate a low pressure tire. 

Tire sealant not approved by HYUNDAI 

dealer or the equivalent specified for 

your vehicle  may damage the tire 

pressure sensor.

The spare tire (if equipped) does not 

come with a tire pressure monitoring 

sensor. When the low pressure tire or 

the flat tire is replaced with the spare 

tire, the Low Tire Pressure Indicator will 

remain on. Also, the TPMS Malfunction 

Indicator will illuminate after blinking 

for one minute if the vehicle is driven 

at speed above 15.5 mph (25 km/h) for 

approximately 10 minutes.
Once the original tire equipped with 

a tire pressure monitoring sensor is 

reinflated to the recommended pressure 

and reinstalled on the vehicle, the 

Low Tire Pressure Indicator and TPMS 

Malfunction Indicator will go off within a 

few minutes of driving.
If the indicators do not extinguish after 

a few minutes, contact an authorized 

HYUNDAI dealer.
Each wheel is equipped with a tire 

pressure sensor mounted inside the tire 

behind the valve stem (except for the 

spare tire). You must use TPMS specific 

wheels. It is recommended that you 

always have your tires serviced by an 

authorized HYUNDAI dealer.

Emergency Situations

8-16

You may not be able to identify a tire 

with low pressure by simply looking at it. 

Always use a good quality tire pressure 

gauge to measure. Please note that a tire 

that is hot (from being driven) will have a 

higher pressure measurement than a tire 

that is cold.
A cold tire means the vehicle has been 

sitting for 3 hours and driven for less 

than 1 mile (1.6 km) in that 3 hour period.
Allow the tire to cool before measuring 

the inflation pressure. Always be sure 

the tire is cold before inflating to the 

recommended pressure.

 WARNING

ś

The TPMS cannot alert you to severe 

and sudden tire damage caused by 

external factors such as nails or road 

debris.

ś

If you feel any vehicle instability, 

immediately take your foot off 

the accelerator, apply the brakes 

gradually with light force, and slowly 

move to a safe position off the road.

 WARNING

Tampering with, modifying, or disabling 

the Tire Pressure Monitoring System 

(TPMS) components may interfere 

with the system’s ability to warn the 

driver of low tire pressure conditions 

and/or TPMS malfunctions. Tampering 

with, modifying, or disabling the Tire 

Pressure Monitoring System (TPMS) 

components may void the warranty for 

that portion of the vehicle.

 Information

This device complies with Part 15 of the 
FCC rules.

Operation is subject to the following three 
conditions:

1. 

This device may not cause harmful 
interference, and

2. 

This device must accept any 
interference received, including 
interference that may cause undesired 
operation.

3. 

Changes or modifications not expressly 
approved by the party responsible 
for compliance could void the user’s 
authority to operate the equipment.

08

8-17

,)<28+$9($)/$77,5(ǣ:,7+7,5(02%,/,7<.,7Ǥ

ONX4E080039

For safe operation, carefully read and 

follow the instructions in this manual 

before use.
(1) Compressor
(2) Sealant bottle
The Tire Mobility Kit is a temporary fix to 

the tire and have the tire inspected by an 

authorized HYUNDAI dealer as soon as 

possible.

 CAUTION

When two or more tires are flat, do not 

use the tire mobility kit because the 

sealant provided with the Tire Mobility 

Kit must be used for only one flat tire.

 WARNING

Do not use the Tire Mobility Kit to repair 

punctures in the tire walls. This can 

result in an accident due to tire failure.

 WARNING

Have your tire repaired as soon as 

possible. The tire may lose air pressure 

at any time after inflating with the Tire 

Mobility Kit.

Introduction

With the Tire Mobility Kit you stay mobile 

even after experiencing a tire puncture.
The compressor and sealing compound 

system effectively and comfortably seals 

most punctures in a passenger car tire 

caused by nails or similar objects and 

reinflates the tire.
After you ensure that the tire is properly 

sealed you can drive cautiously on the 

tire (distance up to 200 km (120 miles)) 

at a max. speed of (80 km/h (50 mph) 

in order to reach a service station or tire 

dealer for the tire replacement.
It is possible that some tires, especially 

with larger punctures or damage to the 

sidewall, cannot be sealed completely.
Air pressure loss in the tire may adversely 

affect tire performance.
For this reason, you should avoid abrupt 

steering or other driving maneuvers, 

especially if the vehicle is heavily loaded 

or if a trailer is in use.
The Tire Mobility Kit is not designed 

or intended as a permanent tire repair 

method and is to be used for one tire 

only.
This instruction shows you step by step 

how to temporarily seal the puncture 

simply and reliably.
Read the section “Notes on the safe use 

of the Tire Mobility Kit”.

 WARNING

Do not use the TMK if a tire is severely 

damaged by driving run flat or with 

insufficient air pressure.
Only punctured areas located within the 

tread region of the tire can be sealed 

using the TMK.

Emergency Situations

8-18

Notes on the safe use of the Tire 

Mobility Kit

ś

Park your car at the side of the road 

so that you can work with the Tire 

Mobility Kit away from moving traffic.

ś

To be sure your vehicle will not move, 

even when you’re on fairly level 

ground, always set your parking brake.

ś

Only use the Tire Mobility Kit for 

sealing/inflation passenger car tires. 

Only punctured areas located within 

the tread region of the tire can be 

sealed using the tire mobility kit.

ś

Do not use on motorcycles, bicycles 

or any other type of tires.

ś

When the tire and wheel are 

damaged, do not use Tire Mobility Kit 

for your safety.

ś

Use of the Tire Mobility Kit may not be 

effective for tire damage larger than 

approximately 4 mm (16 inch).
Please contact the nearest HYUNDAI 

dealer if the tire cannot be made 

roadworthy with the Tire Mobility Kit.

ś

Do not use the Tire Mobility Kit if a tire 

is severely damaged by driving run flat 

or with insufficient air pressure.

ś

Do not remove any foreign objects 

such as nails or screws that have 

penetrated the tire.

ś

Provided the car is outdoors, leave 

the vehicle in the ready (

) mode. 

Otherwise operating the compressor 

may eventually drain the car battery.

ś

Never leave the Tire Mobility Kit 

unattended while it is being used.

ś

Do not leave the compressor running 

for more than 10 minutes at a time or 

it may overheat.

ś

Do not use the Tire Mobility Kit if the 

ambient temperature is below -30°C 

(-22°F).

ś

In case of skin contact with the 

sealant, wash the area thoroughly 

with plenty of water. If the irritation 

persists, seek medical attention.

ś

In case of eye contact with the 

sealant, flush your eyes for at least 15 

minutes. If the irritation persists, seek 

medical attention.

ś

In case of swallowing the sealant, 

rinse the mouth and drink plenty of 

water. However, never give anything 

to an unconscious person and seek 

medical attention immediately.

ś

Long time exposure to the sealant 

may cause damage to bodily tissue 

such as kidney, etc.

08

8-19

Components of the Tire Mobility Kit

OTM080022

1.  Speed restriction label
2.  Sealant and sealant bottle
3.  Connection hose of compressor and tire
4.  Connector and cable for connection of power outlet
5.  Holder for the sealant bottle
6. Compressor
7. ON/OFF switch
8.  Pressure gauge for displaying the tire inflation pressure
9.  Valve for reducing tire inflation pressure
Connectors, cable and connection hose are stored in the compressor housing.

Strictly follow the specified sequence, otherwise the sealant may escape under high 

pressure.

Emergency Situations

8-20

 WARNING

Do not use the tire sealant after the 

sealant has expired (for example, past 

the expiration date on the sealant 

container). This can increase the risk of 

tire failure.

 WARNING

ś

Keep out of reach of children.

ś

Avoid contact with eyes.

ś

Do not swallow.

Using the Tire Mobility Kit

 WARNING

ONX4080010

Detach the speed restriction label (1) 

from the sealant bottle (2), and place 

it in a highly visible place inside the 

vehicle such as on the steering wheel to 

remind the driver not to drive too fast.

OTM080025

1.  Shake the sealant bottle (2).

08

8-21

OTM080023

2.  Remove the cover (A) of the sealant 

bottle (2) and compressor (6). 

OTM080024

3.  Connect the sealant bottle (2) and 

compressor (6). 

4.  Make sure that the valve (9) for 

reducing tire inflation pressure is 

closed. 

ONX4080011

5.  Unscrew the valve cap from the 

valve of the defective and screw 

the connection hose (3) of the 

compressor and tire.

NOTICE

Securely install the sealant filling hose 

to the valve. If not, sealant may flow 

backward, possibly clogging the filling 

hose.

6.  Make sure the compressor turns off by 

pressing [O] of the main switch (7). 

ONX4080012

7.  Connect the cable and connector (4) 

to the power outlet in the vehicle.

8.  Start the vehicle.

Emergency Situations

8-22

9.  With the vehicle ON 

(

 indicator ON), switch on 

the compressor and let it run for 

approximately 5~7 minutes to fill 

the sealant up to proper pressure. 

(Refer to “Tire and Wheels” section 

in chapter2)

. The inflation pressure of 

the tire after filling is unimportant and 

will be checked/corrected later.
Be careful not to overinflate the tire 

and stay away from the tire when 

filling it.

 CAUTION

Do not attempt to drive your vehicle if 

the tire pressure is below 200 kpa (29 

psi). This could result in an accident due 

to sudden tire failure.

10. Switch off the compressor.
11. Detach the hoses from the sealant 

bottle connector and from the tire 

valve.

Return the Tire Mobility Kit to its storage 

location in the vehicle.

 WARNING

Do not leave your vehicle running in 

a poorly ventilated area for extended 

periods of time. Carbon monoxide 

poisoning and suffocation can occur.

Distributing the sealant

OOSH079022L

12. Immediately drive approximately 4~6 

miles (7~10 km or about 10 minutes) 

to evenly distribute the sealant in the 

tire.

Do not exceed a speed of 50 mph (80 

km/h). If possible, do not fall below a 

speed of 12 mph (20 km/h).
While driving, if you experience any 

unusual vibration, ride disturbance or 

noise, reduce your speed and drive with 

caution until you can safely pull off of the 

side of the road.
Call for road side service or towing.

08

8-23

13. After driving approximately 4~6 miles 

(7~10 km or about 10 minutes), stop at 

a safe location.

ONX4080011

14. Connect the connection hose (3) of 

the compressor and tire into the tire 

valve. 

15. Connect cables (4) to the power 

outlet.

16. Adjust the tire inflation pressure to the 

recommended tire inflation.
With the vehicle in the ready (

mode, proceed as follows.


-

To increase the inflation pressure:

Switch on the compressor. 

To check the current inflation 

pressure setting, briefly switch off 

the compressor.


-

To reduce the inflation pressure:

Press the button (9) on the 

compressor.

NOTICE

Do not let the compressor run for more 

than 10 minutes, otherwise the device 

will overheat and may be damaged.

Checking the Tire Inflation 

Pressure

1.  After driving approximately 7~10 km 

(4~6 miles or about 10 minutes), stop 

at a safe location.

ONX4080011

2.  Connect the connection hose (3) of 

the compressor and tire into the tire 

valve.

3.  Connect cables (4) to the power 

outlet.

4.  Adjust the tire inflation pressure to the 

recommended tire inflation.
With the vehicle in the ready (

mode, proceed as follows.


-

To increase the inflation pressure:

Switch on the compressor. 

To check the current inflation 

pressure setting, briefly switch off 

the compressor.


-

To reduce the inflation pressure:

Press the button (9) on the 

compressor.

NOTICE

Do not let the compressor run for more 

than 10 minutes, otherwise the device 

will overheat and may be damaged.

Emergency Situations

8-24

 Information

The pressure gauge may show higher than 
actual reading when the compressor is 
running. To get an accurate tire pressure, 
the compressor needs to be turned off.

 CAUTION

If the inflation pressure is not 

maintained, drive the vehicle a second 

time, refer to Distributing the sealant. 

Then repeat steps 11 to 14.
Use of the TMK may be ineffectual for 

tire damage larger than approximately 

0.16 in (4 mm).
Contact an authorized HYUNDAI dealer 

if the tire cannot be made roadworthy 

with the Tire Mobility Kit.

 WARNING

The tire inflation pressure must be 

inflated to the proper pressure (Refer to 

“Tire and Wheels” section in chapter 2). 

If it is not, do not continue driving.
Call for road side service or towing.

 CAUTION

Tire pressure sensor
The sealant on the tire pressure sensor 

and wheel should be removed when 

you replace the tire with a new one and 

inspect the tire pressure sensors. Get 

this done at an authorized dealer.

 Information

When reinstalling the repaired or replaced 
tire and wheel on the vehicle, tighten the 
wheel nut to 11~13 kgf·m (79~94 lbf·ft).

08

8-25

TOWING

Towing Service

A

A

ONX4080013

[A] : Dollies

If emergency towing is necessary, have it 

done by an authorized HYUNDAI dealer 

or a commercial tow-truck service.
Proper lifting and towing procedures 

are necessary to prevent damage to 

the vehicle. The use of wheel dollies or 

flatbed is recommended.
For AWD vehicles, it must be towed 

with a wheel lift and dollies or flatbed 

equipment with all the wheels off the 

ground. 

 CAUTION

ONX4080015

ś

Do not tow with sling-type 

equipment. Use wheel lift or flatbed 

equipment.

ONX4080016

ś

Do not tow the vehicle with the any 

wheels on the ground as this may 

cause damage to the vehicle.

Emergency Situations

8-26

Removable Towing Hook

ONX4080017

1.  Open the liftgate, and remove the 

towing hook from the tool case.

„

Front

ONX4080018

„

Rear

ONX4H080001

2.  Remove the hole cover by pressing 

the lower part of the cover on the 

bumper.

3.  Install the towing hook by turning it 

clockwise into the hole until it is fully 

secured.

4.  Remove the towing hook and install 

the cover after use.

08

8-27

Emergency Towing

„

Front

ONX4080019

„

Rear

ONX4H080002

If towing is necessary, have it done by 

an authorized HYUNDAI dealer or a 

commercial tow truck service.
If a towing service is not available in 

an emergency, your vehicle may be 

temporarily towed using a cable or chain 

secured to the emergency towing hook 

at the front (or rear) of the vehicle.
Use extreme caution when towing the 

vehicle with a cable or chain. A driver 

must be in the vehicle to steer it and 

operate the brakes.
Towing in this manner may be done 

only on hard-surfaced roads for a short 

distance and at low speeds. Also, the 

wheels, axles, power train, steering and 

brakes must all be in good condition.

 CAUTION

The driver must be in the vehicle for 

steering and braking operations when 

the vehicle is being towed. Passengers 

other than the driver must not be in the 

vehicle.

Always follow these emergency towing 

precautions:

ś

Place the ignition switch in the ACC 

position so the steering wheel is not 

locked.

ś

Place the shift button in N (Neutral).

ś

Release the parking brake.

ś

Depress the brake pedal with more 

force than normal as you will have 

reduced braking performance.

ś

More steering effort will be required 

because the power steering system 

will be disabled.

ś

Use a vehicle heavier than your own to 

tow your vehicle.

ś

The drivers of both vehicles should 

communicate with each other 

frequently.

ś

Before emergency towing, check that 

the hook is not broken or damaged.

ś

Fasten the towing cable or chain 

securely to the hook.

ś

Do not jerk the hook. Apply steady 

and even force.

Emergency Situations

8-28

ONX4080022

ś

Use a towing cable or chain less than 

16 feet (5 m) long. Attach a white or 

red cloth (about 12 inches (30 cm) 

wide) in the middle of the cable or 

chain for easy visibility.

ś

Drive carefully so the towing cable or 

chain remains tight during towing.

ś

Before towing, check the automatic 

transmission for fluid leaks under your 

vehicle. If the automatic transmission 

fluid is leaking, flatbed equipment or a 

towing dolly must be used.

NOTICE

Accelerate or decelerate the vehicle 

in a slow and gradual manner while 

maintaining tension on the tow rope 

or chain to start or drive the vehicle, 

otherwise tow hooks and the vehicle 

may be damaged.

NOTICE

To avoid damage to your vehicle and 

vehicle components when towing:

ś

Always pull straight ahead when 

using the towing hooks. Do not pull 

from the side or at a vertical angle.

ś

Do not use the towing hooks to pull 

a vehicle out of mud, sand or other 

conditions from which the vehicle 

cannot be driven out under its own 

power.

ś

Limit the vehicle speed to 10 mph 

(15 km/h) and drive less than 1 

mile (1.5 km) when towing to avoid 

serious damage to the automatic 

transmission.

08

8-29

Your HYUNDAI vehicle may come 

equipped with certain additional 

emergency or roadside assistance 

accessories that may be useful if a 

problem occurs.

Fire Extinguisher

If there is small fire and you know how 

to use the fire extinguisher, follow these 

steps carefully.
1.  Pull out the safety pin at the top of the 

extinguisher that keeps the handle 

from being accidentally pressed.

2.  Aim the nozzle towards the base of 

the fire.

3.  Stand approximately 8 ft (2.5 m) away 

from the fire and squeeze the handle 

to discharge the extinguisher. If you 

release the handle, the discharge will 

stop.

4.  Sweep the nozzle back and forth 

at the base of the fire. After the fire 

appears to be out, watch carefully 

since it may re-ignite.

First Aid Kit

Supplies for use in giving first aid such as 

scissors, bandages and adhesive tape, 

etc. are provided.

Triangle Reflector

Place the triangle reflector on the road 

to warn oncoming vehicles during 

emergencies, such as when the vehicle is 

parked by the roadside due to problems.

Tire Pressure Gauge

Tires normally lose some air in day-to-

day use, and you may have to add a air 

periodically and usually it is not a sign of 

a leaking tire, but of normal wear. Always 

check tire pressure when the tires are 

cold because tire pressure increases with 

temperature.

To check the tire pressure, take the 

following steps:
1.  Unscrew the inflation valve cap that is 

located on the rim of the tire.

2.  Press and hold the gauge against the 

tire valve. Some air will leak as you 

begin and more will leak if you don’t 

press the gauge in firmly.

3.  A firm non-leaking push will activate 

the gauge.

4.  Read the tire pressure on the gauge 

to see whether the tire pressure is low 

or high.

5.  Adjust the tire pressure to the 

specified pressure. Refer to “Tires and 

Wheels” section in chapter 2.

6.  Reinstall the inflation valve cap.

EMERGENCY/ROADSIDE ASSISTANCE ACCESSORIES 

9

9. Maintenance

Engine Compartment ....................................................................................... 9-3
Maintenance Services ......................................................................................9-4

Owner’s Responsibility ............................................................................................... 9-4

Owner Maintenance Precautions ............................................................................... 9-4

Owner Maintenance ......................................................................................... 9-5

Owner Maintenance Schedule ....................................................................................9-5

Scheduled Maintenance Services ....................................................................9-7

Normal Maintenance Schedule .................................................................................. 9-9

Maintenance Under Severe Usage Conditions ........................................................ 9-12

Explanation of Scheduled Maintenance Items ..............................................9-14
Engine Oil .........................................................................................................9-16

Checking the Engine Oil Level ................................................................................... 9-16

Checking the Engine Oil and Filter ............................................................................9-17

Engine Coolant/Inverter Coolant ....................................................................9-18

Checking the Coolant Level....................................................................................... 9-18

Changing Coolant ..................................................................................................... 9-20

Hybrid Starter & Generator (HSG) Belt ...........................................................9-21

Checking the Hybrid Starter & Generator (HSG) Belt .............................................. 9-21

Brake Fluid ........................................................................................................9-21

Checking the Brake Fluid Level ................................................................................. 9-21

Washer Fluid .................................................................................................... 9-22

Checking the Washer Fluid Level ..............................................................................9-22

Air Cleaner ....................................................................................................... 9-23

Filter Replacement .....................................................................................................9-23

Cabin Air Filter ................................................................................................. 9-24

Filter Inspection..........................................................................................................9-24

Filter Replacement .....................................................................................................9-24

Wiper Blades ................................................................................................... 9-25

Blade Inspection ........................................................................................................9-25

Blade Replacement ....................................................................................................9-25

Battery (Plug-in Hybrid Vehicle) .................................................................... 9-29

For Best Battery Service ........................................................................................... 9-30

Battery Capacity Label ............................................................................................... 9-31

Battery Recharging .................................................................................................... 9-31

Reset Items .................................................................................................................9-33

9

Tires and Wheels ............................................................................................. 9-34

Tire Care ......................................................................................................................9-34

Recommended Cold Tire Inflation Pressures ...........................................................9-34

Check Tire Inflation Pressure .....................................................................................9-35

Tire Rotation ...............................................................................................................9-36

Wheel Alignment and Tire Balance ...........................................................................9-37

Tire Replacement .......................................................................................................9-37

Wheel Replacement .................................................................................................. 9-38

Tire Traction ............................................................................................................... 9-38

Tire Maintenance....................................................................................................... 9-38

Tire Sidewall Labeling ................................................................................................9-39

Tire Terminology and Definitions ............................................................................. 9-42

All Season Tires .......................................................................................................... 9-44

Summer Tires ............................................................................................................ 9-44

Snow Tires.................................................................................................................. 9-44

Radial-Ply Tires .......................................................................................................... 9-45

Low Aspect Ratio Tires .............................................................................................. 9-45

Fuses ................................................................................................................ 9-47

Instrument Panel Fuse Replacement ....................................................................... 9-48

Engine Compartment Panel Fuse Replacement ..................................................... 9-49

Fuse/Relay Panel Description................................................................................... 9-50

Light Bulbs .......................................................................................................9-59

Headlight, Position Lamp, Turn Signal Lamp, Daytime Running Light (DRL) 

Replacement ............................................................................................................. 9-60

Side Repeater Lamp Replacement .......................................................................... 9-60

Rear Combination Lamp Replacement ....................................................................9-61

High Mounted Stop Lamp Replacement ................................................................. 9-64

License Plate Lamp Replacement ............................................................................ 9-64

Interior Light Replacement ....................................................................................... 9-65

Appearance Care ............................................................................................ 9-67

Exterior Care ...............................................................................................................9-67

Interior Care .................................................................................................................9-71

Emission Control System .................................................................................9-74

Crankcase Emission Control System ........................................................................9-74

Evaporative Emission Control System Including Onboard Refueling Vapor  

Recovery (ORVR) ........................................................................................................9-74

Exhaust Emission Control System .............................................................................9-75

California Perchlorate Notice ..........................................................................9-77

9-3

09

„

Smartstream G1.6 T-GDi HEV

The actual engine compartment in the vehicle may differ from the illustration.

ONX4PH091001N

1. ECU
2.  Engine coolant reservoir
3.  Engine coolant reservoir cap
4.  Inverter coolant reservoir
5.  Brake fluid reservoir
6. Air cleaner

7.  Engine oil filler cap
8.  Engine oil dipstick
9.  Windshield washer fluid reservoir
10. Fuse box
11.  Inverter coolant reservoir cap

ENGINE COMPARTMENT

Maintenance

9-4

You should exercise the utmost care 

to prevent damage to your vehicle and 

injury to yourself whenever performing 

any maintenance or inspection 

procedures.
Have your vehicle maintained and 

repaired by an authorized HYUNDAI 

dealer. An authorized HYUNDAI dealer 

meets HYUNDAI’s high service quality 

standards and receives technical support 

from HYUNDAI in order to provide you 

with a high level of service satisfaction.

Owner’s Responsibility

Maintenance service and record 

retention are the owner’s responsibility.
You should retain documents that show 

proper maintenance has been performed 

on your vehicle in accordance with 

the scheduled maintenance service 

charts shown on the following pages. 

You need this information to establish 

your compliance with the servicing 

and maintenance requirements of your 

vehicle warranties.
Detailed warranty information is 

provided in your Owner’s Handbook & 

Warranty Information booklet.
Repairs and adjustments required as a 

result of improper maintenance or a lack 

of required maintenance are not covered.

Owner Maintenance Precautions

Inadequate, incomplete or insufficient 

servicing may result in operational 

problems with your vehicle that could 

lead to vehicle damage, an accident, or 

personal injury. This chapter provides 

instructions only for the maintenance 

items that are easy to perform.
Your vehicle should not be modified 

in any way. Such modifications may 

adversely affect the performance, safety 

or durability of your vehicle and may, in 

addition, violate conditions of the limited 

warranties covering the vehicle.

NOTICE

Improper owner maintenance during 

the warranty period may affect 

warranty coverage. For details, read the 

separate Owner’s Handbook & Warranty 

Information Booklet provided with 

the vehicle. If you’re unsure about any 

servicing or maintenance procedure, 

have the system be serviced by an 

authorized HYUNDAI dealer.

MAINTENANCE SERVICES

09

9-5

 WARNING

Performing maintenance work on a 

vehicle can be dangerous. If you lack 

sufficient knowledge and experience 

or the proper tools and equipment 

to do the work, have it done by an 

authorized HYUNDAI dealer. ALWAYS 

follow these precautions for performing 

maintenance work:

ś

Park your vehicle on level ground, 

move the shift button into the P 

(Park) position, apply the parking 

brake, and place the Engine Start/

stop button in the OFF position.

ś

Block the tires (front and back) to 

prevent the vehicle from moving.
Remove loose clothing or jewelry 

that can become entangled in 

moving parts.

ś

If you must run the engine during 

maintenance, do so out doors or in 

an area with plenty of ventilation.

ś

Keep flames, sparks, or smoking 

materials away from the battery and 

fuel-related parts.

The following lists are vehicle checks and 

inspections that should be performed 

by the owner or an authorized HYUNDAI 

dealer at the frequencies indicated to 

help ensure safe, dependable operation 

of your vehicle.
Any adverse conditions should be 

brought to the attention of your dealer as 

soon as possible.
These Owner Maintenance vehicle 

checks are generally not covered by 

warranties and you may be charged for 

labor, parts and lubricants used.

Owner Maintenance Schedule

When you stop for fuel:

ś

Check the coolant level in the engine 

coolant reservoir.

ś

Check the windshield washer fluid 

level.

ś

Check for low or under-inflated tires.

 WARNING

Be careful when checking your engine 

coolant/inverter coolant level if the 

engine is hot. This may result in coolant 

being blown out of the opening and 

cause serious burns and other injuries.

OWNER MAINTENANCE

Maintenance

9-6

While operating your vehicle:

ś

Note any changes in the sound of the 

exhaust or any smell of exhaust fumes 

in the vehicle.

ś

Check for vibrations in the steering 

wheel. Notice if there is any increased 

steering effort or looseness in the 

steering wheel, or change in its 

straight-ahead position.

ś

Notice if your vehicle constantly turns 

slightly or “pulls” to one side when 

traveling on smooth, level road.

ś

When stopping, listen and check for 

unusual sounds, pulling to one side, 

increased brake pedal travel or “hard-

to-push” brake pedal.

ś

If any slipping or changes in the 

operation of your transmission occurs, 

check the transmission fluid level.

ś

Check the automatic transmission P 

(Park) function.

ś

Check the parking brake.

ś

Check for fluid leaks under your 

vehicle (water dripping from the air 

conditioning system during or after 

use is normal).

At least monthly:

ś

Check coolant level in the engine 

coolant reservoir.

ś

Check the operation of all exterior 

lights, including the stoplights, turn 

signals and hazard warning flashers.

ś

Check the inflation pressures of all 

tires including the spare for tires that 

are worn, show uneven wear, or are 

damaged.

ś

Check for loose wheel lug nuts.

At least twice a year:

ś

Check radiator, heater and air 

conditioning hoses for leaks or 

damage.

ś

Check windshield washer spray and 

wiper operation. Clean wiper blades 

with a clean cloth dampened with 

washer fluid.

ś

Check headlight alignment.

ś

Check muffler, exhaust pipes, shields 

and clamps.

ś

Check the seat belts for wear and 

function.

At least once a year:

ś

Clean body and door drain holes.

ś

Lubricate door hinges and hood 

hinges.

ś

Lubricate door and hood locks and 

latches.

ś

Lubricate door rubber weather strips.

ś

Check the air conditioning system.

ś

Inspect and lubricate automatic 

transmission linkage and controls.

ś

Clean the battery and terminals. (For 

plug-in hybrid vehicle)

ś

Check the brake fluid level.

09

9-7

Follow Normal Maintenance Schedule if the vehicle is usually operated where none of 

the following conditions apply. If any of the following conditions apply, you must follow 

the Maintenance Under Severe Usage Conditions.

ś

Repeated driving short distance of less than 5 miles (8 km) in normal temperature or 

less than 10 miles (16 km) in freezing temperature

ś

Extensive engine idling or low speed driving for long distances

ś

Driving on rough, dusty, muddy, unpaved, graveled or salt-spread roads

ś

Driving in areas using salt or other corrosive materials or in very cold weather

ś

Driving in heavy dust conditions

ś

Driving in heavy traffic area

ś

Driving on uphill, downhill, or mountain roads repeatedly

ś

Using for towing or camping, and driving with loads on the roof 

ś

Driving as a patrol car, taxi, other commercial use of vehicle towing

ś

Frequently driving under high speed or rapid acceleration/deceleration

ś

Frequently driving in stop-and-go conditions

ś

Engine oil usage which is not recommended (Mineral type, Semi-synthetic, Lower 

grade spec, etc.)

If your vehicle is operated under the above conditions, you should inspect, replace 

or refill more frequently than the following Normal Maintenance Schedule. After the 

periods or distance shown in the chart, continue to follow the prescribed maintenance 

intervals.

 Information

After driving more than 10 years or 100,000 miles, use severe maintenance schedule.

SCHEDULED MAINTENANCE SERVICES

Maintenance

9-8

 Information

ś

It is normal for engine oil to be consumed during driving. The engine oil level should 
be checked on regular basis. 

ś

The engine oil change interval for normal operating conditions is based on the use of 
the recommended engine oil specification in chapter 2. If the recommended engine 
oil specification is not used, then replace the engine oil according to the maintenance 
schedule under severe operating conditions. 

ś

The vehicle may be equipped with the Oil Life Management System that predicts 
engine oil life based on the driver’s driving history and alerts the driver to change 
engine oil.


-

If the deterioration of the engine oil increases depending on the driver’s driving 
style, the remaining oil life alert will appear on the instrument cluster before the 
normal engine oil replacement interval. Have the engine oil and filter changed by an 
authorized HYUNDAI dealer. 


-

Oil Life Management System works when the recommended engine oil is used. 
If the recommended engine oil is not used, replace the engine oil according to the 
maintenance schedule under severe usage conditions. Also, check the engine oil level 
regularly as this system assumes that the engine oil is being filled normally.


-

Always reset the remaining engine oil life whenever the engine oil is changed.
Otherwise, the indication of remaining Oil life in the Oil Life Management System 
may not be accurate.To reset the Oil Change Reminder, select ‘RESET’ from the 
instrument cluster or infotainment system screen. Then, select ‘Yes’ when the 
message “Reset oil life?” or “Has the engine oil been changed? Press [Yes] to reset 
the oil life.” appears on the screen.


-

If there is no alert until the maximum maintenance interval, have the vehicle 
checked by an authorized HYUNDAI dealer.

09

9-9

The f

ollo

wing main

tenance services mus

t be perf

ormed t

o ensur

e good emission contr

ol and perf

ormance.

Keep r

eceip

ts f

or all v

ehicle emission services t

o pr

ot

ect y

our w

arr

anty

. Wher

e bo

th mileage and time ar

e sho

wn, the fr

equenc

of


service is de

termined b

y whiche

ver occur

s fir

st.

MAINTENANCE  

INTER

VALS

MAINTENANCE   ITEM

Number o

f months or driving dis

tance, whiche

ver comes fir

st

M

onths

12

24

36

48

60

72

84

96

108

120

132

144

156

168

180

Miles

x1,000

8

16

24

32

40

48

56

64

72

80

88

96

104

112

120

Kmx1,000

13

26

39

52

65

78

91

104

117

130

143

156

169

182

195

HSG belts 

*1

Inspect e

very 8,

000 miles (13,

000 km

) or 12 mon

ths.  

R

eplace e

very 64

,000 miles (104

,000 km

) or 48 mon

ths

Engine oil and engine oil filt

er 

*2 *3 *5

RRRRRRRRRRRRRRR

Fuel additiv

es 

*4

Add e

very 8,

000 miles (13,

000 km

) or 12 mon

ths

Air cleaner filt

er

I

I

R

I

I

R

I

I

R

I

I

R

I

I

R

Spark plugs

R

eplace e

very 48,

000 miles (78,

000 km

)

R

ota

te tir

es

R

ota

te tir

es e

very 8,

000 miles (13,

000 km

) or 12 mon

ths

Cabin air filt

er

I

R

I

R

I

R

I

R

IRIRIRI

Engine coolan

t

At fir

st, r

eplace a

t 120

,000 miles (200

,000 km

) or 120 mon

ths. 

 A

ft

er tha

t, r

eplace e

very 2

4,

000 miles (

40

,000 km

) or 2

4 mon

ths

I : Inspect and if necessary

, adjus

t, corr

ect, clean or r

eplace.

R : R

eplace or change.

*1 : 

The driv

e belt should be r

eplaced when cr

ack

s occur or t

ension is r

educed e

xcessiv

ely

.

*2 : 

R

equir

es<API SN PL

US (

or abo

ve

) F

ull s

ynthe

tic> gr

ade engine oil. If a lo

w

er gr

ade engine oil (

miner

al oil including Semi-

synthe

tic

) is used, then the engine oil and engine oil filt

er mus

t be r

eplaced a

t e

very 5,

000 miles (

8,

000 km

) or 6 months as 

indica

ted f

or se

ver

e maint

enance condition.

*3 : 

As it is normal f

or engine oil t

o be consumed during driving, the amount o

f engine oil should be check

ed r

egularly

.

*4 : 

If T

OP TIER De

ter

gent Gasoline is no

t a

vailable, one bo

ttle o

f additiv

e is r

ecommended. A

dditiv

es ar

e a

vailable fr

om y

our 

authoriz

ed HYUND

AI dealer along with inf

orma

tion on ho

w t

o use them. Do no

t mix o

ther additiv

es.

*5 : 

N

ev

er add an

y additiv

es t

o the engine oil. E

ngine oil additiv

es can change the pr

operties o

f engine oil and ma

y cause serious 

engine f

ailur

e.

N

ormal M

aint

enance Schedule

Maintenance

9-10

MAINTENANCE  

INTER

VALS

MAINTENANCE   ITEM

Number o

f months or driving dis

tance, whiche

ver comes fir

st

M

onths

12

24

36

48

60

72

84

96

108

120

132

144

156

168

180

Miles

x1,000

8

16

24

32

40

48

56

64

72

80

88

96

104

112

120

Kmx1,000

13

26

39

52

65

78

91

104

117

130

143

156

169

182

195

In

vert

er coolan

t

HEV

At fir

st, r

eplace a

t 120

,000 miles (200

,000 km

) or 120 mon

ths.  

Aft

er tha

t, r

eplace e

very 2

4,

000 miles (

40

,000 km

) or 2

4 mon

ths

PHEV

R

eplace e

very 35,

000 miles (

60

,000 km

) or 36 mon

ths

Int

er

cooler

, in/out hose

At fir

st, inspect a

t 5,

000 miles (

8,

000 km

) or 6 mon

ths,  

Aft

er tha

t, inspect e

very 20

,000 miles (32,

000 km

) or 2

4 months

Ba

tt

ery (12V) condition  

(F

or plug-in h

ybrid v

ehicle

)

IIIIIIIIIIIIIII

Br

ak

e lines, hoses and connections

I

IIIIIIIIIIIIII

Disc br

ak

es and pads

I

IIIIIIIIIIIIII

St

eering gear r

ack, link

age and boo

ts

I

IIIIIIIIIIIIII

Driv

esha

ft and boo

ts

I

IIIIIIIIIIIIII

Suspension moun

ting bolts

I

IIIIIIIIIIIIII

Air conditioner r

efriger

ant

I

IIIIIIIIIIIIII

Air conditioner compr

essor

I

IIIIIIIIIIIIII

Exhaus

t pipe and muffler

IIIIIII

Aut

oma

tic tr

ansmission fluid

N

o check, N

o service r

equir

ed

Vapor hose, fuel filler cap and fuel tank

IIIIIII

I : Inspect and if necessary

, adjus

t, corr

ect, clean or r

eplace.

R : R

eplace or change.

N

ormal M

aint

enance Schedule (

CONT

.)

09

9-11

MAINTENANCE  

INTER

VALS

MAINTENANCE   ITEM

Number o

f months or driving dis

tance, whiche

ver comes fir

st

M

onths

12

24

36

48

60

72

84

96

108

120

132

144

156

168

180

Miles

x1,000

8

16

24

32

40

48

56

64

72

80

88

96

104

112

120

Kmx1,000

13

26

39

52

65

78

91

104

117

130

143

156

169

182

195

Fuel tank air filt

er 

I

I

I

I

I

I

I

Fuel lines, hoses and connections

I

I

I

I

I

I

I

Parking br

ak

e

I

I

I

I

I

I

I

Br

ak

e fluid

Inspect e

very 8,

000 miles (13,

000 km

) or 12 mon

ths.

R

eplace e

very 48,

000 miles (78,

000 km

) or 48 mon

ths

Tr

ansf

er case oil/r

ear diff

er

ential oil *

6

III

Driv

e sha

ft

I

I

I

I

I

I

I

I : Inspect and if necessary

, adjus

t, corr

ect, clean or r

eplace.

R : R

eplace or change.

*6 : 

Tr

ansf

er case oil/r

ear diff

er

ential oil should be changed an

ytime, fr

ont/r

ear diff

er

ential ha

ve been submer

ged in w

at

er

.


Ã

Fuel filt

er is consider

ed t

o be maint

enance fr

ee but periodic inspection is r

ecommended f

or this maint

enance schedule 

depends on fuel quality

. If ther

e ar

e some important sa

fe

ty ma

tt

er

s lik

e fuel flo

w r

es

triction, sur

ging, loss o

f po

w

er

, har

d s

tarting 

pr

oblem e

tc, r

eplace the fuel filt

er immedia

tely r

egar

dless  o

f maint

enance schedule and consult an authoriz

ed HYUND

AI 

dealer f

or de

tails.

N

ormal M

aint

enance Schedule (

CONT

.)

Maintenance

9-12

Maintenance Under Severe Usage Conditions 

The following items must be serviced more frequently on cars mainly used under severe 

driving conditions. Refer to the chart below for the appropriate maintenance intervals.

R : Replace

I : Inspect and if necessary, adjust, correct, clean or replace

Maintenance item

Maintenance 

operation

Maintenance Intervals

Driving 

condition

Engine oil and engine oil filter

R

Every 5,000 miles 

(8,000 km) or 6 months

D, H, I, L

Air cleaner filter

R

Replace more 

frequently depending 

on the condition

C, E

Spark plugs

R

Replace more 

frequently depending 

on the condition

A, B, F, G, H, 

I, K

HSG (Hybrid Starter & 

Generator) belt

R

Every 30,000 miles 

(48,000km) or  

24 months

B, C, D, E, I, K 

I

Every 5,000 miles 

(8,000km) or  

6 months

Automatic transmission fluid

R

Every 60,000 miles 

(96,000km)

A, C, D, E, F, G, 

H, I, K

Steering gear rack, linkage and 

boots

I

Inspect more frequently 

depending on the 

condition

C, D, E, F, G, 

H, I

Front suspension ball joints

I

Inspect more frequently 

depending on the 

condition

C, D, E, F, G

Disc brakes and pads, calipers 

and rotors

I

Inspect more frequently 

depending on the 

condition

C, D, G, H, J, K

Parking brake

I

Inspect more frequently 

depending on the 

condition

C, D, G, H

09

9-13

Maintenance item

Maintenance 

operation

Maintenance Intervals

Driving 

condition

Driveshaft and boots

I

Inspect more frequently 

depending on the 

condition

C, D, E, F, G, 

H, I, J

Drive shaft

I

Inspect more frequently 

depending on the 

condition

C, D, E, F, G, 

H, I, J

Cabin air filter

(for evaporator and blower 

unit)

R

Replace more 

frequently depending 

on the condition

C, E, G

Rear differential oil (AWD)

R

Replace every 72,000 

miles (120,000 km)

C, D, E, G, H, 

I, J

Transfer case oil (AWD)

R

Replace every 72,000

miles (120,000 km)

C, D, E, G, H, 

I, J

Severe driving conditions

A.  Repeatedly driving short distance of less than 5 miles (8 km) in normal temperature 

or less than 16 miles (10 km) in freezing temperature

B.  Extensive engine idling or low speed driving for long distances
C. Driving on rough, dusty, muddy, unpaved, graveled or salt-spread roads
D. Driving in areas using salt or other corrosive materials or in very cold weather
E.  Driving in the condition of inflowing sand or dust into engine
F.  Driving in heavy traffic area
G. Driving on uphill, downhill, or mountain roads repeatedly
H. Using for towing or camping, and driving with loads on the roof 
I.  Driving as a patrol car, taxi, other commercial use or vehicle towing
J.  Frequently driving under high speed or rapid acceleration/deceleration
K.  Frequently driving in stop-and-go conditions
L.  Engine oil usage which is not recommended (Mineral type, Semi-synthetic, Lower 

grade spec, etc.)

Maintenance

9-14

Engine Oil and Filter

The engine oil and filter should be 

changed at the intervals specified in the 

maintenance schedule. If the vehicle 

is being driven in severe conditions, 

more frequent oil and filter changes are 

required.

HSG (Hybrid Starter & Generator) 

Belt

The HSG belt should be changed at the 

intervals specified in the maintenance 

schedule.

Fuel Lines, Fuel Hoses and 

Connections

Check the fuel lines, fuel hoses and 

connections for leakage and damage. 

Have an authorized HYUNDAI dealer 

replace any damaged or leaking parts 

immediately.

Fuel Filter

The fuel filter is considered to be 

maintenance free but periodic inspection 

is recommended for this maintenance 

depends on fuel quality. If there are 

some important matters like fuel flow 

restriction, surging, loss of power, hard 

starting problem etc., replace the fuel 

filter immediately. Consult an authorized 

HYUNDAI dealer for details.

Vapor Hose and Fuel Filler Cap

The vapor hose and fuel filler cap should 

be inspected at those intervals specified 

in the maintenance schedule. Your 

HYUNDAI dealer will help to determine if 

replacement is needed.

Air Cleaner Filter

A genuine HYUNDAI air cleaner filter 

is recommended when the filter is 

replaced.

Spark Plugs

Make sure to install new spark plugs of 

the correct heat range.
When assembling parts, be sure to 

wipe the inside and outside of the boot 

bottom of the ignition coil and the 

insulator of the spark plug with a soft 

cloth to prevent contamination of the 

spark plug insulator.

 WARNING

Do not remove spark plugs from the 

vehicle when the engine is hot.  You 

may damage the engine and may also 

risk burn injury.

Cooling System

Check cooling system components, such 

as radiator, coolant reservoir, hoses and 

connections for leakage and damage. 

Replace any damaged parts.

Engine Coolant/Inverter Coolant

The coolant should be changed at the 

intervals specified in the maintenance 

schedule.

Automatic Transmission Fluid

The automatic transmission fluid level 

does not need to be checked under 

normal usage conditions.
Have the automatic transmission fluid 

changed by an authorized HYUNDAI 

dealer according to the maintenance 

schedule.

EXPLANATION OF SCHEDULED MAINTENANCE ITEMS

09

9-15

Brake Hoses and Lines

Visually check for proper installation, 

chafing, cracks, deterioration and any 

leakage. Replace any deteriorated or 

damaged parts immediately.

Brake Fluid

Check the brake fluid level in the brake 

fluid reservoir. The level should be 

between the MIN and the MAX marks 

on the side of the reservoir. Use only 

hydraulic brake fluid conforming to DOT 

4 specification.

Parking Brake

Inspect the parking brake system.

Brake Discs, Pads, Calipers and 

Rotors

Check the pads for excessive wear, discs 

for run out and wear, and calipers for 

fluid leakage. 

Exhaust Pipe and Muffler

Visually inspect the exhaust pipes, 

muffler and hangers for cracks, 

deterioration, or damage. Start 

the engine and listen carefully for 

any exhaust gas leakage. Tighten 

connections or replace parts as 

necessary.

Suspension Mounting Bolts

Check the suspension connections for 

looseness or damage. Retighten to the 

specified torque.

Steering Gear Box, Linkage & 

Boots/Lower Arm Ball Joint

With the vehicle stopped and the hybrid 

system off, check for excessive free-play 

in the steering wheel. Check the linkage 

for bends or damage. Check the dust 

boots and ball joints for deterioration, 

cracks, or damage.
Replace any damaged parts.

Air Conditioning Refrigerant

Check the air conditioning lines and 

connections for leakage and damage.

Drive Shaft and Related

Check the drive shaft, boots, clamps, 

rubber couplings and center-bearing 

rubber for cracks, deterioration, or 

damage. Replace any damaged parts 

and if necessary, repack the grease.

Maintenance

9-16

Checking the Engine Oil Level

Engine oil is used for lubricating, 

cooling, and operating various hydraulic 

components in the engine. Engine oil 

consumption while driving is normal, 

and it is necessary to check and refill the 

engine oil regularly. Also, check and refill 

the oil level within the recommended 

maintenance schedule to prevent 

deterioration of oil performance.
Check the engine oil following the below 

procedure. 
1.  Follow all of the oil manufacturer’s 

precautions.

2.  Be sure the vehicle is on the level 

ground in P (Park) with the parking 

brake set and the wheels blocked.

3.  Turn the engine on and warm 

the engine up until the coolant 

temperature reaches a constant 

normal temperature.

4.  Turn the engine off, remove the oil 

filler cap and pull the dipstick out. 

Wait for 15 minutes for the oil to return 

to the oil pan.

5.  Wipe the dipstick clean and re-insert 

it fully.

ONX4PH091002N

6.  Pull the dipstick out again and check 

the level. The level should be between 

F (Full) and L (Low).

ONX4H090020

7.  If the oil level is below L, add enough 

oil to bring the level to F.

Use only the specified engine oil (Refer 

to “Recommended Lubricants and 

Capacities” section in chapter 2).

NOTICE

To prevent damage to your engine:

ś

Do not overfill with engine oil. Add oil 

in small quantities and recheck level 

to ensure engine is not overfilled.

ś

The engine oil consumption may 

increase while you break in a new 

vehicle and it will be stabilized after 

driving 4,000 miles (6,000 km).   

ś

The engine oil consumption can be 

affected by driving habits, climate 

conditions, traffic conditions, 

oil quality, etc. Therefore, it is 

recommended that you inspect the 

engine oil level regularly and refill it 

if necessary. 

ENGINE OIL


Content      ..     18      19      20      21     ..