Hyundai Tucson Plug-in Hybrid (2024 year). Manual in english - page 6
 

  Index      Manuals     Hyundai Tucson Plug-in Hybrid (2024 year). Manual in english


Search            copyright infringement  


Content      ..     4      5      6      7     ..


Hyundai Tucson Plug-in Hybrid (2024 year). Manual in english - page 6


03

3-57

OHI038158

ś

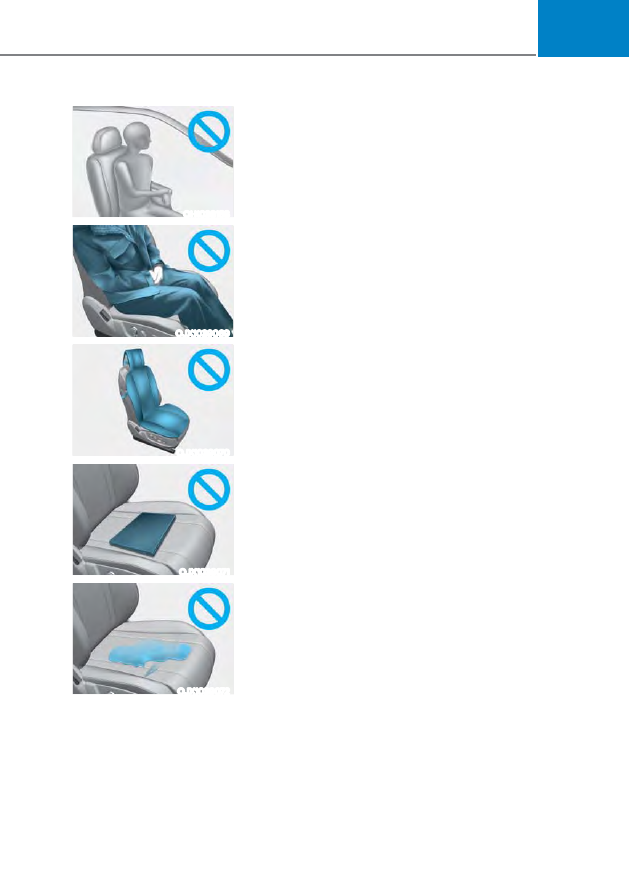
NEVER lean on the door or center console or sit on 

one side of the front passenger seat.

OJX1039069

ś

Do not sit on the passenger seat wearing heavily 

padded clothes such as ski wear and hip protector.

OJX1039070

ś

Do not use car seat accessories such as thick blankets 

and cushions which cover up the car seat surface.

OJX1039071

ś

Do not place electronic devices such as laptops, DVD 

player, or conductive materials such as water bottles 

on the passenger seat.

ś

Do not use electronic devices such as laptops and 

satellite radios which use inverter chargers.

OJX1039072

ś

If large quantity of liquid has been spilled on the 

passenger seat, the air bag warning light may 

illuminate or malfunction.
Therefore, make sure the seat has been completely 

dried before driving the vehicle.

ś

Do not place sharp objects on the front passenger seat. These may damage the 

occupant detection system, if they puncture the seat cushion.

ś

Do not place any items under the front passenger seat.

ś

When changing or replacing the seat or seat cover, use original items only. 

The OCS has been developed based on using original HYUNDAI car seats only. 

Altering or changing the authentic parts may result in system malfunction and 

increase risk of injury when in collision. Any of the above could interfere with the 

proper operation of the OCS sensor thereby increasing the risk of an injury in an 

accident.

Seats & Safety System

3-58

OHI038118

Proper seated position for OCS

If the “PASSENGER AIR BAG OFF” 

indicator is on when an adult is seated 

in the front passenger seat, place the 

Engine Start/Stop button in the OFF 

position and ask the passenger to sit 

properly (sitting upright with the seat 

back in an upright position, centered 

on the seat cushion with their seat belt 

on, legs comfortably extended and their 

feet on the floor). Restart the engine and 

have the person remain in that position. 

This will allow the system to detect the 

person and to enable the passenger air 

bag. If the “PASSENGER AIR BAG OFF” 

indicator is still on, ask the passenger to 

move to the rear seat.

 WARNING

NEVER allow an adult passenger to ride 

in the front passenger seat when the 

“PASSENGER AIR BAG OFF” indicator 

is illuminated. During a collision, the 

air bag will not inflate if the indicator 

is illuminated. Have your passenger 

reposition themselves in the seat. If the 

“PASSENGER AIR BAG OFF” indicator 

remains illuminated after the passenger 

repositions themselves properly 

and the vehicle is restarted, have 

the passenger move to the rear seat 

because the air bag will not inflate.

NOTICE

The “PASSENGER AIR BAG OFF” 

indicator generally illuminates for 

approximately 4 seconds after the 

Engine Start/Stop button is in the ON 

or START position. But, if the Engine 

START/STOP button is pressed to the 

ON or START position within 3 minutes 

after the engine is turned OFF, the 

indicator does not illuminate. If the 

front passenger seat is occupied, 

the OCS will then classify the front 

passenger after several more seconds.

03

3-59

Do not install a Child Restraint 

System on the front passenger seat

OHI039193N

Even though your vehicle is equipped 

with the OCS, never install a child 

restraint in the front passenger’s seat. 

An inflating air bag can forcefully strike a 

child or child restraint resulting in serious 

or fatal injury.

 WARNING

NEVER use a rearward facing Child 

Restraint on a seat protected by an 

ACTIVE AIRBAG in front of it, DEATH 

or SERIOUS INJURY to the CHILD can 

occur.

Why didn’t my air bag go off in a 

collision?

There are certain types of accidents in 

which the air bag would not be expected 

to provide additional protection. These 

include rear impacts, second or third 

collisions in multiple impact accidents, 

as well as low speed impacts. Damage to 

the vehicle indicates a collision energy 

absorption, and is not an indicator of 

whether or not an air bag should have 

inflated.

Air bag collision sensors

 WARNING

To reduce the risk of an air bag 

deploying unexpectedly and causing 

serious injury or death:

ś

Do not hit or allow any objects to 

impact the locations where air bags 

or sensors are installed.

ś

Do not perform maintenance on or 

around the air bag sensors. If the 

location or angle of the sensors is 

altered, the air bags may deploy 

when they should not or may not 

deploy when they should.

ś

Installing bumper guards with non-

genuine Hyundai or non-equivalent 

parts may adversely affect the 

collision and airbag deployment 

performance.

ś

Press the Engine Start/Stop button to 

the OFF or ACC position and wait for 

3 minutes when the vehicle is being 

towed to prevent inadvertent air bag 

deployment.

ś

Have all air bag repairs performed by 

an authorized HYUNDAI dealer.

3-60

Seats & Safety System

ONX4030041/ ONX4030042/ ONX4030056/ ONX4030044/ ONX4030043/ ONX4030045

1.  SRS control module / Rollover sensor
2.  Front impact sensor
3.  Side impact sensor (Pressure)

4.  Side impact sensor (Acceleration)*
5.  Side impact sensor (Acceleration)*

* : if equipped

03

3-61

Air bag inflation conditions

ONX4030046

Front air bags

Front air bags are designed to inflate 

in a frontal collision depending on the 

severity of impact of the front collision.

ONX4030050

ONX4A033004

Side and curtain air bags

Side and curtain air bags are designed 

to inflate when an impact is detected by 

side collision sensors depending on the 

severity.
Although the driver’s and front 

passenger’s air bags are designed to 

inflate in frontal collisions, they also may 

inflate in other types of collisions if the 

front impact sensors detect a sufficient 

impact. Side and curtain air bags are 

designed to inflate in side impact 

collisions, but they may inflate in other 

collisions if the side impact sensors 

detect a sufficient impact.
Also, the side and curtain air bags are 

designed to inflate when a rollover 

is detected by a rollover sensor. (if 

equipped with rollover sensor)
If the vehicle chassis is impacted by 

bumps or objects on unimproved roads, 

the air bags may deploy. Drive carefully 

on unimproved roads or on surfaces not 

designed for vehicle traffic to prevent 

unintended air bag deployment.

Seats & Safety System

3-62

Air bag non-inflation conditions

ONX4030047

In certain low-speed collisions the air 

bags may not deploy. The air bags are 

designed not to deploy in such cases 

because they may not provide benefits 

beyond the protection of the seat belts.

ONX4030048

Front air bags are not designed to inflate 

in rear collisions, because occupants 

are moved backward by the force of the 

impact. In this case, inflated air bags 

would not provide any additional benefit.

ONX4030049

Front air bags may not inflate in side 

impact collisions, because occupants 

move in the direction of the collision, 

and thus in side impacts, front air bag 

deployment would not provide additional 

occupant protection.
However, side and curtain air bags and 

the front center air bag may inflate 

depending on the severity of impact.

OTM030034

In an angled collision, the force of impact 

may direct the occupants in a direction 

where the air bags would not be able to 

provide any additional benefit, and thus 

the sensors may not deploy any air bags.

03

3-63

ONX4030051

Just before impact, drivers often brake 

heavily. Such heavy braking lowers the 

front portion of the vehicle causing it 

to “ride” under a vehicle with a higher 

ground clearance. Air bags may not 

inflate in this “underride” situation 

because deceleration forces that are 

detected by sensors may be significantly 

reduced by such “underride” collisions.

ONX4030053

Front air bags may not inflate in 

rollover accidents because front air bag 

deployment would not provide additional 

occupant protection.

ONX4030052

Air bags may not inflate if the vehicle 

collides with objects such as utility poles 

or trees, where the point of impact is 

concentrated and the collision energy is 

absorbed by the vehicle structure.

Seats & Safety System

3-64

SRS Care

The SRS is virtually maintenance-free 

and there are no parts you can safely 

service by yourself. If the SRS air bag 

warning light does not illuminate when 

the Engine Start/Stop button is in the 

ON position, or continuously remains on, 

have your vehicle immediately inspected 

by an authorized HYUNDAI dealer.
Any work on the SRS system, such as 

removing, installing, repairing, or any 

work on the steering wheel, the front 

passenger’s panel, front seats and roof 

rails must be performed by an authorized 

HYUNDAI dealer. Improper handling of 

the SRS system may result in serious 

personal injury.

 WARNING

To reduce the risk of serious injury or 

death take the following precautions:

ś

Do not attempt to modify or 

disconnect the SRS components or 

wiring, including the addition of any 

kind of badges to the pad covers or 

modifications to the body structure.

ś

Do not place objects over or near 

the air bag modules on the steering 

wheel, instrument panel, and the 

front passenger’s panel above the 

glove box.

ś

Clean the air bag pad covers with 

a soft cloth moistened with plain 

water. Solvents or cleaners could 

adversely affect the air bag covers 

and proper deployment of the 

system.

ś

Always have inflated air bags 

replaced by an authorized HYUNDAI 

dealer.

ś

If components of the air bag system 

must be discarded, or if the vehicle 

must be scrapped, certain safety 

precautions must be observed. 

Consult an authorized HYUNDAI 

dealer for the necessary information. 

Failure to follow these precautions 

could increase the risk of personal 

injury.

03

3-65

Additional Safety Precautions

Passengers should not move out of 

or change seats while the vehicle is 

moving.

 A passenger who is not wearing 

a seat belt during a crash or emergency 

stop can be thrown against the inside of 

the vehicle, against other occupants, or 

be ejected from the vehicle.

Do not use any accessories on seat 

belts.

 Devices claiming to improve 

occupant comfort or reposition the seat 

belt can reduce the protection provided 

by the seat belt and increase the chance 

of serious injury in a crash.

Do not modify the front seats.


Modification of the front seats could 

interfere with the operation of the 

supplemental restraint system sensing 

components or side air bags.

Do not place items under the front 

seats.

 Placing items under the front seats 

could interfere with the operation of the 

supplemental restraint system sensing 

components and wiring harnesses.

Do not cause impact to the doors.


Impact to the doors when the Engine 

Start/Stop button is in the ON or START 

position may cause the air bags to 

inflate.

Modifications to accommodate 

disabilities. 

If you require modification 

to your vehicle to accommodate 

a disability, contact the HYUNDAI 

Customer Connect Center at 800-633-

5151.

Adding equipment to or modifying 

your air bag equipped vehicle

If you modify your vehicle by changing 

your vehicle’s frame, bumper system, 

front end or side sheet metal or ride 

height, this may affect the operation of 

your vehicle’s air bag system.

Air Bag Warning Labels

ODN8039057L

Air bag warning labels, required by the 

U.S. National Highway Traffic Safety 

Administration (NHTSA), are attached 

to alert the driver and passengers of 

potential risks of the air bag system.
Be sure to read all of the information 

about the air bags that are installed on 

your vehicle in this Owners Manual.

4

4. Instrument  Cluster

Instrument Cluster ............................................................................................4-4

Instrument Cluster Control ..........................................................................................4-5

Instrument panel illumination ...................................................................................4-5

Gauges and Meters ......................................................................................................4-5

Speedometer .............................................................................................................4-5

Power gauge ............................................................................................................. 4-6

Fuel gauge ................................................................................................................. 4-6

Hybrid battery SOC (State of Charge) gauge ........................................................... 4-7

Plug-in hybrid mode indicator .................................................................................. 4-7

Outside temperature gauge ..................................................................................... 4-8

Odometer .................................................................................................................. 4-8

Distance to empty .................................................................................................... 4-9

Fuel economy (for 10.25-inch cluster) ..................................................................... 4-9

Transmission Shift Indicator ...................................................................................... 4-10

Automatic transmission shift indicator .................................................................. 4-10

Warning and Indicator Lights .................................................................................... 4-10

Seat belt warning light ............................................................................................ 4-10

Air bag warning light ............................................................................................... 4-10

Parking brake warning light ..................................................................................... 4-11

Regenerative brake warning light ........................................................................... 4-12

Anti-lock Brake System (ABS) warning light .......................................................... 4-12

Electronic Brake Force Distribution (EBD) system warning light ......................... 4-12

Electric Power Steering (EPS) warning light .......................................................... 4-13

Malfunction Indicator Lamp (MIL) .......................................................................... 4-13

Electronic Parking Brake (EPB) warning light ........................................................ 4-14

AUTO HOLD indicator light ..................................................................................... 4-15

Charging system warning light ............................................................................... 4-15

Engine oil pressure warning light ........................................................................... 4-15

Low fuel level warning light .................................................................................... 4-16

Service warning light ............................................................................................... 4-16

Charging Cable Connection Indicator (Plug-in hybrid vehicle) ............................ 4-16

Master warning light .................................................................................................4-17

Low tire pressure warning light ...............................................................................4-17

Forward Safety warning light .................................................................................. 4-18

Lane Safety indicator light ...................................................................................... 4-18

All Wheel Drive (AWD) warning light ...................................................................... 4-18

All Wheel Drive (AWD) LOCK indicator light .......................................................... 4-18

LED headlight warning light .................................................................................... 4-19

Icy road warning light .............................................................................................. 4-19

Ready indicator ........................................................................................................ 4-19

EV mode indicator ...................................................................................................4-20

Electronic Stability Control (ESC) indicator light ...................................................4-20

4

Electronic Stability Control (ESC) OFF indicator light ...........................................4-20

Immobilizer Indicator Light (without smart key) ...................................................4-20

Immobilizer indicator light (with smart key) ...........................................................4-21

Downhill Brake Control (DBC) indicator light .........................................................4-21

Turn signal indicator light ........................................................................................4-22

High beam indicator light .......................................................................................4-22

Low beam indicator light ........................................................................................4-22

Light ON indicator light ...........................................................................................4-22

High Beam Assist indicator light .............................................................................4-22

Cruise indicator light ...............................................................................................4-22

SPORT Mode indicator light ....................................................................................4-23

SMART Mode indicator light ...................................................................................4-23

LCD Display Messages ...............................................................................................4-23

Shift to P ...................................................................................................................4-23

Low key battery ........................................................................................................4-23

Press START button while turning wheel ...............................................................4-23

Check steering wheel lock system .........................................................................4-23

Press brake pedal to start engine ...........................................................................4-24

Key not in vehicle .....................................................................................................4-24

Key not detected ......................................................................................................4-24

Press START button again .......................................................................................4-24

Press START button with key ...................................................................................4-24

Check BRAKE SWITCH fuse ....................................................................................4-24

Shift to P to start engine ..........................................................................................4-24

12V battery discharging due to additional electrical devices ...............................4-24

Door, Hood, Liftgate open indicator .......................................................................4-25

Sunroof open indicator ............................................................................................4-25

Low pressure ............................................................................................................4-25

Wiper/Lights display ................................................................................................4-26

Low washer fluid ......................................................................................................4-26

Low fuel ....................................................................................................................4-26

Engine has overheated ............................................................................................4-26

Low engine oil ..........................................................................................................4-26

Check headlight .......................................................................................................4-26

Check turn signal ..................................................................................................... 4-27

Check brake light ..................................................................................................... 4-27

Check headlight LED ............................................................................................... 4-27

Ready to start driving .............................................................................................. 4-27

Check regenerative brakes...................................................................................... 4-27

Stop vehicle and check brakes ............................................................................... 4-27

Check Hybrid system ............................................................................................... 4-27

Stop safely and check Hybrid system .................................................................... 4-27

4

4. Instrument  Cluster

Check Hybrid system. Do not start engine ............................................................ 4-27

Stop safely and check power supply ......................................................................4-28

Check virtual engine sound system........................................................................4-28

Refill inverter coolant ..............................................................................................4-28

Park with engine On to charge battery ..................................................................4-28

Start engine to avoid battery discharge .................................................................4-28

Check regenerative brakes......................................................................................4-29

Check virtual engine sound system........................................................................4-29

Unplug vehicle to start (Plug-in hybrid vehicle) ....................................................4-29

Remaining time (Plug-in hybrid vehicle) ................................................................4-29

Wait until fuel door unlocks (Plug-in hybrid vehicle) ........................................... 4-30

Check fuel door (Plug-in hybrid vehicle) ............................................................... 4-30

Fuel door open (Plug-in hybrid vehicle) ................................................................. 4-31

Shift to P to charge (Plug-in hybrid vehicle) .......................................................... 4-31

Switching to Hybrid mode to allow heating or air conditioning (Plug-in hybrid 

vehicle) ..................................................................................................................... 4-31

Maintaining Hybrid mode to allow heating or air conditioning (Plug-in hybrid 

vehicle) .....................................................................................................................4-32

Low/High System Temp. Maintaining Hybrid mode (Plug-in hybrid vehicle) .....4-32

Low/High System Temp. Switching to Hybrid mode (Plug-in hybrid vehicle) ....4-32

Switching to Hybrid mode to lubricate engine (Plug-in hybrid vehicle) ..............4-33

Maintaining Hybrid mode to protect engine (Plug-in hybrid vehicle) .................4-33

Exit SPORT mode to switch to EV (Plug-in hybrid vehicle) ...................................4-33

LCD Display ..................................................................................................... 4-34

LCD Display Control ...................................................................................................4-34

View Modes ................................................................................................................4-35

Trip computer mode ................................................................................................4-36

Turn By Turn (TBT) mode .........................................................................................4-36

Driving Assist mode .................................................................................................4-36

Master warning group .............................................................................................4-37

User settings mode ..................................................................................................4-39

Trip Computer (4.2-inch) - Hybrid Vehicle ............................................................... 4-46

Trip modes ............................................................................................................... 4-46

Trip Computer (10.25-inch) - Hybrid Vehicle ........................................................... 4-49

Trip modes ............................................................................................................... 4-49

Trip Computer (4.2-inch) - Plug-in Hybrid Vehicle ...................................................4-52

Trip modes ................................................................................................................4-52

Trip Computer (10.25-inch) - Plug-in Hybrid Vehicle ...............................................4-55

Trip modes ................................................................................................................4-55

Vehicle Settings (Infotainment System) ........................................................4-58

Setting Your Vehicle .................................................................................................. 4-58

4-4

Instrument Cluster

„

4.2 inch

„

10.25-inch

The actual cluster in the vehicle may differ from the illustration.

For more information, refer to “Gauges and meters” section in this chapter.

ONX4PH042009N/ONX4043024N

1. Power gauge
2. Speedometer
3.  Battery SOC (State of Charge) gauge

4. Fuel gauge
5.  Warning and indicator lights
6.  LCD display (including Trip computer)

INSTRUMENT CLUSTER

04

4-5

Instrument Cluster Control

Instrument panel illumination

OCN7040019L

You can adjust the brightness of the 

instrument panel illumination from the 

User Settings Mode on the LCD display 

ZKHQWKHLJQLWLRQVZLWFKLVRQœ/LJKWVƟ

Illumination’). When the vehicle’s parking 

lights or headlights are on, interior switch 

illumination intensity and mood lamps 

are also adjusted.

If your vehicle is equipped with 

additional navigation, please refer 

to the infotainment system manual 

separately supplied.

 WARNING

Never adjust the instrument cluster 

while driving. This could result in loss 

of control and lead to an accident that 

may cause vehicle damage, or lead to 

serious injury or death.

ś

The brightness of the instrument 

panel illumination is displayed.

ś

When the brightness setting reaches 

either the minimum or maximum 

level, a chime will sound.

Gauges and Meters

Speedometer

„

4.2-Inch

ONX4EH040004

„

10.25-inch

ONX4PH042011N

The speedometer indicates the speed of 

the vehicle and is calibrated in miles per 

hour (MPH) and/or kilometers per hour 

(km/h).

Instrument Cluster

4-6

Power gauge

„

4.2-Inch

„

10.25-inch

ONX4H040004

OCN7H040002

The power gauge indicates whether the 

current driving condition is fuel efficient 

or not.

ś

CHARGE : Shows that the energy 

made by the vehicle is being 

converted to electrical energy. 

(Regenerated energy)

ś

ECO : Shows that the vehicle is being 

driven in an Eco-friendly manner.

ś

POWER : Shows that the vehicle is 

exceeding the Eco-friendly range.

 Information

Accordance to the power gauge area the 
“EV” indicator comes on or off.


-

“EV” indicator ON : Vehicle is driven 
using the electric motor or the gasoline 
engine is stopped.


-

“EV” indicator OFF : Vehicle is driven 
using the gasoline engine.

Fuel gauge

„

4.2-Inch

„

10.25-inch

ONX4040008

OCN7H040016N

This gauge indicates the approximate 

amount of fuel remaining in the fuel tank.

 Information

ś

The fuel tank capacity is given in 
chapter 2.

ś

The fuel gauge is supplemented by 
a low fuel warning light, which will 
illuminate when the fuel tank is nearly 
empty.

ś

On inclines or curves, the fuel gauge 
pointer may fluctuate or the low fuel 
warning light may come on earlier than 
usual due to the movement of fuel in 
the tank.

 WARNING

Running out of fuel can expose vehicle 

occupants to danger.
You must stop and obtain additional 

fuel as soon as possible after the 

warning light comes on or when the 

gauge indicator comes close to the “E 

(Empty)” level.

NOTICE

Avoid driving with an extremely low 

fuel level. Running out of fuel could 

cause the engine to misfire damaging 

the catalytic converter.

04

4-7

Hybrid battery SOC (State of Charge) 

gauge

„

4.2-Inch

„

10.25-inch

ONX4EH040008

OCN7H040003

This gauge indicates the remaining 

hybrid battery power. If the SOC is 

near the “L (Low)” level, the vehicle 

automatically operates the engine to 

charge the battery.
However, if the Service Indicator (

and Malfunction Indicator Lamp (MIL) 

(

) turn on when the SOC gauge is near 

the “L (Low)” level, we recommend the 

vehicle be checked by an authorized 

HYUNDAI dealer.

NOTICE

Never try to start the vehicle if the fuel 

tank is empty. In this condition, the 

engine cannot charge the high voltage 

battery of the hybrid system. If you 

try to start the vehicle when the fuel 

is empty, the high voltage battery will 

become discharged and be damaged.

Plug-in hybrid mode indicator

„

AUTO mode 

‡

Type A

‡

Type B

ONX4EPHQ011013L

ONX4PHQ011014N

„

CS mode 

‡

Type A

‡

Type B

ONX4EPHQ011015L

ONX4PHQ011016N

ś

CD (Charge Depleting, Electric) 

mode : The high-voltage (hybrid) 

battery is used to drive the vehicle.

ś

AUTO mode : CD mode and CS mode 

are selected automatically depending 

on road conditions.

ś

CS (Charge Sustaining, Hybrid) mode : 

The high-voltage (hybrid) battery and 

gasoline engine is used to drive the 

vehicle.

 Information

Even when the battery charging rate 
is high and driving in electric mode is 
possible, engine may turn on in some areas 
to protect the system.

Instrument Cluster

4-8

Outside temperature gauge

„

4.2-Inch

OTMA048112

„

10.25-inch

ODN8A049031

The outside ambient temperature is 

displayed in the lower portion of the LCD 

cluster display.  The temperature will read 

in Fahrenheit or Celsius depending on the 

units selected in the User Settngs menu.
Note that the temperature indicated 

on the LCD display may not change 

as quickly as the outside temperature 

(there may be a slight delay before the 

temperature changes.)
You can change the temperature unit 

from the Settings menu in the cluster or 

infotainment system screen.

Select:


-

6HWXSƟ8QLWƟ7HPSHUDWXUH8QLWƟ

°F/°C (for cluster type)


-

6HWXSƟ*HQHUDO6HWWLQJVƟ8QLW
Ɵ7HPSHUDWXUH8QLWƟr&r)IRU

infotainment system screen type)

Both the temperature unit on the cluster 

LCD display and infotainment system 

screen will change.

Odometer

„

4.2-Inch

OTMA048183

„

10.25-inch

OCN7H040004N

The odometer indicates the total 

distance that the vehicle has been driven 

and should be used to determine when 

periodic maintenance is required.

04

4-9

Distance to empty

„

4.2-Inch

ONX4043026N

„

10.25-inch

OCN7040016N

ś

The distance to empty is the 

estimated mileage the vehicle can be 

driven with the remaining fuel.

ś

If the estimated distance is below 1 mi. 

(1 km), the trip computer will display 

“---” as distance to empty. When this 

occurs, the remaining fuel is very low.  

Refuel the vehicle immediately.

 Information

ś

If the vehicle is not on level ground or 
the battery power has been interrupted, 
the distance to empty function may not 
operate correctly.

ś

The distance to empty may differ 
from the actual driving distance as it 
is an estimate of the available driving 
distance.

ś

The Distance to Empty indicator may 
not change accurately if less than 1.5 
gallons of fuel are added to the vehicle. 

ś

The distance to empty may vary 
significantly based on driving 
conditions, driving habits, and 
condition of the vehicle.

Fuel economy (for 10.25-inch 

cluster) 

OTMA040002

The average fuel economy (1) and instant 

fuel economy (2) is displayed at the 

bottom of the cluster. 

Automatic reset

To automatically reset the average fuel 

economy, select between "After Ignition" 

or "After Refueling" from the Settings 

menu in the infotainment system screen.

Instrument Cluster

4-10

Transmission Shift Indicator (if 

equipped)

Automatic transmission shift 

indicator

„

4.2-Inch

OTM040016

„

10.25-inch

OCN7040013N

The Transmission Shift Indicator is shown 

in the upper corner of the LCD display to 

indicate the current gear or Park(P).

Warning and Indicator Lights

 Information

Make sure that all warning lights are OFF 
after starting the engine. If any light is still 
ON, this indicates a situation that needs 
attention.

Seat belt warning light

This warning light informs the driver that 

the seat belt is not fastened.

For more details, refer to “Seat Belts” 

section in chapter 3.

Air bag warning light

This warning light illuminates:

ś

When you set the ignition switch or 

the Engine Start/Stop button to the 

ON position.


- The air bag warning light illuminates 

for about 3 ~ 6 seconds and then 

turns off when all checks have been 

performed.

ś

The air bag warning light will remain 

illuminated if there is a malfunction 

with the Safety Restraint System (SRS) 

air bag operation.
If the Air Bag warning light remains 

illuminated while driving, have the 

vehicle inspected by an authorized 

HYUNDAI dealer.

04

4-11

Parking brake warning light

This warning light illuminates:

ś

When you set the ignition switch or 

the Engine Start/Stop button to the 

ON position.


- The parking brake light illuminates 

for about 3 seconds and will then 

turn off once the parking brake is 

released.

ś

Whenever the parking brake is 

applied.

ś

Whenever the brake fluid level in the 

reservoir is low.


- If the warning light illuminates 

with the parking brake released, it 

indicates the brake fluid level in the 

reservoir is low.

ś

Whenever the regenerative brake 

does not operate.

If the brake fluid level in the reservoir is 
low:

1.  Drive carefully to the nearest safe 

location and stop your vehicle.

2.  With the engine stopped, check the 

brake fluid level immediately and add 

fluid as required 

(For more details, 

refer to “Brake Fluid” section in 

chapter 9)

. After adding brake fluid, 

check all brake components for fluid 

leaks. If a brake fluid leak is found, or 

if the warning light remains on, or if 

the brakes do not operate properly, do 

not drive the vehicle. Have the vehicle 

inspected by an authorized HYUNDAI 

dealer.

Dual-diagonal braking system

Your vehicle is equipped with dual-

diagonal braking system. This means you 

still have braking on two wheels even if 

one of the dual systems should fail.
With only one of the dual systems 

working, more than normal pedal travel 

and greater pedal pressure is required to 

stop the vehicle.
Also, the vehicle will not stop in as short 

a distance with only a portion of the 

brake system working.
If you experience a malfunction with 

the brake system while driving, attempt 

to slow your vehicle by coasting or 

by using engine braking.  You may be 

able to reduce your vehicle speed by 

manually downshifting to a lower gear. 

Use Manual Shift Mode using either the 

gear shift button or the paddle shifters (if 

equipped) to shift to a lower gear.

 WARNING

Parking Brake & Brake Fluid Warning 

Light
Driving the vehicle with a warning light 

ON is dangerous. If the Parking Brake 

warning light illuminates with the 

parking brake released, it indicates that 

the brake fluid level is low.
If this occurs, have the vehicle 

inspected by an authorized HYUNDAI 

dealer.

Instrument Cluster

4-12

Regenerative brake warning 

light

(yellow)

This warning light illuminates:

When the regenerative brake does not 

operate and the brake does not perform 

well. This causes the Brake Warning 

light (red) and Regenerative Brake 

Warning Light (yellow) to illuminate 

simultaneously.
If this occurs, drive safely and have 

the vehicle inspected by an authorized 

HYUNDAI dealer.
The operation of the brake pedal may 

be more difficult than normal and the 

braking distance may increase.

Anti-lock Brake System (ABS) 

warning light

This warning light illuminates:

ś

When you set the ignition switch or 

the Engine Start/Stop button to the 

ON position.


- The ABS warning light illuminates 

for about 3 seconds and then goes 

off.

ś

Whenever there is a malfunction with 

the ABS.
Note that the hydraulic braking 

system will still be operational even 

if there is a malfunction with the 

ABS. If the ABS warning light remains 

illuminated while driving, have the 

vehicle inspected by an authorized 

HYUNDAI dealer.

Electronic Brake Force 

Distribution (EBD) system 

warning light

When the ABS warning and 

Parking Brake warning lights are on 

simultaneously, it may indicate a 

problem with the Electronic Brake Force 

Distribution system.
If both the ABS warning light and the 

Parking Brake warning light remain 

illuminated while driving, have the 

vehicle inspected by an authorized 

HYUNDAI dealer.

 WARNING

Electronic Brake Force Distribution 

(EBD) System Warning Light
When both ABS and Parking Brake 

warning lights are on, the brake 

system will not work normally and you 

may experience an unexpected and 

dangerous situation during sudden 

braking.
If this occurs, avoid high speed driving 

and abrupt braking.
Have the vehicle inspected by an 

authorized HYUNDAI dealer as soon as 

possible.

04

4-13

 Information - Electronic Brake 

Force Distribution (EBD) 

system warning light

When the ABS warning light is on or both 
ABS and Parking Brake warning lights 
are on, the speedometer, odometer, or 
tripmeter may not work. Also, the EPS 
warning light may illuminate and the 
steering effort may increase or decrease.

If this occurs, have the vehicle inspected 
by an authorized HYUNDAI dealer as 
soon as possible.

Electric Power Steering (EPS) 

warning light

This warning light illuminates:

ś

When you set the ignition switch or 

the Engine Start/Stop button to the 

ON position.


- The electric power steering Warning 

light illuminates for about 3 seconds 

and then goes off.

ś

Whenever there is a malfunction with 

the EPS.
If the EPS warning light remains 

illuminated while driving, have the 

vehicle inspected by an authorized 

HYUNDAI dealer.

Malfunction Indicator Lamp 

(MIL)

This indicator light illuminates:

ś

When you set the ignition switch or 

the Engine Start/Stop button to the 

ON position.


- The malfunction indicator light 

illuminates for about 3 seconds and 

then goes off.

ś

Whenever there is a malfunction with 

either the emission control system or 

the engine or the vehicle powertrain.
If the MIL warning light remains 

illuminated while driving, have the 

vehicle inspected by an authorized 

HYUNDAI dealer.

ś

If the enhanced engine protection 

system becomes activated due to lack 

of engine oil, engine power will be 

limited. If such condition continues 

repeatedly, the Malfunction Indicator 

Lamp will illuminate.

NOTICE

ś

Driving with the Malfunction 

Indicator Lamp (MIL) on may cause 

damage to the emission control 

system which could affect drivability 

and/or fuel economy.

ś

If the enhanced engine protection 

system becomes activated due to 

lack of engine oil, engine power 

will be limited. If such condition 

continues repeatedly, the 

Malfunction Indicator Lamp will 

illuminate.

Instrument Cluster

4-14

NOTICE

If the Malfunction Indicator Lamp 

(MIL) illuminates, potential catalytic 

converter damage is possible which 

could result in loss of engine power.
If this occurs, have the vehicle 

inspected by an authorized HYUNDAI 

dealer as soon as possible.

NOTICE

If the oil pressure lowers due to 

insufficient engine oil, etc., the engine 

oil pressure warning light turns on 

and an enhanced engine protection 

system that limits the engine's power 

is activated. After that, engine warning 

light turns on if driving repeatedly and 

continuously.

Electronic Parking Brake 

(EPB) warning light 

This warning light illuminates:

ś

When you set the ignition switch or 

the Engine Start/Stop button to the 

ON position.


- The EPB warning light illuminates 

for about 3 seconds and then goes 

off.

ś

Whenever there is a malfunction with 

the EPB.
If the EPB warning light remains 

illuminated while driving, have the 

vehicle inspected by an authorized 

HYUNDAI dealer.

 Information

The Electronic Parking Brake (EPB) 
warning light may illuminate when 
the Electronic Stability Control (ESC) 
indicator light comes on to indicate that 
the ESC is not working properly (This 
does not indicate malfunction of the EPB).

04

4-15

AUTO HOLD indicator light

This indicator light illuminates:

ś

[White] When you activate the auto 

hold system by pressing the AUTO 

HOLD switch.

ś

[Green] When you stop the vehicle 

completely by depressing the brake 

pedal with the Auto Hold system 

activated.

ś

[Yellow] Whenever there is a 

malfunction with the Auto Hold 

system.
If the AUTO HOLD indicator light 

remains YELLOW while driving, have 

the vehicle inspected by an authorized 

HYUNDAI dealer.

For more details, refer to “Auto Hold” 

section in chapter 6.

Charging system warning 

light

This warning light illuminates:

When the battery is not being charged 

while the engine is running. Immediately 

turn OFF all electrical accessories. Try 

not to use electrically operated controls, 

such as the power windows. Keep the 

engine running.
Have the vehicle inspected by an 

authorized HYUNDAI dealer as soon as 

possible.

Engine oil pressure warning 

light

This warning light illuminates: 

When the engine oil pressure is low.

If the engine oil pressure is low: 

1.  Drive carefully to the nearest safe 

location and stop your vehicle.

2.  Turn the engine off and check the 

engine oil level 

(For more details, 

refer to “Engine Oil” section in 

chapter 9)

. If the level is low, add oil 

as required.

If the warning light remains on after 

adding oil or if oil is not available, have 

the vehicle inspected by an authorized 

HYUNDAI dealer as soon as possible.
Continued driving with the warning light 

on may cause engine failure.

 Information

When engine oil pressure decreases due to 
insufficient engine oil, etc., the Engine Oil 
Pressure warning light will illuminate. In 
addition, the enhanced engine protection 
system which limits engine power will be 
activated. When the engine oil pressure 
is restored, the warning light and the 
enhanced engine protection system will 
turn off after the engine is restarted.

Instrument Cluster

4-16

NOTICE

If the engine is not stopped 

immediately after the Engine Oil 

Pressure warning light is illuminated, 

severe damage could result.

Low fuel level warning light

This warning light illuminates:

When the fuel tank is nearly empty.
Add fuel as soon as possible.

NOTICE

Driving with the Low Fuel Level warning 

light on or with the fuel level below “E” 

can cause the engine to misfire and 

damage the catalytic converter.

Service warning light

This warning light illuminates:

ś

When you set the ignition switch or 

the Engine Start/Stop button to the 

ON position.


- The service warning light illuminates 

for approximately 3 seconds and 

then turns off when all checks have 

been performed.

ś

When there is a problem with the 

hybrid vehicle control system or 

hardware.

When the warning light illuminates while 

driving, or does not go OFF after starting 

the vehicle, have the vehicle inspected 

by an authorized HYUNDAI dealer.

Charging Cable Connection 

Indicator (Plug-in hybrid 

vehicle)

This indicator illuminates in red when the 

charging cable is connected.

04

4-17

Master warning light

This warning light illuminates:

When there is a malfunction in operation 

in any of the following systems:


- Forward Collision-Avoidance Assist 

malfunction


- Forward Collision-Avoidance Assist 

radar blocked


- Blind-Spot Collision-Avoidance Assist 

malfunction (if equipped)


- Blind-Spot Collision-Avoidance Assist 

radar blocked (if equipped)


- LED headlight malfunction  (if 

equipped)


- High Beam Assist malfunction (if 

equipped)


- Smart Cruise Control malfunction (if 

equipped)


- Smart Cruise Control radar blocked (if 

equipped)


- Tire Pressure Monitoring System 

(TPMS) malfunction

To identify the details of the warning, 

look at the LCD display.

Low tire pressure warning 

light

This warning light illuminates:

ś

When you set the ignition switch or 

the Engine Start/Stop button to the 

ON position.


- The low tire pressure warning light 

illuminates for approximately 3 

seconds and then goes off.

ś

When one or more of your tires are 

significantly underinflated. (The 

location of the underinflated tires are 

displayed on the LCD display.)

For more details, refer to “Tire Pressure 

Monitoring System (TPMS)” section in 

chapter 8.

This warning light remains ON after 
blinking for approximately 60 seconds, or 
repeatedly blinks ON and OFF in 3 second 
intervals:

When there is a malfunction with the 

TPMS.
If this occurs, have the vehicle inspected 

by an authorized HYUNDAI dealer as 

soon as possible.

For more details, refer to “Tire Pressure 

Monitoring System (TPMS)” section in 

chapter 8.

 WARNING

Safe Stopping

ś

The TPMS cannot alert you to severe 

and sudden tire damage caused by 

external factors.

ś

If you notice any vehicle instability, 

immediately take your foot off the 

accelerator pedal, apply the brakes 

gradually with light force, and slowly 

move to a safe position off the road.

Instrument Cluster

4-18

Forward Safety warning light 

This warning light illuminates:

ś

When you set the Engine Start/Stop 

button to the ON position.


- The Forward Safety warning light 

illuminates for approximately 3 

seconds and then goes off.

ś

Whenever there is a malfunction with 

Forward Collision-Avoidance Assist.

If this occurs, have the vehicle inspected 

by an authorized HYUNDAI dealer.

For more details, refer to “Forward 

Collision-Avoidance Assist (FCA)” 

section in chapter 7.

Lane Safety indicator light (if 

equipped)

This indicator light illuminates:

ś

[Green] When Lane Keeping Assist 

operating conditions are satisfied.

ś

[White] When Lane Keeping Assist 

operating conditions are not satisfied.

ś

[Yellow] Whenever there is a 

malfunction with Lane Keeping Assist.
If this occurs, have the vehicle 

inspected by an authorized HYUNDAI 

dealer.

For more details, refer to “Lane Keeping 

Assist (LKA)” section in chapter 7.

All Wheel Drive (AWD) 

warning light

This warning light illuminates:

Whenever there is a malfunction with the 

AWD system.
If this occurs, have the vehicle inspected 

by an authorized HYUNDAI dealer.

For more details, refer to "All Wheel 

Drive (AWD)" section in chapter 6.

All Wheel Drive (AWD) LOCK 

indicator light

This indicator light illuminates:

ś

Once you set the ignition switch or 

Engine Start/Stop Button to the ON 

position.


- It illuminates for approximately 3 

seconds and then goes off.

ś

When you select AWD Lock mode by 

pressing the AWD LOCK button.


- The AWD LOCK mode is to increase 

the drive power when driving on 

wet pavement, snow covered roads 

and/or off-road.

NOTICE

Do not use AWD LOCK mode on dry 

paved roads or highway, it can cause 

noise, vibration or damage of AWD 

related parts.

04

4-19

LED headlight warning light 

This warning light illuminates:

ś

When you set the ignition switch or 

the Engine Start/Stop button to the 

ON position.


- The LED headlight warning light 

illuminates for approximately 3 

seconds and then goes off.

ś

Whenever there is a malfunction with 

the LED headlight.
If the LED headlight warning light 

remains illuminated while driving, 

have the vehicle inspected by an 

authorized HYUNDAI dealer.

This warning light blinks:

Whenever there is a malfunction with a 

LED headlight related part.
If this occurs, have the vehicle inspected 

by an authorized HYUNDAI dealer.

NOTICE

Continuous driving with the LED 

Headlight warning light on or blinking 

can reduce LED headlight life.

Icy road warning light 

This warning light is to warn the driver 

the road may be icy.
When the temperature on the outside 

temperature gauge is approximately 

below 40°F (4°C), the Icy Road warning 

light and Outside Temperature Gauge 

blinks and then illuminates. Also, the 

warning chime sounds 1 time.
You can activate or deactivate Icy Road 

Warning function from the User Settings 

menu in the cluster LCD display.


-

6HWXSƟ9HKLFOH6HWWLQJVƟ&OXVWHUƟ

Icy Road Warning

 Information

If the Icy Road warning light appears 
while driving, you should drive more 
attentively and safely refraining from 
over-speeding, rapid acceleration, sudden 
braking or sharp turning, etc.

Ready indicator

This indicator illuminates:

When the vehicle is ready to be driven.


- ON : Normal driving is possible.


- OFF : Normal driving is not possible, 

or a problem has occurred.

When the ready indicator goes OFF, 

there is a problem with the system. If this 

occurs, have the vehicle inspected by an 

authorized HYUNDAI dealer.

Instrument Cluster

4-20

EV mode indicator

This indicator illuminates:

When the vehicle is driven by the electric 

motor.

Electronic Stability Control 

(ESC) indicator light

This indicator light illuminates:

ś

When you set the ignition switch or 

the Engine Start/Stop button to the 

ON position.


- The Electronic Stability Control 

indicator light illuminates for about 

3 seconds and then goes off.

ś

Whenever there is a malfunction with 

the ESC system.
If this occurs, have the vehicle 

inspected by an authorized HYUNDAI 

dealer.

This indicator light blinks:

While the ESC is operating.

For more details, refer to “Electronic 

Stability Control (ESC)” section in 

chapter 6.

Electronic Stability Control 

(ESC) OFF indicator light 

This indicator light illuminates:

ś

When you set the ignition switch or 

the Engine Start/Stop button to the 

ON position.


- The ESC OFF indicator light 

illuminates for approximately 3 

seconds and then goes off.

ś

When you deactivate the ESC system 

by pressing the ESC OFF button.

For more details, refer to “Electronic 

Stability Control (ESC)” section in 

chapter 6.

Immobilizer Indicator Light 

(without smart key) 

This indicator light illuminates:

ś

When the vehicle detects the 

immobilizer in the key with the 

ignition switch in the ON position.


- At this time, you can start the 

engine.


- The indicator light goes off after 

starting the engine.

This indicator light blinks:

ś

When there is a malfunction with the 

immobilizer system.
In this case, have the vehicle 

inspected by an authorized HYUNDAI 

dealer.

04

4-21

Immobilizer indicator light 

(with smart key) 

This indicator light illuminates for up to 
30 seconds:

When the vehicle detects the smart key 

in the vehicle with the Engine Start/Stop 

button in the ACC or ON position.


- Once the smart key is detected, you 

can start the engine.


- The indicator light goes off after 

starting the engine.

This indicator light blinks for a few 
seconds:

When the smart key is not in the vehicle.


- If the smart key is not detected, you 

cannot start the engine.

This indicator light illuminates for 2 
seconds and goes off:

If the smart key is in the vehicle and the 

Engine Start/Stop button is ON, but the 

vehicle cannot detect the smart key.
If this occurs, we recommend that 

you have the vehicle inspected by an 

authorized HYUNDAI dealer.

This indicator light blinks:

When there is a malfunction with the 

immobilizer system.
If this occurs, have the vehicle inspected 

by an authorized HYUNDAI dealer.

Downhill Brake Control (DBC) 

indicator light

This indicator light illuminates:

ś

When you set the ignition switch or 

the Engine Start/Stop button to the 

ON position.


- The downhill brake control indicator 

light illuminates for about 3 seconds 

and then goes off.

ś

When you activate the system by 

pressing the DBC button.

This indicator light blinks:

When Downhill Brake Control system is 

operating.

This indicator light illuminates yellow:

Whenever there is a malfunction with 

Downhill Brake Control system.
If this occurs, have the vehicle inspected 

by an authorized HYUNDAI dealer.

For more details, refer to "Downhill 

Brake Control (DBC)" section in chapter 

6.

Instrument Cluster

4-22

Turn signal indicator light

This indicator light blinks:

When you operate the turn signal 

indicator stalk.

If any of the following occur, there may 

be a malfunction with the turn signal 

system.


- The turn signal indicator light 

illuminates but does not blink


- The turn signal indicator light blinks 

rapidly


- The turn signal indicator light does not 

illuminate at all

If any of these conditions occur, have 

the vehicle inspected by an authorized 

HYUNDAI dealer.

High beam indicator light

This indicator light illuminates:

ś

When the headlights are on and in the 

high beam position

ś

When the turn signal lever is pulled 

into the Flash-to-Pass position.

Low beam indicator light

This indicator light illuminates:

When the headlights are on.

Light ON indicator light

This indicator light illuminates:

When the tail lights or headlights are on.

High Beam Assist indicator 

light

This indicator light illuminates:

When the high-beam is on with the light 

switch in the AUTO position.

ś

[White] When High Beam Assist is 

ready to operate.

ś

[Green] When High Beam Assist is 

operating.

If your vehicle detects oncoming or 

preceding vehicles, High Beam Assist 

will switch the high beam to low beam 

automatically.

For more details, refer to “High Beam 

Assist (HBA)” section in chapter 5.

Cruise indicator light 

This indicator light illuminates:

When the cruise control system is 

enabled.

For more details, refer to "Cruise 

Control (CC)" in chapter 7.

04

4-23

SPORT Mode indicator light 

This indicator light illuminates

When you select "SPORT" mode as drive 

mode.

For more details, refer to "Drive Mode 

Integrated Control System" in chapter 

6.

SMART Mode indicator light 

This indicator light illuminates:

When you select ''SMART" mode as drive 

mode.

For more details, refer to "Drive Mode 

Integrated Control System'' in chapter 

6.

LCD Display Messages

Shift to P (if equipped)

This message is displayed if you try to 

turn off the vehicle without the shift 

button in the P (Park) position.
If this occurs, the Engine Start/Stop 

button turns to the ACC position.

Low key battery (if equipped)

When the Engine Start/Stop button 

is pressed to turn OFF the engine, 

this message may be displayed.  This 

message indicates that the internal 

battery of the Smart Key is low. Consider 

replacing the Smart Key internal battery.

Press START button while turning 

wheel (if equipped)

This message is displayed if the steering 

wheel does not unlock normally when 

the Engine Start/Stop button is pressed.
You should press the Engine Start/Stop 

button while turning the steering wheel 

right and left.

Check steering wheel lock system (if 

equipped)

This message is displayed if the steering 

wheel does not lock normally while the 

Engine Start/Stop button is pressed to 

the OFF position.


Content      ..     4      5      6      7     ..