Hyundai Tucson Plug-in Hybrid (2024 year). Manual in english - page 2
 

  Index      Manuals     Hyundai Tucson Plug-in Hybrid (2024 year). Manual in english


Search            copyright infringement  


Content      ..      1      2      3      ..


Hyundai Tucson Plug-in Hybrid (2024 year). Manual in english - page 2


Foreword/Starting your Hybrid/Plug-in hybrid vehicle

1-28

 Information

Charging connector AUTO/LOCK mode

The charging connector is locked in the 
inlet at a different period according to 
which mode is selected.

ś

LOCK mode : The connector locks 
when the charging connector is plugged 
into the charging inlet.

ś

AUTO mode : The connector locks 
when charging starts. 

For more details, refer to “Charging 
Connector AUTO/ LOCK Mode” in this 
chapter. 

OOSEVQ018057

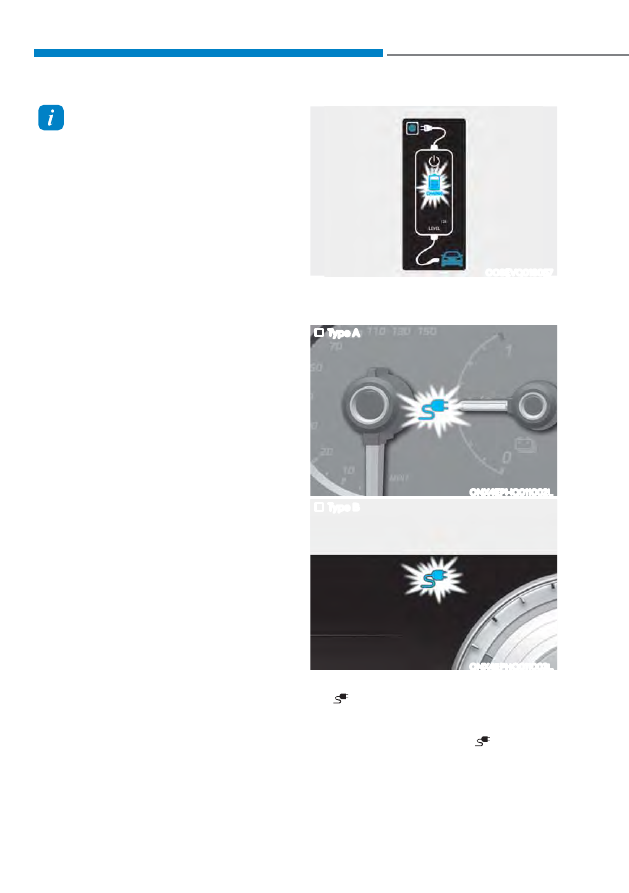
8.  Charging starts automatically 

(charging lamp blinks).

„

Type A

ONX4EPHQ011002L

„

Type B

ONX4EPHQ011003L

9.  Check if the charging indicator light 

(

) of the high voltage battery in 

the instrument cluster is turned ON. 

Charging is not active when the 

charging indicator light (

) is OFF.

When the charging connector is not 

connected properly, reconnect the 

charging cable to charge it again. 
01

1-29

 Information

To control the temperature of the high 
voltage battery while charging or when 
the battery temperature is high, the air 
conditioner is used to cool down the 
battery. It may generate noise or vibration 
from operation of the air conditioner 
compressor and cooling fan, but it is a 
normal condition when charging the high 
voltage battery. Also, the air conditioner’s 
performance may be degraded due to 
operation of the cooling system to charge 
the high voltage battery. This is a normal 
condition.

 Information

Even though charging is possible with 
the Start/Stop button in the ON/START 
position, for you safety, start charging 
when the Start/Stop button is in the 
OFF position and the vehicle shifted to P 
(Park). After charging has started, you 
can use electrical components such as the 
radio by pressing the Start/Stop button to 
the START or ON position.

During charging, the gear cannot be 
shifted from P (Park) to any other gear. 

OAEPHQ049818L

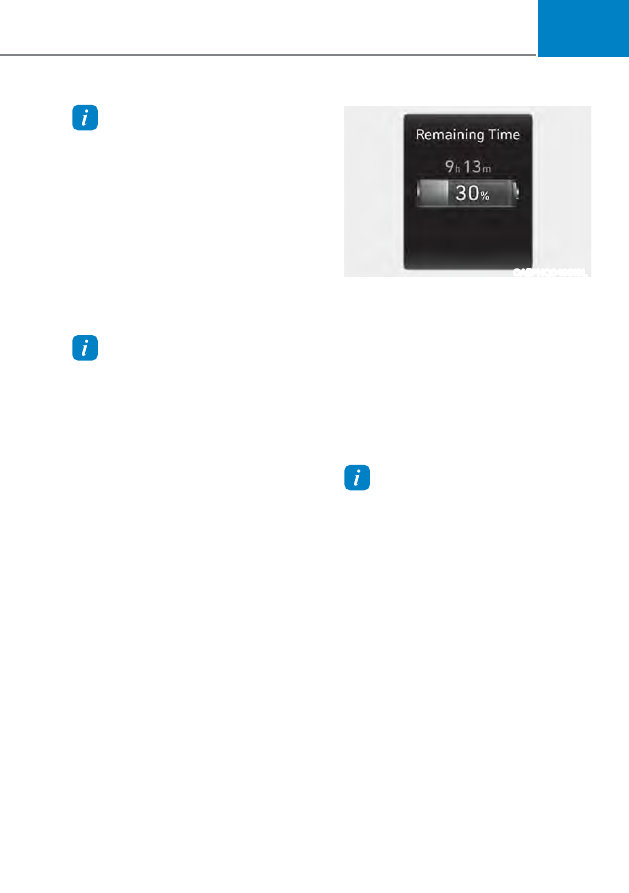
10. After charging has started, the 

estimated charging time is displayed 

on the instrument cluster for about 1 

minute.
If you open the driver seat door while 

charging, the estimated charging time 

is also displayed on the instrument 

cluster for about 1 minute. 
When scheduled charging is set, the 

estimated charging time is displayed 

as “--” .

 Information

Depending on the condition and durability 
of the high voltage battery, charger 
specifications, and ambient temperature, 
the time required for charging the battery 
may vary.

Foreword/Starting your Hybrid/Plug-in hybrid vehicle

1-30

Checking Charging Status

ONX4EPHQ011020L

When charging the high voltage battery, 

the charge level can be checked from 

outside the vehicle.

Classification

Details

Operation of charging 

indicator lamp

Mode

Status

Charging 

inlet

Charging 

button

A

READY

Non-charging 

state

0 ~ 65 %

On (Yellow)

Off

65 ~ 100 %

On (Green)

Off

B

Aux. Battery 

Saver / High 

voltage warning

Charging the 12V auxiliary 

battery / High voltage warning 

state

On (Red)

Off

C

Charging

Charging

0 ~ 65 %

Blinking 

(Yellow)

Off

65 ~ 100 %

Blinking 

(Green)

Off

D

Charging 

complete

Charging 

completed (turns 

off in 5 seconds)

100 %

2Q*UHHQƟ

OFF

Off

E

Charging failed

Error while charging

Blinking 

(Red)

Off

F

Scheduled 

charging standby

Reserved charging is operating 

(turns OFF after 3 minutes)

Off

ON

G

Error

CAN communication error 

status

2Q*UHHQƟ

On (Orange) 

Ɵ2Q5HG

Off

01

1-31

Char

ging S

ta

tus Indica

tor Lamp f

or Portable Char

ger

Contr

ol Bo

x

Indica

tor

De

tails

PL

UG

(Gr

een

)

On : P

ow

er on  

Blink : Plug t

emper

atur

e sensor f

ailur

e

(R

ed)

On : Plug high t

emper

atur

e pr

ot

ection

Blink : Plug high t

emper

atur

e w

arning

POWER

On : P

ow

er on  

CHAR

GE

Blink :  

Char

ging in po

w

er sa

ving mode, only the CHAR

GE  

indica

tor is illumina

ted. 

FA

UL

T

Blink : Char

ging in

terrup

ted

CHAR

GE 

LEVEL

Char

ging curr

ent 12 A

The char

ging curr

ent 

changes (3 le

vel) whene

ver 

the butt

on (1) is pr

essed 

for 1 sec with the char

ger 

plugged in

to an electrical 

outle

t but no

t the v

ehicle. 

Ã

 Back of the control box

Char

ging curr

ent 10 A

Char

ging curr

ent 18 A

VEHICLE

(Gr

een

)

Char

ging connect

or plugged

(Blue

)

Char

ging

(R

ed)

Blink : Char

ging impossible 

Foreword/Starting your Hybrid/Plug-in hybrid vehicle

1-32

Char

ging S

ta

tus Indica

tor Lamp f

or Portable Char

ger

NO

Contr

ol Bo

x

Sta

tus / Diagnosis / Count

ermeasur

e

NO

Contr

ol Bo

x

Sta

tus / Diagnosis / Count

ermeasur

e

1

ś

Char

ging connect

or plugged int

vehicle (

Gr

een ON)

ś

Plug t

emper

atur

e sensor f

ailur

e  

(Gr

een blink

)

ś

Plug high t

emper

atur

e pr

ot

ection  

(R

ed blink

)

ś

Plug high t

emper

atur

e w

arning (R

ed 

ON)

Contact an authoriz

ed HYUND

AI dealer

.

2

 -Char

ging connect

or plugged int

vehicle (

Gr

een ON)

3

 -While char

ging

ś&KDU

JHLQGLFD

WRU

*U

HHQEOLQN

ś9

HKLFOHLQGLFD

WRU%OXH21

4

 -Be

for

e plugging char

ging connect

or 

int

o v

ehicle (R

ed blink

)

ś$EQRUPDOW

HPSHU

D

WXU

H

ś,&&%,Q&DEOH&RQWU

RO%R

[I

DLOXU

H

Contact an authoriz

ed HYUND

AI dealer

.

01

1-33

NO

Contr

ol Bo

x

Sta

tus / Diagnosis / Count

ermeasur

e

NO

Contr

ol Bo

x

Sta

tus / Diagnosis / Count

ermeasur

e

5

 -Plugged int

o v

ehicle (R

ed blink

)

ś'LDJQRV

WLFGH

YLFHI

DLOXU

H

ś&XUU

HQWOHDN

DJH

ś$EQRUPDOW

HPSHU

D

WXU

H

Contact an authoriz

ed HYUND

AI dealer

.

6

 -A

ft

er plugging char

ging connect

or int

vehicle (R

ed blink

)

ś&RPPXQLFD

WLRQI

DLOXU

H

Contact an authoriz

ed HYUND

AI dealer

.

7

ś

Plug t

emper

atur

e sensor f

ailur

e  

(Gr

een blink

)

ś

Plug high t

emper

atur

e pr

ot

ection  

(R

ed blink

)

ś

Plug high t

emper

atur

e w

arning (R

ed 

ON)

Contact an authoriz

ed HYUND

AI dealer

.

8

 -P

ow

er sa

ving mode

ś

PLQXW

HVD

IW

HUFKDU

JLQJV

WDUWV


(Gr

een blink

)

Char

ging S

ta

tus Indica

tor Lamp f

or Portable Char

ger

Foreword/Starting your Hybrid/Plug-in hybrid vehicle

1-34

How to Disconnect Portable Charger 

(ICCB: In-Cable Control Box)

1.  Hold the charging connector handle 

and pull it out.

 Information

To prevent charging cable theft, 
the charging connector cannot be 
disconnected from the inlet when the 
doors are locked or the charging connector 
is in the LOCK mode. Unlock all doors to 
disconnect the charging connector from 
the inlet. 

However, if the vehicle is in the charging 
connector AUTO mode, the charging 
connector automatically unlocks from the 
inlet when charging is completed.

If the charging connector is disconnected 
while the release button is not pressed, the 
connector and the inlet may be damaged.

For more details, refer to “Charging 
Connector AUTO/ LOCK Mode” in this 
chapter.

ONX4PHQ011030N

2.  Make sure to completely close the 

charging door. 

*  The charging door dose not have a 

locking system. 

OAEE046507N

3.  Disconnect the plug from the 

household electric outlet. Do not pull 

the cable when disconnecting the 

plug. 

4.  Close the protection caps of the 

charging connector and the charging 

plug to protect them from foreign 

substances.

5.  If the personal charging connector is 

used, store the connector in the cable 

compartment.

01

1-35

Unlock Charging Connector in 

Emergency

ONX4PHQ013035N

ONX4PHQ013034N

If the charging connector does not 

disconnect due to battery discharge 

and electric wire failure, perform the 

following:
1.  Open the liftgate.
2.  Lift the luggage tray cover by the 

handle (1).

3.  Raise the luggage tray (2).
4.  Gently pull the emergency cable (3) to 

disconnect the charging connector.

Precautions When Using the 

Portable Charger

ś

Use the portable charger that is 

certified by HYUNDAI.

ś

Do not try to repair, disassemble, or 

adjust the portable charger. 

ś

If an extension cord is used it must be 

rated for heavy duty of at least 15A. 

Keep as short as possible. 

ś

Stop using immediately when failure 

occurs. 

ś

Do not touch the plug and charging 

connector with wet hands. 

ś

Do not touch the terminal part of the 

AC charging connector and the AC 

charging port on the vehicle. 

ś

Do not connect the charging 

connector to voltage that does not 

comply with regulations. 

ś

Do not use the portable charger if it is 

worn, if any of the wiring is exposed, 

or if there are any signs of damage to 

the cable or connector.

ś

Do not let children operate or touch 

the portable charger.

ś

Do not let the controller to be in 

contact with water.

ś

Keep the normal charging connector 

or plug terminal free of foreign 

substances. 

ś

Do not step on the cable or cord. Do 

not pull the cable or cord and do not 

twist or bend it. 

ś

Do not attempt to charge the vehicle 

outside during inclement weather 

when there is the possibility of 

lightning.

ś

Do not drop the controller or place 

heavy objects on the equipment.

ś

Do not place an object that can 

generate high temperatures near the 

charger when charging.

ś

Before plugging into any electrical 

outlet, have a qualified electrician 

inspect and verify the household 

electrical system for heavy duty 

service at a 12 amp continuous load.

ś

Stop using the portable charger 

immediately if the household electric 

outlet or any components becomes 

overheated or has a burning smell.

Foreword/Starting your Hybrid/Plug-in hybrid vehicle

1-36

Trickle Charge (Type B)

„

Portable Charger

ONE1Q011087L

(1)  Code and Plug (Code set)
(2) Control Box
(3)  Charging Cable and Charging 

Connector

Trickle charge can be used when 

AC charge is not available by using 

household electricity.

How to set the charge level of the 

portable charger

OAEE046506N

Plug

Electric Outlet

1.  Check the rated current of the electric 

outlet prior to connecting the plug to 

the outlet.

2.  Connect the plug to a household 

electric outlet.

3.  Check the display window on the 

control box.

01

1-37

„

Ready state

ONX4EPHQ011005L

„

Charging state

ONX4EPHQ011006L

ONX4EPHQ011024L

4.  In ready or charging state where the 

Fault indicator does not blink, press the 

button (1) on the control box for more 

than 2 seconds to adjust the charge 

level. (Refer to charging cable type and 

example for setting the charge level.)

5.  The display window on the control box 

changes From 6A and 8A and 10A to 

12A every time you press the button (1).

6.  When the charge level you want is 

displayed in the display window, press 

the button (1) on the control box for 

more than 1 second to apply the desired 

charge level. If you do not press the 

button within 10 seconds, it will return 

to the previously set charge level.

7.  When setting the charge level is 

complete, start charging according to 

the trickle charge procedure.


Ã

Example for setting the ICCB charge level (The example is only for reference and 

may vary according to the surrounding environment.)

Outlet current

ICCB charge level

Control box display window

14-16A

12A

ONX4EPHQ011007L

13-12A

10A

11-10A

8A

9-8A

6A

Foreword/Starting your Hybrid/Plug-in hybrid vehicle

1-38

How to Connect Portable Charger 

(ICCB: In-Cable Control Box)

OAEE046506N

Plug

Electric Outlet

1.  Connect the plug to a household 

electric outlet.

ONX4EPHQ011005L

2.  Check if the power lamp (green) 

illuminates on the control box.

3.  Depress the brake pedal and apply the 

parking brake.

4.  Turn OFF all switches, shift to P (Park), 

and turn OFF the vehicle.

ONX4EPHQ011022L

5.  Press center edge of the charging 

door to open the charging door.

 Information

If the charging door does not open because 
ice has formed around it, tap lightly or 
push on the door to break the ice and 
release the door. Do not pry on the door. If 
necessary, spray around the door with an 
approved deicer fluid (do not use radiator 
antifreeze) or move the vehicle to a warm 
place and allow the ice to melt.

6.  Check if there is dust on the charging 

connector and charging inlet.

ONX4PHQ011028N

7.  Hold the charging connector handle 

and connect it to the vehicle AC 

charging inlet. Push the connector 

until you hear a “clicking” sound. If 

the charging connector and charging 

terminal are not connected properly, 

this may cause a fire.

01

1-39

 Information

Charging connector AUTO/LOCK mode

The charging connector is locked in the 
inlet at a different period according to 
which mode is selected.

ś

LOCK mode : The connector locks 
when the charging connector is plugged 
into the charging inlet.

ś

AUTO mode : The connector locks 
when charging starts.

For more details, refer to “Charging 
Connector AUTO/ LOCK Mode” in this 
chapter.

ONX4EPHQ011006L

8.  Charging starts automatically 

(charging lamp blinks).

„

Type A

„

Type B

ONX4EPHQ011002L

ONX4EPHQ011003L

9.  Check if the charging indicator 

light of the high voltage battery 

on the instrument cluster is turned 

ON. Charging is not done when the 

charging indicator lamp is OFF.
When the charging connector is not 

connected properly, reconnect the 

charging cable to charge it again.

 Information

ś

Even though charging is possible with 
the ignition switch in the ON/START 
position, for your safety, start charging 
when the ignition switch is in the 
LOCK/OFF position and the vehicle 
shifted to P (Park).

After charging has started, you can use 
electrical components such as the radio 
by placing the ignition switch in ACC 
or ON position.

ś

Moving the shift button from P (Park) 
to R (Reverse)/N(Neutral)/D (Drive) 
stops the charging process.

To restart the charging process, move 
the shift button to P (Park), place the 
ignition switch to the LOCK/OFF 
position, and disconnect the charging 
cable. Then, connect the charging cable.

Foreword/Starting your Hybrid/Plug-in hybrid vehicle

1-40

OAEPHQ049818L

10.  After charging has started, the 

estimated charging time is displayed 

on the instrument cluster for about 1 

minute.
If you open the driver seat door while 

charging, the estimated charging time 

is also displayed on the instrument 

cluster for about 1 minute.
When scheduled charging is set, the 

estimated charging time is displayed 

as “--” .

 Information

Depending on the condition and durability 
of the high voltage battery, charger 
specifications, and ambient temperature, 
the time required for charging the battery 
may vary.

Checking Charging Status

ONX4EPHQ011020L

When charging the high voltage battery, 

the charge level can be checked from 

outside the vehicle.

01

1-41

Classification

Details

Operation of charging 

indicator lamp

Mode

Status

Charging 

inlet

Charging 

button

A

READY

Non-charging 

state

0 ~ 65 %

On (Yellow)

Off

65 ~ 100 %

On (Green)

Off

B

Aux. Battery 

Saver / High 

voltage warning

Charging the 12V auxiliary 

battery / High voltage warning 

state

On (Red)

Off

C

Charging

Charging

0 ~ 65 %

Blinking 

(Yellow)

Off

65 ~ 100 %

Blinking 

(Green)

Off

D

Charging 

complete

Charging 

completed (turns 

off in 5 seconds)

100 %

2Q*UHHQƟ

OFF

Off

E

Charging failed

Error while charging

Blinking 

(Red)

Off

F

Scheduled 

charging standby

Reserved charging is operating 

(turns OFF after 3 minutes)

Off

ON

G

Error

CAN communication error 

status

2Q*UHHQƟ

On (Orange) 

Ɵ2Q5HG

Off

Foreword/Starting your Hybrid/Plug-in hybrid vehicle

1-42

Charging Status Indicator Lamp for Portable Charger

„

Control Box

ONX4EPHQ011008L

Indicator

Details

POWER

On : Power on

CHARGE

On : Charge

Blink : Current limit due to high plug temperature or high internal 

temperature

FAULT

Blink : Error while charging

01

1-43

Indicator

Details

Error code

On : Error while charging/ Error during self-diagnosis

Error code

Item

Cause

E1

CP 

communication

Vehicle communication error

E2

Leakage

Current leakage

E3

Charger error

E4

Plug temperature

Plug overtemperature 

warning

E5

Plug temperature failure

E6

Charger error

E7

Overcurrent

Charging overcurrent warning

E8

Internal 

temperature

Charger overheating

E9

Charger error

F1

Relay fusion

Charger error

F2

GM/I

Poor grounding of outlet

F3

SMPS 

Power failure

SMPS error (voltage failure)

F4

SMPS error (abnormal 

voltage)

F5

CP voltage error

CP (-) voltage error

F6

CP (+) voltage error

F7

Temperature 

sensor error

Plug temperature sensor error

F8

PCB internal temperature 

sensor error

Foreword/Starting your Hybrid/Plug-in hybrid vehicle

1-44

Indicator

Details

CHARGE 

LEVEL

Type A

Type B

Type C

12 A

10 A

8 A

10 A

8 A

7 A

8 A

6 A

6 A

The charging current changes whenever the 

button (1) is pressed for less than 1 sec with 

the charger plugged into an electrical outlet 

but not the vehicle.

*  The control box

ONX4EPHQ011024L

01

1-45

Status / Diagnosis / Countermeasure

ONX4EPHQ011005L

ś

Charging connector plugged into 

vehicle (Power indicator : green ON)

ś

Plug connected to an electric outlet 

(Power indicator : green ON)

Contact an authorized HYUNDAI dealer.

ONX4EPHQ011006L

While charging (Power indicator : green 

ON, Charge indicator :blue ON)
Contact an authorized HYUNDAI dealer.

ONX4EPHQ011009L

Before plugging charging connector 

into vehicle (Power indicator : green ON, 

Fault indicator : red blink)

ś

Abnormal temperature

ś

ICCB (In-Cable Control Box) failure

Contact an authorized HYUNDAI dealer.

Foreword/Starting your Hybrid/Plug-in hybrid vehicle

1-46

ONX4EPHQ011009L

Plugged into vehicle (Power indicator : 

green ON, Fault indicator : red blink)

ś

Diagnostic device failure

ś

Current leakage

ś

Abnormal temperature

Contact an authorized HYUNDAI dealer.

ONX4EPHQ011010L

A leakage current occurs with “E2” error 

code (Power indicator : green ON, Fault 

indicator : red blink, E2 displayed)
Contact an authorized HYUNDAI dealer.

ONX4EPHQ011024L

After disconnecting and reconnecting 

the power plug, the error is cleared by 

pressing the button (1) for 2 seconds 

or longer. If this doesn’t clear the error, 

Contact an authorized HYUNDAI dealer. 

ONX4EPHQ011011L

Power saving mode

ś

Charge level display window turns off 

when the status is not changed for 

more than 1 minute

Contact an authorized HYUNDAI dealer.

01

1-47

How to Disconnect Portable Charger 

(ICCB: In-Cable Control Box)

ONX4PHQ011029N

1.  Hold the charging connector handle 

and pull it while pressing the release 

button.

 Information

To prevent charging cable theft, 
the charging connector cannot be 
disconnected from the inlet when the 
doors are locked. Unlock all doors to 
disconnect the charging connector from 
the inlet.

However, if the vehicle is in the charging 
connector AUTO mode, the charging 
connector automatically unlocks from the 
inlet when charging is completed.

For more details, refer to “Charging 
Connector AUTO/ LOCK Mode” in this 
chapter.

ONX4PHQ011030N

2.  Make sure to completely close the 

charging door.


Ã

The charging door dose not have a 

locking system.

OAEE046506N

Plug

Electric Outlet

3.  Disconnect the plug from the 

household electric outlet. Do not pull 

the cable when disconnecting the 

plug.

4.  Close the protective cover for the 

charging connector so that foreign 

material cannot get into the terminal.

5.  Put the charging cable inside the 

cable compartment to protect it.

Foreword/Starting your Hybrid/Plug-in hybrid vehicle

1-48

Unlock Charging Connector in 

Emergency

ONX4PHQ013035N

ONX4PHQ013034N

If the charging connector does not 

disconnect due to battery discharge 

and electric wire failure, perform the 

following:
1.  Open the liftgate.
2.  Lift the luggage tray cover by the 

handle (1).

3.  Raise the luggage tray (2).
4.  Gently pull the emergency cable (3) to 

disconnect the charging connector.

Precautions for Portable Charger 

(ICCB: In-Cable Control Box)

ś

Use the portable charger that is 

certified by HYUNDAI Motors.

ś

Do not try to repair, disassemble, or 

adjust the portable charger.

ś

Do not use an extension cord or 

adapter.

ś

Stop using immediately when failure 

occurs.

ś

Do not touch the plug and charging 

connector with wet hands.

ś

Do not touch the terminal part of the 

AC charging connector and the AC 

charging inlet on the vehicle.

ś

Do not connect the charging 

connector to voltage that does not 

comply with regulations.

ś

Do not use the portable charger if it 

is worn out, exposed, or there exists 

any type of damage on the portable 

charger.

ś

If the ICCB case and AC charging 

connector is damaged, cracked, or the 

wires are exposed in any way, do not 

use the portable charger.

ś

Do not let children operate or touch 

the portable charger.

01

1-49

ś

Keep the control box free of water.

ś

Keep the AC charging connector 

or plug terminal free of foreign 

substances.

ś

Do not step on the cable or cord. Do 

not pull the cable or cord and do not 

twist or bend it.

ś

Do not charge when there is lightning.

ś

Do not drop the control box or place a 

heavy object on the control box.

ś

Do not place an object that can 

generate high temperatures near the 

charger when charging.

ś

Charging with the worn out or 

damaged household electric outlet 

can result in a risk of electric shock. 

If you are in doubt to the household 

electric outlet condition, have it 

checked by a licensed electrician.

ś

Stop using the portable charger 

immediately if the household 

electric outlet or any components is 

overheated or you notice burnt odors.

Action to be Taken when 

Charging Stops Abruptly

When the high voltage battery does not 

charge, check the followings:
1.  Check the charging setting for the 

vehicle.
(for example, When scheduled 

charging is set, charging is not 

initiated immediately when the AC 

charger or portable charger (ICCB: In-

Cable Control Box) is connected.)

2.  Check the operation status of AC 

charger, portable charger.
(Charging Status Indicator Lamp for 

Portable Charger, refer to “Checking 

Charging Status” for trickle charge in 

this chapter.)


Ã

Actual method for indicating 

the charging status may vary 

in accordance with the charger 

manufacturer.

3.  When the vehicle does not charge 

and a warning message appears on 

the cluster, check the corresponding 

message. Refer to “LCD Display 

Messages”, in this chapter.

4.  If the vehicle is properly charged 

when charged with another normally 

working charger, contact the charger 

manufacturer.

5.  If the vehicle does not charge when 

charged with another normally 

working charger, contact an 

authorized HYUNDAI dealer for 

inspection.

Foreword/Starting your Hybrid/Plug-in hybrid vehicle

1-50

Starting the Vehicle

Vehicles with smart key system

1.  Carry the smart key or leave it inside 

the vehicle.

2.  Make sure the parking brake is firmly 

applied.

3.  Make sure the shift button is in P 

(Park). With the shift button in N 

(Neutral), you cannot start the vehicle.

4.  Depress the brake pedal.
5.  Press the Engine Start/Stop button. 

If the hybrid system starts, the “

” 

indicator will come on.
Whether the engine is cold or warm, it 

should be started without depressing 

the accelerator.

After following the start procedures, 

” indicator on the instrument 

cluster will turn on. For more details, 

please check chapter 6.

ECONOMICAL and SAFE OPERATION of 

Hybrid system

ś

Drive smoothly. Accelerate at a 

moderate rate and maintain a steady 

cruising speed. Do not make “jack-

rabbit” starts. Do not race between 

stoplights.
Avoid heavy traffic whenever possible. 

Always maintain a safe distance 

from other vehicles so you can 

avoid unnecessary braking. This also 

reduces brake wear out.

ś

The regenerative brake generates 

energy when the vehicle decelerates.

ś

When the hybrid battery power is 

low, the hybrid system automatically 

recharges the hybrid battery.

ś

When the engine is running with the 

shift button in N (Neutral), the hybrid 

system cannot generate electricity. 

The hybrid battery cannot recharge 

with the shift button in N (Neutral).

 Information

In the hybrid system, the engine 
automatically runs and stops. When 
the hybrid system operates, the “

” 

indicator is illuminated.

In the following situation, the engine may 
operate automatically.


-

When the engine is ready to run


-

When the hybrid battery is being 
charged


-

Depending on the temperature 
condition of the hybrid battery

Special Features

Hybrid vehicles sound different than 

gasoline engine vehicles. When the 

hybrid system operates, you may 

hear a sound from the hybrid battery 

system under the floor. If you apply 

the accelerator pedal rapidly, you may 

hear an unconventional sound. When 

you apply the brake pedal, you may 

hear a sound from the regenerative 

brake system. When the hybrid system 

is turned off or on, you may hear a 

sound in the engine compartment. If 

you depress the brake pedal repeatedly 

when the hybrid system is turned on, 

you may hear a sound in the engine 

compartment. None of these sounds 

indicate a problem. These are normal 

characteristics of hybrid vehicles.
If any of following occur, it’s a normal 

condition if you hear a motor sound in 

the engine compartment:


- After turning off the hybrid system, 

the brake pedal is released.


- When the hybrid system is turned off, 

the brake pedal is applied.


- When the driver door is opened.

DRIVING THE HYBRID VEHICLE

01

1-51

When the hybrid system is turned ON, 

the gasoline engine may run or may not. 

In this situation, you may feel a vibration. 

This does not indicate a malfunction. 

When the “

” indicator illuminates, the 

hybrid system is ready to begin driving. 

Even if the engine is off, you can operate 

the vehicle as long as the “

” indicator 

is illuminated.

NOTICE

The hybrid system contains many 

electronic components. High voltage 

components, such as cables and other 

parts, may emit electromagnetic waves. 

Even when the electromagnetic cover 

blocks electromagnetic emissions, 

electromagnetic waves may have an 

effect on electronic devices. When your 

vehicle is not used for a long period of 

time, the hybrid system will discharge. 

You need to drive the vehicle several 

times a month. Drive at least for 1 hour 

or 10 miles. When the hybrid battery 

is discharged, or when it is impossible 

to jump start the vehicle, contact your 

authorized HYUNDAI dealer.

 WARNING

ś

When you start the hybrid system 

with the shift button in P (Parking), 

the “

” indicator illuminates on 

the instrument cluster. The driver 

can drive the vehicle, even when the 

gasoline engine is off.

ś

When you leave the vehicle, you 

should turn OFF the hybrid system 

or locate the shift button in P (Park). 

When you depress the accelerator 

pedal by mistake, or when the shift 

button is not in P (Park), the vehicle 

will abruptly move, possibly resulting 

in serious injury or death.

Virtual Engine Sound System (VESS)

The Virtual Engine Sound System 

generates engine sound for pedestrians 

to hear vehicle sound because there is 

limited sound while motor power is used.

ś

When the engine is running, the gear 

shift button is not in P (Park), the VESS 

will operate.

ś

When the gear is shifted to R 

(Reverse), an additional warning 

sound will be heard.

What does regenerative braking do?

It uses an electric motor when 

decelerating and when braking and 

transforms kinetic energy to electrical 

energy in order to charge the high 

voltage battery.

Battery

ś

Hybrid


- The vehicle is composed of a high 

voltage battery that drives the motor 

and air conditioner, and an integrated 

12V lead battery with the HEV battery 

that drives the lamps, wipers, and audio 

system.


- The integrated 12V battery is 

automatically charged when the vehicle 

is in the ready (

) mode.

ś

Plug-in hybrid vehicle


- The vehicle is composed of a high 

voltage battery that drives the 

motor and air-conditioner, and an 

auxiliary battery (12 V) that drives 

the lamps, wipers, and audio 

system.


- The auxiliary battery is 

automatically charged when the 

vehicle is in the ready (

) mode.

Foreword/Starting your Hybrid/Plug-in hybrid vehicle

1-52

Hybrid System Gauge

Power gauge

„

4.2-Inch

ONX4H040004

„

10.25-inch

OCN7H040002

The hybrid system gauge indicates 

whether the current driving condition is 

fuel efficient or not.

ś

CHARGE:
Shows that the energy made by the 

vehicle is being converted to electrical 

energy. (Regenerated energy)

ś

ECO:
Shows that the vehicle is being driven 

in an Eco-friendly manner.

ś

POWER:
Shows that the vehicle is exceeding 

the Eco-friendly range.

According to the hybrid system gauge 

area, the “EV” indicator comes on or off.


- “EV” indicator ON : Vehicle is driven 

using the electric motor or the 

gasoline engine is stopped.


- “EV” indicator OFF : Vehicle is driven 

using the gasoline engine.

Hybrid battery SOC (State of Charge) 

gauge

„

4.2-Inch

ONX4HQ010016N

„

10.25-inch

OCN7H040003

This gauge indicates the remaining 

hybrid battery power. If the SOC is 

near the “L (Low)” level, the vehicle 

automatically operates the engine to 

charge the battery.
However, if the Service Indicator (

and Malfunction Indicator Lamp (MIL) 

(

) turn on when the SOC gauge is 

near the “L (Low)” level, have the vehicle 

be checked by an authorized HYUNDAI 

dealer.

01

1-53

Plug-in Hybrid Mode (Plug-in 

hybrid vehicle)

„

EV/HEV button

ONX4EPHQ011012L

Pressing the [EV/HEV] button changes 

the plug-in hybrid system modes, 

between Electric (CD) mode and Hybrid 

(CS) mode.
Each time the mode is changed a 

corresponding indicator is displayed on 

the instrument cluster as follows.

„

AUTO mode 

‡

Type A

‡

Type B

ONX4EPHQ011013L

ONX4EPHQ011014L

„

CS mode 

‡

Type A

‡

Type B

ONX4EPHQ011015L

ONX4EPHQ011016L

Plug-in hybrid mode indicator

ś

CD (Charge Depleting, Electric) 

mode : The high-voltage (hybrid) 

battery is used to drive the vehicle.

ś

AUTO mode : CD mode and CS mode 

are selected automatically depending 

on road conditions.

ś

CS (Charge Sustaining, Hybrid) mode : 

The high-voltage (hybrid) battery and 

gasoline engine is used to drive the 

vehicle.

 Information

Even when the battery charging rate 
is high and driving in electric mode is 
possible, engine may turn on in some areas 
to protect the system.

Foreword/Starting your Hybrid/Plug-in hybrid vehicle

1-54

Infotainment system Screen (Plug-in 

hybrid vehicle) (if equipped)

OTMPHQ010018L

Press [PHEV] on the [Home] screen or 

the [All menus] screen and the menus 

related to plug-in hybrid ([ECO driving], 

[Energy information], [EV range], [Set 

charging times], [Charging stations], 

[Petrol stations]) are displayed.

For more information, please refer to 

the Infotainment System Manual that 

was separately supplied with your 

vehicle.

Aux. Battery Saver+ (Plug-in 

hybrid vehicle)

The Aux. Battery Saver+ is a function that 

monitors the charging status of the 12 V 

auxiliary battery. If the auxiliary battery 

level is low, the main high voltage battery 

charges the auxiliary battery.

 Information

The Aux. Battery Saver+ function will 
be ON when the vehicle is delivered. If 
the function is not needed, you may turn 
it off in the Users Settings mode on the 
cluster. For more information, refer to the 
following page.

Mode

ś

Cycle Mode:

When the vehicle is OFF with all doors, 

hood and liftgate closed, the Aux. Battery 

Saver+ periodically activates according 

to the auxiliary battery status.

ś

Automatic Mode:

When the ignition switch is in the ON 

position with the charging connector 

plugged in, the function activates 

according to the auxiliary battery status 

to prevent overdischarge of the auxiliary 

battery.

01

1-55

 Information

ś

The Aux. Battery Saver+ activates 
maximum of 20 minutes. If the Aux. 
Battery Saver+ function activates 
more than 10 times consecutively, in 
the Automatic Mode the function will 
stop activating, judging that there is 
a problem with the auxiliary battery. 
In this case, drive the vehicle for some 
period of time. The function will start 
activating if the auxiliary battery 
returns to normal.

ś

The Aux. Battery Saver+ function 
cannot prevent battery discharge if the 
auxiliary battery is damaged, worn out, 
used as a power supply or unauthorized 
electronic devices are used.

ś

If the Aux. Battery Saver+ function was 
activated, the high voltage battery level 
may have decreased.

System Setting

OAEPHQ049855L

The driver can activate the Aux. Battery 

Saver+ function by placing the ignition 

switch to the ON position and by 

selecting:

œ8VHU6HWWLQJVƟ2WKHUƟ$X[%DWWHU\

Saver+’

The Aux. Battery Saver+ function 

deactivates, when the driver cancels the 

system setting.

 WARNING

ONX4EPHQ011025L

When the function is activating, the 

charging indicator lamp will be on in 

red and high voltage electricity will be 

flowing in the vehicle. Do not touch 

the high voltage electric wire (orange), 

connector, and all electric components 

and devices. This may cause electric 

shock and lead to injuries. Also, do not 

modify your vehicle in any way. This 

may affect your vehicle performance 

and lead to an accident.

Foreword/Starting your Hybrid/Plug-in hybrid vehicle

1-56

Warning and Indicator Lights

Ready indicator

This indicator illuminates:

When the vehicle is ready to be driven.


- ON : Normal driving is possible.


- OFF : Normal driving is not possible, 

or a problem has occurred.

When the ready indicator goes OFF, 

there is a problem with the system. If this 

occurs, have your vehicle inspected by 

an authorized HYUNDAI dealer.

EV mode indicator

This indicator illuminates:

When the vehicle is driven by the electric 

motor.

Charging Cable Connection 

Indicator (Plug-in hybrid 

vehicle)

This indicator illuminates in red when the 

charging cable is connected.

Service warning light

This warning light illuminates:

ś

When you set the ignition switch or 

the Engine Start/Stop button to the 

ON position.


- The service warning light illuminates 

for approximately 3 seconds and 

then turns off when all checks have 

been performed.

ś

When there is a problem with the 

hybrid vehicle control system or 

hardware.

When the warning light illuminates while 

driving, or does not go OFF after starting 

the vehicle, have the vehicle inspected 

by an authorized HYUNDAI dealer.

Regenerative brake warning 

light

(yellow)

This warning light illuminates:

When the regenerative brake does not 

operate and the brake does not perform 

well. This causes the Brake Warning 

light (red) and Regenerative Brake 

Warning Light (yellow) to illuminate 

simultaneously.
If this occurs, drive safely and have 

your vehicle inspected by an authorized 

HYUNDAI dealer. The operation of the 

brake pedal may be more difficult than 

normal and the braking distance may 

increase.

01

1-57

LCD Display Messages

Ready to start driving

OOSHQ019003L

This message is displayed when the 

vehicle is ready to be driven.

Check regenerative brakes

OOSHQ019004L

This message is displayed when 

the brake performance is low or the 

regenerative brake does not work 

properly due to a failure in the brake 

system.
If this occurs, it may take longer for the 

brake pedal to operate and the braking 

distance may become longer.

Stop vehicle and check brakes

OOSHQ019006L

This message is displayed when a failure 

occurs in the brake system.
If this occurs, park the vehicle in a safe 

location and tow your vehicle to the 

nearest authorized HYUNDAI dealer and 

have the vehicle inspected.

Check Hybrid system

OOSHQ019005L

This message is displayed when there is a 

problem with the hybrid control system. 

Refrain from driving when the warning 

message is displayed.
If this occurs, have the vehicle inspected 

by an authorized HYUNDAI dealer.

Foreword/Starting your Hybrid/Plug-in hybrid vehicle

1-58

Stop safely and check Hybrid system

OOSHQ019007L

This message is displayed when there 

is a problem with the hybrid control 

system. The “

” indicator will blink 

and a warning chime will sound for 

approximately 10 seconds until the 

problem is solved. Refrain from driving 

when the warning message is displayed.
If this occurs, have the vehicle inspected 

by an authorized HYUNDAI dealer.

Check Hybrid system. Do not start 

engine

OOSHQ019008L

This message is displayed when the 

hybrid battery power (SOC) level is low. 

A warning chime will sound until the 

problem is solved. Refrain from driving 

when the warning message is displayed.
If this occurs, have the vehicle inspected 

by an authorized HYUNDAI dealer.

Stop safely and check power supply

OOSHQ019009L

This message is displayed when a failure 

occurs in the power supply system.
If this occurs, park the vehicle in a safe 

location and tow your vehicle to the 

nearest authorized HYUNDAI dealer and 

have the vehicle inspected.

Check virtual engine sound system

OOSHQ019010L

This message is displayed when there is 

a problem with the Virtual Engine Sound 

System (VESS).
If this occurs, have the vehicle inspected 

by an authorized HYUNDAI dealer.

01

1-59

Refill inverter coolant

OOSHQ019012L

This message is displayed when the 

inverter coolant is nearly empty.
You should refill the inverter coolant.

Park with engine On to charge 

battery

OOSHQ019013L

This message is displayed when the 

hybrid battery power (SOC) level is low.
If this occurs, park the vehicle in a safe 

location and wait until the hybrid battery 

is charged.

Start engine to avoid battery 

discharge

OOSHQ019027L

This message is displayed to inform the 

driver the 12V battery may be discharged 

if the ignition switch is in ON position 

(without the 

 indicator ON).

Set the vehicle to the ready (

) mode 

to prevent the 12V battery from being 

discharged.


Content      ..      1      2      3      ..