Hyundai Elantra Hybrid (2024 year). Manual in english - page 5
 

  Index      Manuals     Hyundai Elantra Hybrid (2024 year). Manual in english


Search            copyright infringement  


Content      ..     3      4      5      6     ..


Hyundai Elantra Hybrid (2024 year). Manual in english - page 5


4-26

Instrument Cluster

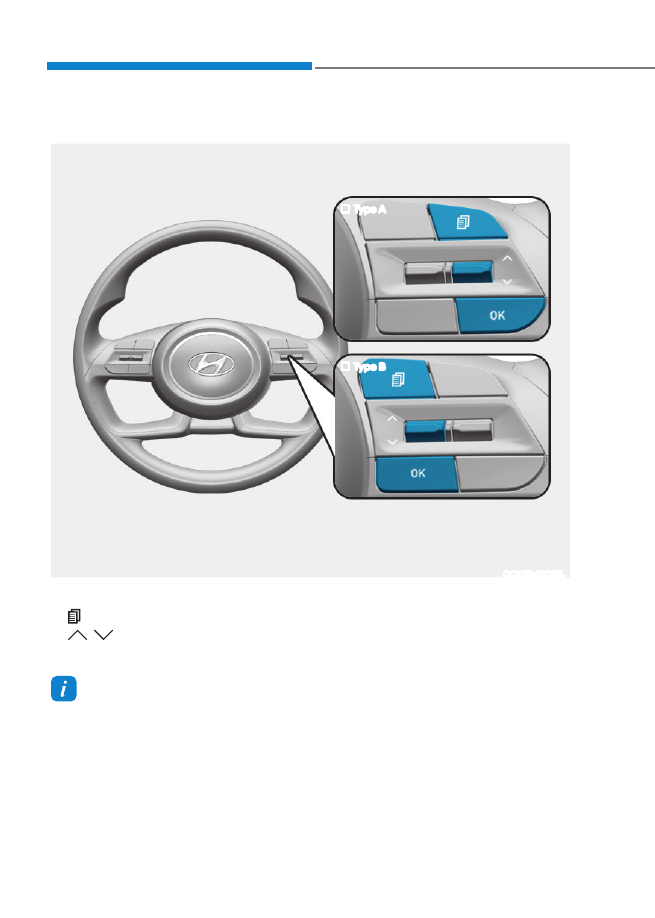
Cluster Display Control

OCN7040023L

„

„

Type A

„

„

Type B

The cluster display modes can be changed by using the control buttons.
1. 

 : MODE button for changing modes

2. 

 : MOVE switch for changing items

3.  OK : Push the SELECT/RESET button for setting or resetting the selected item

 Information

When the infotainment system is applied, only the User’s Setting mode on the 

infotainment system is supported but the User’s Setting mode on the instrument cluster is 

not supported.

CLUSTER DISPLAY (TYPE A)

04

4-27

Cluster Display Modes

Modes

Symbol

Explanation

Driving 

Assist


- Smart Cruise Control


- Lane Keeping Assist


- Lane Following Assist 

Trip 

Computer

This mode displays driving information such as the tripmeter, 

fuel economy, etc.

For more details, refer to "Trip Computer" in this chapter.

Turn By 

Turn (TBT)

This mode displays the state of the navigation.

User 

Settings

In this mode, you can change settings of the doors, lights, 

etc.

Warning


- This mode displays warning messages related to the 

lamp malfunction, etc.


- Tire pressure information

The information provided may differ depending on which functions are applicable 

to your vehicle.

Instrument Cluster

4-28

Trip computer mode

OCN7043100N

The trip computer mode displays 

information related to vehicle driving 

parameters including fuel economy, trip 

meter information and vehicle speed.
For more information, refer to "Trip 

Computer" in this chapter.

Turn By Turn (TBT) mode 

OIK047147N

This mode displays the state of the 

navigation.

Driving Assist mode

OCN7060074N

LKA/SCC

This group displays the state of the Smart 

Cruise Control, Lane Keeping Assist.
For more details, refer to each function 

information in chapter 7.

04

4-29

Master warning mode

OCN7H043028L

This warning light informs the driver the 

following situations.


- Forward Collision-Avoidance Assist 

malfunction (if equipped)


- Forward Collision-Avoidance Assist 

radar blocked (if equipped)


- Blind-Spot Collision-Avoidance Assist 

malfunction (if equipped)


- Blind-Spot Collision-Avoidance Assist 

radar blocked (if equipped)


- High Beam Assist malfunction (if 

equipped)


- Lamp malfunction (if equipped)


- Smart Cruise Control malfunction (if 

equipped)


- Tire Pressure Monitoring System 

(TPMS) malfunction (if equipped)

The Master Warning Light illuminates 

if one or more of the above warning 

situations occur. At this time, a Master 

Warning icon ( ) will appear beside the 

User Settings icon ( ), on the cluster 

display. (if equipped)
If the warning situation is solved, the 

master warning light will be turned 

off and the Master Warning icon will 

disappear.

OCN7H043033L

Tire Pressure

This mode displays information related to 

Tire Pressure.
For more information, refer to "Tire 

Pressure Monitoring System (TPMS)" in 

chapter 8.

Instrument Cluster

4-30

User Settings Mode

OCN7H043036L

In this mode, you can change the 

settings of the instrument cluster, doors, 

lamps, etc.
1.  Driver assistance
2.  ECO Vehicle
3.  Cluster
4.  Lights
5.  Door
6.  Convenience
7.  Units
8.  Language
9.  Reset
The information provided may differ 

depending on which functions are 

applicable to your vehicle.

Shift to P to edit settings / Engage parking 

brake to edit settings

This warning message illuminates if 

you try to select an item from the User 

Settings mode while driving.

• 

Dual clutch transmission
For your safety, change the User 

Settings after parking the vehicle, 

applying the parking brake and 

moving the shift level to P(Park).

Quick guide (Help)

This mode provides quick guides for the 

systems in the User Settings mode.
Select an item, press and hold the OK 

button.
For more details about each system, 

refer to this Owner’s Manual.

04

4-31

1.  Driver Assistance

Items

Explanation

Driving 

Convenience

• 

Smart Cruise Control
To set the Distance, Acceleration, Reaction Speed of Smart 

Cruise Control

For more details, refer to the "Smart Cruise Control (SCC)" in chapter 7.

Warning 

Methods

To adjust the warning methods of the driver assistance system.

• 

Warning Volume: High/Medium/Low

• 

Warning Volume: High/Medium/Low/Off (for Mexico and Israel)

• 

Haptic Warning

Driver Attention 

Warning

• 

Leading Vehicle Departure Alert
To activate or deactivate the Leading vehicle departure alert.

For more details, refer to the “Driver Attention Warning (DAW)” in 

chapter 7.

Driving Safety

• 

Forward Safety
To activate or deactivate the Forward Safety.

• 

Forward Safety Warning Timing
To adjust the Forward Safety warning timing of the driver 

assistance system.

For more details, refer to "Forward Collision–Avoidance Assist (FCA) 

(Sensor fusion)" in chapter 7.

• 

Lane Safety
To activate or deactivate the Lane Safety.

For more details, refer to " Lane Keeping Assist (LKA)" in chapter 7.

• 

Blind-Spot Safety
To activate or deactivate the Blind-Spot Safety.

For more details, refer to “ Blind-Spot Collision-Avoidance Assist 

(BCA)” in chapter 7.

• 

Exit Safety
To activate or deactivate the Exit Safety.

For more details, refer to “ Safe Exit Warning (SEW)” in chapter 7

Parking Safety

• 

Parking Distance Warning Auto ON
To activate or deactivate Parking Distance Warning Auto On.

For more details, refer to "Forward/Reverse Parking Distance 

Warning (PDW)" in chapter 7.

• 

Rear Cross-Traffic Safety
To activate or deactivate Rear Cross-Traffic Safety.

For more details, refer to “Rear Cross-Traffic Collision-Avoidance 

Assist(RCCA)” in chapter 7.

Instrument Cluster

4-32

2.  Cluster

Items

Explanation

Theme Selection

To activate or deactivate the service interval function.

• 

CLASSIC A/CLASSIC B/CLASSIC C/CUBE

Wiper/Lights Display

When the wiper switch or light switch is operated while 

the wiper/light mode display function is set, the selected 

position is temporarily displayed on the cluster. When it is 

off, it doesn't show up.

Traffic Signs

To activate or deactivate the traffic information.
When activated, the traffic information will be displayed 

on the cluster display.

Icy Road Warning

To activate or deactivate the icy road warning function.

Cluster Voice Guidance 

Volume

To adjust the cluster voice guidance volume.

Welcome Sound

To activate or deactivate the welcome sound.

3.  Lights

Items

Explanation

Illumination

To adjust the illumination level.

• 

Level 1-20

One Touch 

Turn Signal

• 

Off: The one touch turn signal function will be deactivated.

• 

3, 5, 7 Flashes: The turn signal indicator will blink 3, 5, or 7 times 

when the turn signal lever is moved slightly.

For more details, refer to “Exterior lights” in chapter 5.

Headlight 

Delay

• 

To activate or deactivate the headlight delay function.

For more details, refer to “Exterior lights” in chapter 5.

High Beam 

Assist

• 

To activate or deactivate the High Beam Assist function.

For more details, refer to “High beam assist (HBA)” in chapter 5.

04

4-33

4.  Door

Items

Explanation

Auto Lock

• 

Enable on Shift: All doors will be automatically locked if the dual 

clutch transmission shift lever is moved from the P (Park) position 

to the R (Reverse), N (Neutral), or D (Drive) position. (Only when the 

engine is running)

• 

Enable on Speed: All doors will be automatically locked when the 

vehicle speed exceeds 9.3 mph (15 km/h).

• 

Disable: The auto door lock operation will be deactivated.

Auto Unlock

• 

On Shift to P: All doors will be automatically unlocked if the dual 

clutch transmission shift lever is moved to P (Park) position. (Only 

when the engine is running)

• 

On key out/Vehicle Off: All doors will be automatically unlocked 

when t he ignition key is removed from the ignition switch is set to 

the LOCK/OFF position.

• 

Disable: The auto door unlock operation will be canceled.

Two Press 

Unlock

• 

Off: The two press unlock function will be deactivated. Therefore, all 

doors will unlock if the door unlock button is pressed.

• 

On: Only the driver’s door will unlock if the door unlock button is 

pressed. When the door unlock button is pressed again within 4 

seconds, the remaining doors will unlock.

Horn 

Feedback

To activate or deactivate the horn feedback.
If the horn feedback is activated, after locking the door by pressing the 

lock button on the remote key, and pressing it again within 4 seconds, 

the horn feedback sound will operate once to indicate that all doors 

are locked (if equipped with remote key).

Smart Trunk

To activate or deactivate the smart trunk.
For more details, refer to “Smart trunk” in chapter 5.

Instrument Cluster

4-34

5.  Convenience

Items

Explanation

Seat Easy 

Access

• 

Off: The seat easy access function is deactivated.

• 

Normal/Extended: When you turn off the engine, the driver’s seat 

will automatically move rearward short (Normal) or long (Extended) 

for you to enter or exit the vehicle more comfortably.

For more details, refer to “Integrated memory system” in chapter 5.

Rear 

Occupant 

Alert

• 

To activate or deactivate the rear occupant alert system.

For more details, refer to the “Rear Occupant Alert (ROA)" in chapter 5.

Service 

Interval

• 

To activate or deactivate the service interval.
When the 'Enable Service Interval' function is set, you can enter the 

mileage (km) and duration (months).

Welcome 

Mirror/Light

• 

On door unlock: The side view mirrors are unfolded and the 

welcome light turns on automatically when the doors are unlocked.

• 

On driver approach: The side view mirrors are unfolded and 

the welcome light turns on automatically when the vehicle is 

approached with the smart key.

For more details, refer to “Welcome system” in chapter 5.

Wireless 

Charging 

System

To activate or deactivate the wireless charging system in the front seat.
For more details, refer to “Wireless cellular phone charging system” in 

chapter 5.

04

4-35

6.  Units

Items

Explanation

Speed Unit (if equipped)

To select the speed unit. (km/h, MPH)

Temperature Unit

To select the temperature unit. (°C,°F)

Fuel Economy Unit

To select the fuel economy unit. (km/L, L/100km, MPG)

Tire Pressure Unit

To select the tire pressure unit. (psi, kPa, bar)

7.  Language (if equipped)

Items

Explanation

Language

Choose the language. You can choose the language in infotainment 

syste m. (if equipped)

8.  Reset

Items

Explanation

Reset

You can reset the menus in the User Settings Mode. All menus in the 

User Settings Mode are reset to factory settings, except language and 

service interval.

4-36

Instrument Cluster

Cluster Display Control

OCN7040023L

„

„

Type A

„

„

Type B

The cluster display modes can be changed by using the control buttons.

Switch

Operation

Function

Tap

MODE button for changing view modes

Tap

MOVE switch for changing items

OK

Tap

SELECT/RESET button for setting the selected item

Tap and hold

SELECT/RESET button for retrieving assist information or 

resetting the selected item

 Information

When the infotainment system is applied, only the User’s Setting mode on the 

infotainment system is supported but the User’s Setting mode on the instrument cluster is 

not supported.

CLUSTER DISPLAY (TYPE B)

04

4-37

Cluster Display Modes

Modes

Symbol

Explanation

Driving Assist

• 

Lane Keeping Assist

• 

Smart Cruise Control

• 

Lane Following Assist

Trip Computer

This mode displays driving information such as the 

tripmeter, fuel economy, etc.

For more details, refer to "Trip Computer" in this chapter.

Turn By Turn (TBT)

This mode displays the state of the navigation.

Warning

This mode displays warning messages related to the 

lamp malfunction, tire pressure information & coolant 

temperature, etc. 

The information provided may differ depending on which functions are applicable 

to your vehicle.

Instrument Cluster

4-38

Driving Assist group

OCN7043092

SCC/HDA/LKA

This group displays the state of Smart 

Cruise Control, Lane Following Assist and 

Highway Driving Assist.
For more details, refer to each function 

information in chapter 7.

Trip computer group 

OCN7043100N

The trip computer group displays 

information related to vehicle driving 

parameters including fuel economy, 

tripmeter information and vehicle speed. 
For more details, refer to "Trip computer" 

in this chapter.

Turn By Turn (TBT) group

OIK047147N

This group displays the state of the 

navigation.

04

4-39

Master warning group

OCN7H043028L

This warning light informs the driver the 

following situations.

• 

Forward Collision-Avoidance Assist 

system malfunction

• 

Forward Collision-Avoidance Assist 

radar blocked

• 

Blind-Spot Collision-Avoidance Assist 

system malfunction (if equipped)

• 

Blind-Spot Collision-Avoidance Assist 

radar blocked (if equipped)

• 

Lamp malfunction (if equipped)

• 

High Beam Assist malfunction (if 

equipped)

• 

Smart Cruise Control malfunction (if 

equipped)

• 

Tire Pressure Monitoring System 

malfunction (if equipped)

The Master Warning Light illuminates 

if one or more of the above warning 

situations occur.
At this time, a Master Warning icon ( ) 

will appear beside the User Settings icon 

( ), on the cluster display.
If the warning situation is solved, the 

master warning light will be turned 

off and the Master Warning icon will 

disappear.

OCN7H043033L

Tire Pressure

This mode displays information related to 

Tire Pressure.
For more details, refer to “Tire pressure 

monitoring system (TPMS)” in chapter 8.

OCN7H043043L

Coolant temperature

This mode displays information of 

coolant temperature.

Instrument Cluster

4-40

Trip Computer

The trip computer is a microcomputer-

controlled driver information system that 

displays information related to driving.

 Information

Some driving information stored in the 

trip computer (for example Average 

Vehicle Speed) resets if the battery 

connector is disconnected.

Trip modes

Since refueling

Since reset

Energy flow

 • 

Tripmeter

 • 

Elapsed time

 • 

Fuel economy

 • 

Tripmeter

 • 

Elapsed time

 • 

Fuel economy

Digital Speedometer

Current Trip

 • 

Tripmeter

 • 

Elapsed time

 • 

Fuel economy

ODN8A069203

To change the trip mode, toggle the “

” switch on the steering wheel.

Pressing the OK button for more than 1 

second resets the displayed mode.

04

4-41

Since refueling

OCN7043112N

After the vehicle has been refueled, 

the trip distance, total driving time and 

average fuel economy appear.
To reset manually, press the 

OK

 button 

on the steering wheel for more than 1 

second when "

Since Refueling

" appears.

Since Reset

OCN7043113N

Accumulated trip distance, total driving 

time, and average fuel economy appear.
The information is accumulated starting 

from the last reset.
To reset manually, press the 

OK

 button 

on the steering wheel for more than 1 

second when "

Since Reset

" appears.

Instrument Cluster

4-42

Current trip

OCN7043100N

Current trip distance, total driving time, 

and average fuel economy appear.
The information is combined for each 

ignition cycle. However, when the engine 

has been OFF for 4 hours or longer the 

Drive Info screen will reset.
To manually reset the information, press 

and hold the OK button when viewing 

the Drive Info. The trip distance, the 

average fuel economy, and total driving 

time will reset simultaneously.
The driving information will continue 

to be counted while the engine is still 

running (for example, when the vehicle is 

in traffic or stopped at a stop light).

 Information

The vehicle must be driven for a minimum 

of 0.19 miles (300 meters) since the last 

ignition key cycle before the average fuel 

economy will be recalculated.

Energy flow 

OCN7H043031L

This mode displays the engine status 

for each area, such as the power 

transmission status of the hybrid system 

according to the driving condition, 

starting and accelerating, constant 

speed driving, and deceleration.
For more details, refer to “Energy flow” 

in chapter 1.

Digital speedometer

OIK047151N

The digital speedometer display shows 

the speed of the vehicle.

04

4-43

VEHICLE SETTINGS 

(INFOTAINMENT SYSTEM)

Vehicle Settings in the infotainment 

system provides user options for a 

variety of settings including door lock/

unlock features, convenience features, 

driver assistance settings, etc.
Vehicle Settings menu

• 

Driver Assistance

• 

Cluster

• 

Climate

• 

Seat

• 

Lights

• 

Door

• 

Convenience

These options may differ depending on 

which functions are available on your 

vehicle.

 WARNING

Do not operate the Vehicle Settings 

while driving. This may cause 

distraction resulting in an accident.

SETTING YOUR VEHICLE

OCN7043094

1.  Press the SETUP button on the main 

keyboard. 

2.  Select 

Vehicle

 to change the Vehicle 

Settings.

The infotainment system may change 

after software updates. For more 

information, refer to the user's manual 

provided in the infotainment system and 

the quick reference guide.

5. Convenience Features

Convenience Features

Accessing Your Vehicle ..................................................................................5-4

Remote Key ............................................................................................................... 5-4

Smart Key ...................................................................................................................5-7

Immobilizer System ................................................................................................5-14

Hyundai Digital Key ......................................................................................5-16

Digital Key (Smartphone) ........................................................................................5-16

Digital Key (Card Key) .............................................................................................. 5-21

Used Vehicle/Digital Key Maintenance ................................................................ 5-26

Limitations of the System ...................................................................................... 5-26

Door Locks .................................................................................................... 5-27

Operating Door Locks from Outside the Vehicle ..................................................5-27

Operating Door Locks from Inside the Vehicle .................................................... 5-29

Automatic Door Lock and Unlock Features ...........................................................5-31

Child-Protector Rear Door Locks ...........................................................................5-31

Rear Occupant Alert (ROA) ......................................................................... 5-32

Rear Occupant Alert Operation ............................................................................. 5-32

Theft-Alarm System ..................................................................................... 5-33
Driver Position Memory System ................................................................. 5-34

Storing Memory Positions ..................................................................................... 5-34

Recalling Memory Positions .................................................................................. 5-34

Resetting Integrated Memory System .................................................................. 5-35

While Resetting the Integrated Memory System ................................................. 5-35

Seat Easy Access Operation .................................................................................. 5-36

Steering Wheel ............................................................................................. 5-37

Motor Driven Power Steering (MDPS) .................................................................. 5-37

Tilt Steering / Telescope Steering ......................................................................... 5-38

Horn......................................................................................................................... 5-39

Mirrors ..........................................................................................................5-40

Inside Rearview Mirror ...........................................................................................5-40

Side View Mirrors ...................................................................................................5-48

Windows .......................................................................................................5-50

Power Windows .......................................................................................................5-51

Sunroof ......................................................................................................... 5-55

Sunshade ................................................................................................................ 5-55

Tilt Open/Close.......................................................................................................5-56

Slide Open/Close ...................................................................................................5-56

Automatic Reversal ................................................................................................ 5-57

Resetting the Sunroof ............................................................................................5-58

Sunroof Open Warning ..........................................................................................5-58

5

5

Hood .............................................................................................................5-59
Trunk ............................................................................................................. 5-61

Opening the Trunk ...................................................................................................5-61

Emergency Trunk Safety Release ..........................................................................5-62

Smart Trunk with Auto Open .................................................................................5-63

Fuel Filler Door .............................................................................................5-66

Opening the Fuel Filler Door .................................................................................5-66

Closing the Fuel Filler Door ................................................................................... 5-67

Exterior Lights ..............................................................................................5-69

Lighting Control......................................................................................................5-69

High Beam Operation ............................................................................................ 5-70

Turn Signals and Lane Change Signals .................................................................. 5-71

Battery Saver Function ........................................................................................... 5-71

Headlight Delay Function .......................................................................................5-72

Daytime Running Light (DRL) .................................................................................5-72

High Beam Assist (HBA) .............................................................................. 5-73

High Beam Assist Settings ......................................................................................5-73

High Beam Assist Operation ...................................................................................5-74

High Beam Assist Malfunction and Limitations ....................................................5-74

Interior Lights ............................................................................................... 5-76

Interior Lights Auto Off .......................................................................................... 5-76

Front Lamps ............................................................................................................ 5-76

Room Lamp .............................................................................................................5-77

Luggage Compartment Lamp ............................................................................... 5-78

Vanity Mirror Lamp ................................................................................................. 5-78

Welcome System .................................................................................................... 5-79

Wipers and Washers ................................................................................... 5-80

Windshield Wipers .................................................................................................5-80

Windshield Washers ................................................................................................5-81

Automatic Climate Control System ............................................................5-82

Automatic Heating and Air Conditioning .............................................................5-83

Manual Heating and Air Conditioning ..................................................................5-84

System Operation ...................................................................................................5-90

System Maintenance .............................................................................................5-92

Windshield Defrosting and Defogging .......................................................5-94

Automatic Climate Control System.......................................................................5-94

Defogging Logic .....................................................................................................5-95

Auto Defogging System .........................................................................................5-96

Defroster ................................................................................................................. 5-97

5

Climate Control Additional Features ..........................................................5-98

Sunroof Inside Air Recirculation ............................................................................5-98

Auto Comfort Control (for driver’s seat) ...............................................................5-98

Automatic Ventilation ............................................................................................5-98

Storage Compartment .................................................................................5-99

Center Console Storage .........................................................................................5-99

Glove Box ................................................................................................................5-99

Interior Features ......................................................................................... 5-100

Cup Holder ............................................................................................................ 5-100

Sunvisor ................................................................................................................. 5-101

Power Outlet .......................................................................................................... 5-101

USB Charger ..........................................................................................................5-102

Wireless Cellular Phone Charging System ..........................................................5-103

Clock ......................................................................................................................5-105

Clothes Hanger ......................................................................................................5-105

Infotainment System ................................................................................. 5-106

USB Port ................................................................................................................ 5-106

Antenna ..................................................................................................................5-107

Steering Wheel Audio Control ............................................................................. 5-108

Infotainment System  ........................................................................................... 5-109

Voice Recognition  ........................................................................................................5-109

Bluetooth® Wireless Technology hands-free  ..................................................... 5-109

How Vehicle Radio Works ..................................................................................... 5-110

5. Convenience Features

Convenience Features

5-4

Remote Key (if equipped)

OIG046001

Your HYUNDAI uses a remote key, which 

you can use to lock or unlock the driver 

and passenger doors or the rear trunk.
(1)  Door Lock
(2)  Door Unlock
(3)  Trunk Unlock 
(4)  Panic 

Locking (1)

To lock your vehicle:
1.  Make sure all doors, the engine hood 

and the trunk are closed.

2.  Press the Door Lock button (1) on the 

remote key to lock all doors.

3.  The doors will lock and the hazard 

warning lights will blink. 

4.  Make sure the doors are locked by 

checking the position of the door lock 

button inside the vehicle.

 WARNING

Do not leave the keys in your 

vehicle with unsupervised children. 

Unattended children could place the 

key in the ignition switch and may 

operate power windows or other 

controls, or even make the vehicle 

move, which could result in serious 

injury or death.

Unlocking (2) 

To unlock your vehicle:
1.  Press the Door Unlock button (2) on 

the remote key.

2.  The driver’s door will unlock. The 

hazard warning lights will blink two 

times. 

Two press unlock setting:

If you press the Door Unlock button 

on the remote key again within four 

seconds, then all the doors will unlock.
Two press unlock setting can be changed 

according to owner’s preference in the 

cluster User Settings mode.

User settings mode method:

You can activate or deactivate the Two 

Press Unlock feature from the Settings 

menu in the instrument cluster.
Select: 

User Settings

 > 

Door 

Two Press 

Unlock

 Information

After unlocking the doors, the doors will 

automatically relock after 30 seconds 

unless a door is opened.

ACCESSING YOUR VEHICLE

05

5-5

Opening the trunk (3)

To unlock the trunk :
1.  Press and hold the Trunk Unlock 

button (3) on the remote key for more 

than one second.

2.  The hazard warning lights will blink 

two times and the trunk will be 

unlocked. 

3.  Once the trunk is opened and then 

closed, the trunk will automatically 

lock.

 Information

The word “HOLD” is written on the 

button to inform you that you must press 

and hold the button for more than one 

second.

Using panic alarm (4)

Press and hold the Panic button (4) for 

more than one second. The horn sounds 

and hazard warning lights flash for about 

30 seconds.
To cancel the panic mode, press any 

button on the remote key.

Starting the vehicle

For information, refer to the “Key Ignition 

Switch” section in chapter 6.

NOTICE

To prevent damaging the remote key:

• 

Keep the remote key away from 

water or any liquid and fire. Internal 

circuits may malfunction if the inside 

of the remote key gets damp (from 

liquids or moisture) or if it is heated. 

This can exclude the remote key from 

being covered under warranty.

• 

Avoid dropping or throwing the 

remote key.

• 

Protect the remote key from extreme 

temperatures.

Mechanical key

OIG046004

If the remote key does not operate 

normally, you can lock or unlock the 

driver’s door by using the mechanical 

key.
To unfold the mechanical key, press the 

release button on the remote.
To return the key to its stored position, 

press the release button and fold the key 

back into the remote.

Remote key precautions

The remote key will not work if any of the 

following occur:

• 

The key is in the ignition switch.

• 

You exceed the operating distance 

limit (about 33 feet [10 m]).

• 

The remote key battery is weak.

• 

Other vehicles or objects may be 

blocking the signal.

• 

The weather is extremely cold.

• 

The remote key is close to a radio 

transmitter such as a radio station or 

an airport which can interfere with 

normal operation of the remote key.

If the remote key does not work 

correctly, open and close the door 

with the mechanical key. If you have a 

problem with the remote key contact an 

authorized HYUNDAI dealer.

Convenience Features

5-6

If the remote key is in close proximity to 

your mobile phone, the signal could be 

blocked by your mobile phone’s normal 

operational signals. This is specifically 

relevant when the phone is active such 

as making and receiving calls, text 

messaging, and/or sending/receiving 

emails.
When possible, avoid placing the remote 

key and your mobile phone in the same 

location such as a pants or jacket pocket 

in order to avoid interference between 

the two devices.

 Information

This device complies with Part 15 of the 

FCC rules.

Operation is subject to the following three 

conditions:

1. 

This device may not cause harmful 

interference.

2. 

This device must accept any 

interference received, including 

interference that may cause undesired 

operation.

3. 

Changes or modifications not expressly 

approved by the party responsible 

for compliance could void the user’s 

authority to operate the device.

NOTICE

Keep the remote key away from 

electromagnetic materials that block 

electromagnetic waves to the key 

surface.

Battery replacement

OPD046002

If the remote key is not working properly, 

try replacing the battery with a new one.
Battery Type: CR2032
To replace the battery:
1.  Insert a slim tool into the slot and 

gently pry open the cover.

2.  Using a screw driver, remove the 

battery cover.

3.  Remove the old battery and insert the 

new battery. Make sure the battery 

position is correct.

4.  Reinstall the battery cover and key 

cover in the reverse order  of removal.

If you suspect your remote key might 

have sustained some damage, or you feel 

your remote key is not working correctly 

contact an authorized HYUNDAI dealer.

 WARNING

THIS PRODUCT CONTAINS A BUTTON 

BATTERY.
If swallowed, a lithium button battery 

can cause severe or fatal injuries within 

2 hours. Keep batteries out of reach of 

children.
If you think batteries may have been 

swallowed or placed inside any part 

of the body, seek immediate medical 

attention.

05

5-7

 Information

An inappropriately disposed 

battery can be harmful to the 

environment and human health. 

Dispose of the battery according 

to your local law(s) or regulation.

Smart Key (if equipped)

„

„

Type A

OCN7053005

„

„

Type B

OCN7053004

Your HYUNDAI uses a smart key, which 

you can use to lock or unlock a door (and 

trunk) and even start the engine even just 

carrying the key.
(1)  Door Lock
(2)  Door Unlock
(3)  Trunk Open
(4)  Panic
(5)  Remote Start (if equipped)

Locking your vehicle (1)

Button type

OCN7050078

1.  Close all doors, engine hood and 

trunk. 

2.  Have the smart key with you. 
3.  Press the door handle button or press 

the Door Lock button (1) on the smart 

key. The chime sounds and hazard 

warning lights blink. Also, the side 

view mirrors fold if 

On door unlock 

or 

On driver approach 

is selected from 

the Settings menu in the instrument 

cluster or infotainment system (if 

equipped).

4.  Make sure the doors are locked by 

pulling the door outside handle. 

 Information

The door handle button will only operate 

when the smart key is within 28~40 inches 

(0.7~1 m) from the outside door handle.

Convenience Features

5-8

Touch sensor type 

OCN7050092N

1.  Close all doors, engine hood and 

trunk. 

2.  Have the smart key with you. 
3.  Touch the outer part of the door 

handle on or near the handle detent 

for about 1 second or until you hear 

the door locks actuate. The chime 

sounds and hazard warning lights 

blink. Also, the side view mirrors 

fold if 

On door unlock

 or 

On driver 

approach 

is selected from the 

Settings menu in the instrument 

cluster or infotainment system (if 

equipped).

4.  Make sure the doors are locked by 

pulling the door outside handle. 

 Information

• 

The door handle button will only 

operate when the smart key is within 

28~40 inches (0.7~1 m) from the outside 

door handle.

• 

If you locked the door with the touch 

sensor on the door handle, the doors 

cannot be unlocked with the sensor 

within 3 seconds.

 Information

Even though you press the outside door 

handle button or touch the touch sensor, 

the doors will not be locked and the chime 

will sound for 3 seconds if any of the 

following occurs:

• 

The Smart Key is in the vehicle

• 

The Engine Start/Stop button is in ACC 

or ON position.

• 

Any door except the trunk is opened.

 CAUTION

When you leave your vehicle with 

the smart key, make sure to press the 

button on the front door handle or 

touch the touch sensor on the front 

door handle to lock the doors after 

closing all of the doors, the hood and 

the trunk. If you do not press the button 

or touch the touch sensor firmly, the 

doors might not be locked so please use 

caution.

 WARNING

Do not leave the Smart Key in your 

vehicle with unsupervised children. 

Unattended children could press the 

Engine Start/ Stop button and may 

operate power windows or other 

controls, or even make the vehicle 

move, which could result in serious 

injury or death.

05

5-9

Unlocking your vehicle (2)

Button type

OCN7050078

To unlock:
1.  Have the smart key with you.
2.  Press the door handle button or press 

the Door Lock button (2) on the smart 

key. The chime sounds and hazard 

warning lights blink two times. Also, 

the side view mirrors unfold if 

On 

door unlock 

or 

On driver approach 

is selected from the Settings menu in 

the instrument cluster or infotainment 

system (if equipped).

• 

If you unlock the doors using the 

passenger side door handle, all the 

doors are unlocked. If you unlock 

the doors using the driver side door 

handle, either the driver’s side door 

is unlocked or all the doors are 

unlocked depending on the setting 

for the Two Press Unlock feature. 

Change the Driver Door unlock 

mode by referring to “Setting the 

Two Press Unlock feature”.

Touch sensor type

OCN7050093N

To unlock:
1.  Have the smart key with you.
2.  Grab the door handle to activate the 

door unlock touch sensor. The chime 

sounds and hazard warning lights 

blink two times. Also, the side view 

mirrors unfold if 

On door unlock 

or 

On driver approach 

is selected from 

the Settings menu in the instrument 

cluster or infotainment system (if 

equipped).

• 

If you unlock the doors using the 

passenger side door handle, all the 

doors are unlocked. If you unlock 

the doors using the driver side door 

handle, either the driver’s side door 

is unlocked or all the doors are 

unlocked depending on the setting 

for the Two Press Unlock feature. 

Change the Driver Door unlock 

mode by referring to “Setting the 

Two Press Unlock feature”.

 Information

• 

The door handle button or touch sensor 

only operates when the smart key is 

within 28-40 in. (0.7-1 m) from the 

outside door handle.

• 

After unlocking the doors, the doors 

are locked automatically after 30 

seconds unless a door is opened.

Convenience Features

5-10

Two Press Unlock Feature

You can activate or deactivate the Two 

Press Unlock feature from the Settings 

menu in the instrument cluster or 

infotainment system. Select:

• 

User Settings

 > 

Door 

Two Press 

Unlock 

(for instrument cluster type)

• 

Settings 

Vehicle 

Door 

Two Press 

Unlock 

(for infotainment system type)

 Information

• 

For more information on the cluster 

type Settings menu, refer to the 

“Cluster display (Type A)” section in 

chapter 4.

• 

The infotainment system may change 

after software updates. For more 

information, refer to the user’s manual 

provided in the infotainment system 

and the quick reference guide.

Setting the door lock/unlock prevention 

feature

The doors may lock or unlock if the touch 

sensor of the outside door handle is 

recognized while washing your vehicle or 

due to heavy rain.
To prevent unintentional door lock or 

unlock:
Press the lock button on the smart key 

and immediately press the unlock button 

along with the lock button for more than 

4 seconds. The hazard warning lights 

blink four times. At this time, the doors 

do not lock or unlock even though the 

touch sensor is touched on the outside 

door handle. To deactivate the function, 

press the door lock or unlock button on 

the smart key.

 Information

• 

During a car wash or rain, in order 

to minimize unintentional operation 

of the touch sensor, the touch sensor 

may become insensitive. This is not a 

malfunction.

• 

The doors may not lock or unlock in 

the following situations.


-

If the touch sensor is touched with 

gloves on.


-

If the door is suddenly approached.

Unlocking the trunk (3)

To open: 
1.  Make sure you have the smart key in 

your possession.

2.  Press the trunk open/close button on 

the vehicle or press and hold the trunk 

Open button (3) on the smart key 

for more than 1 second. The hazard 

warning lights blink twice and the 

trunk is unlocked.

3.  Pull up on the trunk to open.

Using panic alarm (4)

The horn sounds and the hazard warning 

lights blink for about 30 seconds if this 

button (4) is pressed for more than 1 

second. To stop the horn and lights, 

press any button on the smart key.

05

5-11

Remotely starting the vehicle (5) (if 

equipped)

You can start the engine and turn on the 

climate system by pressing the remote 

start button (5) outside the vehicle.
To start and stop engine remotely :
1.  Press the door lock button (1), and 

then the hazard warning lights blink 

once to alert you.

2.  Press the Remote Start button (5) 

for more than 2 seconds to start the 

engine within 4 seconds after pressing 

the door lock button (1).

3.  If you want to stop the engine, press 

the Remote Start button (5) again.

In case of the manual operation, 

the climate control system will be 

maintained even when the engine is 

turned OFF. However, the automatic 

operation is set to 72°F (22°C).
If someone without a designated smart 

key attempts to drive your vehicle after 

you remotely started it, the engine will 

be stopped.

 Information

After remotely starting the vehicle, the 

engine will turn off after 10 minutes if the 

vehicle is not driven. 

 CAUTION

• 

The remote start will not work if you 

exceed the operating distance limit 

(about 33 ft. (10 m)).

• 

Avoid idling the engine for prolonged 

periods to follow the emission 

regulations in your locality.

• 

Laws in your locality may restrict the 

use of remote start. You should check 

locality regulations before using this 

remote starting system.

• 

It is only possible to start the engine 

remotely when shifted to P (Park).

• 

If the hood or the trunk is opened, 

you cannot start the engine 

remotely.

 Information

If the smart key is not moved for some 

time, the detection function for smart key 

operation will pause. Lift the smart key to 

activate the detection again.

Convenience Features

5-12

Starting the vehicle

You can start the engine without 

inserting the key. 
For detailed information refer to the 

Engine Start/ Stop button in chapter 6.

 Information

If the smart key is not moved for some 

time, the detection function for smart key 

operation will pause. Lift the smart key to 

activate the detection again. 

NOTICE

To prevent damaging the smart key:

• 

Keep the smart key away from water 

or any liquid and fire. If the inside 

of the smart key gets damp (due to 

drinks or moisture), or is heated, 

internal circuit may malfunction and 

may void the vehicle warranty.

• 

Avoid dropping or throwing the 

smart key.

• 

Protect the smart key from extreme 

temperatures.

NOTICE

Always have the smart key with you 

when leaving the vehicle. If the smart 

key is left near the vehicle, the vehicle 

battery may be discharged.

Mechanical key

If the Smart Key does not operate 

normally, you can lock or unlock the 

driver’s door by using the mechanical 

key.

OCN7053008

Turn the knob (2) of the mechanical key 

after removing the key protector (1).
After using the mechanical key, turn the 

key knob (2) and insert the key protector 

(1).

Loss of a smart key

A maximum of two Smart Keys can be 

registered to a single vehicle. If you 

happen to lose your smart key, you 

should immediately take the vehicle 

and remaining keys to your authorized 

HYUNDAI dealer or tow the vehicle, if 

necessary.

Smart key precautions

The smart key may not work if any of the 

following occur:

• 

The smart key is close to a radio 

transmitter such as a radio station or 

an airport which can interfere with 

normal operation of the transmitter.

• 

The smart key is near a mobile two 

way radio system or a cellular phone.

• 

Another vehicle’s smart key is being 

operated close to your vehicle.

05

5-13

• 

If your windows are tinted, especially 

with metallic window tint, it may 

cause frequency interference, 

reducing the smart key operating 

range.

If the smart key does not work correctly, 

open and close the door with the 

mechanical key. If you have a problem 

with the smart key, contact an authorized 

HYUNDAI dealer.
If the smart key is in close proximity to 

your mobile phone, the signal could be 

blocked by your mobile phone’s normal 

operational signals. This is specifically 

relevant when the phone is active such 

as making and receiving calls, text 

messaging, and/or sending/receiving 

emails. When possible, avoid keeping 

the smart key and your mobile phone in 

the same location such as pants or jacket 

pocket in order to avoid interference 

between the two devices.

 Information

This device complies with Part 15 of the 

FCC rules.

Operation is subject to the following three 

conditions:

1. 

This device may not cause harmful 

interference, and

2. 

This device must accept any 

interference received, including 

interference that may cause undesired 

operation.

3. 

Changes or modifications not expressly 

approved by the party responsible 

for compliance could void the user’s 

authority to operate the device. 

NOTICE

Keep the smart key away from 

electromagnetic materials that blocks 

electromagnetic waves to the key 

surface.

Battery replacement

Battery Type: CR2450
To replace the battery:

2C_RemoveSmartKeyCover

1.  Put the slim tool into the key hole 

(1) to pry open the rear cover of the 

smart key.

2C_ReplaceSmartKeyBattery

2.  Remove the old battery and insert the 

new battery. Make sure the battery 

position is correct.

3.  Reinstall the rear cover of the smart key.
If you suspect your smart key might have 

sustained some damage, or you feel 

your smart key is not working correctly, 

contact an authorized HYUNDAI dealer.

Convenience Features

5-14

 WARNING

THIS PRODUCT CONTAINS A BUTTON 

BATTERY.
If swallowed, a lithium button battery 

can cause severe or fatal injuries within 

2 hours. Keep batteries out of reach of 

children.
If you think batteries may have been 

swallowed or placed inside any part 

of the body, seek immediate medical 

attention.

 Information

An inappropriately disposed 

battery can be harmful to the 

environment and human health. 

Dispose of the battery according 

to your local law(s) or regulation.

Immobilizer System 

The immobilizer system protects your 

vehicle from theft. If an improperly 

coded key (or other device) is used, the 

engine’s fuel system is disabled.
When the ignition switch is placed in 

the ON position, the immobilizer system 

indicator should come on briefly, then 

go off. If the indicator starts to blink, the 

system does not recognize the coding of 

the key.
Turn the ignition switch to the LOCK/OFF 

position, then turn the ignition switch to 

the ON position again.
In some circumstances, the vehicle may 

not recognize your smart key if another 

smart key device is nearby or a metal 

object such as a key chain is causing 

interference with the smart key.
If this occurs, your vehicle may not 

start. Remove any metal objects or 

additional keys near the smart key before 

attempting to start the vehicle again.
If the system repeatedly does not 

recognize the coding of the key, contact 

your HYUNDAI dealer.
Do not attempt to alter this system 

or add other devices to it. Electrical 

problems could result that may make 

your vehicle inoperable.

 WARNING

In order to prevent theft of your 

vehicle, do not leave spare keys 

anywhere in your vehicle. Your 

immobilizer password is a customer 

unique password and should be kept 

confidential.


Content      ..     3      4      5      6     ..