Hyundai Santa Fe (2023 year). Manual in english - page 9
Convenience features
Automatic heating and air
conditioning
The Automatic Climate Control System
is controlled by setting the desired
temperature.
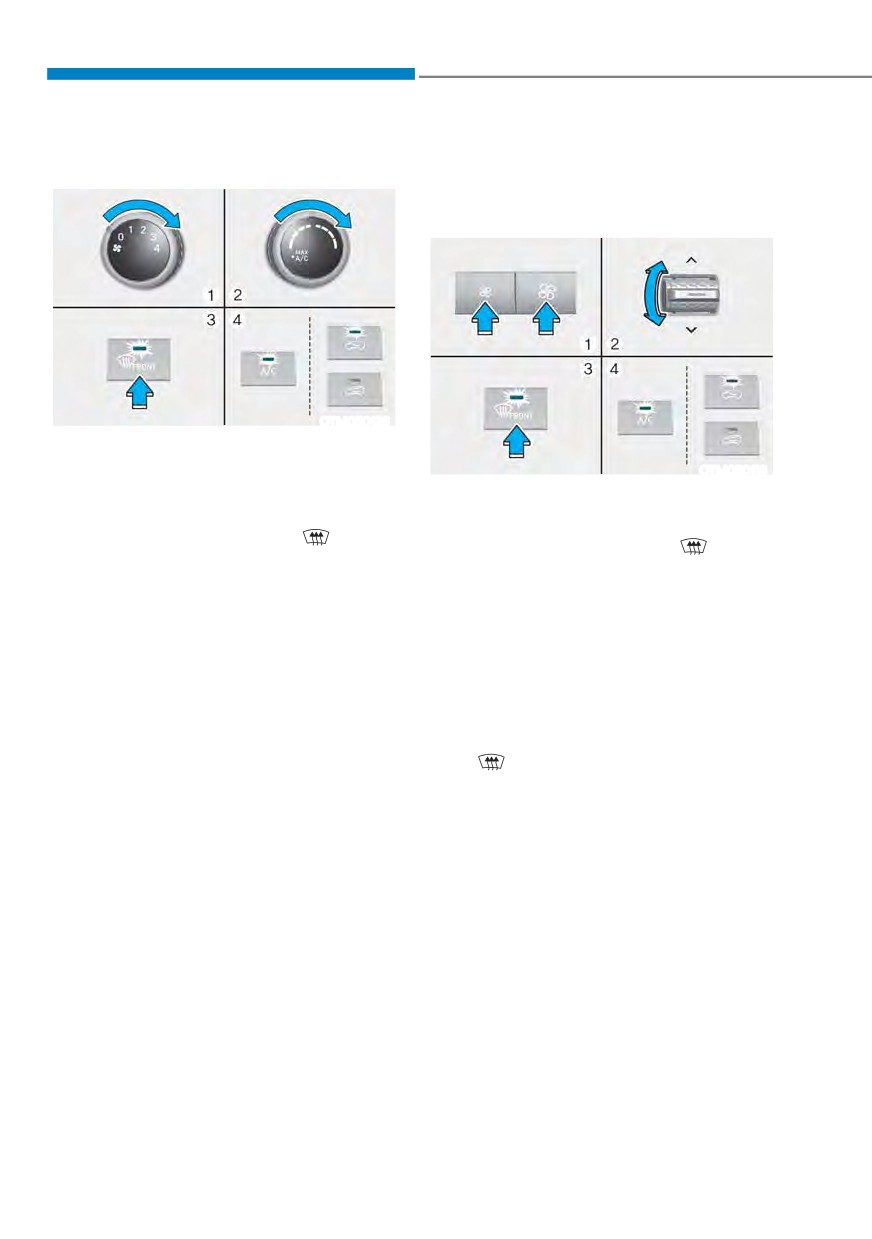
1. Press the AUTO button. (3)
The modes, fan speeds, air intake and
air-conditioning will be controlled
automatically by the temperature
setting you select.
OTM050052
2. Turn the temperature control knob
(1, 2) to the desired temperature. If
the temperature is set to the lowest
Information
setting (Lo), the air conditioning
Never place anything near the sensor to
system will operate continuously.
After the interior has cooled
ensure better control of the heating and
cooling system.
sufficiently, adjust the knob to
a higher temperature set point
whenever possible.
Manual heating and air
conditioning
To turn the automatic operation off,
The heating and cooling system can be
select any button of the following:
controlled manually by pushing buttons
- Mode selection button
other than the AUTO button. In this case,
the system works sequentially according
- Front windshield defroster button
to the order of buttons selected. When
(Press the button one more time
pressing any button except the AUTO
to deselect the front windshield
button while using automatic operation,
defroster function. The ‘AUTO’ sign
the functions not selected will be
will illuminate on the information
controlled automatically.
display once again.)
1. Start the engine.
- Fan speed control button
2. Set the mode to the desired position.
The selected function will be
For improving the effectiveness of
controlled manually while other
heating and cooling, select:
functions operate automatically.
- Heating:
For your convenience and to improve
the effectiveness of the climate control,
- Cooling:
use the AUTO button and set the
3. Set the temperature control to the
temperature to 73°F (23°C).
desired position.
4. Set the air intake control to the
outside (fresh) air position.
5. Set the fan speed control to the
desired speed.
6. If air conditioning is desired, turn the
air conditioning system on.
7. Press the AUTO button to convert to
full automatic control of the system.
5-106
05
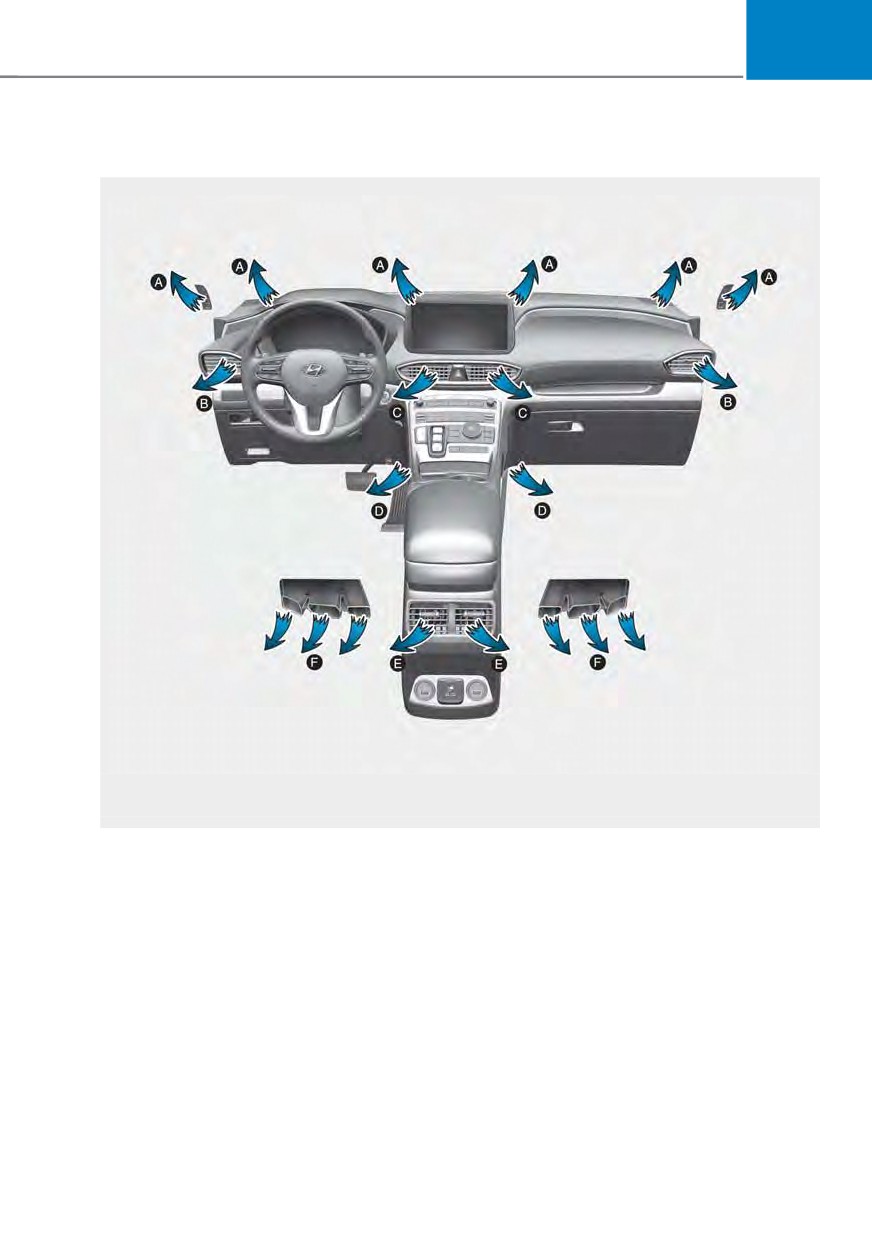
Mode selection (12)
The actual shape of air conditioner may differ from the illustration.
OTMA050100
The mode selection button controls the direction of the air flow through the ventilation
system.
5-107
Convenience features
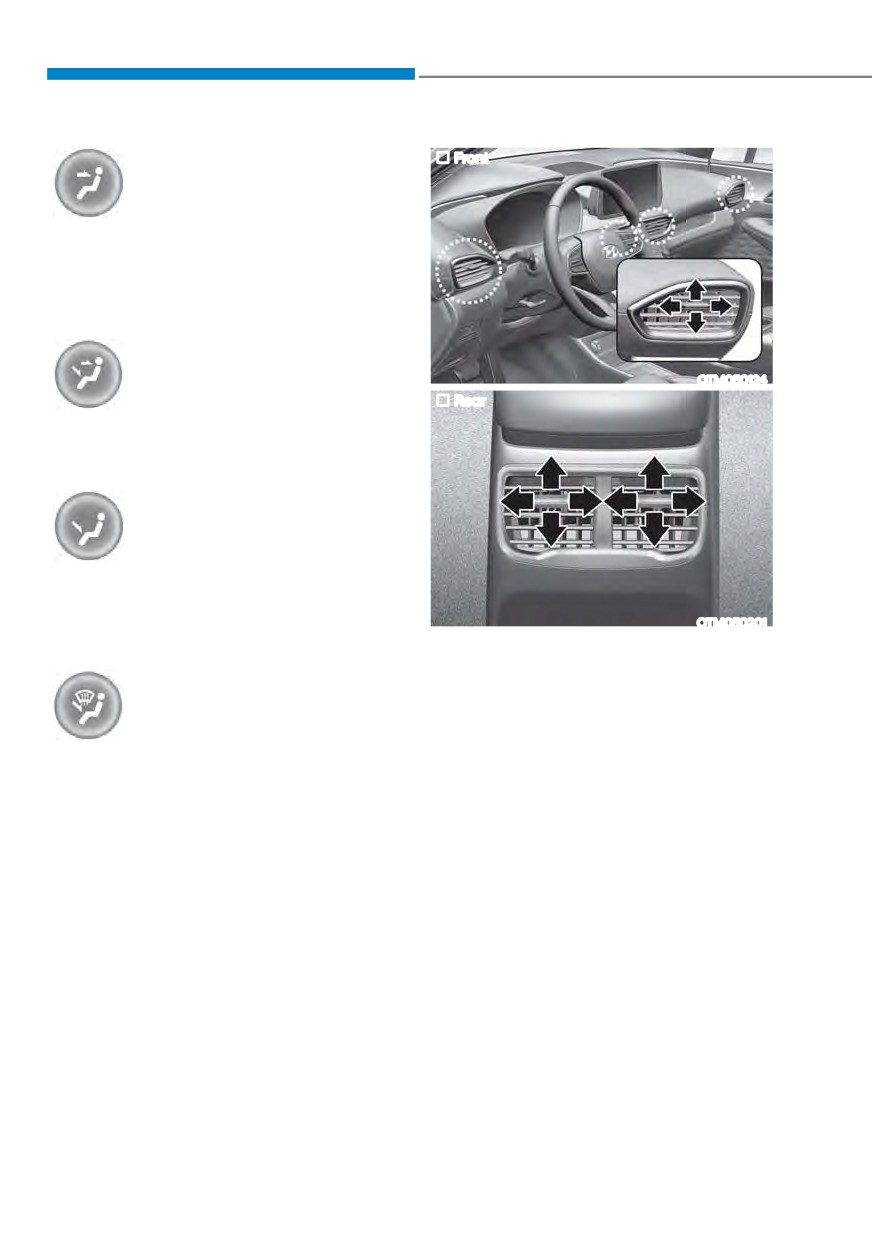
Front
Face-Level (B, C, E)
Air flow is directed toward the upper
body and face. Additionally, each outlet
can be controlled to direct the air
discharged from the outlet.
Bi-Level (B, C, D, E, F, G)
OTM050124
Rear
Air flow is directed towards the face and
the floor.
Floor-Level (A, C, D, E, F, G)
Most of the air flow is directed to the
floor, with a small amount of the air
being directed to the windshield and side
OTM050201
window defrosters.
Instrument panel vents
The outlet vents can be opened or closed
Floor/Defrost-Level
separately using the vent control lever.
(A, C, D, E, F, G)
If you move the vent control lever to the
left end, the outlet vents can be closed.
Most of the air flow is directed to the
floor and the windshield with a small
amount directed to the side window
defrosters.
Defrost-Level (A, D)
Most of the air flow is directed to the
windshield with a small amount of air
directed to the side window defrosters.
5-108
05
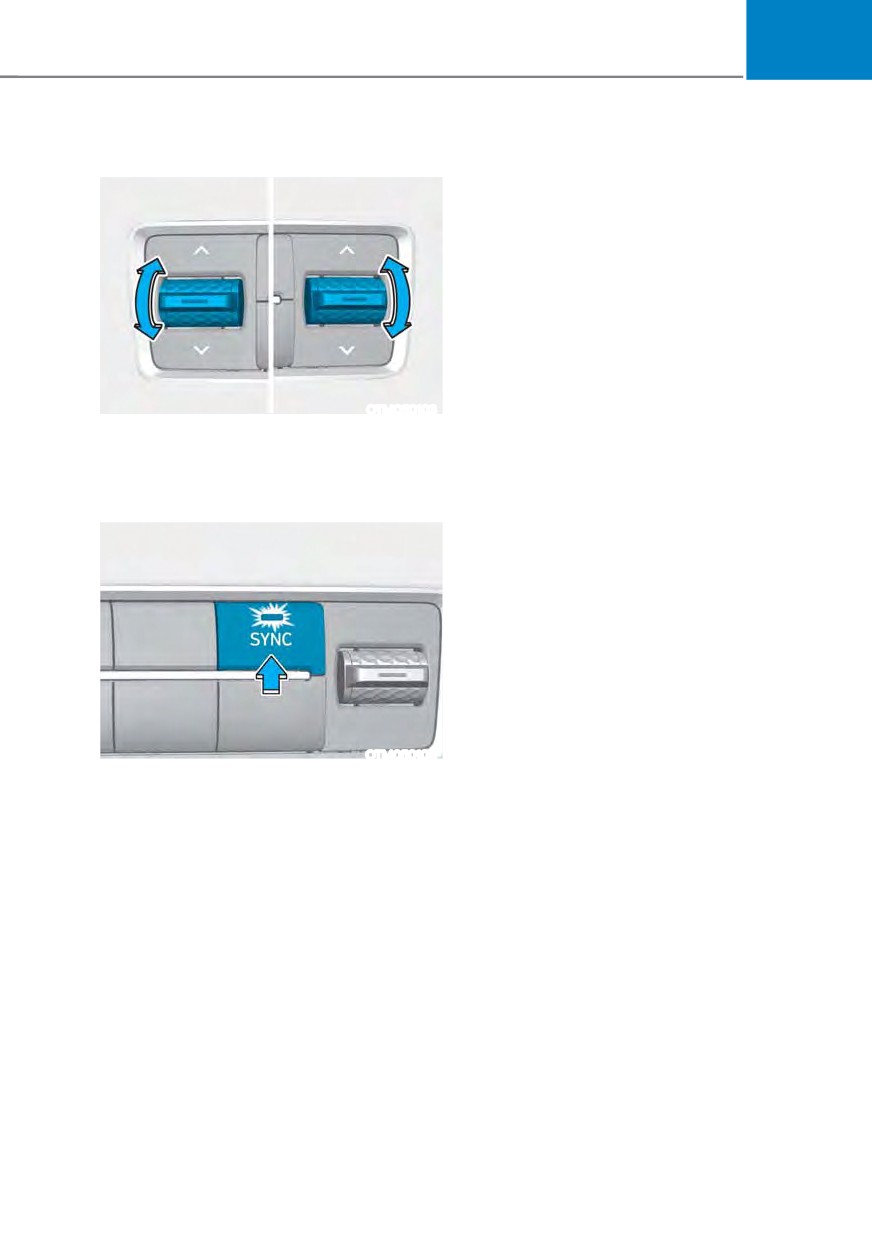
Temperature control
Adjusting the driver and passenger side
temperature individually
ś Press the “SYNC” button again to
adjust the driver and passenger side
temperature individually. The button
indicator will turn off.
Temperature conversion
If the battery has been discharged or
disconnected, the temperature mode
display will reset to Centigrade.
To change the temperature unit from °C
OTM050103
to °F or °F to °C :
The temperature will increase by pushing
- Automatic climate control system
the knob upward. The temperature
Press the AUTO button for 3 seconds
will decrease by pushing the knob
while pressing the OFF button.
downward.
- Instrument cluster
*R WR 8VHU 6HWWLQJV 0RGH Ɵ 8QLWV Ɵ
Temperature Unit.
The temperature unit on both the cluster
LCD display and the climate control
screen will change.
OTM050108
Adjusting the driver and passenger side
temperature equally
ś Press the “SYNC” button to adjust
the driver and passenger side
temperature equally.
The passenger side temperature will
be set to the same temperature as the
driver side temperature.
ś Turn the driver side temperature
control knob. The driver and
passenger side temperature will be
adjusted equally.
5-109
Convenience features
Air intake control
Information
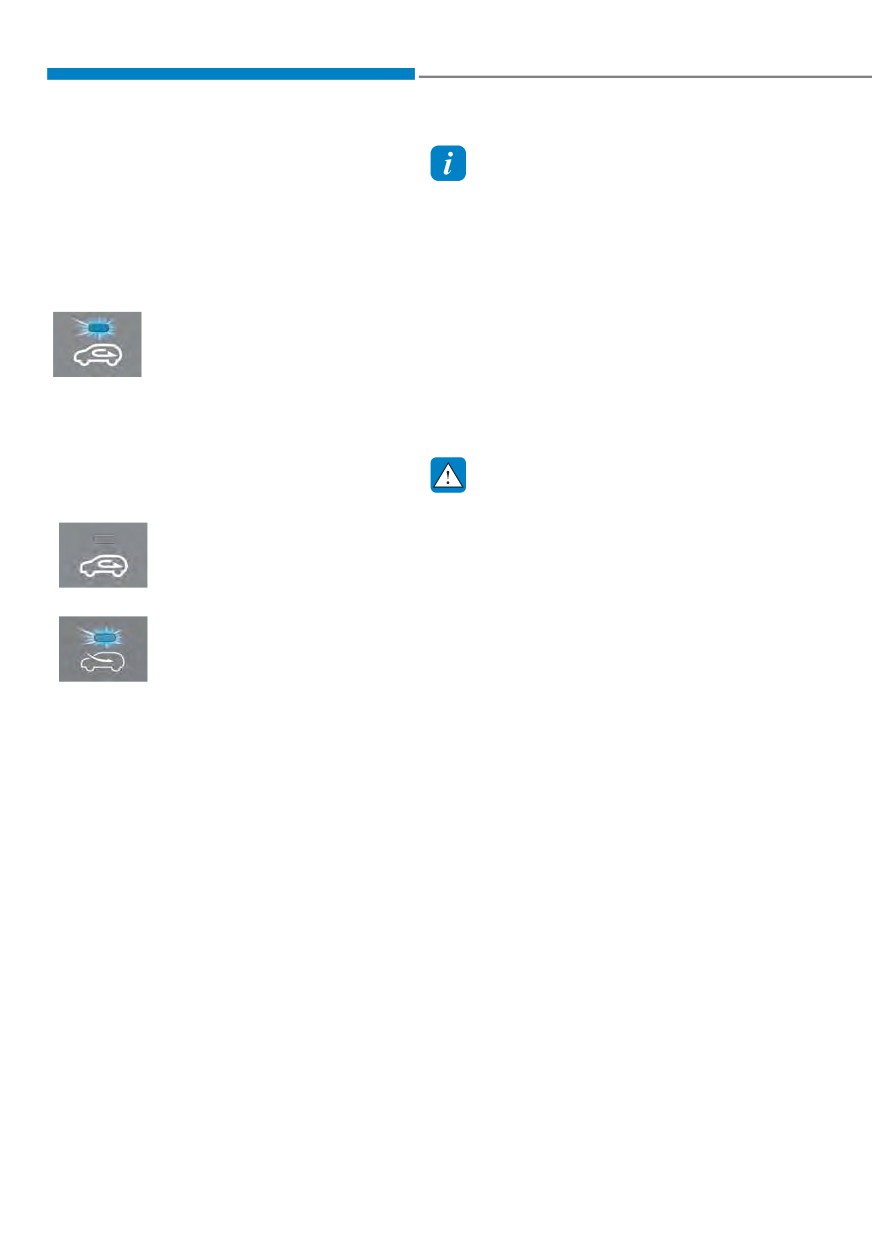
This is used to select the outside (fresh)
Using the system in the fresh air position is
air position or recirculated air position.
recommended.
To change the air intake control position,
Prolonged operation of the heater in the
push the control button.
recirculated air position (without air
conditioning selected) can cause fogging of
Recirculated air position
the windshield and side windows and the
With the recirculated air
air within the passenger compartment will
position selected, air from the
become stale.
passenger compartment will
In addition, prolonged use of the air
be drawn through the heating
conditioning with the recirculated air
system and heated or cooled
position selected will result in excessively
according to the function
dry air in the passenger compartment.
selected.
Outside (fresh) air position
WARNING
Type A
ś Continued climate control system
With the outside (fresh) air
operation in the recirculated air
position selected, air enters
position may allow humidity to
the vehicle from outside
increase inside the vehicle which
and is heated or cooled
may fog the glass and obscure
Type B
according to the function
visibility.
selected.
ś Do not sleep in a vehicle with the air
conditioning or heating system on. It
may cause serious harm or death due
to a drop in the oxygen level and/or
body temperature.
ś Continued climate control system
operation in the recirculated air
position can cause drowsiness
or sleepiness, and loss of vehicle
control. Set the air intake control
to the outside (fresh) air position as
much as possible while driving.
5-110
05
Fan speed control
System operation
The fan speed can be set as desired by
Ventilation
pushing the fan speed control button.
1. Set the mode to the
position.
More air is delivered with higher fan
2. Set the air intake control to the
speeds.
outside (fresh) air position.
Pressing the OFF button turns off the fan.
3. Set the temperature control to the
desired position.
NOTICE
4. Set the fan speed control to the
Operating the fan when the ignition
desired speed.
switch is in the ON position could cause
the battery to discharge. Operate the
Heating
fan when the engine is running.
1. Set the mode to the
position.
2. Set the air intake control to the
Air conditioning
outside (fresh) air position.
Push the A/C button to turn the air
3. Set the temperature control to the
conditioning system on (indicator light
desired position.
will illuminate).
4. Set the fan speed control to the
Push the button again to turn the air
desired speed.
conditioning system off.
5. If dehumidified heating is desired,
turn the air conditioning system on.
OFF mode
If the windshield fogs up, set the mode
Push the OFF button to turn the climate
to the
or
position.
control system off. However, you can still
operate the mode and air intake buttons
Operation Tips
as long as the ignition switch is in the ON
position.
ś To help keep dust or unpleasant fumes
from entering the vehicle through the
ventilation system, temporarily set the
air intake control to the recirculated
air position. Be sure to return the
control to the fresh air position when
the irritation has passed to keep fresh
air in the vehicle. This will help keep
the driver alert and comfortable.
ś To prevent interior fog on the
windshield, set the air intake control
to the fresh air position and fan speed
to the desired position, turn on the air
conditioning system, and adjust the
temperature control to the desired
temperature.
5-111
Convenience features
Air conditioning
Air conditioning system operation tips
HYUNDAI Air Conditioning Systems are
ś
If the vehicle has been parked in
filled with R-1234yf refrigerant.
direct sunlight during hot weather,
open the windows for a short time
1. Start the engine. Push the air
to let the hot air inside the vehicle
conditioning button.
escape.
2. Set the mode to the position.
ś
After sufficient cooling has been
3. Set the air intake control to the
achieved, switch back from the
outside air or recirculated air position.
recirculated air to the fresh outside air
4. Adjust the fan speed control and
position.
temperature control to maintain
ś
To help reduce moisture inside of
maximum comfort.
the windows on rainy or humid
days, decrease the humidity inside
NOTICE
the vehicle by operating the air
conditioning system with the windows
When using the air conditioning system,
and sunroof closed.
monitor the temperature gauge closely
ś
Use the air conditioning system every
while driving up hills or in heavy traffic
when outside temperatures are high.
month for a few minutes to ensure
maximum system performance.
Air conditioning system operation may
cause engine overheating. Continue to
ś
If you operate the air conditioner
use the fan but turn the air conditioning
excessively, the difference between
system off if the temperature gauge
the temperature of the outside air and
indicates engine overheating.
that of the windshield could cause
the outer surface of the windshield to
fog up, causing loss of visibility. In this
case, set the mode selection button to
the
position and set the fan speed
control knob to the lowest speed
setting.
5-112
05
System maintenance
Checking the amount of air
conditioner refrigerant and
Cabin air filter
compressor lubricant
When the amount of refrigerant is low,
the performance of the air conditioning
is reduced. Overfilling also reduces the
performance of the air conditioning system.
Therefore, if abnormal operation is found,
have the system be inspected by an
authorized HYUNDAI dealer.
NOTICE
OIK047401L
It is important that the correct type and
amount of oil and refrigerant is used.
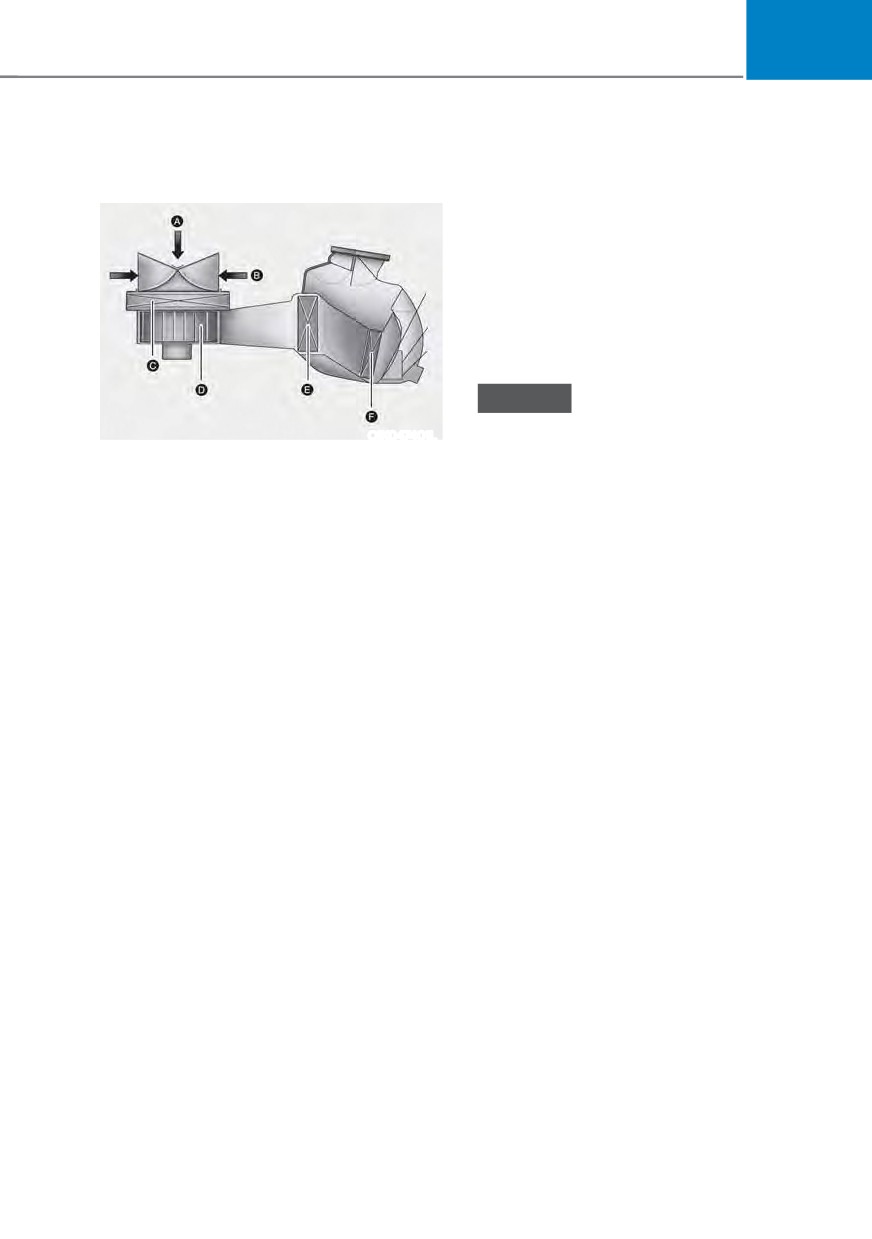
[A] : Outside air, [B] : Recirculated air
[C] : Cabin air filter, [D] : Blower
Otherwise, damage to the compressor
and abnormal system operation may
[E] : Evaporator core, [F] : Heater core
occur. To prevent damage, the air
The cabin air filter is installed behind
conditioning system in your vehicle
the glove box. It filters the dust or other
should only be serviced by trained and
pollutants that enter the vehicle through
certified technicians.
the heating and air conditioning system.
Have the cabin air filter be replaced
by an authorized HYUNDAI dealer
according to the maintenance schedule.
If the vehicle is being driven in severe
conditions such as dusty or rough roads,
more frequent climate control filter
inspections and changes are required.
If the air flow rate suddenly decreases,
have the system be checked at an
authorized HYUNDAI dealer.
5-113
Convenience features
NOTICE
ś The refrigerant system should only
be serviced by trained and certified
technicians to insure proper and safe
operation.
ś The refrigerant system should be
serviced in a well-ventilated place.
ś The air conditioning evaporator
(cooling coil) shall never be repaired
or replaced with one removed from
a used or salvaged vehicle and new
OTM050040L
replacement MAC evaporators shall
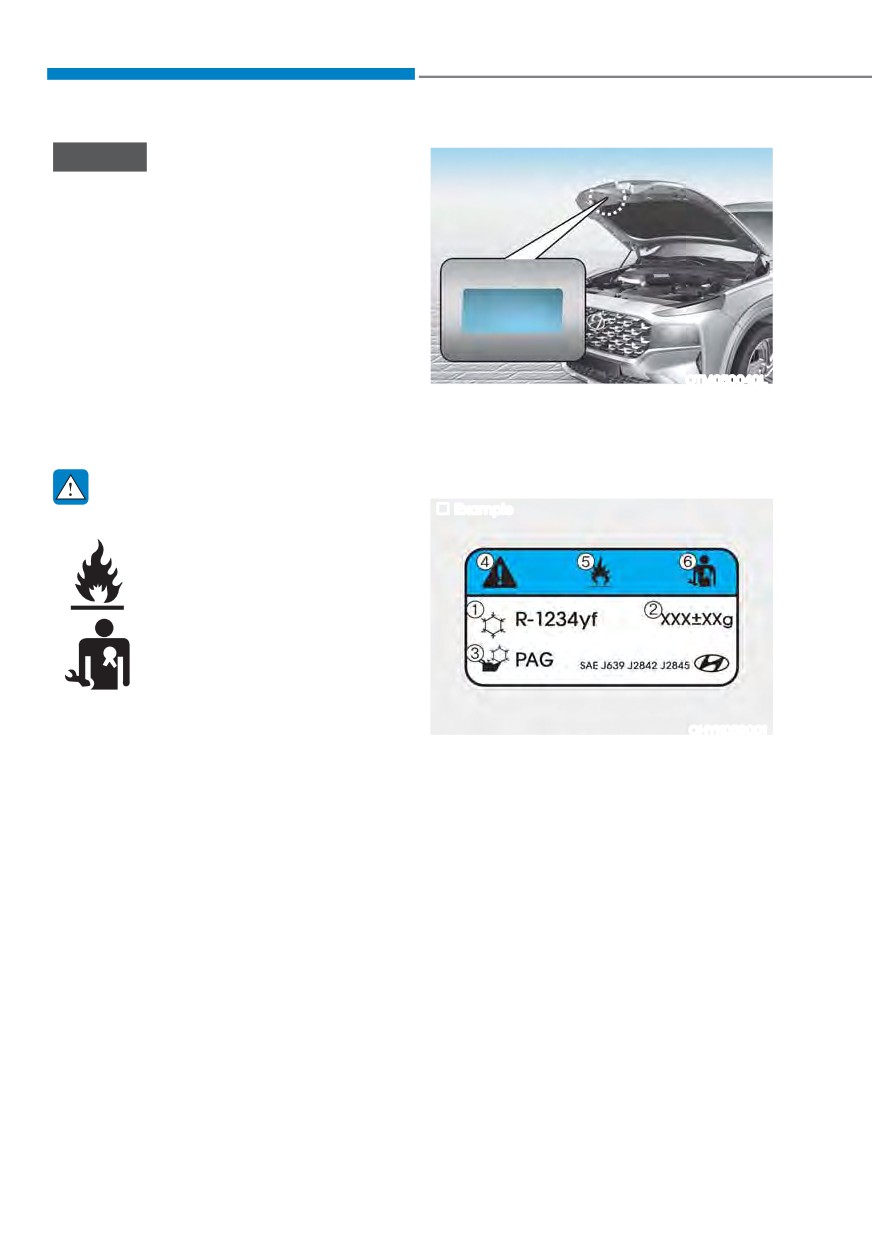
Air Conditioning refrigerant label
be certified (and labeled) as meeting
You can find out which air conditioning
SAE Standard J2842.
refrigerant is applied to your vehicle on
the label located inside of the hood.
WARNING
Example
Vehicles equipped with R-1234yf
Since the refrigerant is
mildly flammable and
operated at high pressure,
the air conditioning system
should only be serviced
by trained and certified
technicians. It is important
that the correct type and
amount of oil and refrigerant
are used.
OHYK059001
All refrigerants should be reclaimed
Each symbols and specification on
with proper equipment.
the air conditioning refrigerant label is
Venting refrigerants directly to the
represented as below:
atmosphere is harmful to individuals
1. Classification of refrigerant
and environment. Failure to heed these
warnings can lead to serious injuries.
2. Amount of refrigerant
3. Classification of compressor lubricant
4. Caution
5. Flammable refrigerant
6. To require registered technician to
service air conditioning system
5-114
05
WINDSHIELD DEFROSTING AND DEFOGGING
Manual climate control system
WARNING
To defog inside windshield
Windshield heating
Do not use the position during
cooling operation in extremely humid
weather. The difference between the
temperature of the outside air and that
of the windshield could cause the outer
surface of the windshield to fog up,
causing loss of visibility could cause
an accident resulting in serious injury
or death. In this case, set the mode
selection button to the position
and fan speed control knob to a lower
speed.
OTM050115
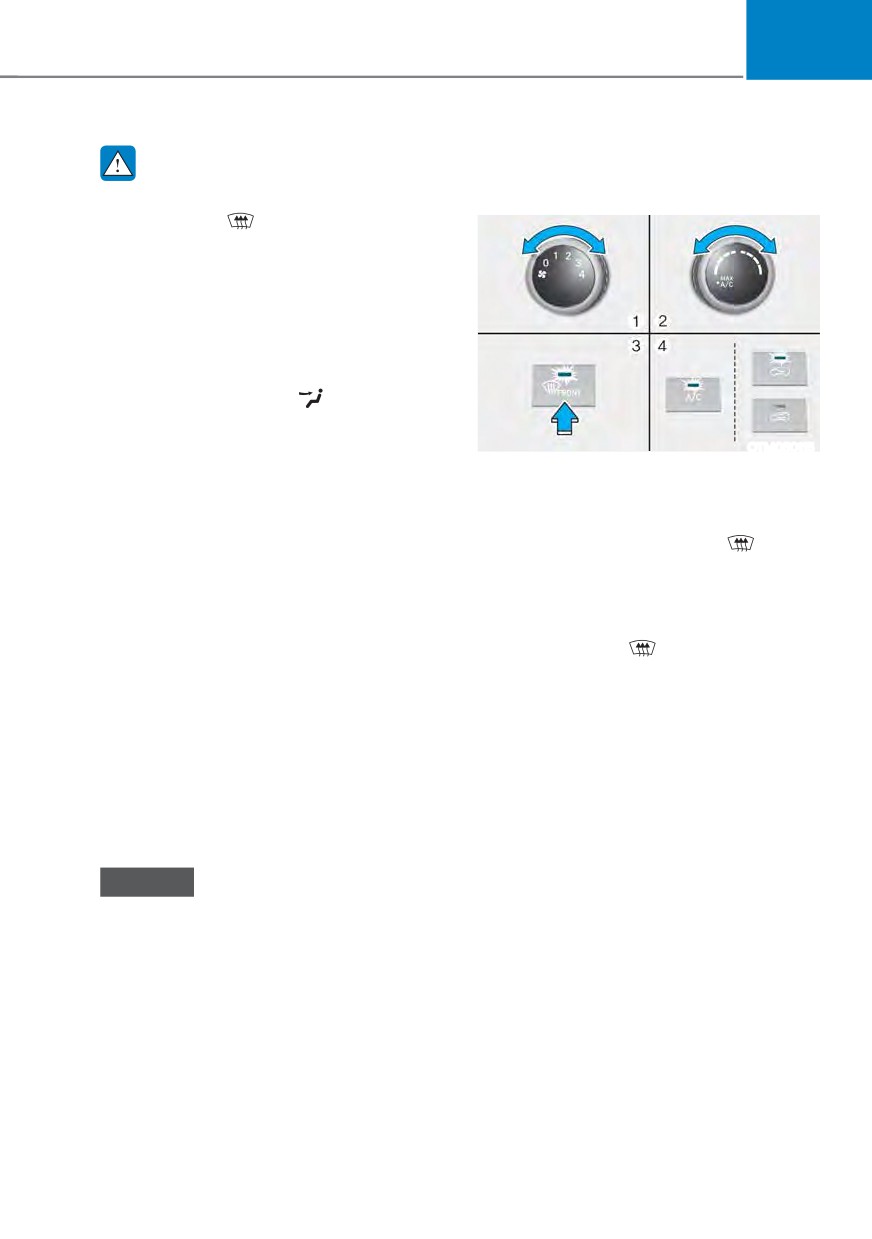
1. Select any fan speed except “0”
ś For maximum defrost performance,
position.
set the temperature control to the
highest temperature setting and
2. Select the desired temperature.
the fan speed control to the highest
3. Press the defroster button (
).
setting.
4. The outside (fresh) air will be selected
ś If warm air to the floor is desired while
automatically. Additionally, the
defrosting or defogging, set the mode
air conditioning (if equipped) will
to the floor-defrost position.
automatically operate if the mode is
ś Before driving, clear all snow and ice
selected to the
position.
from the windshield, rear window,
If the air conditioning and outside
side view mirrors, and all side
(fresh) air position are not selected
windows.
automatically, press the corresponding
ś Clear all snow and ice from the
button manually.
hood and air inlet in the cowl grill
to improve heater and defroster
efficiency and to reduce the
probability of fogging up the inside of
the windshield.
NOTICE
If the engine temperature is still cold
after starting, then a brief engine warm
up period may be required for the
vented air flow to become warm or hot.
5-115
Convenience features
To defrost outside windshield
Automatic climate control
system
To defog inside windshield
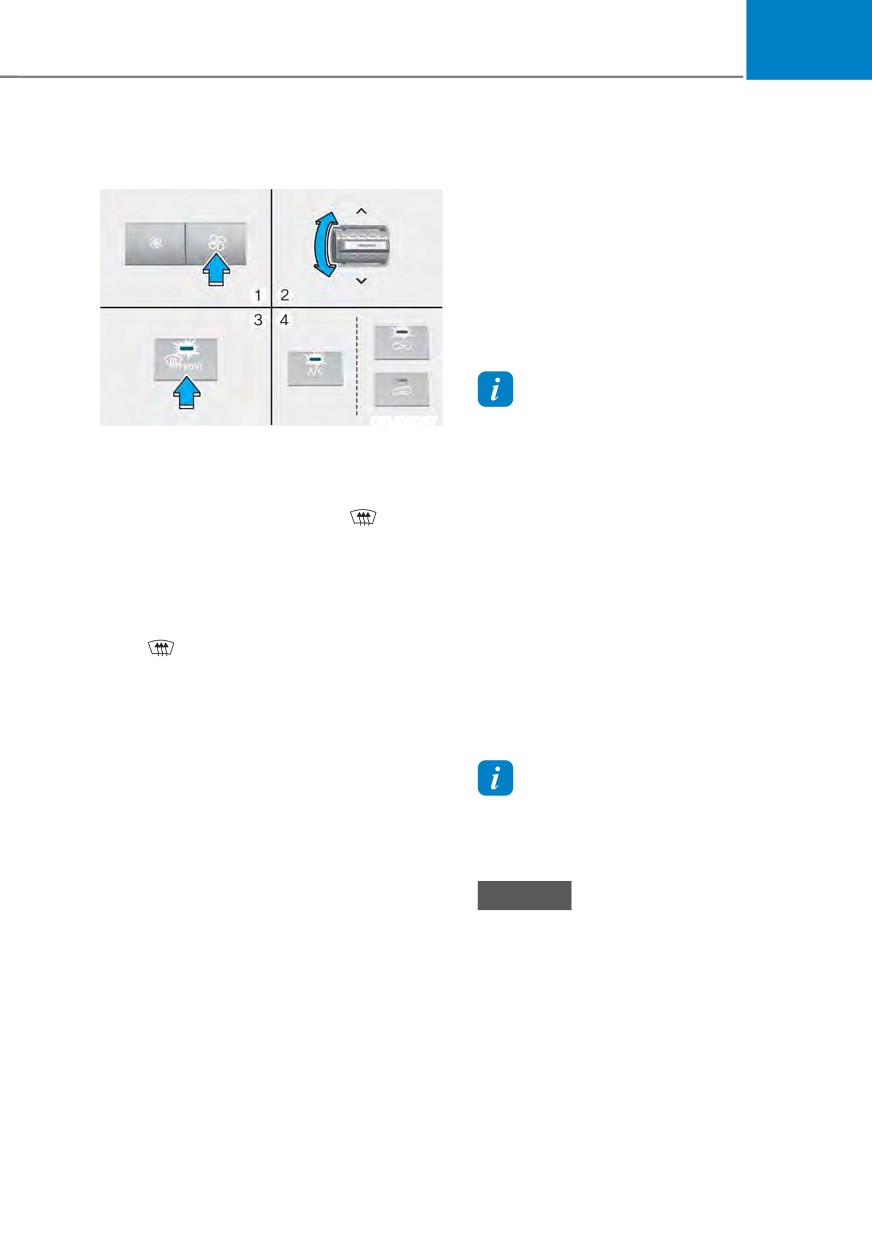
OTM050126
1. Set the fan speed to the highest
(extreme right) position.
OTM050116
2. Set the temperature to the extreme
1. Select the desired fan speed.
hot position.
2. Select the desired temperature.
3. Press the defroster button (
).
3. Press the defroster button (
).
4. The outside (fresh) air and air
4. The air-conditioning will turn on
conditioning (if equipped) will be
according to the detected ambient
selected automatically.
temperature, outside (fresh) air
position and higher fan speed will be
selected automatically.
If the air-conditioning, outside (fresh)
air position and higher fan speed are
not selected automatically, adjust the
corresponding button or knob manually.
If the
position is selected, lower fan
speed is controlled to higher fan speed.
5-116
05
To defrost outside windshield
Auto defogging system (only
for automatic climate control
system, if equipped)
Auto defogging help reduce the
possibility of fogging up the inside of the
windshield by automatically sensing the
moisture on inside the windshield.
The auto defogging system operates
when the heater or air conditioning is on.
Information
OTM050117
The auto defogging system may not
operate normally, when the outside
1. Set fan speed to the highest position.
temperature is below 14°F(-10°C).
2. Set temperature to the extreme hot
(HI) position.
To cancel or set the Auto Defogging
3. Press the defroster button (
).
System, keep the front defroster button
4. The air-conditioning will turn
pressed for 3 seconds. The “ADS OFF”
on according to the detected
symbol will be shown in the climate
ambient temperature and outside
display to inform you that the system
(fresh) air position will be selected
is deactivated. To re-activate the auto
automatically.
defogging system, follow the procedure
mentioned above and the “ADS OFF”
If the
position is selected, lower fan
speed is controlled to higher fan speed.
symbol will disappear.
If the battery has been disconnected
or discharged, it resets to the auto
defogging status.
Information
For efficiency, do not select recirculated
air position while the Auto defogging
system is operating.
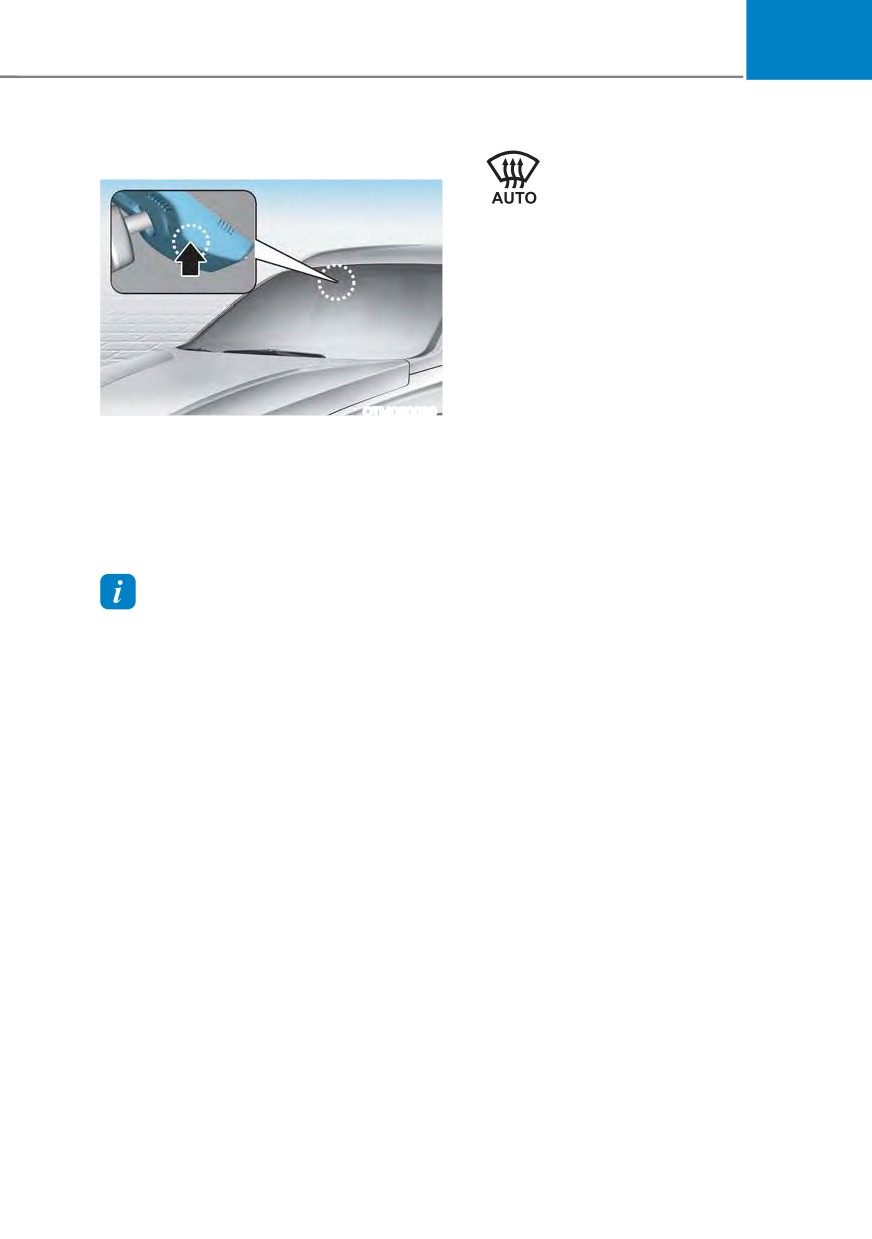
NOTICE
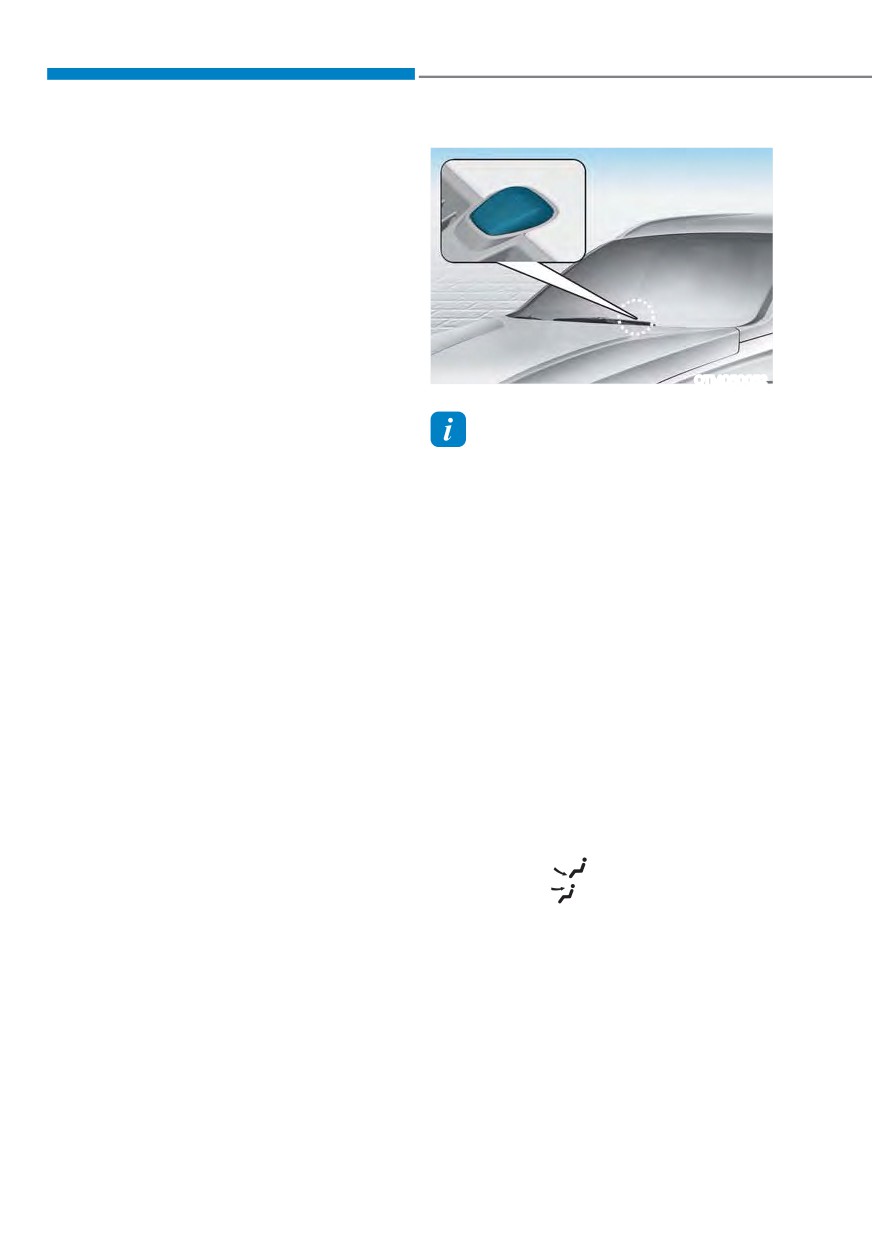
Do not remove the sensor cover located
on the top of the windshield glass.
Damage to system parts could occur
and may not be covered by your vehicle
warranty.
5-117

Convenience features
Rear window defroster
Information
ś If there is heavy accumulation of snow
NOTICE
on the rear window, brush it off before
To prevent damage to the rear window
operating the rear defroster.
defroster conducting elements bonded
ś The rear window defroster
to the inside surface of the rear window,
automatically turns off after
never use sharp instruments or window
approximately 20 minutes or when the
cleaners containing abrasives to clean
Engine Start/Stop button is in the OFF
the window.
position.
The defroster heats the
Side view mirror defroster (if
window to remove frost, fog
equipped)
and thin ice from the interior
If your vehicle is equipped with the Side
and exterior of the rear
view mirror defrosters, they will operate
window, while the engine is
at the same time you turn on the rear
running.
window defroster.
ś To activate the rear window defroster,
press the rear window defroster
button located in the center control
panel. The indicator on the rear
window defroster button illuminates
when the defroster is ON.
ś To turn off the defroster, press the rear
window defroster button again.
5-118
05
&/,0$7
( &21752/ $'',7,21$/ )($785(6
Auto defogging system
When the Auto Defogging
System operates, the indicator
will illuminate.
If a high amount of humidity is detected
in the vehicle, the Auto Defogging
System will be enabled. The following
steps will be performed automatically:
Step 1) Air conditioning will turn ON.
Step 2) Air intake control will change to
Fresh mode.
Step 3) Mode will change to defrost to
direct airflow to the windshield.
OTM050039
Step 4) Fan speed will be set to MAX.
Auto defogging helps reduce the
possibility of fogging up the inside of the
If the air conditioning is off or
windshield by automatically sensing the
recirculation mode is manually selected
moisture on inside the windshield.
while Auto Defogging System is ON, the
Auto Defogging System indicator will
The auto defogging system operates
blink 3 times to signal that the manual
when the heater or air conditioning is on.
operation has been canceled.
Information
The auto defogging system may not
operate normally, when the outside
temperature is below 14°F (10°C).
5-119

Convenience features
Turning the Auto Defogging System
NOTICE
ON or OFF
Do not remove the sensor cover located
Climate control system
on the upper end of the windshield
Press the front windshield defroster
glass.
button for 3 seconds when the Engine
Damage to system parts could occur
Start/Stop button is in the ON position.
and may not be covered by your vehicle
When the Auto Defogging System is
warranty.
turned off, the ADS OFF symbol will blink
3 times and ADS OFF will be displayed on
Auto dehumidify (if equipped)
the climate control information screen.
To increase cabin air quality and reduce
When the Auto Defogging System is
windshield misting, recirculation mode
turned on, the ADS OFF symbol will blink
switches off automatically after about 5
6 times without a signal.
to 30 minutes, depending on the outside
temperature, and the air intake will
Infotainment system
change to fresh mode.
Auto Defogging System can be turned
RQ DQG RII E\ VHOHFWLQJ œ6HWXS Ɵ
Turning Auto Dehumidify ON or OFF
9HKLFOH 6HWWLQJV Ɵ &OLPDWH Ɵ 'HIRJ
Climate control system
'HIURVW 2SWLRQV Ɵ $XWR 'HIRJŔ IURP WKH
To turn the Auto Dehumidify feature
infotainment system screen.
on or off, select Face level (
) mode
For detailed information, refer to the
and press the air intake control (
)
separately supplied infotainment
button at least five times within three
system manual.
seconds. When Auto Dehumidify is
turned on, the air intake control button
indicator will blink 6 times. When turned
Information
off, the indicator will blink 3 times.
ś When the air conditioning is turned
on by Auto Defogging System, if you
Infotainment system
try to turn off the air conditioning, the
Auto Dehumidify can be turned on and
indicator will blink 3 times and the air
RII E\ VHOHFWLQJ œ6HWXS Ɵ 9HKLFOH 6HWWLQJV
conditioning will not be turned off.
Ɵ &OLPDWH Ɵ $XWRPDWLF 9HQWLODWLRQ Ɵ
ś To maintain the effectiveness and
Auto Dehumidify’ from the infotainment
efficiency of the Auto Defogging
system screen.
System, do not select Recirculation
For detailed information, refer to the
mode while the system is operating.
separately supplied infotainment
ś When Auto Defogging System is
system manual.
operating, fan speed adjustment,
temperature adjustment, and air intake
control selection are all disabled.
5-120
05
Recirculating air when washer
Sunroof inside air recirculation
fluid is used
(if equipped)
Recirculation mode automatically
When the is sunroof opened, fresh
activates to reduce any objectionable
mode will be automatically selected.
scent of the washer fluid from entering
At this time, if you press the air intake
the cabin when the windshield washer is
control button, recirculation mode will
used.
be selected but will change back to fresh
mode after 3 minutes. When the sunroof
Turning Activate upon Washer Fluid
is closed, the air intake position will
Use ON or OFF
return to the original position that was
selected.
Climate control system
To turn the Activate upon Washer Fluid
Auto. Controls That Use Climate
Use feature on or off, select Floor level
Control Settings (for driver’s
(
) mode, and then press the air
intake control (
) button four times
seat)
within two seconds while pressing the
The temperature of the driver’s seat
A/C icon.
warmer, air ventilated seat and heated
When Activate upon Washer Fluid Use
steering wheel is automatically
ON is turned on, the air intake control
controlled depending on the inside and
button indicator will blink 6 times. When
outside temperature of the vehicle when
turned off, the indicator will blink 3
the engine is running.
times.
To use these features, it must be
enabled from the Settings menu in the
Infotainment system
infotainment system screen. Select:
Activate upon Washer Fluid Use can be
-
6HWXS Ɵ 9HKLFOH 6HWWLQJV Ɵ 6HDW Ɵ
WXUQHG RQ DQG RII E\ VHOHFWLQJ œ6HWXS Ɵ
+HDWHG 9HQWLODWHG )HDWXUHV Ɵ +HDWHG
9HKLFOH 6HWWLQJV Ɵ &OLPDWH Ɵ 5HFLUFXODWH
9HQWLODWHG )HDWXUHV Ɵ $XWR &RQWUROV
$LU Ɵ $FWLYDWH XSRQ :DVKHU )OXLG 8VH
That Use Climate Control Settings
(or Interlocking washer fluid)’ from the
For more details on Auto Comfort
infotainment system screen.
Control, refer to “Seat Warmers” and
For detailed information, refer to the
“Air ventilation seats” section in chapter
separately supplied infotainment
3 and “Heated Steering Wheel” section
system manual.
in chapter 5.
However, in cold weather to prevent
the windshield from fogging up, the
recirculation mode may not be selected.
5-121
Convenience features
6725$*( &203
$570(17
Center console storage
WARNING
Never store cigarette lighters, propane
cylinders, or other flammable/explosive
materials in the vehicle. These items
may catch fire and/or explode if the
vehicle is exposed to hot temperatures
for extended periods.
WARNING
ALWAYS keep the storage compartment
covers closed securely while driving.
Items inside your vehicle are moving as
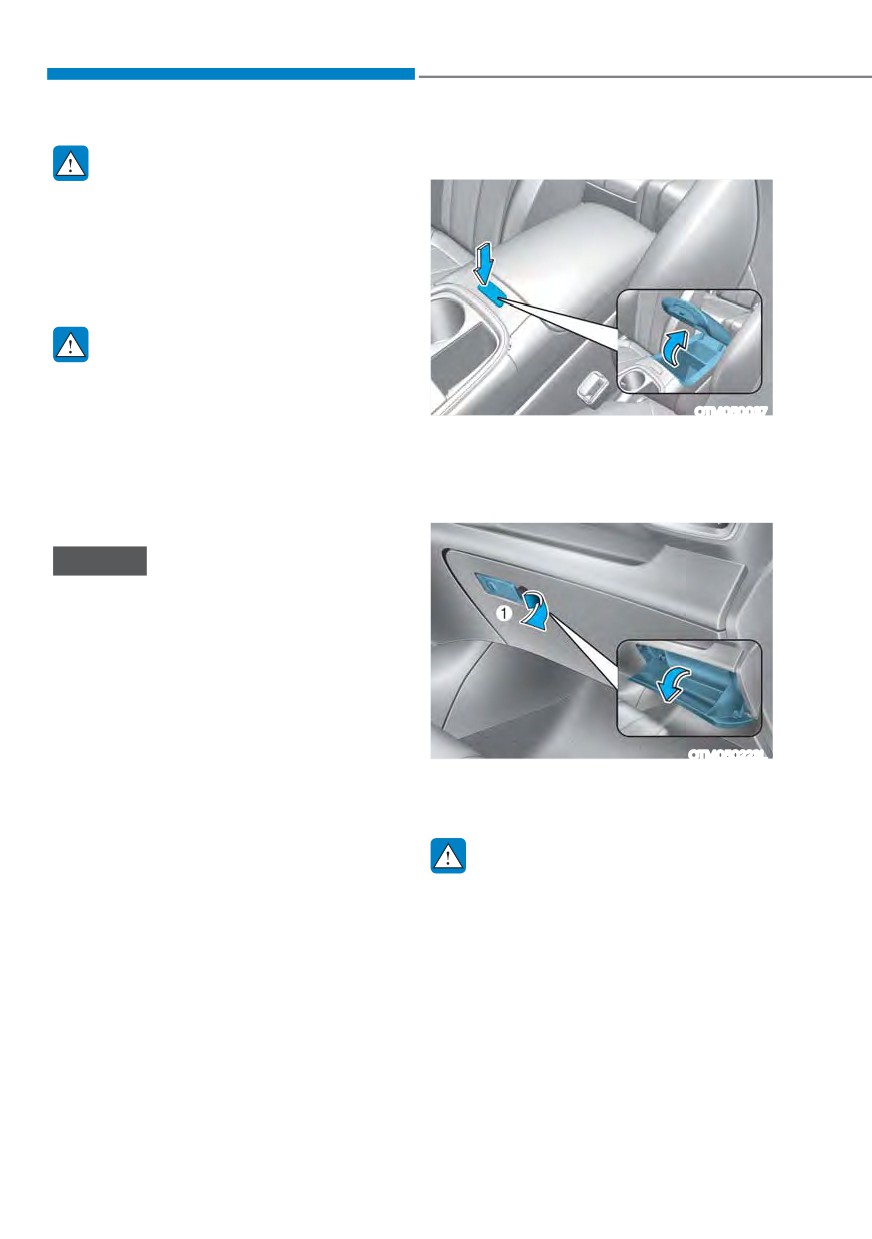
OTM050037
fast as the vehicle. If you have to stop
To open:
or turn quickly, or if there is a crash, the
Press the button.
items may fly out of the compartment
and may cause an injury if they strike
Glove box
the driver or a passenger.
NOTICE
To avoid possible theft, do not leave
valuables in the storage compartments.
OTM050223L
To open:
Pull the lever (1).
WARNING
ALWAYS close the glove box door after
use.
An open glove box door can cause
serious injury to the passenger in an
accident, even if the passenger is
wearing a seat belt.
5-122
05
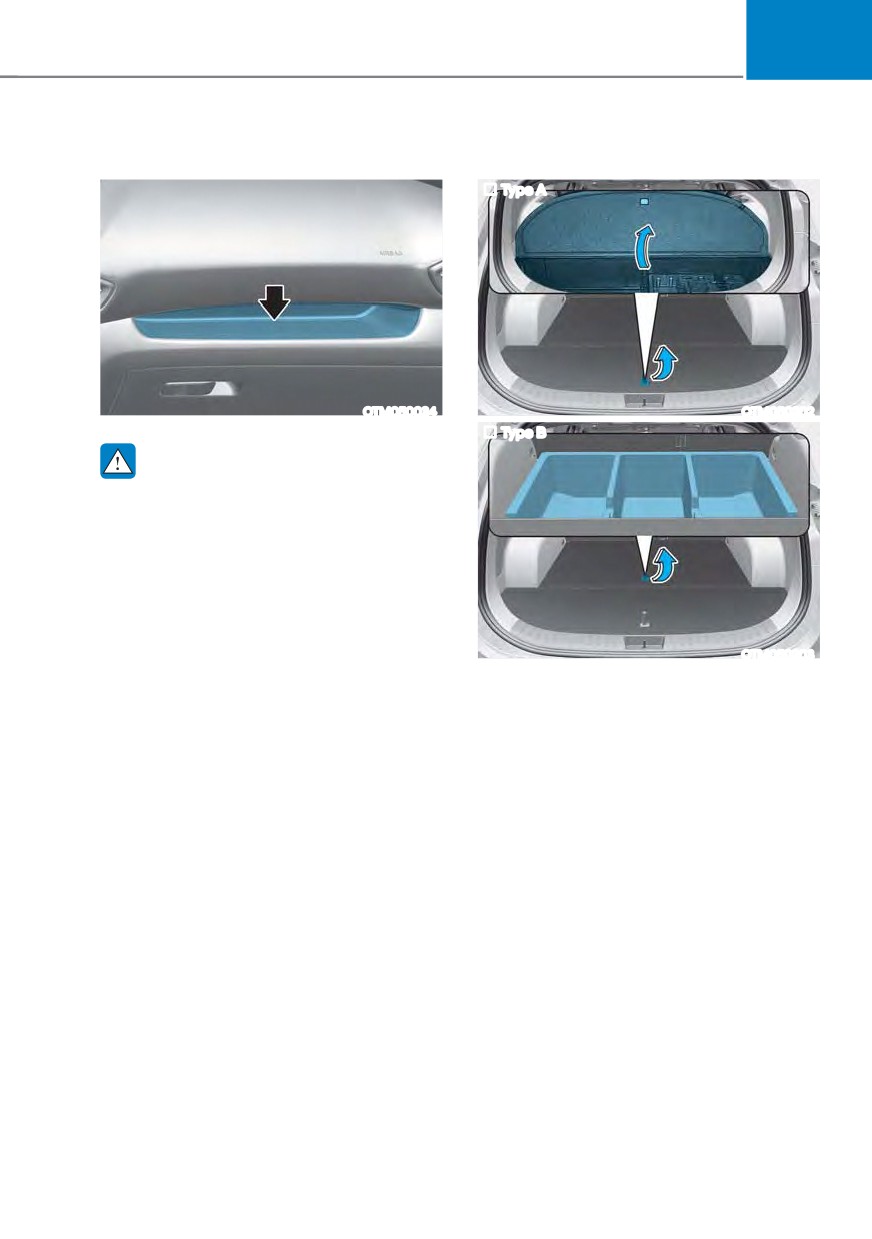
Tray
Luggage tray (if equipped)
Type A
OTM050034
OTM050202
Type B
WARNING
Do not place the heavy, sharp or
breakable objects in the tray. Such
objects can be thrown from the
tray in the event of a sudden stop
or an accident, possibly injuring the
passengers in the vehicle.
OTM050203
You can place a first aid kit, a reflector
triangle (front tray), tools, etc., in the box
for easy access.
ś Grasp the handle on the top of the
cover and lift it.
5-123
Convenience features
INTERIOR FEATURES
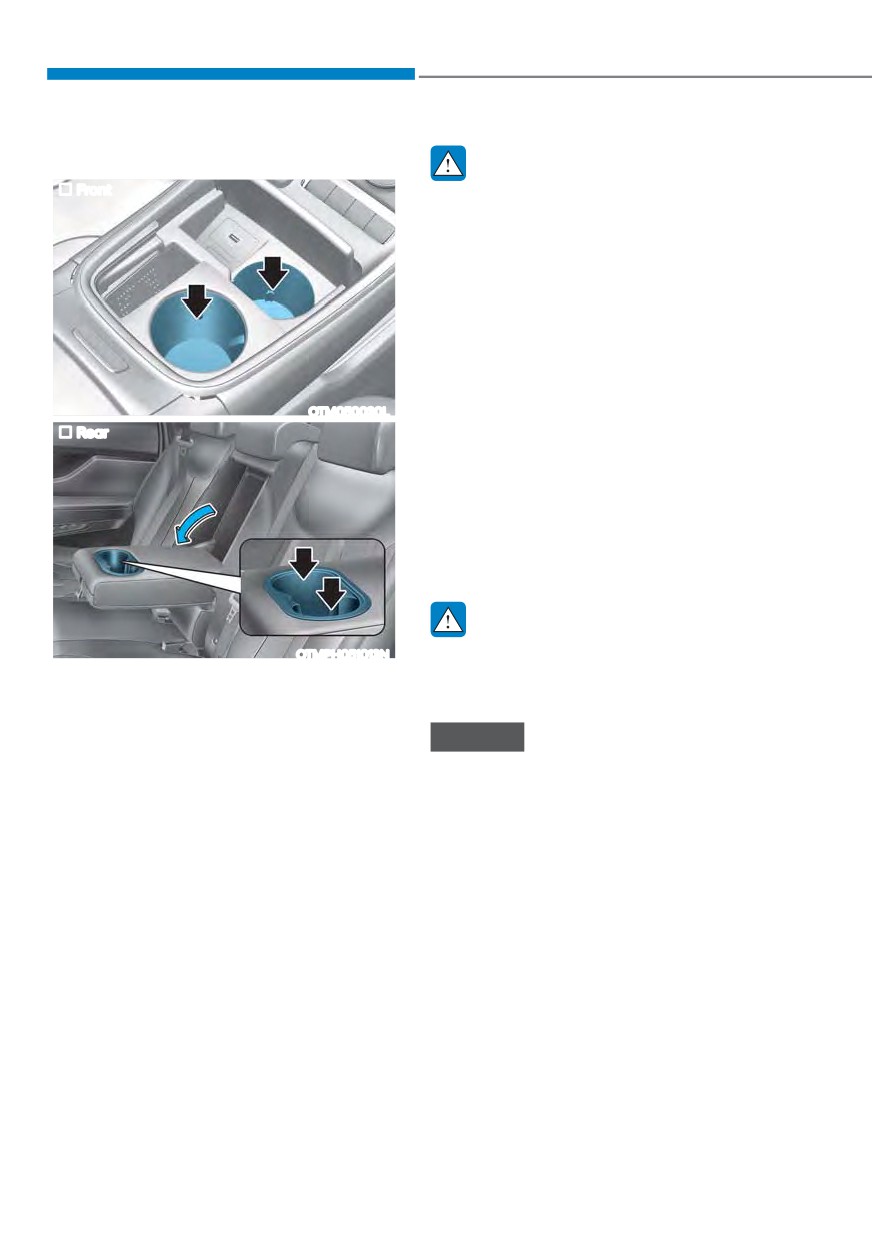
Cup holder
WARNING
Front
ś
Avoid abrupt starting and braking
when the cup holder is in use to
prevent spilling your drink. If hot
liquid spills, you could be burned.
Such a burn to the driver could cause
loss of vehicle control resulting in an
accident.
ś
Do not place uncovered or unsecured
cups, bottles, cans, etc., in the cup
holder containing hot liquid while
the vehicle is in motion. Injuries may
OTM050030L
result in the event of a sudden stop
Rear
or collision.
ś
Only use soft cups in the cup holders.
Hard objects can injure you in an
accident.
ś
Do not forcefully open the cover. It
may damage if you forcefully open
the cover with your fingers, etc..
WARNING
OTMPH051013N
Keep cans or bottles out of direct sun
light and do not put them in a hot
Cups or small beverages cups may be
vehicle. It may explode.
placed in the cup holders.
NOTICE
ś Keep your drinks sealed while
driving to prevent spilling your drink.
If liquid spills, it may get into the
vehicle’s electrical/electronic system
and damage electrical/electronic
parts.
ś When cleaning spilled liquids do not
use hot air to blow out or dry the cup
holder. This may damage the interior.
5-124
05
Ashtray (if equipped)
Sunvisor
OPDE046419
OTM048089
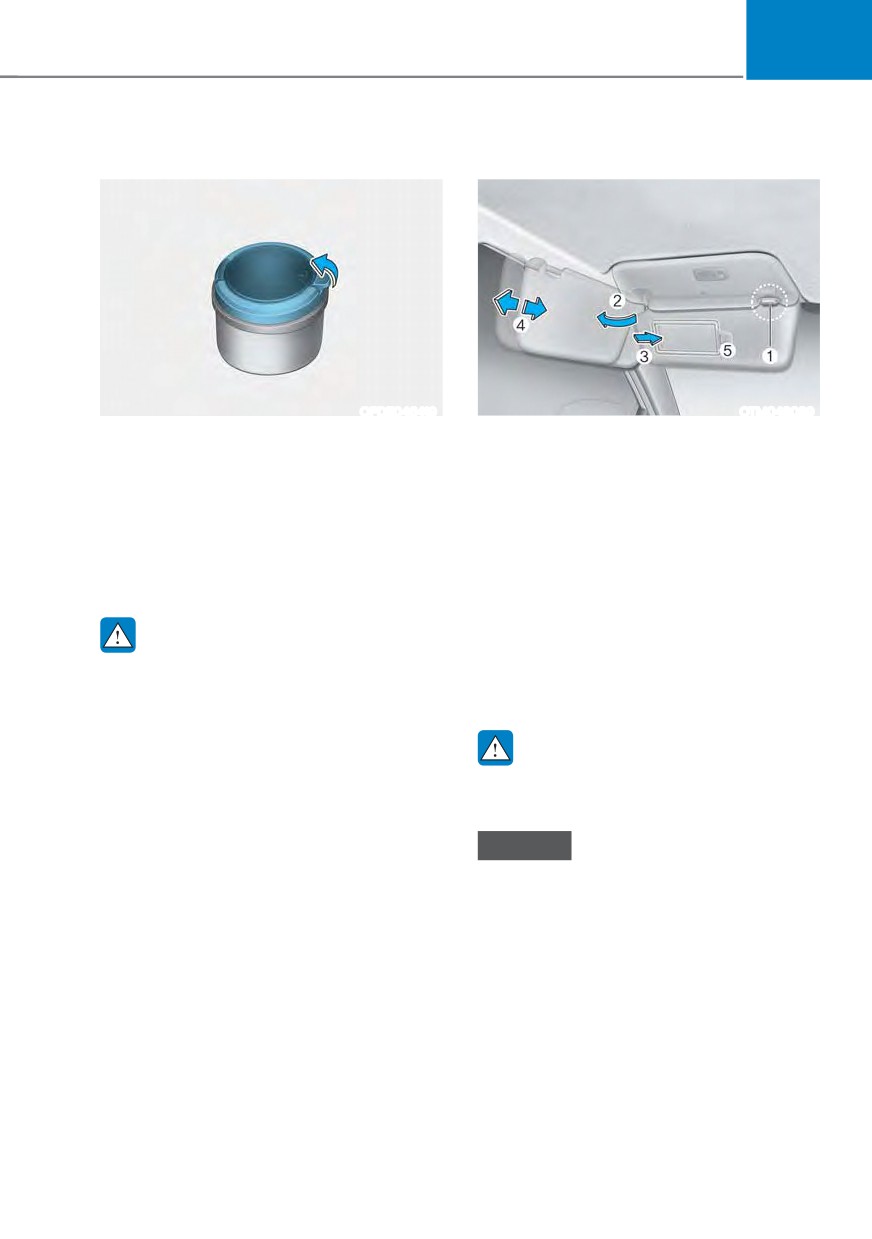
To use the ashtray, open the cover.
To use the sunvisor, pull it downward.
To use the sunvisor to block the sun
To clean the ashtray:
from the side window, pull it downward,
The plastic receptacle should be
release it from the bracket (1) and swing
removed by lifting the plastic ashtray
it to the side (2) towards the window.
receptacle upward after turning the
To use the vanity mirror, pull down the
cover counterclockwise and pulling it
sunvisor and slide the mirror cover (3).
out.
Adjust the sunvisor forward or backward
(4) as needed (if equipped). Use the
ticket holder (5) to hold tickets.
WARNING
Close the vanity mirror cover securely
Putting lit cigarettes or matches in
and return the sunvisor to its original
an ashtray with other combustible
position after use.
materials may cause a fire.
WARNING
For your safety, do not block your view
when using the sunvisor.
NOTICE
The tab (5) adjacent to the vanity mirror
on the sunvisor can be used for toll
road tickets or self parking tickets. Use
caution when inserting tickets into the
ticket holder to avoid damage. Refrain
from putting several tickets in the ticket
holder as this could also damage the
retaining tab.
5-125
Convenience features
Power outlet
CAUTION
Front
To prevent damage to the power
outlets:
ś
Use the power outlet only when the
engine is running and remove the
accessory plug after use. Using the
accessory plug for prolonged periods
of time with the engine off could
cause the battery to discharge.
ś
Only use 12 volts electric accessories
which are less than 180 watts in
electric capacity.
OTM050026
Rear
ś
Adjust the air-conditioner or heater
to the lowest operating level when
using the power outlet.
ś
Close the cover when not in use.
ś
Some electronic devices can
cause electronic interference
when plugged into a vehicle’s
power outlet. These devices may
cause excessive audio static and
malfunctions in other electronic
systems or devices used in your
OTM050031
vehicle.
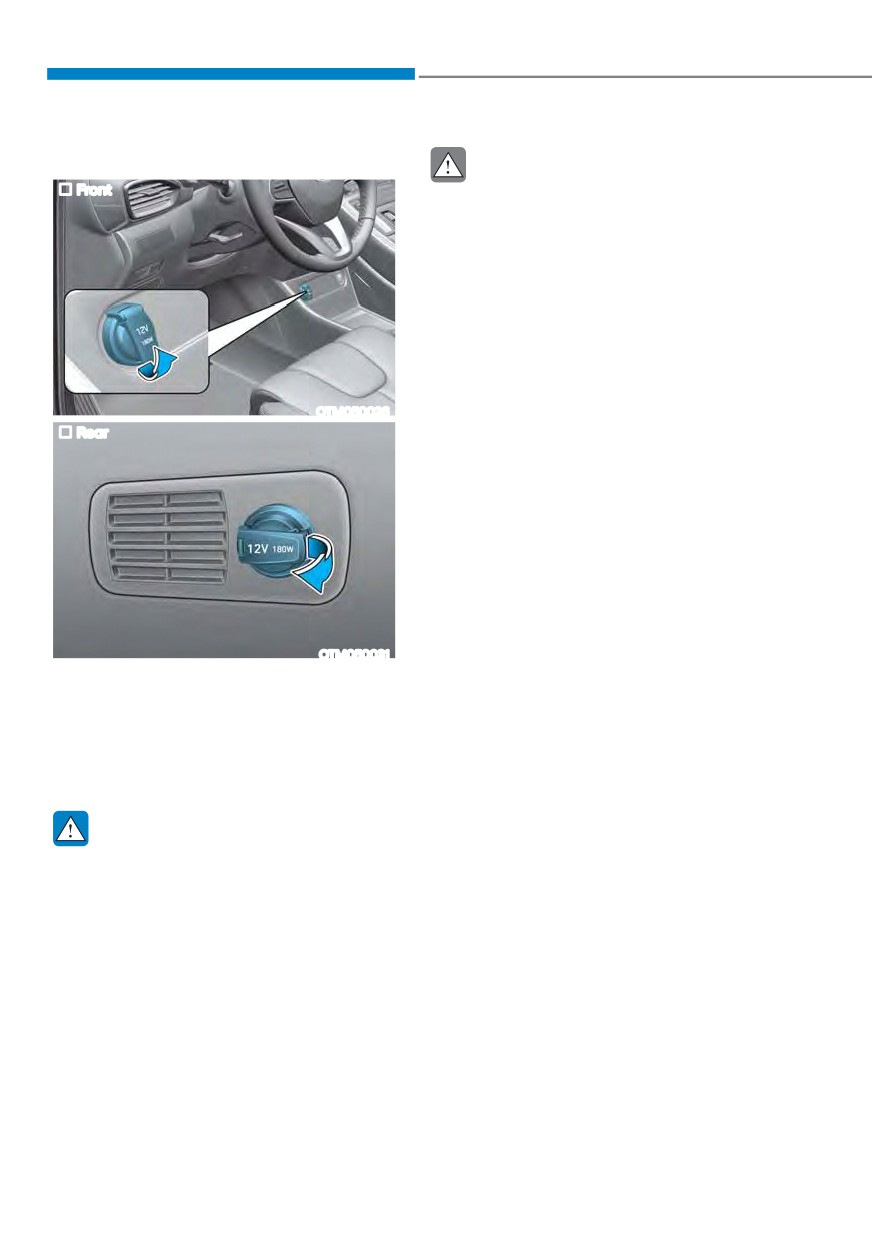
The power outlet is designed to provide
ś
Push the plug in as far as it will go. If
power for mobile telephones or other
good contact is not made, the plug
devices designed to operate with vehicle
may overheat and the fuse may open.
electrical systems. The devices should
ś
Plug in battery equipped electrical/
draw less than 180 watts with the engine
electronic devices with reverse
running.
current protection. The current
from the battery may flow into the
WARNING
vehicle’s electrical/electronic system
and cause system malfunction.
Avoid electrical shocks. Do not place
your fingers or foreign objects (pin, etc.)
into a power outlet or touch the power
outlet with a wet hand.
5-126
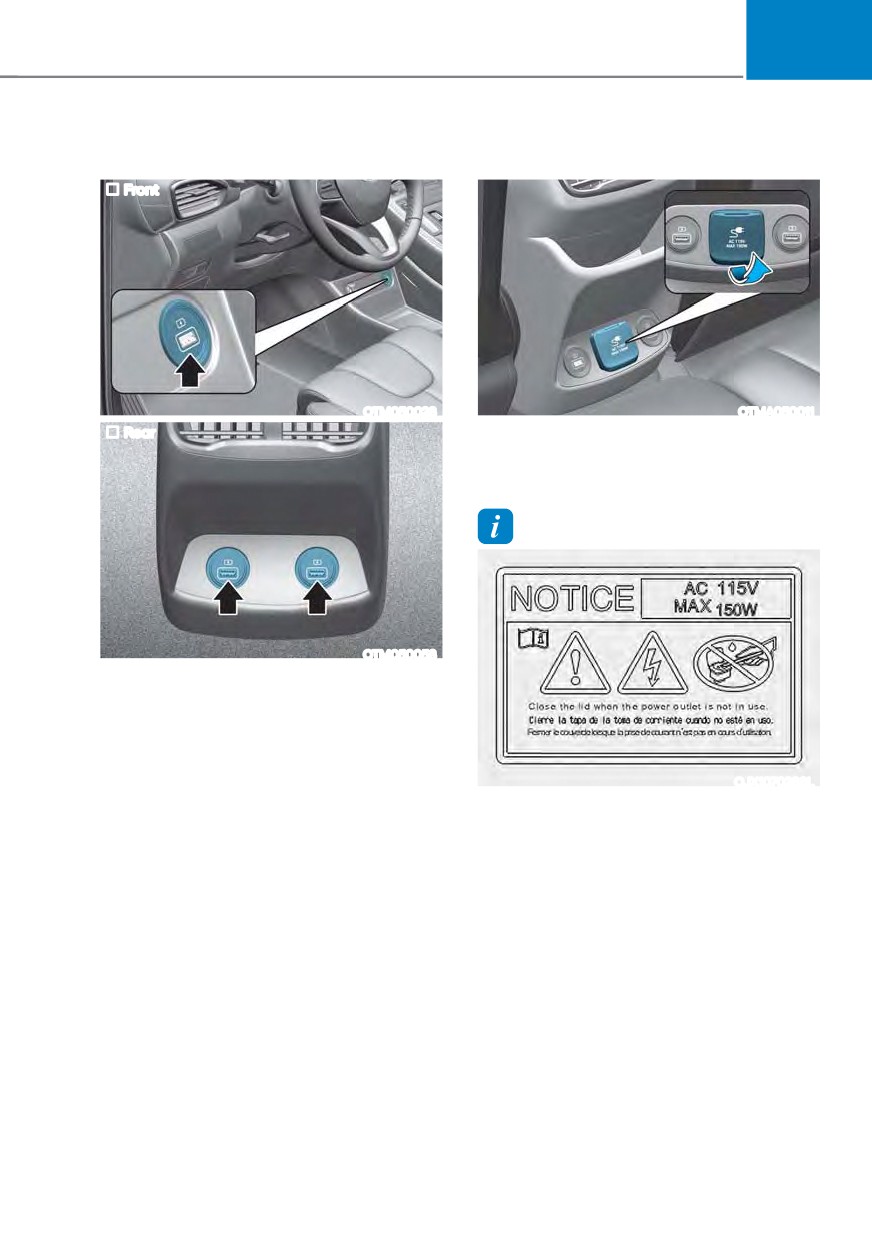
05
USB charger
AC Inverter (if equipped)
Front
OTM050028
OTMA050011
Rear
The AC inverter supplies 115V/150W
electric power to operate electric
accessories or equipments.
Information
OTM050058
The USB charger is designed to recharge
batteries of small size electrical devices
using a USB cable.
The electrical devices can be recharged
when the Engine Start/Stop button is in
the ACC or ON (or START) position.
OJX1070288L
The battery charging state may be
ś
Rated voltage : AC 115 volts
monitored on the electrical device.
ś
Maximum electric power : 150 watts
Disconnect the USB cable from the USB
ś
In order to avoid an electrical system
port after use.
failure, electric shock, etc., be sure to
ś A smart phone or a tablet PC may
read owner’s manual before use.
get warmer during the re-charging
ś
Be sure to close the cover except the
process. It does not indicate any
time of use.
malfunction with the charging system.
ś A smart phone or a tablet PC, which
adopts a different re-charging
method, may not be properly re-
charged. In this case, use an exclusive
charger of your device.
ś The charging terminal is only to
recharge a device. Do not use the
charging terminal either to turn ON
an audio or to play media In the
infotainment system.
5-127
Convenience features
NOTICE
WARNING
ś
To help prevent the battery from
To reduce a risk of serious or fatal
being discharged, do not use the
injuries:
AC inverter while the engine is not
ś
Do not use a heated electric device
running.
such as a coffeepot, toaster, heater,
ś
When not using the AC inverter,
iron, etc.
make sure to close the AC inverter
ś
Do not insert foreign objects into the
cover.
outlet and do not touch the outlet as
ś
After using an electric accessory
you may get shocked.
or equipment, pull the plug out.
ś
Do not let children touch the AC
Leaving the accessory or equipment
inverter.
plugged in for a long time may cause
battery discharge.
ś
Do not use an electric accessory or
equipment the power consumption
of which is greater than 220
volts/200 watts.
ś
Some electric accessories or
equipment can cause electronic
interference. It may cause excessive
audio noise and malfunctions in
other electric systems or devices in
the vehicle.
ś
Do not use broken electric
accessories or equipment, which
may damage the AC inverter and
electrical systems of the vehicle.
ś
Do not use two or more electric
accessories or equipment at the
same time. It may cause damage to
the electrical systems of the vehicle.
ś
When the input voltage is lower,
outlet LED will blink and the AC
inverter will turn off automatically. If
the input voltage goes up to normal,
the AC inverter will turn on again.
5-128
05
Wireless smart phone charging
To charge a cellular phone
system (if equipped)
The wireless smart phone charging
system charges only the Qi-enabled
smart phones (
). Read the label on
the smart phone accessory cover or
visit your smart phone manufacturer’s
website to check whether your smart
phone supports the Qi technology.
The wireless charging process starts
when you put a Qi-enabled smart phone
on the wireless charging unit.
1. Remove other items, including the
smart key, from the wireless charging
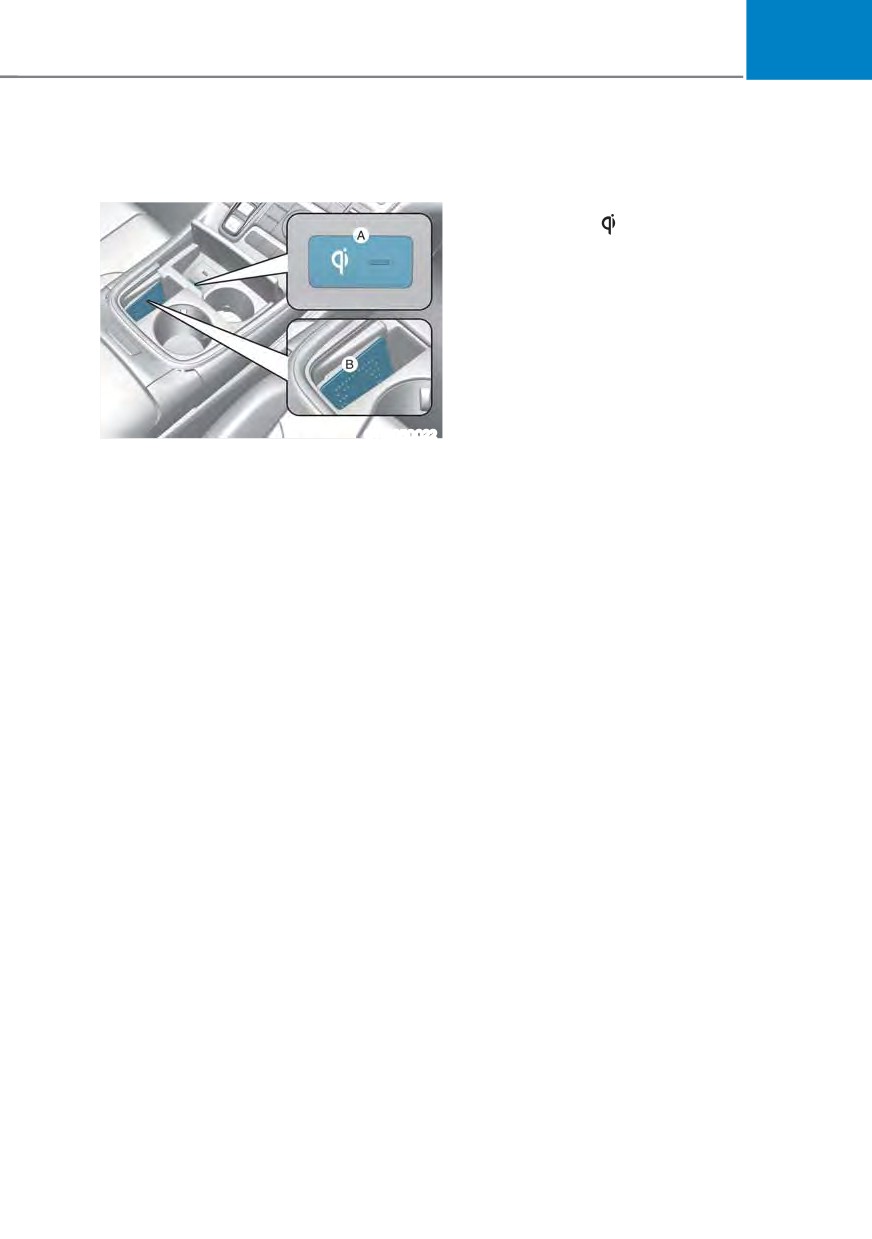
OTM050022
unit. If not, the wireless charging
[A] : Indicator light, [B] : Charging pad
process may be interrupted. Place
the smart phone on the center of the
On certain models, the vehicle comes
charging pad.
equipped with a wireless smart phone
2. The indicator light is orange when the
charger.
smart phone is charging. The indicator
The system is available when all doors
light will turn blue when phone
are closed, and when the Engine Start/
charging is complete.
Stop button is in the ACC or ON (or
3. You can turn ON or OFF the wireless
START) position.
charging function from the Settings
menu on the instrument cluster.
Select:
-
6HWXS Ɵ 8VHU VHWWLQJV Ɵ
&RQYHQLHQFH Ɵ :LUHOHVV &KDUJLQJ
If your smart phone is not charging:
- Slightly change the position of the
smart phone on the charging pad.
- Make sure the indicator light is
orange.
5-129
Convenience features
The indicator light will blink orange for 10
NOTICE
seconds if there is a malfunction in the
ś
The wireless smart phone charging
wireless charging system.
system may not support certain
In this case, temporarily stop the
smart phones, which are not verified
charging process, and re-attempt to
for the Qi specification (
).
charge your smart phone again.
ś
When placing your smart phone on
The system warns you with a message on
the charging pad, position the phone
the LCD display if the smart phone is still
in the middle of the mat for optimal
on the wireless charging unit after the
charging performance. If your smart
vehicle is turned OFF and the front door
phone is off to the side, the charging
is opened.
rate may be less and in some cases
the smart phone may experience
For some manufacturer’s smart phones,
higher heat conduction.
the system may not warn you even
ś
In some cases, the wireless charging
though the smart phone is left on the
may stop temporarily when the
wireless charging unit. This is due to the
smart key is used, either when
particular characteristic of the smart
starting the vehicle or locking/
phone and not a malfunction of the
unlocking the doors, etc.
wireless charging.
ś
When charging certain smart
phones, the charging indicator may
Information
not change to blue when the smart
phone is fully charged.
For some manufacturers’ cellular phones,
the system may not warn you even though
ś
The wireless charging process may
temporarily stop, when temperature
the cellular phone is left on the wireless
charging unit. This is due to the particular
abnormally increases inside the
wireless smart phone charging
characteristic of the cellular phone and
not a malfunction of the wireless charging.
system. The wireless charging
process restarts, when temperature
falls to a certain level.
ś
The wireless charging process may
temporarily stop when there is
any metallic item, such as a coin,
between the wireless smart phone
charging system and smart phone.
5-130
05
ś
When charging some smart phones
Clock
with a self-protection feature,
The clock can be set from the
the wireless charging speed may
infotainment system.
decrease and the wireless charging
may stop.
For detailed information, refer to the
separately supplied infotainment
ś
If the smart phone has a thick cover,
system manual.
the wireless charging may not be
possible.
ś
If the smart phone is not completely
WARNING
contacting the charging pad,
Do not attempt to adjust the clock
wireless charging may not operate
while driving. Doing so may result in
properly.
distracted driving which may lead to
ś
Some magnetic items like credit
an accident involving personal injury or
cards, phone cards or rail tickets may
death.
be damaged if left with the smart
phone during the charging process.
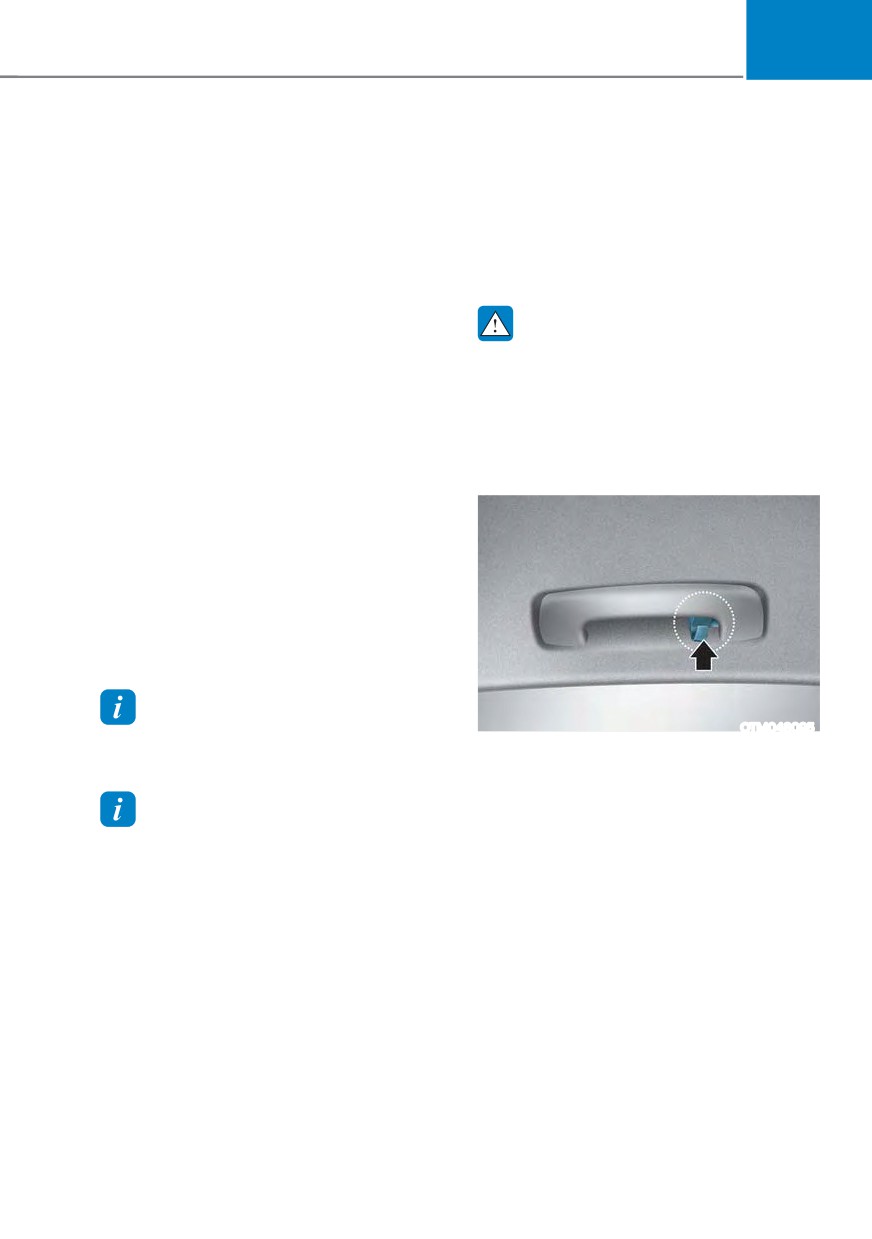
Coat hook
ś
When any smart phone without
a wireless charging function or a
metallic object is placed on the
charging pad, a small noise may
sound. This small sound is due to the
vehicle discerning compatibility of
the object placed on the charging
pad. It does not affect your vehicle or
the smart phone in any way.
Information
OTM048095
If the Ignition switch is in the OFF
These hooks are not designed to hold
position, the charging also stops.
large or heavy items.
Information
This device complies with part 15 of the
FCC Rules.
Operation is subject to the following two
conditions:
1. This device may not cause harmful
interference, and
2. This device must accept any
interference received, including
interference that may cause undesired
operation.
5-131
Convenience features
WARNING
WARNING
The following must be observed when
installing ANY floor mat to the vehicle.
ś Ensure to remove a protective
film attached on the carpet
before attaching a floor mat on
the front floor carpet. Otherwise,
the floor mat may move freely on
the protective film and it could
result in unintentional braking or
accelerating.
ś Ensure that the floor mats are
securely attached to the vehicle’s
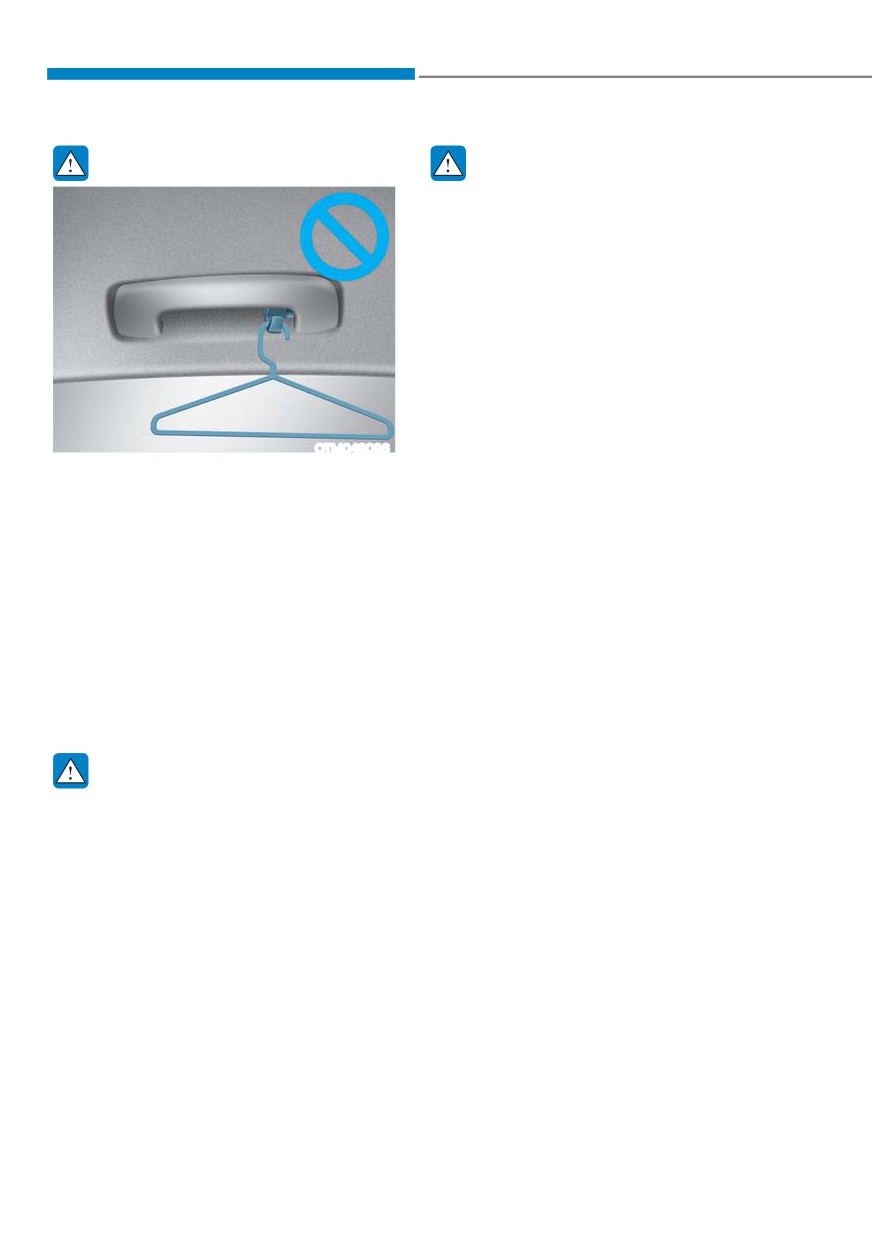
OTM048096
floor mat anchor(s) before driving
the vehicle.
Do not hang other objects such
as hangers or hard objects except
ś Do not use ANY floor mat that cannot
clothes. Also, do not put heavy, sharp
be firmly attached to the vehicle’s
or breakable objects in the clothes
floor mat anchors.
pockets. In an accident or when the
ś Do not stack floor mats on top of one
curtain air bag is inflated, it may cause
another (for example, all-weather
vehicle damage or personal injury.
rubber mat on top of a carpeted floor
mat). Only a single floor mat should
Floor mat anchor(s)
be installed in each position.
ALWAYS use the Floor Mat Anchors to
IMPORTANT - Your vehicle was
attach the front floor mats to the vehicle.
manufactured with driver’s side floor
The anchors on the front floor carpet
mat anchors that are designed to
keep the floor mats from sliding forward.
securely hold the floor mat in place.
To avoid any interference with pedal
operation, HYUNDAI recommends that
WARNING
the HYUNDAI floor mat designed for use
Do not overlay additional mats or liners
in your vehicle be installed.
over the floor mats. If using All Weather
mats, remove the carpeted floor mats
before installing them. Only use floor
mats designed to connect to the
anchors.
5-132
05
Side curtain (if equipped)
Luggage net holder (if equipped)
Type A
OTM050206
OTMPH051014N
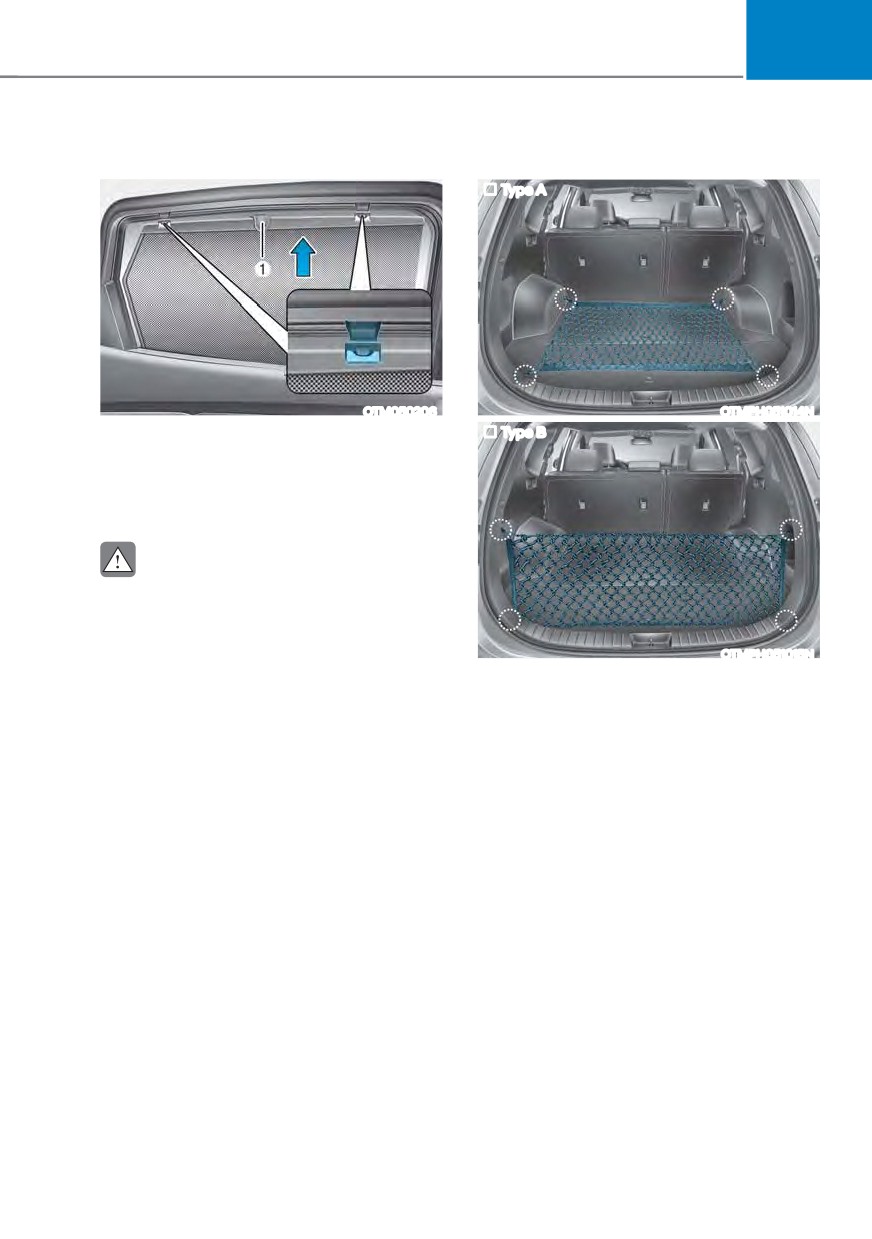
To use the side curtain:
Type B
1. Lift the curtain by the hook (1).
2. Hang the curtain on both sides of the
hook.
CAUTION
ś Always hang both sides of the
curtain on the hook. This could cause
damage to the side curtain if only
one side of the curtain is hooked.
OTMPH051015N
ś Do not let any foreign material get
To keep items from shifting in the
in between the vehicle and side
luggage compartment, you can use the 4
curtain. The side curtain may not be
holders located in the luggage side trim
lifted up.
to attach the luggage net.
Make sure the luggage net is securely
attached to the holders in the luggage
board.
If necessary, contact your authorized
HYUNDAI dealer to obtain a luggage net.
5-133
Convenience features
Using the cargo security screen
WARNING
Avoid eye injury. DO NOT overstretch
the luggage net. ALWAYS keep your
face and body out of the luggage net’s
recoil path. DO NOT use the luggage net
when the strap has visible signs of wear
or damage.
Use the luggage net to keep only light
items from shifting in the luggage
compartment.
Cargo security screen (if
OTMPH051017N
equipped)
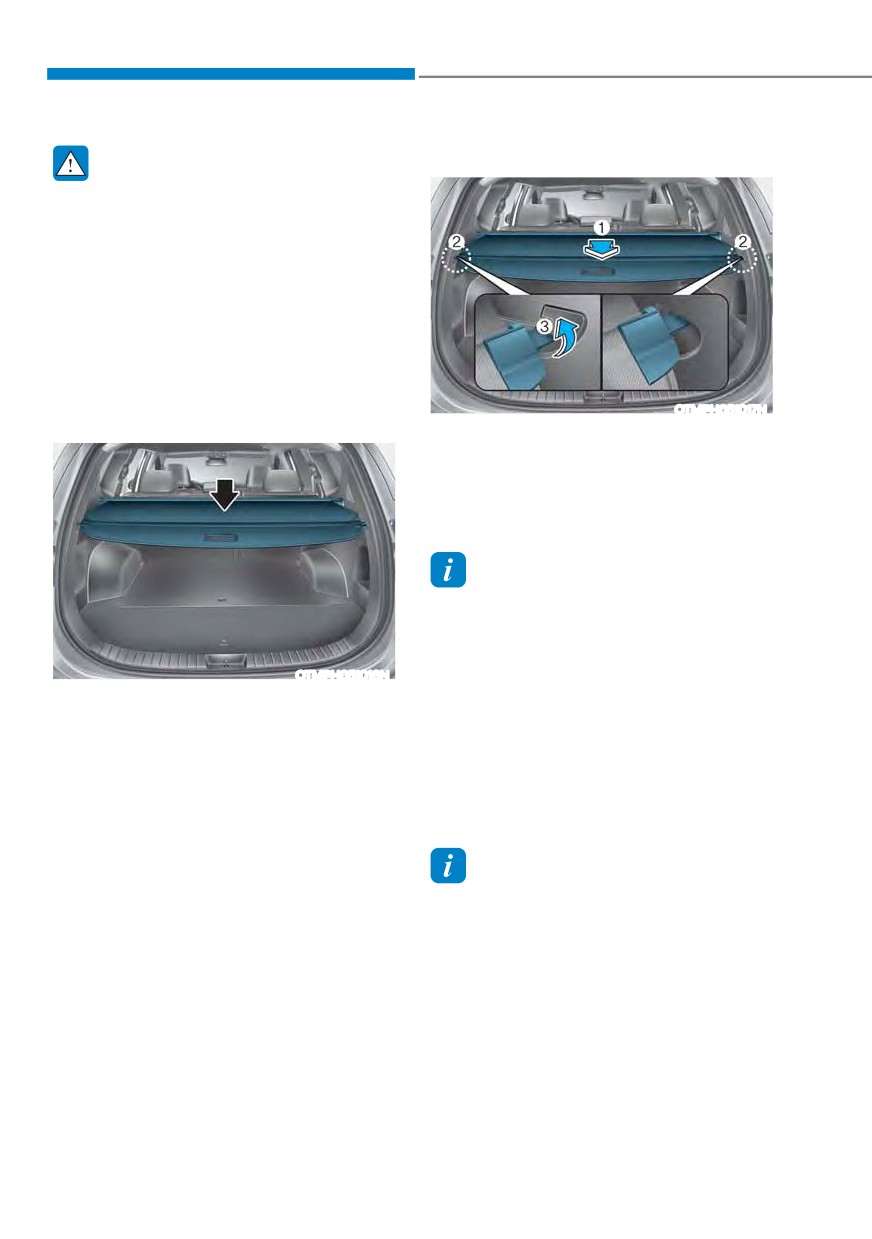
1. Pull the cargo security screen towards
the rear of the vehicle by the handle
(1).
2. Insert the guide pin (2) into the guide
(3).
Information
Pull out the cargo security screen with the
handle in the center to prevent the guide
pin from falling out of the guide.
OTMPH051016N
When the cargo security screen is not in
Use the cargo security screen to cover
use:
items stored in the cargo area.
1. Pull the cargo security screen
backward and up to release it from
the guides.
2. The cargo security screen will
automatically slide back in.
Information
The cargo security screen may not
automatically slide back in if the cargo
security screen is not fully pulled out. Pull
the cargo screen out all the way and then
slowly allow the screen to retract back in.
5-134
05
NOTICE
Since the cargo security screen may
be damaged or malformed, do not put
luggage on it when it is used.
WARNING
ś Do not place objects on the cargo
security screen. Such objects may be
thrown about inside the vehicle and
possibly injure vehicle occupants
during an accident or when braking.
ś Never allow anyone to ride in the
luggage compartment. It is designed
for luggage only.
ś Maintain the balance of the vehicle
and locate the weight as forward as
possible.
5-135
Convenience features
EXTERIOR FEATURES
Roof side rails
WARNING
ś
The following specification is the
maximum weight that can be loaded
onto the roof side rails. Distribute the
load as evenly as possible onto the
roof side rails and secure the load
firmly.
Loading cargo or luggage in excess
of the specified weight limit on the
roof side rails may damage your
vehicle.
OTM050017
ROOF SIDE
220 lbs. (100 kg)
RAILS
EVENLY DISTRIBUTED
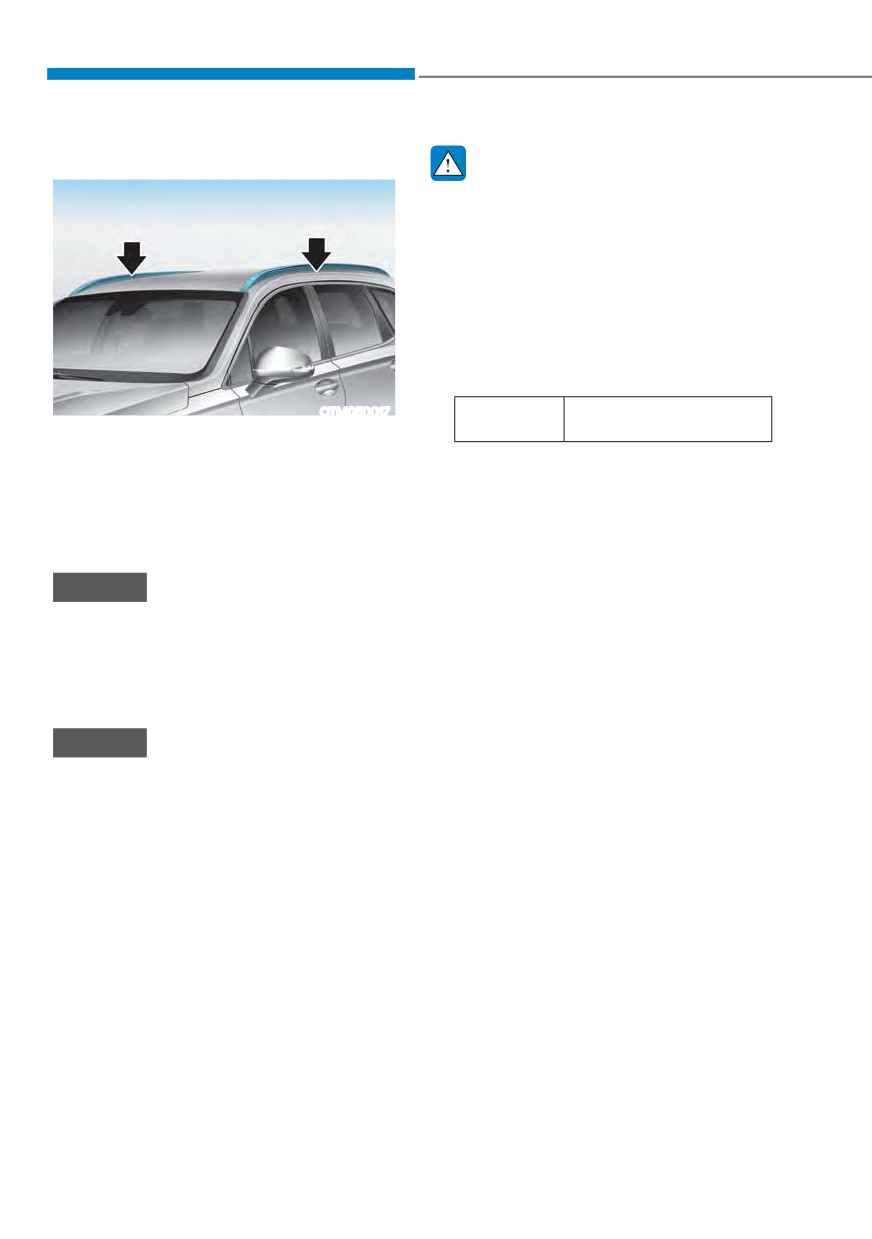
If your vehicle comes with roof side rails,
then roof side rails crossbars can be
ś
The vehicle center of gravity will be
installed on top of your vehicle.
higher when items are loaded onto
The roof side rails crossbars are an
the roof side rails. Avoid sudden
accessory and are available at your
starts, braking, sharp turns, abrupt
HYUNDAI dealer.
maneuvers or high speeds that may
result in loss of vehicle control or
rollover resulting in an accident.
NOTICE
ś
Always drive slowly and turn corners
If the vehicle is equipped with a
carefully when carrying items on the
sunroof, be sure not to position cargo
roof side rails. Severe wind updrafts,
onto the roof side rails in such a way
caused by passing vehicles or natural
that it could interfere with sunroof
causes, can cause sudden upward
operation.
pressure on items loaded on the
roof side rails. This is especially true
NOTICE
when carrying large, flat items such
as wood panels or mattresses. This
ś When carrying cargo on the roof side
could cause the items to fall off the
rails, take the necessary precautions
roof side rails and cause damage to
to make sure the cargo does not
your vehicle or others around you.
damage the roof of the vehicle.
ś
To prevent damage or loss of cargo
ś When carrying large objects on the
while driving, check frequently
roof side rails, make sure they do
before or while driving to make sure
not exceed the overall roof length or
the items on the roof side rails are
width.
securely fastened.
5-136