Hyundai Santa Fe (2023 year). Manual in english - page 8
05
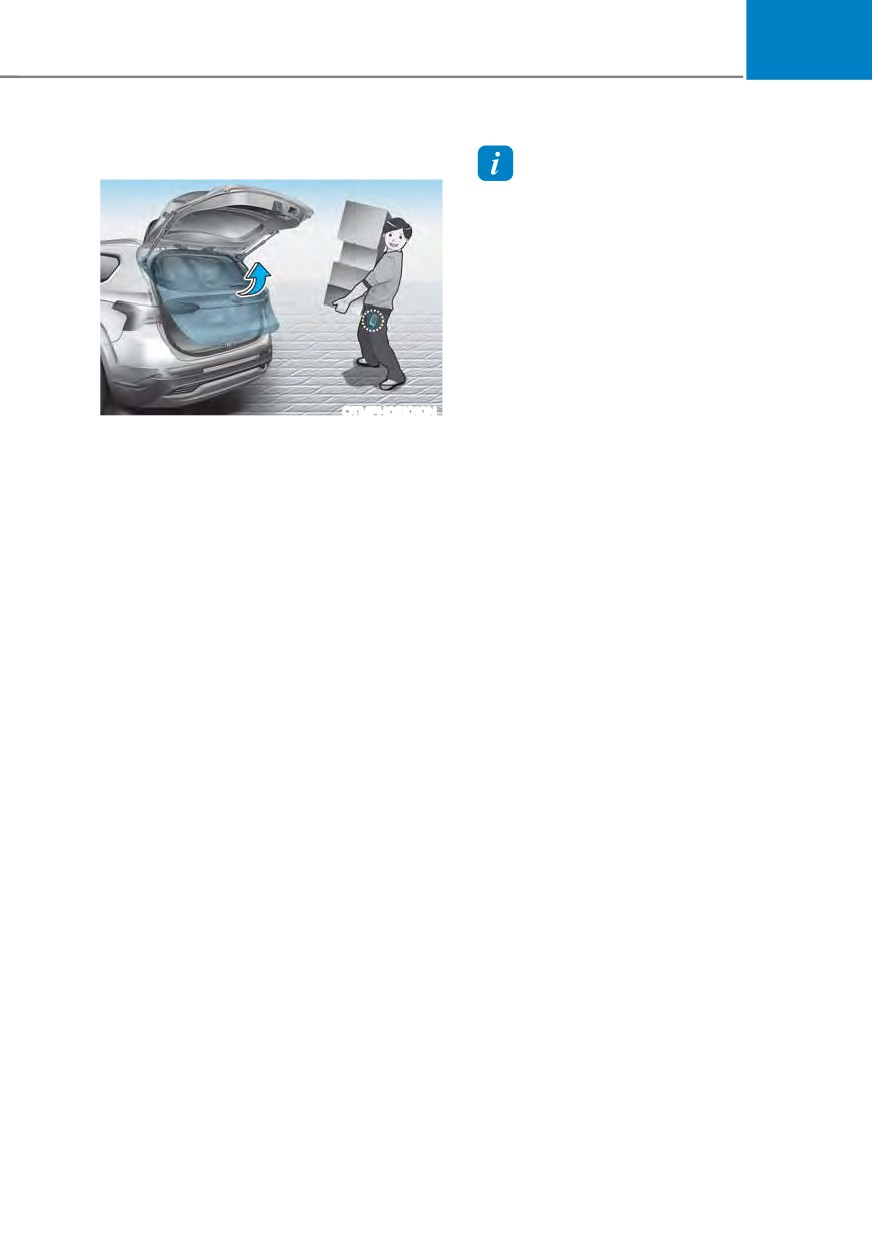
Smart liftgate (if equipped)
Information
The smart liftgate will NOT operate when:
ś A door is not locked or closed.
ś The smart key is detected within
15 seconds from when the doors were
closed and locked.
ś The smart key is detected within
15 seconds after the doors are closed
and locked, and within 60 in. (1.5
m) from the front door handles. (for
vehicles equipped with Welcome Light).
OTMPH051010N
ś The smart key is in the vehicle.
On a vehicle equipped with a smart key,
the liftgate can be opened with hands-
1. Settings
free activation using the smart liftgate
To activate the Smart Liftgate, go to
system.
User Settings Mode and select Smart
Liftgate on the LCD display.
Using smart liftgate
2. Detect and Alert
The hands-free smart liftgate system
can be opened automatically when the
The smart liftgate detecting area
extends approximately 20~40 in.
following conditions are met:
(50~100 cm) behind the vehicle. If you
ś The smart liftgate option is enabled in
are positioned in the detecting area
the Settings menu in the infotainment
and are carrying the smart key, the
system screen.
hazard warning lights will blink and
ś The smart liftgate is activated and
the chime will sound to alert you that
ready 15 seconds after all the doors
the smart liftgate will open.
are closed and locked.
ś The smart liftgate will open when
the smart key is detected in the area
behind the vehicle for 3 seconds.
5-75
Convenience features
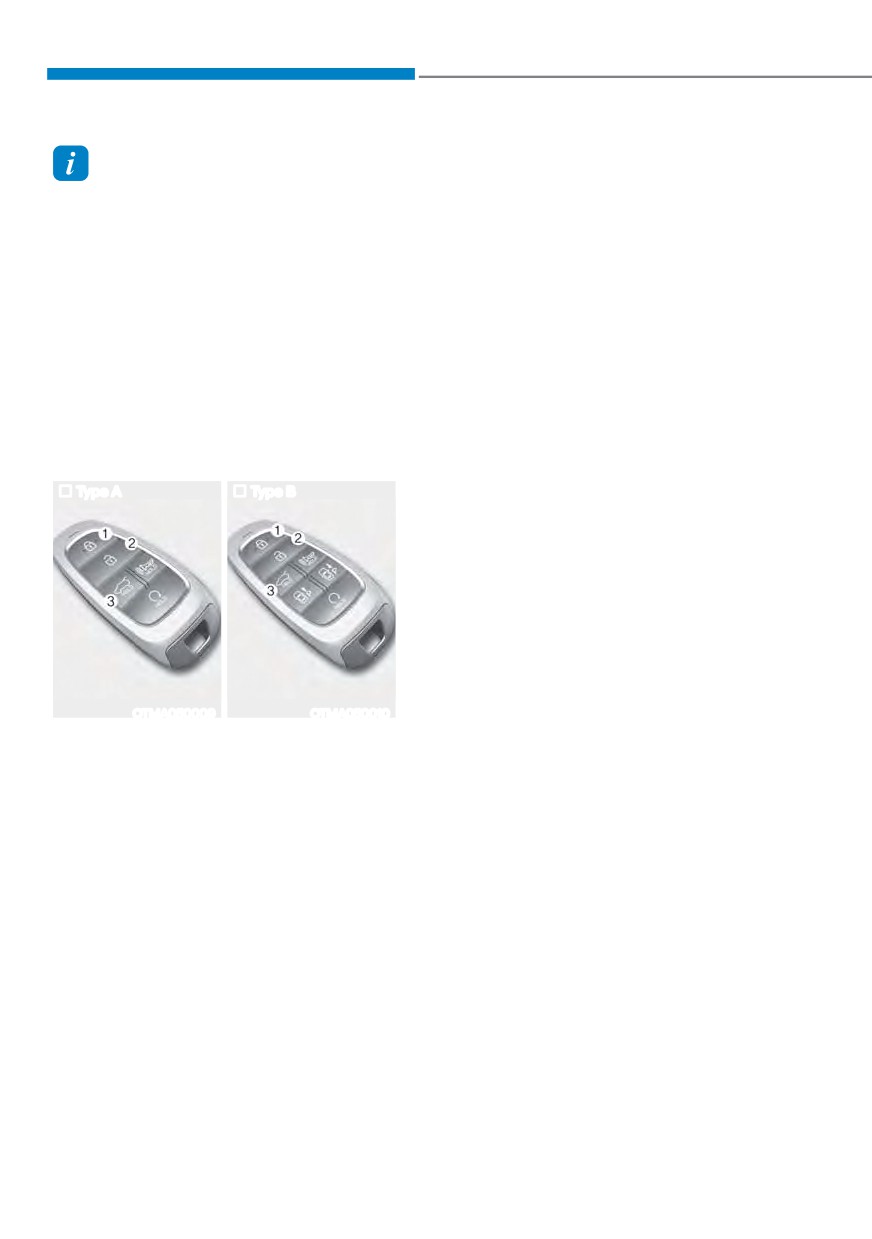
If you press any button on the smart key
Information
during the Detect and Alert stage, the
Do not approach the detecting area if you
smart liftgate will be deactivated.
do not want the liftgate to open. If you
Make sure to be aware of how to
have unintentionally entered the detecting
deactivate the smart liftgate for
area and the hazard warning lights and
emergency situations.
chime starts to operate, move away from
ś
If you press the door unlock button
the area behind the vehicle with the smart
key. The liftgate will remain closed.
(2), the smart liftgate will be
deactivated temporarily. But, if you do
not open any door for 30 seconds, the
3. Automatic opening
smart liftgate will be activated again.
After the hazard warning lights blink
ś
If you press the liftgate open button
and the chime sounds 6 times, the
(3) for more than 1 second, the liftgate
smart liftgate will open.
opens.
Deactivating smart liftgate
ś
The smart liftgate will still be activated
if you press the door lock button (1) or
Type A
Type B
liftgate open/close button (3) on the
smart key as long as the smart liftgate
is not already in the Detect and Alert
stage.
ś
In case you have deactivated the
smart liftgate by pressing the smart
key button and opened a door, the
smart liftgate can be activated again
by closing and locking all doors.
OTMA050009
OTMA050010
1. Door lock
2. Door unlock
3. Liftgate open (Liftgate)
Liftgate open / close (Power liftgate)
5-76
05
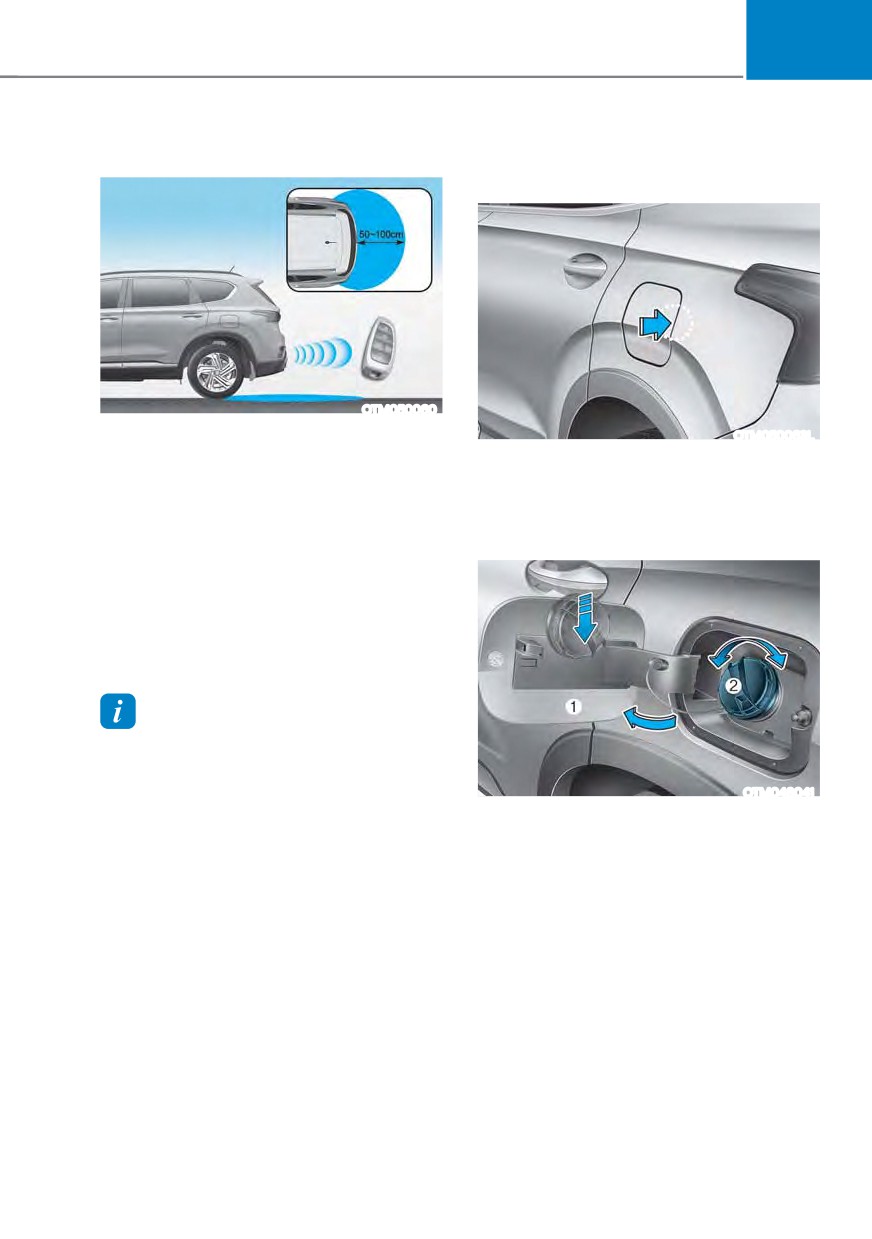
Detecting area
Fuel filler door
Opening the fuel filler door
OTM050060
ś
The smart liftgate detecting area
OTM050063L
extends approximately 20~40 in.
1. Turn the engine off.
(50~100 cm) behind the vehicle. If
2. Ensure Driver’s door is unlocked.
you are positioned in the detecting
area and are carrying the smart key,
3. Press the rear center edge of the fuel
the hazard warning lights will blink
filler door.
and the chime will sound for about 3
seconds to alert you that the liftgate
will open.
ś
The alert stops once the smart key is
moved outside of the detecting area
within the 3 second period.
Information
ś
Smart liftgate may not operate
properly if any of the following occur:
- The smart key is close to a radio
OTM048041
transmitter such as a radio station or
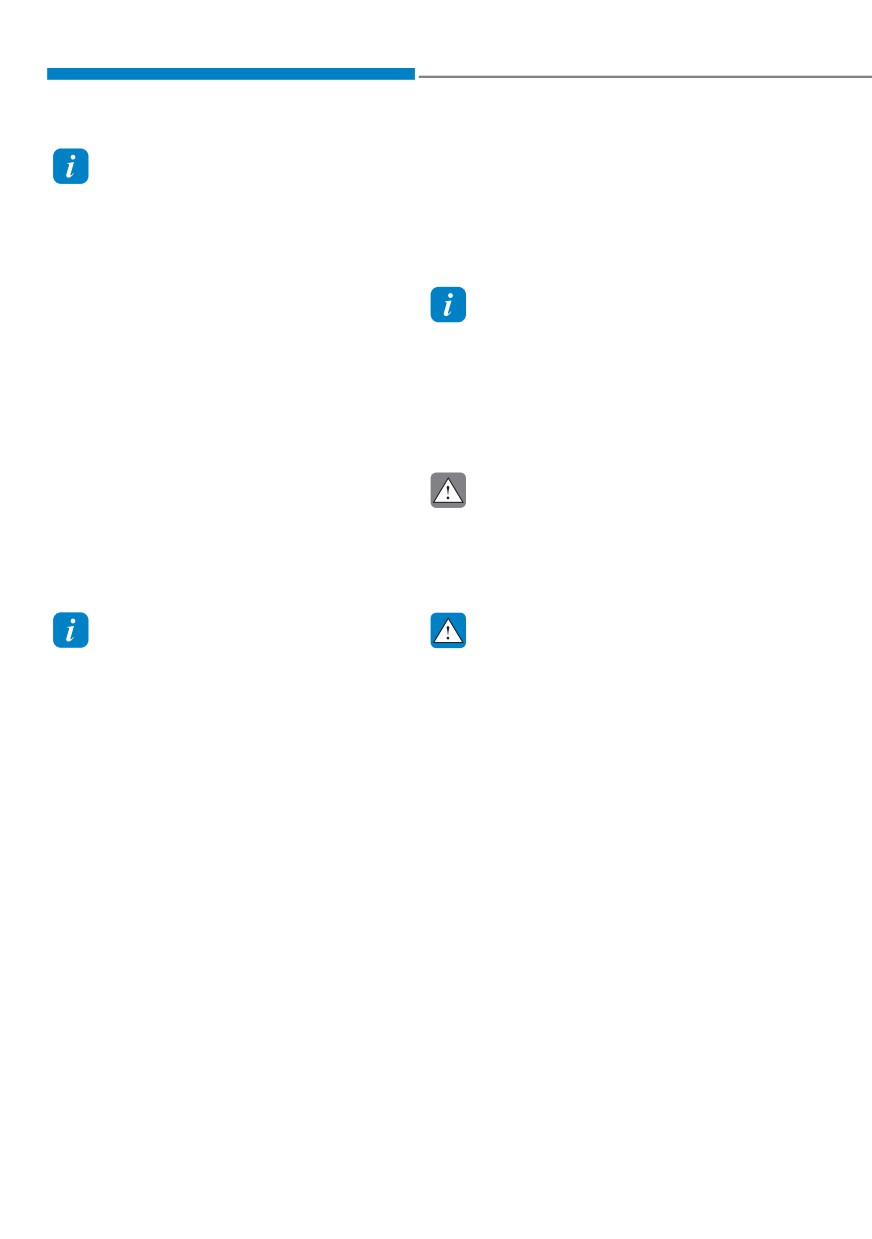
4. Pull the fuel filler door (1) outward to
an airport which can interfere with
access the fuel tank cap.
normal operation of the transmitter.
5. To remove the fuel tank cap (2), turn
- The smart key is near a mobile two
it counterclockwise. You may hear a
way radio system or a mobile phone.
hissing noise as the pressure inside
- Another vehicle’s smart key is being
the tank equalizes.
operated close to your vehicle.
6. Place the cap on the fuel filler door.
ś
Smart liftgate detecting area may
change when:
- The vehicle is parked on an incline
or slope.
- One side of the vehicle is raised or
lowered relative to the opposite side.
5-77
Convenience features
Closing the fuel filler door
Information
1. To install the fuel tank cap, turn it
The fuel filler door will unlock when
clockwise until it “clicks” one time.
Driver’s door is unlocked.
2. Close the fuel filler door until it is
To unlock fuel filler door:
latched securely.
ś Press the unlock button on your smart
key
ś Press the Central Door unlock button
Information
on armrest trim of driver’s door
Make the vehicle door to LOCK position
and the fuel filler door completely closed
The fuel filler door will lock when Driver’s
in order to lock the fuel filler door.
door is locked.
If the fuel filler door is not completely
To lock fuel filler door:
closed, the fuel filler door will not be
locked.
ś Press the lock button on your smart key
ś Press the Central Door lock button on
armrest trim of driver’s door
CAUTION
à All doors will automatically lock after
Keep the door into LOCK position
the vehicle speed exceeds 9 mph. Fuel
when the vehicle is being washed
filler door is also locked when vehicle
(for example, high pressure washer,
speed exceeds 9 mph.
automatic car washer, etc.)
Information
WARNING
If the fuel filler door does not open
Automotive fuel is highly flammable
because ice has formed around it, tap
and explosive. Failure to follow these
lightly or push on the door to break the
guidelines may result in SERIOUS
ice and release the door. Do not pry on the
INJURY or DEATH:
door. If necessary, spray around the door
ś Read and follow all warnings posted
with an approved deicer fluid (do not use
at the gas station.
radiator antifreeze) or move the vehicle to
ś Before refueling, note the location
a warm place and allow the ice to melt.
of the Emergency Fuel Shut-Off, if
available, at the gas station.
ś Before touching the fuel nozzle, you
should eliminate the potential build-
up of static electricity by touching
a metal part of the vehicle, a safe
distance away from the fuel filler
neck, nozzle, or other gas source,
with your bare hand.
ś Do not use mobile phones while
refueling. Electric current and/or
electronic interference from cellular
phones can potentially ignite fuel
vapors and cause a fire.
5-78
05
ś
Do not get back into a vehicle
ś Do not over-fill or top-off your
once you have begun refueling.
vehicle tank, which can cause fuel
You can generate a buildup of
spillage.
static electricity by touching,
ś If a fire breaks out during refueling,
rubbing or sliding against any item
leave the vicinity of the vehicle, and
or fabric capable of producing
immediately contact the manager
static electricity. Static electricity
of the gas station and then contact
discharge can ignite fuel vapors
the local fire department. Follow any
causing a fire. If you must re-enter
safety instructions they provide.
the vehicle, you should once again
ś If pressurized fuel sprays out, it can
eliminate potentially dangerous
cover your clothes or skin and thus
static electricity discharge by
subject you to the risk of fire and
touching a metal part of the vehicle,
burns. Always remove the fuel cap
away from the fuel filler neck, nozzle
carefully and slowly. If the cap is
or other fuel source, with your bare
venting fuel or if you hear a hissing
hand.
sound, wait until the condition stops
ś
When using an approved portable
before completely removing the cap.
fuel container, be sure to place the
ś Always check that the fuel cap is
container on the ground prior to
installed securely to prevent fuel
refueling. Static electricity discharge
spillage in the event of an accident.
from the container can ignite fuel
vapors causing a fire.
Once refueling has begun, contact
Information
between your bare hand and the
Make sure to refuel your vehicle according
vehicle should be maintained until
to the “Fuel Requirements” section in
the filling is complete.
suggested in chapter 1.
ś
Use only approved portable plastic
fuel containers designed to carry and
NOTICE
store fuel.
ś Do not spill fuel on the exterior
ś
When refueling, always shift the
surfaces of the vehicle. Any type of
gear to the P (Park) position, set
fuel spilled on painted surfaces may
the parking brake, and press the
damage the paint.
Engine Start/Stop button to the
OFF position. Sparks produced by
ś If the fuel filler cap requires
electrical components related to the
replacement, use only a genuine
engine can ignite fuel vapors causing
HYUNDAI cap or the equivalent
a fire.
specified for your vehicle. An
ś
Do not use matches or a lighter and
incorrect fuel filler cap can result
in a serious malfunction of the fuel
do not smoke or leave a lit cigarette
in your vehicle while at a gas station,
system or emission control system.
especially during refueling.
5-79
Convenience features
+($'ǘ83 ',63/$< ǣ+8'Ǥ ǣ,) (48,33('Ǥ
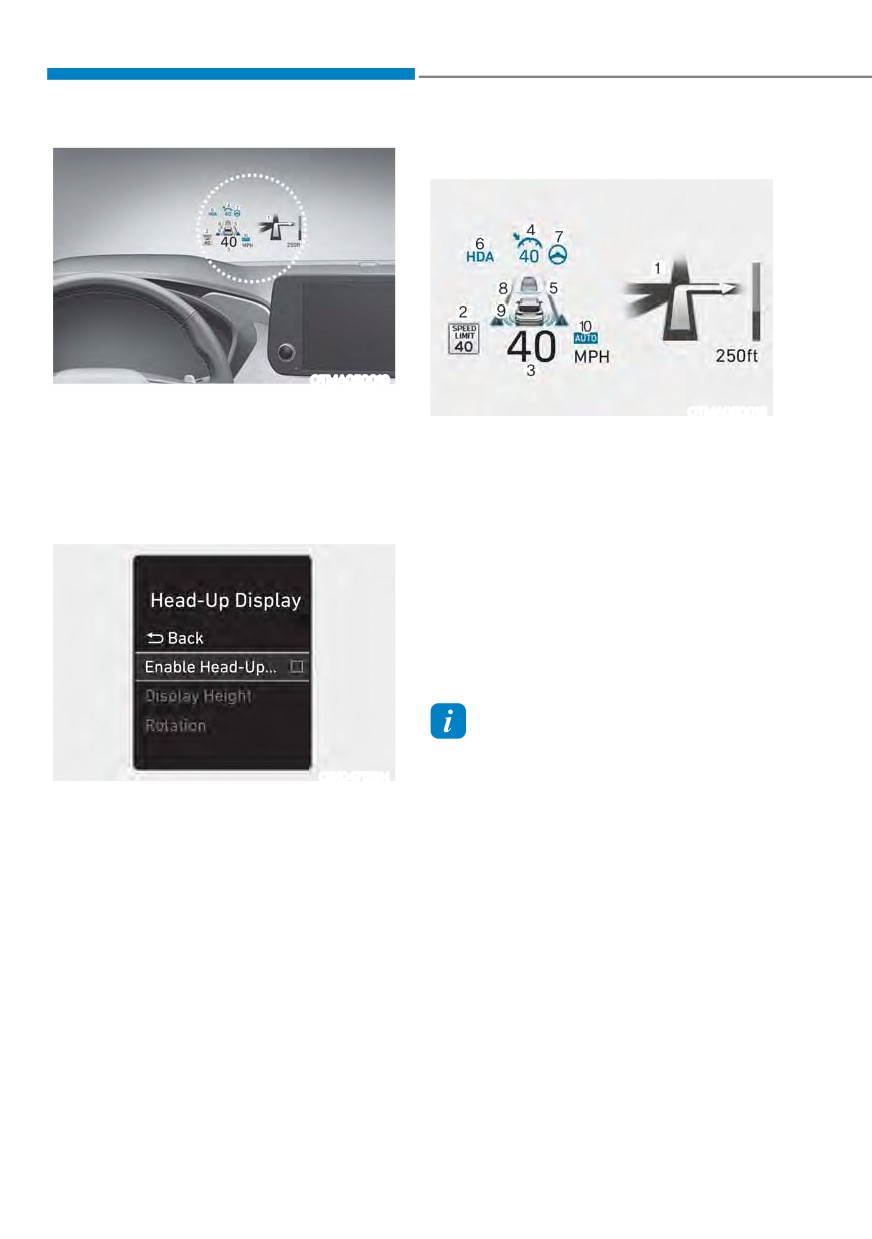
Head-up display information
OTMA050019
The Head-Up Display is an optional
OTMA050016
feature that allows the driver to view
1. Turn by Turn (TBT) navigation
information projected onto a transparent
screen while still keeping your eyes
2. Traffic
safely on the road ahead while driving.
3. Speedometer
4. SCC set speed
Head-up display settings
5. SCC Vehicle distance
6. Highway Driving Assist
7. Lane Following Assist
8. Lane Safety
9. Blind-Spot Safety
10. Highway Auto Speed Change
Information
If you select Turn By Turn (TBT)
navigation information as Head-Up
OIK047152N
Display contents, the Turn By Turn
ś
Head-up display can be enabled from
(TBT) navigation information will not be
the Settings menu in the User Settings
displayed in the instrument cluster LCD
mode on the instrument cluster LCD
display.
display. Select:
-
6HWXS Ɵ +HDG 8S 'LVSOD\ Ɵ (QDEOH
Head-Up Display
ś
After turning on the head-up
display, you can change the settings
of ‘Display Height’ and ‘Content
Selection’ of the Head-Up Display.
5-80
05
Precautions while using the
ś For your safety, make sure to stop the
vehicle before adjusting the settings.
head-up display
ś Do not tint the front windshield glass
ś
It may sometimes be difficult to read
or add other types of metallic coating.
information on the Head-Up Display in
Otherwise, the Head-Up Display
the following situations.
image may be invisible.
- The driver is improperly positioned
ś Do not place any accessories on the
in the driver’s seat
crash pad or attach any objects on the
- The driver wears polarizing-filter
windshield glass.
sunglasses
ś When replacing the front windshield
- An object is located above the
glass, replace it with a windshield
head-up display cover
glass designed for Head-Up Display
- The vehicle is driven on a wet road
operation. Otherwise, duplicated
- Any improper lighting accessory is
images may be displayed on the
windshield glass.
installed inside the vehicle, or there
is incoming light from outside of the
vehicle
WARNING
- The driver wears glasses
Blind-Spot Collision Warning
- The driver wears contact lenses
warnings on the Head-Up Display are
When it is difficult to read the Head-
supplemental. Do not solely depend on
Up Display information, adjust the
them to change lanes. Always take a
image height or brightness level from
look around before changing lanes.
the Settings menu in the infotainment
system screen.
5-81
Convenience features
LIGHTING
Exterior lights
Lighting control
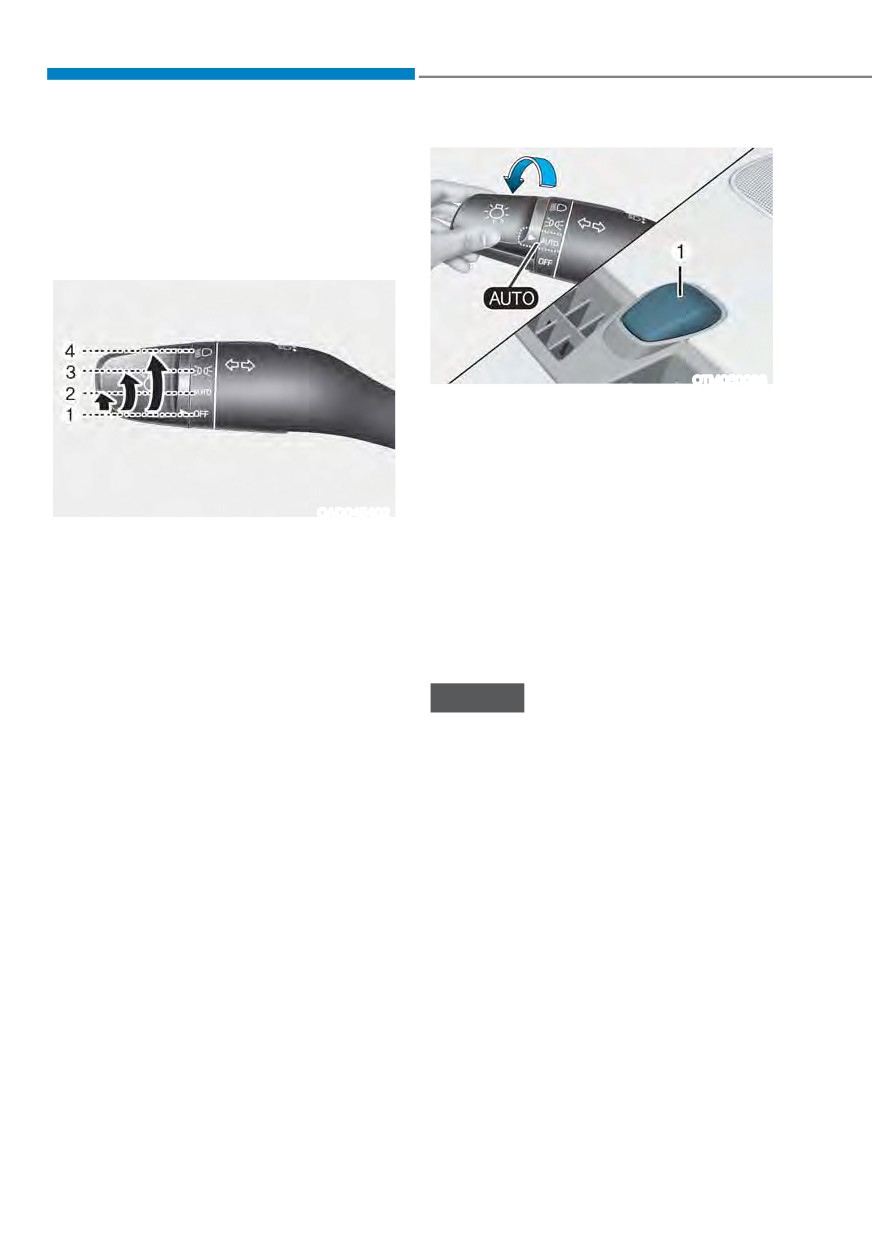
To operate the lights, turn the knob at
the end of the control lever to one of the
following positions:
OTM050098
AUTO headlight
The position lamp and headlight will
be turned ON or OFF automatically
depending on the amount of daylight as
measured by the ambient light sensor (1)
OAD045402
at the upper end of the windshield glass.
1. OFF
Even with the AUTO headlight feature
2. AUTO headlight
in operation, it is recommended to
3. Position lamp
manually turn ON the headlights when
4. Headlight
driving at night or in a fog, driving in the
rain, or when you enter dark areas, such
as tunnels and parking facilities.
Daytime Running Light (DRL)
The Daytime Running Lights (DRL) can
make it easier for others to see the front
NOTICE
of your vehicle during the day, especially
ś Do not cover or spill anything on the
after dawn and before sunset.
sensor (1) located at the upper end of
the windshield glass.
The DRL system will turn the dedicated
ś Do not clean the sensor using
lamp OFF when :
a window cleaner, the cleanser
ś The headlights are ON.
may leave a light film which could
ś The parking brake is applied.
interfere with sensor operation.
ś The vehicle is turned off.
ś If your vehicle has window tint or
other types of metallic coating on the
front windshield, the AUTO headlight
system may not work properly.
5-82
05
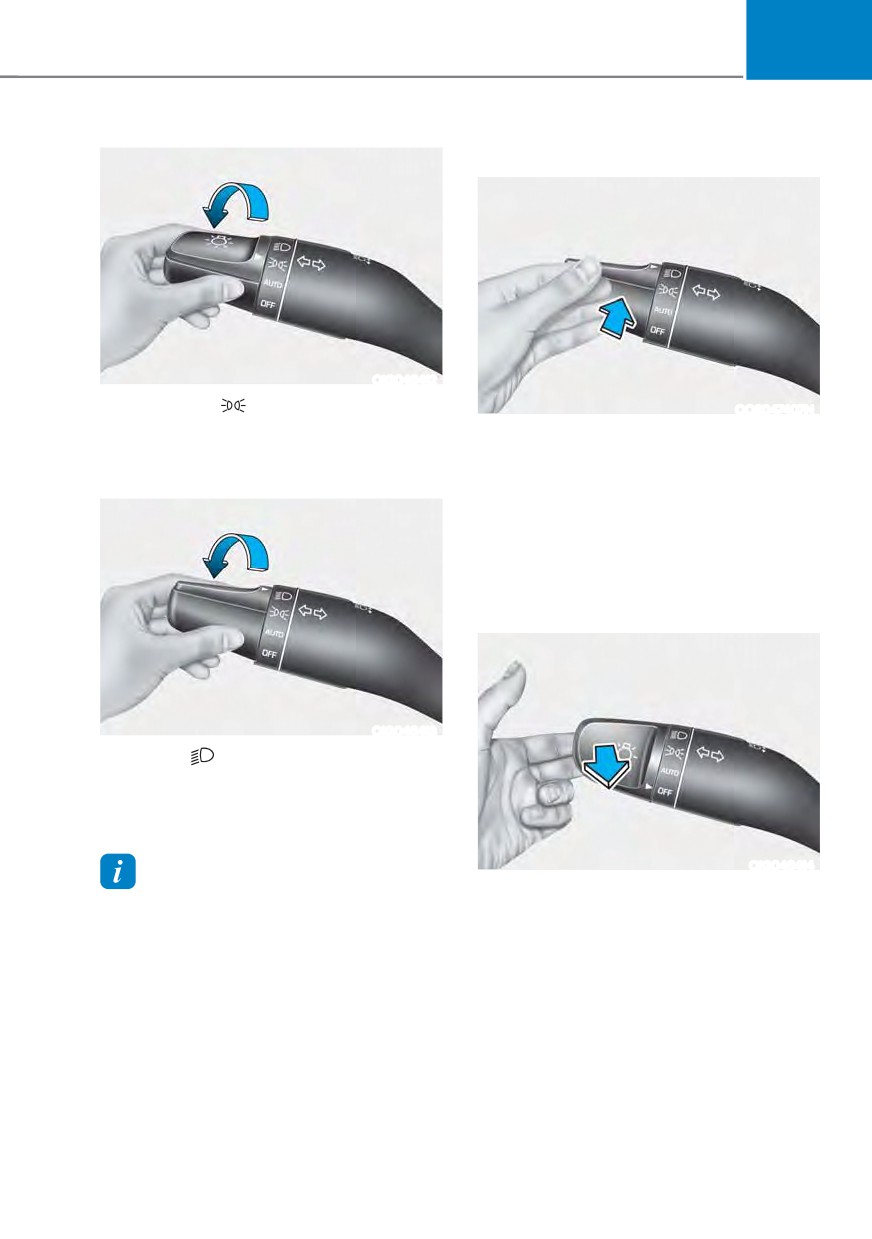
High beam operation
OIG046412
Position lamp (
)
OOS047407N
The position lamp, license plate lamp
To turn on the high beam headlight, push
and instrument panel lamp are turned
the lever away from you. The lever will
ON.
return to its original position.
The high beam indicator will light when
the headlight high beams are switched
on.
To turn off the high beam headlight, pull
the lever towards you. The low beams
will turn on.
OIG046413
Headlight (
)
The headlight, position lamp, license
plate lamp and instrument panel lamp
are turned ON.
OIG046414
Information
To flash the high beam headlight, pull the
The ignition switch must be in the ON
lever towards you, then release the lever.
position to turn on the headlight.
The high beams will remain ON as long
as you hold the lever towards you.
5-83
Convenience features
Turn signals and lane change signals
Battery saver function
The purpose of this feature is to prevent
the battery from being discharged.
The system automatically turns off the
position lamp when the driver turns the
vehicle off and opens the driver-side
door.
With this feature, the position lamps will
turn off automatically if the driver parks
on the side of road at night.
However, the position lamps stay ON
even when the driver-side door is opened
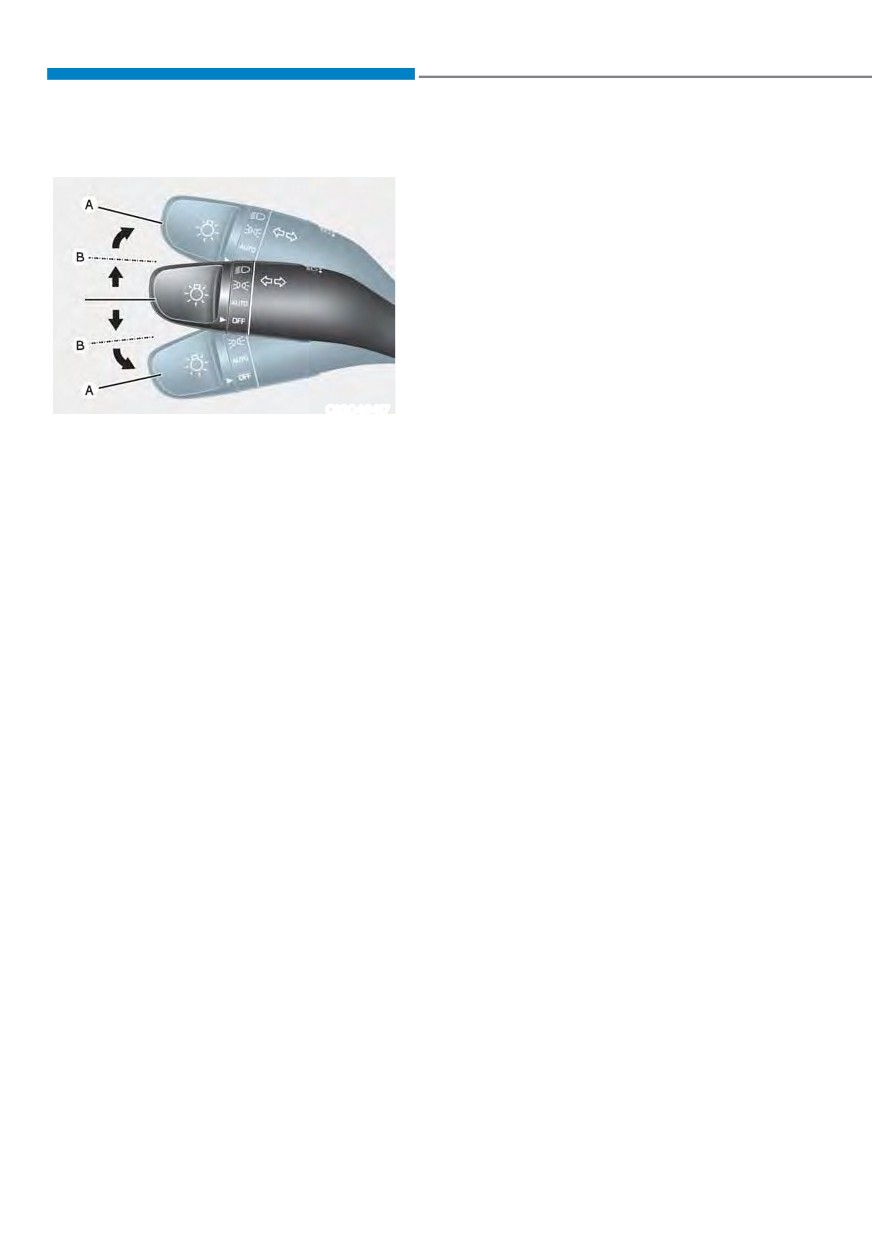
OIG046417
if the headlight switch is turned to the
To signal a turn, push down on the lever
position lamp or AUTO (if equipped)
for a left turn or up for a right turn in
position after the engine is turned off.
position (A).
If necessary, to keep the lamps on
If an indicator stays on and does not flash
turn the position lamps OFF and ON
or if it flashes abnormally, one of the turn
again using the headlight switch on
signal bulbs may be burned out and will
the steering column after the engine is
require replacement.
turned off.
One touch turn signal
To use One Touch Turn Signal push the
turn signal lever up or down to position
(B) and then release it.
The lane change signals will blink 3, 5 or
7 times.
You can enable the One Touch Turn
Signal function or choose the number
RI EOLQNLQJ E\ VHOHFWLQJ œ6HWXS Ɵ 8VHU
6HWWLQJV Ɵ /LJKWV Ɵ 2QH 7RXFK 7XUQ 6LJQDO
Ɵ 2II IODVKHV IODVKHV IODVKHVŔ LQ WKH
instrument panel LCD cluster.
5-84
05
Headlight delay function
Traffic change (if equipped)
(if equipped)
The low beam light distribution is
If you place the ignition switch to the
asymmetric. If you go abroad to a
ACC position or the OFF position with
country with opposite traffic direction,
the headlights ON, the headlights (and/
this asymmetric part will dazzle
or position lamps) remain on for about
oncoming car driver.
5 minutes. However, if the driver’s door
To prevent dazzle, ECE regulation
is opened and closed, the headlights
demand several technical solutions (ex.
are turned off after 15 seconds. Also,
automatic change system, adhesive
with the vehicle off if the driver’s door is
sheet, down aiming). These headlights
opened and closed, the headlights (and/
are designed not to dazzle opposite
or position lamps) are turned off after 15
drivers.
seconds.
You can activate or deactivate the Traffic
The headlights (and/or position lamps)
Change feature from the User Settings
can be turned off by pressing the lock
PRGH RQ WKH /&' GLVSOD\ *R WR œ/LJKWV Ɵ
button on the remote key or smart key
Travel Mode’.
twice or turning the headlight switch to
For more details, refer to “LCD Display”
the OFF or AUTO position.
In chapter 4.
You can enable the headlight delay
IXQFWLRQ E\ VHOHFWLQJ œ6HWXS Ɵ 8VHU
6HWWLQJV Ɵ /LJKWV Ɵ +HDGOLJKW 'HOD\
NOTICE
If the driver exits the vehicle through
another door besides the driver
door, the battery saver function
does not operate and the headlight
delay function does not turn OFF
automatically.
This may cause the battery to
discharge. To avoid battery discharge,
turn OFF the headlights manually from
the headlight switch before exiting the
vehicle.
5-85
Convenience features
+,*+ %($0
$66,67 ǣ+%$Ǥ
NOTICE
Always keep the front view camera in
good condition to maintain optimal
performance of High Beam Assist.
For more details on the precautions
of the front view camera, refer to
“Forward Collision-Avoidance Assist
(FCA)” section in chapter 7.
High Beam Assist Settings
OIK047090
:LWK WKH HQJLQH RQ VHOHFW œ/LJKWV Ɵ +LJK
High Beam Assist will automatically
Beam Assist (or HBA (High Beam Assist))’
adjust the headlight range (switches
from the Settings menu to turn on High
between high beam and low beam)
Beam Assist and deselect to turn off the
depending on the brightness of detected
system.
vehicles and certain road conditions.
WARNING
Detecting sensor (Front view
camera)
For your safety, change the Settings
after parking the vehicle at a safe
location.
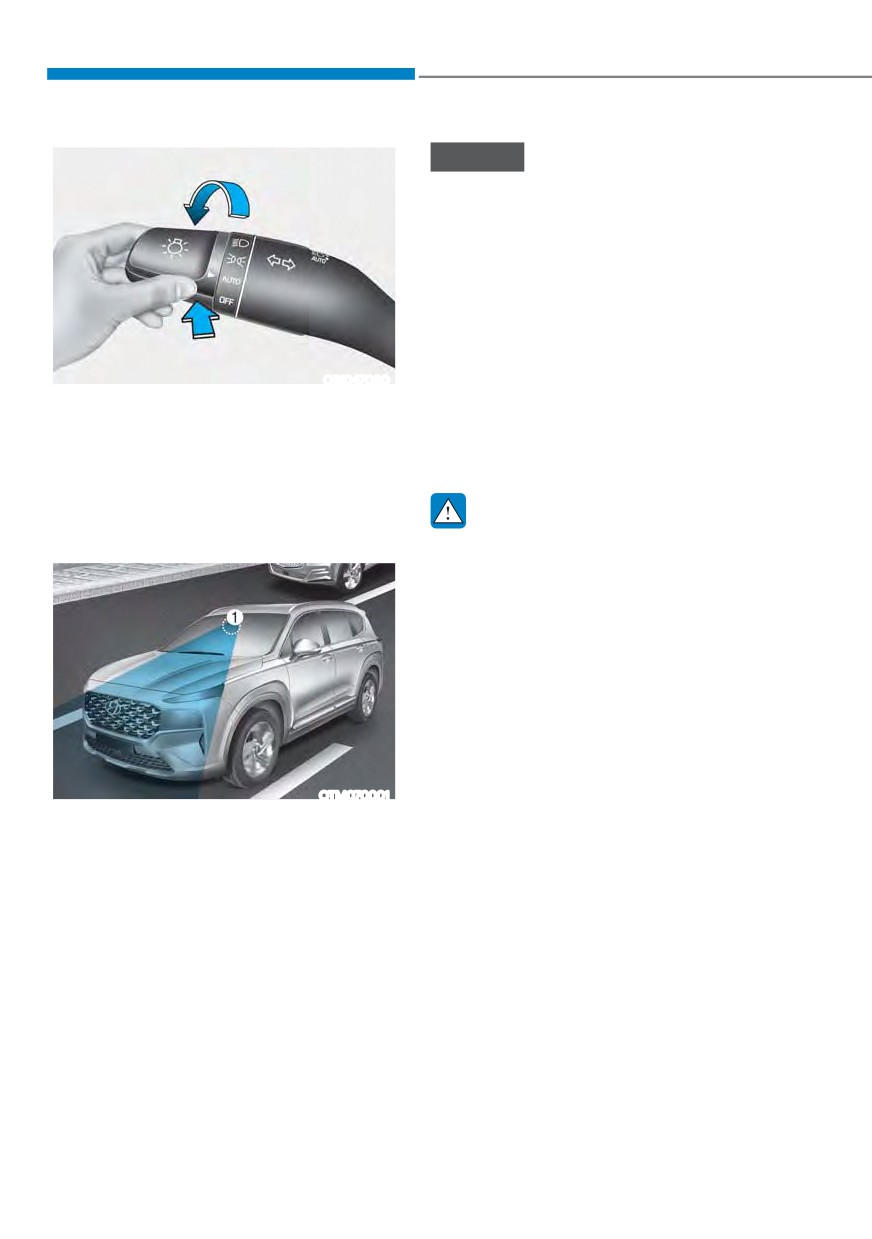
OTM070001
[1] : Front view camera
The front view camera is used as a
detecting sensor to detect ambient light
and brightness while driving.
Refer to the picture above for the
detailed location of the detecting sensor.
5-86
05
High Beam Assist Operation
ś When High Beam Assist is operating,
high beam switches to low beam if
Display and control
any of the following conditions occur:
ś
After selecting ‘High Beam Assist’
- When the headlight of an oncoming
in the Settings menu, High Beam
vehicle is detected.
Assist will operate by following the
procedure below.
- When the tail lamp of a vehicle in
front is detected.
- Place the headlight switch in
the AUTO position and push
- When the headlight or tail lamp of a
the headlight lever towards the
motorcycle or a bicycle is detected.
instrument cluster. The High Beam
- When the surrounding ambient light
Assist (
) indicator light will
is bright enough that high beams
illuminate on the cluster and the
are not required.
system will be enabled.
- When streetlights or other lights are
- When the system is enabled, high
detected.
beam will turn on when vehicle
speed is above 25mph (40km/h).
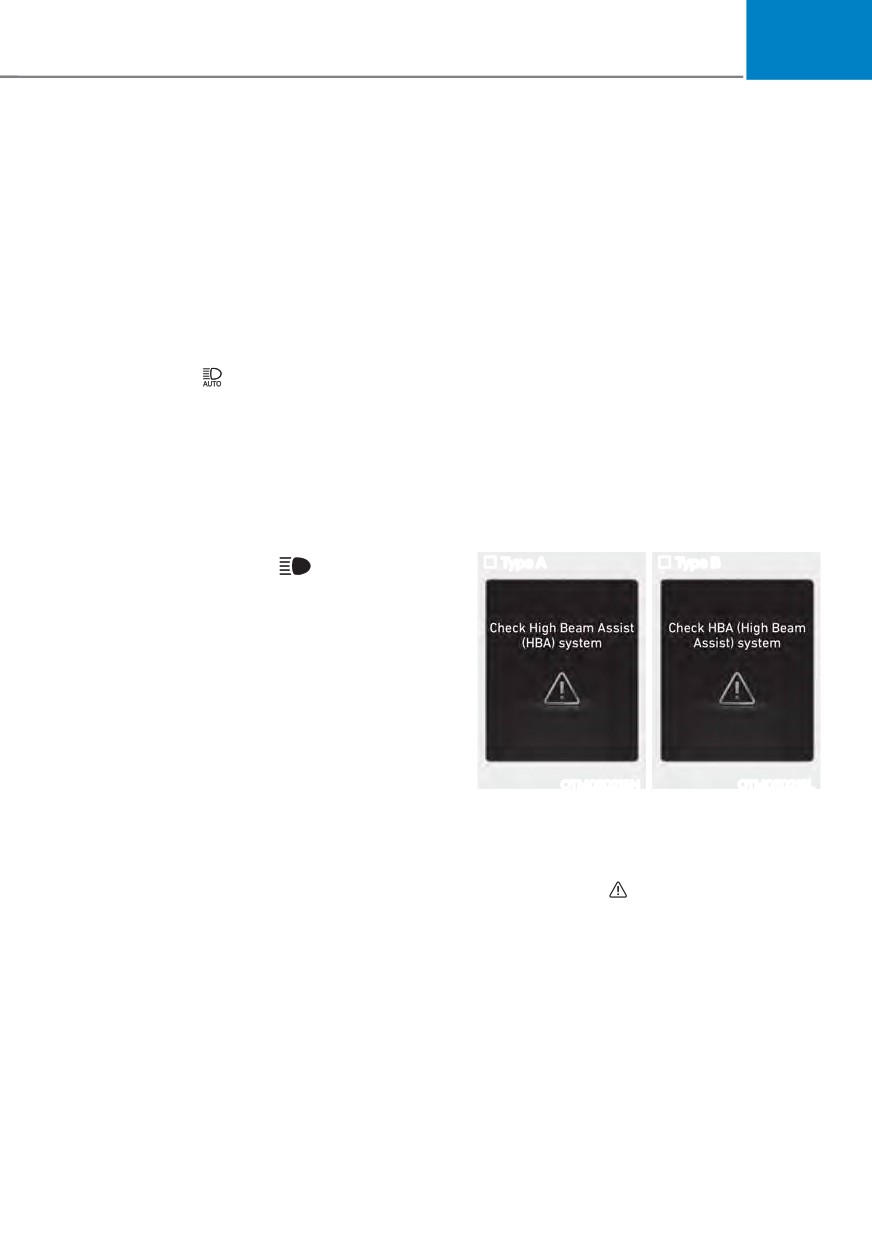
High Beam Assist Malfunction
When vehicle speed is below 15mph
and Limitations
(25km/h), high beam will not turn
High Beam Assist Malfunction
on.
- The High Beam (
) indicator light
Type A
Type B
will illuminate on the cluster when
high beam is on.
ś
When High Beam Assist is operating,
if the headlight lever or switch is used,
the system operates as follow:
- If the headlight lever is pulled
towards you when the high beam
is off, the high beam will turn on
without High Beam Assist canceled.
When you let go of the headlight
OTM050218N
OTM050218L
lever, the lever will move to the
When High Beam Assist is not working
middle and the high beam will turn
properly, the ‘Check High Beam Assist
off.
(HBA) system’ or ‘Check HBA (High
- If the headlight lever is pulled
Beam Assist system’ warning message
towards you when the high beam is
will appear and warning light will
on by High Beam Assist, low beam
illuminate on the cluster. Have the
will be on and the system will turn
system be inspected by an authorized
off.
HYUNDAI dealer.
- If the headlight switch is placed
from AUTO to another position
(headlight/position/off), High
Beam Assist will turn off and the
corresponding lamp will turn on.
5-87
Convenience features
Limitations of High Beam Assist
WARNING
High Beam Assist may not work properly
ś
At times, High Beam Assist may not
in the following situations:
work properly. It is the responsibility
ś
Light from a vehicle is not detected
of the driver for safe driving
because of lamp damage, or because
practices and always check the road
it is hidden from sight, etc.
conditions for your safety.
ś
Headlight of a vehicle is covered with
ś
When High Beam Assist does not
dust, snow or water.
operate normally, change the
ś
A vehicle’s headlights are off but the
headlight position manually between
fog lamps are on and etc.
high beam and low beam.
ś
There is a lamp that has a similar
shape as a vehicle’s lamp.
ś
Headlights have been damaged or not
repaired properly.
ś
Headlights are not aimed properly.
ś
Driving on a narrow curved road,
rough road, uphill or downhill.
ś
Vehicle in front is partially visible on a
crossroad or curved road.
ś
There is a traffic light, reflecting sign,
flashing sign or mirror ahead.
ś
There is a temporary reflector or flash
ahead (construction area).
ś
The road conditions are bad such as
being wet, iced or covered with snow.
ś
A vehicle suddenly appears from a
curve.
ś
The vehicle is tilted from a flat tire or
is being towed.
ś
Light from a vehicle is not detected
because of exhaust fume, smoke, fog,
snow, etc.
For more details on the limitations
of the front view camera, refer to
“Forward Collision-Avoidance Assist
(FCA)” section in chapter 7.
5-88
05
INTERIOR LIGHTS
Front lamps
WARNING
Do not use the interior lights when
driving in the dark. The interior lights
may obscure your view and cause an
accident.
NOTICE
Do not use the interior lights for
extended periods when the vehicle is
turned off or the battery will discharge.
Interior lamp AUTO cut
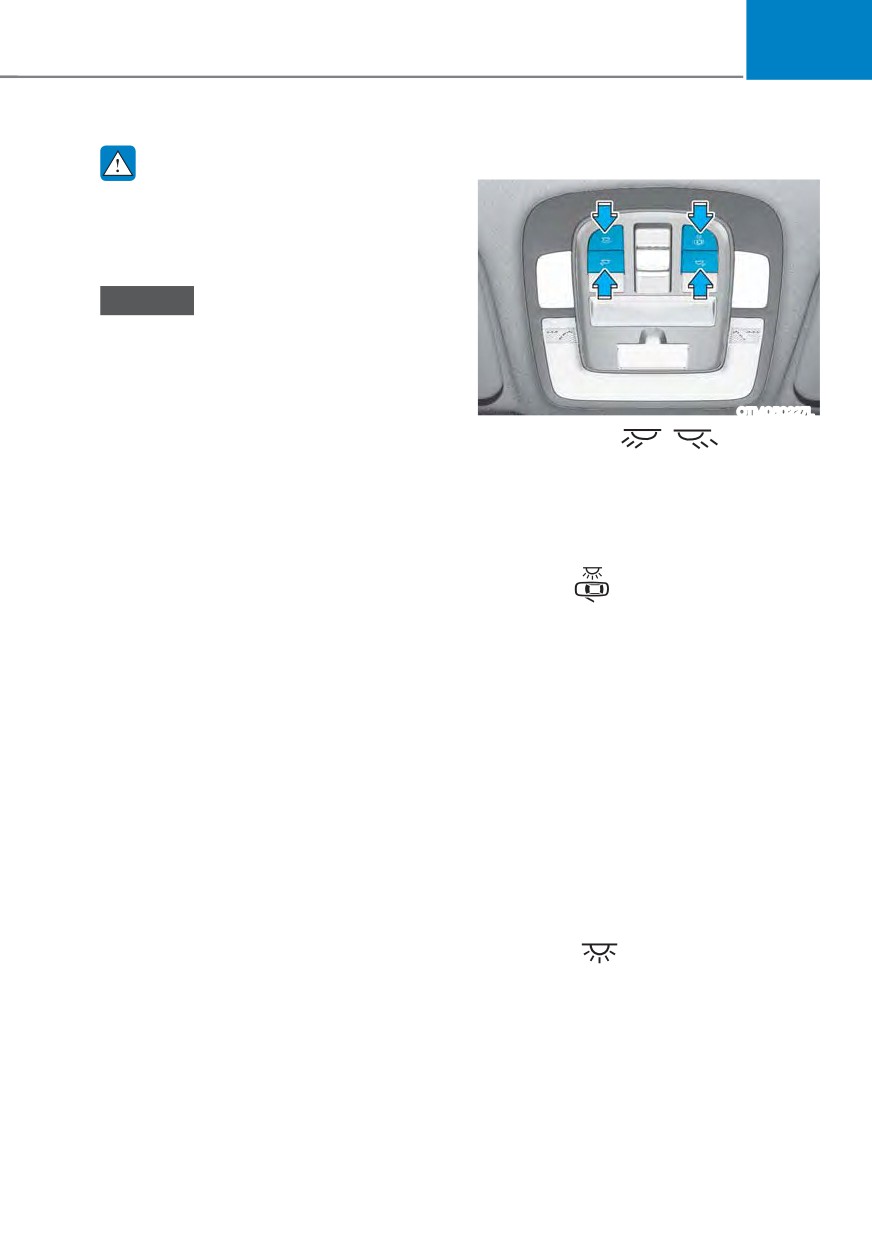
OTM050227L
The interior lamps will automatically go
Front map lamp (
):
off approximately 10 minutes after the
Touch either icons to turn the map lamp
vehicle is turned off and the doors are
on or off. This light produces a spot
closed. If a door is opened, the lamp
beam for convenient use as a map lamp
will go off 40 minutes after the vehicle
at night or as a personal lamp for the
is turned off. If the doors are locked by
driver and the front passenger.
the smart key and the vehicle enters the
armed stage of the theft alarm system,
Door lamp (
):
the lamps will go off five seconds later.
The front or rear room lamps come on
when the front or rear doors are opened.
When doors are unlocked by the smart
key, the front and rear lamps come on
for approximately 30 seconds as long as
any door is not opened. The front and
rear room lamps go out gradually after
approximately 30 seconds when the
door is closed. However, if the Engine
Start/Stop button is in the ON position
or all doors are locked, the front and rear
lamps will turn off. If a door is opened
with the ignition switch in the ACC
position or the OFF position, the front
and rear lamps will stay on for about 10
minutes.
Room lamp (
)
Press the button to turn ON the room
lamp for the front/rear seats.
5-89
Convenience features
Rear lamps
Vanity mirror lamp
Type A
OTM048076
OTM050200
Type B
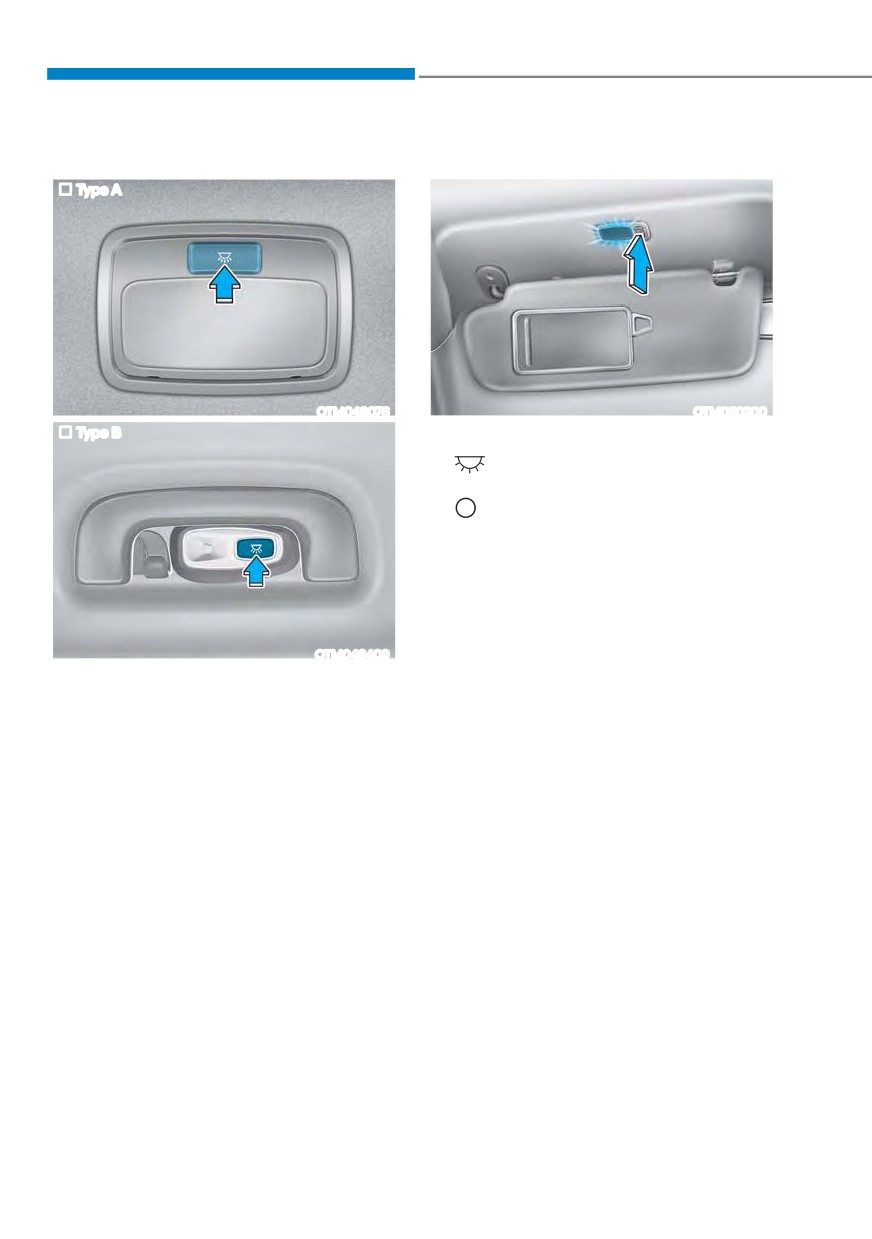
Push the switch to turn the light on or off.
ś
: The lamp will turn on if this
button is pressed.
ś
: The lamp will turn off if this
button is pressed.
OTM048409
Rear room lamp switch :
Press this button to turn the room lamp
on and off.
5-90
05
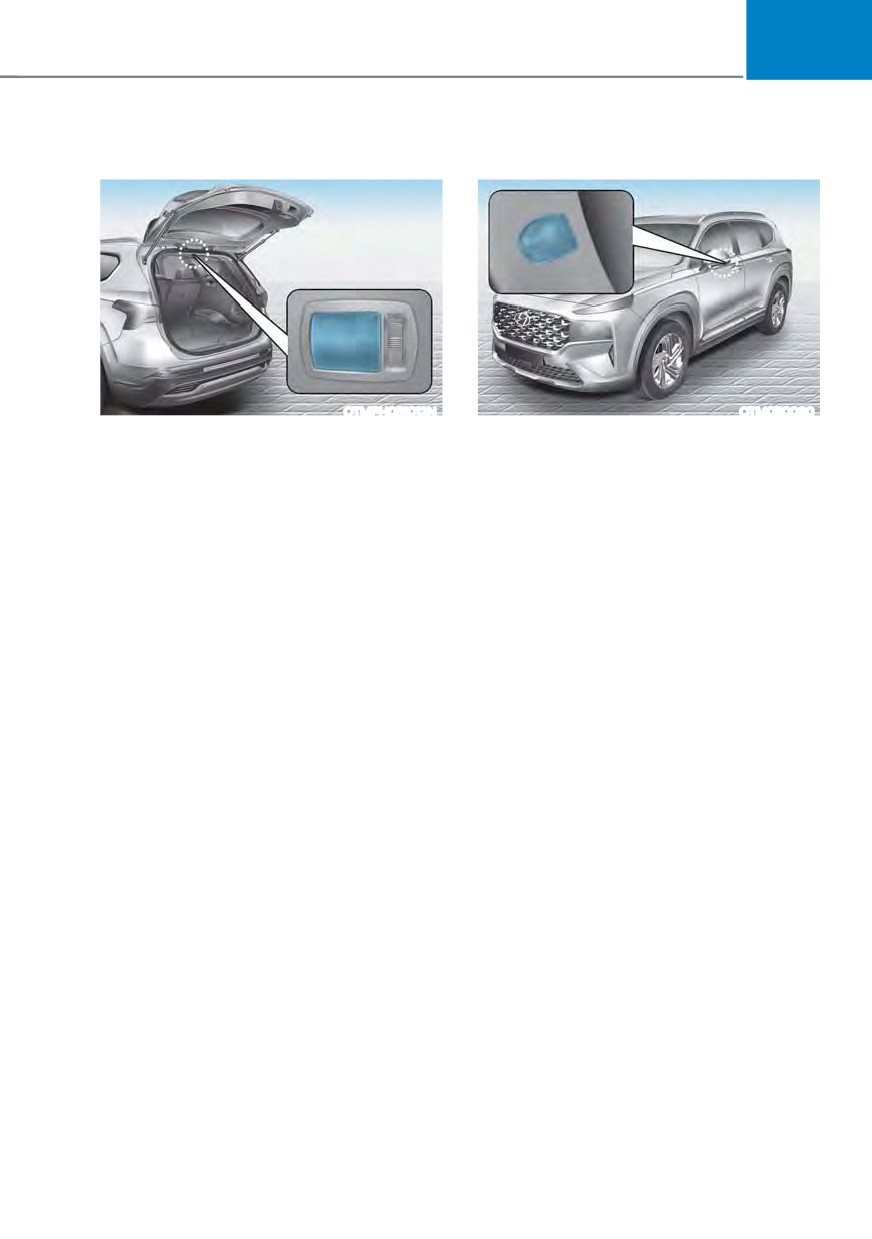
Luggage compartment lamp
Puddle lamp
OTMPH051012N
OTM050080
ś
ON : The luggage compartment lamp
stays on at all times.
Welcome light
ś
DOOR : The luggage compartment
When all doors (and liftgate) are closed
lamp comes on when the liftgate is
and locked, the puddle lamp will turn on
opened.
for 15 seconds if the door is unlocked by
the smart key or when you put your hand
ś
OFF : The luggage compartment lamp
in the outside door handle with the smart
is off.
key in possession.
For more details, refer to “Welcome
System” in this chapter.
Escort light
When the Engine Start/Stop button is in
the OFF position and the driver’s door is
opened, the puddle lamp will turn on for
30 seconds. If the driver’s door is closed
within the 30 second period, the puddle
lamp will turn off after 15 seconds. If the
driver’s door is closed and locked, the
puddle lamp will turn off immediately.
The Puddle Lamp Escort Light will turn
on only the first time the driver’s door is
opened after the engine is turned off.
5-91
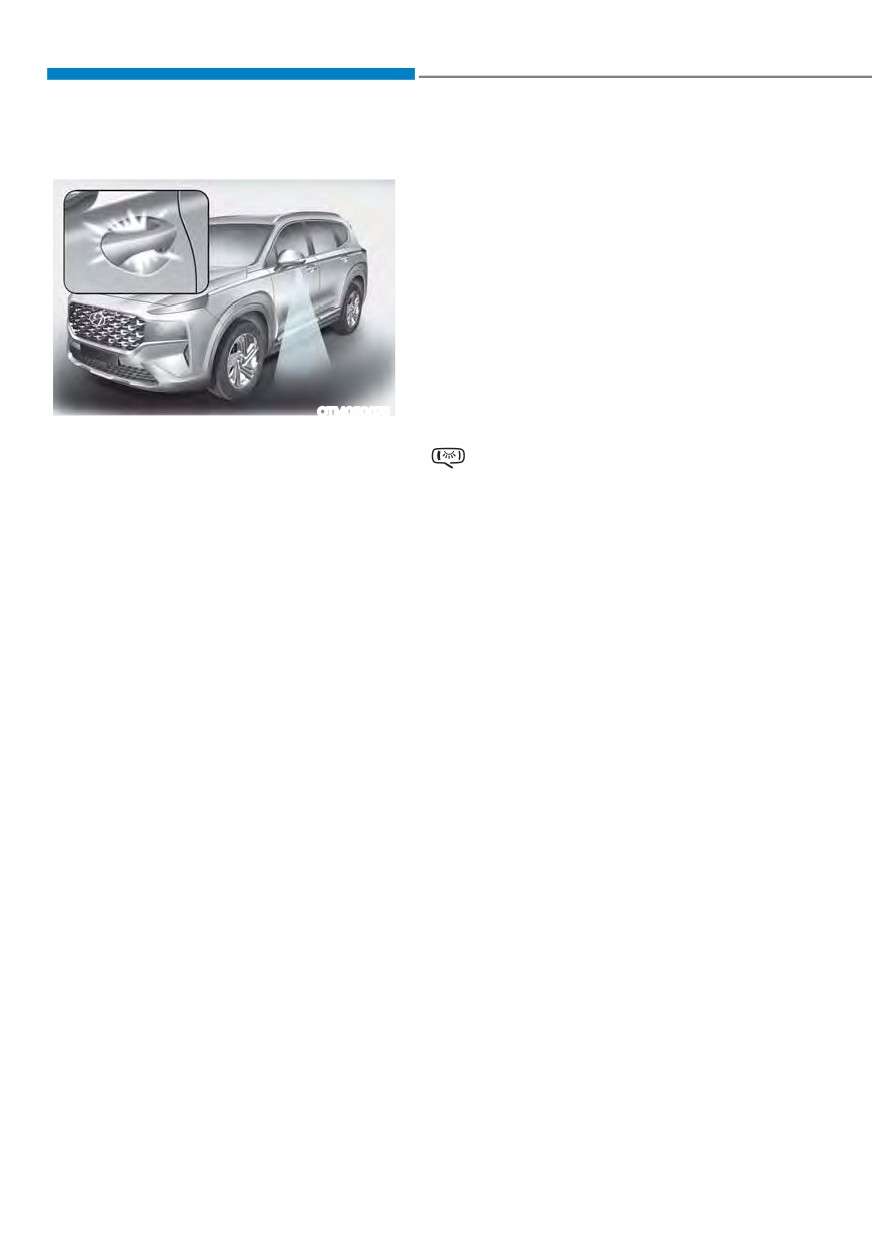
Convenience features
Welcome system
Headlight and position lamp
When the headlight (lamp switch in the
headlight or AUTO position) is on and
all doors (and liftgate) are locked and
closed, the position lamp and headlight
will come on for 15 seconds when the
door unlock button is pressed on the
remote key or smart key.
At this time, if you press the door lock
or unlock button, the position lamp and
headlight will turn off immediately.
OTM050075
Interior lamp
Welcome system helps keep the driver
When the interior lamp switch is in the
visible by turning on vehicle lights when
position and all doors (and liftgate)
the driver approaches the vehicle.
are closed and locked, the room lamp
will come on for 30 seconds if any of the
Puddle lamp and door handle lamp
below is performed.
When all the doors (and liftgate) are
- When the door unlock button is
closed and locked, the puddle lamp
pressed on the remote key or smart
and door handle lamp will turn on for
key.
approximately 15 seconds if any of the
- When you put your hand in the
below is performed.
outside door handle while carrying the
1.
,I œ&RQYHQLHQFH Ɵ :HOFRPH PLUURU
smart key.
OLJKW Ɵ 2Q GRRU XQORFNŔ LV VHOHFWHG LQ
the User Settings mode on the LCD
At this time, if you press the door lock
display,
or unlock button on the smart key the
ś the lamps will turn on when the
lamps will turn off immediately.
door lock button is pressed on the
smart key.
ś the lamps will turn on when the
button of the outside door handle
is pressed with the smart key in
possession.
2.
,I ERWK œ&RQYHQLHQFH Ɵ :HOFRPH
PLUURU OLJKW Ɵ 2Q GRRU XQORFNŔ DQG
œ&RQYHQLHQFH Ɵ :HOFRPH PLUURU OLJKW
Ɵ 2Q GULYHU DSSURDFKŔ LV VHOHFWHG LQ
the User Settings mode on the LCD
display, the lamps will turn on when
the vehicle is approached with the
smart key in possession.
You can activate or deactivate Welcome
Light function from the User Settings
mode on the LCD display.
5-92
05
:,3(56
$1' :$6+(56
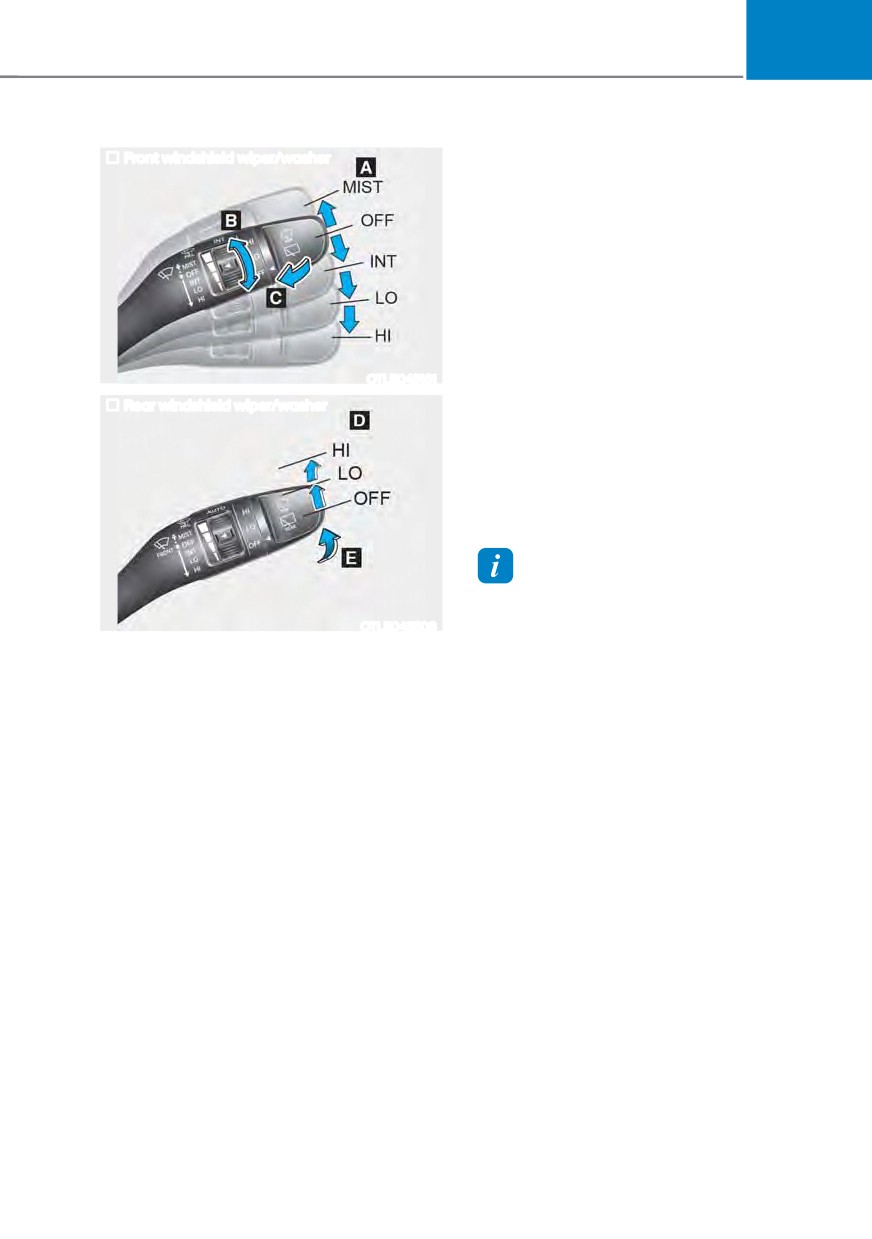
Front windshield wiper/washer
Windshield wipers
Operates as follows when the ignition
switch is turned ON.
MIST :
For a single wiping cycle,
move the lever upward and
release it. The wipers will
operate continuously if the
lever is held in this position.
OFF :
Wipers are not in operation.
INT :
Wipers operate intermittently
OTLE045161
at the same wiping intervals.
Rear windshield wiper/washer
Use this mode in light rain
or mist. To vary the speed
setting, turn the speed
control knob.
LO :
The wiper runs at a lower speed.
HI :
The wiper runs at a higher speed.
Information
If there is heavy accumulation of snow
or ice on the windshield, defrost the
OTLE045508
windshield for about 10 minutes, or until
A. Wiper speed control (front)
the snow and/or ice is removed before
ś MIST - Single wipe
using the windshield wipers to ensure
proper operation.
ś OFF - Off
If you do not remove the snow and/or ice
ś INT - Intermittent wipe
before using the wiper and washer, it may
AUTO* - Auto control wipe
damage the wiper and washer system.
ś LO- Low wiper speed
ś HI - High wiper speed
B. Intermittent control wipe time
adjustment
C. Wash with brief wipes (front)
(pull lever towards you)
D. Rear wiper control*
ś HI - High wiper speed
ś LO- Low wiper speed
ś OFF - Off
E. Wash with brief wipes (rear)
(pull lever towards you)
* : if equipped
5-93
Convenience features
AUTO (Automatic) control
WARNING
(if equipped)
To avoid personal injury from the
The rain sensor located on the upper
windshield wipers, when the engine
end of the windshield glass senses
is running and the windshield wiper
the amount of rainfall and controls the
switch is placed in the AUTO mode:
wiping cycle for the proper interval.
ś Do not touch the upper end of the
The wiper operation time will be
windshield glass facing the rain
automatically controlled depends on
sensor.
rainfall.
ś Do not wipe the upper end of the
When the rain stops, the wiper stops.
windshield glass with a damp or wet
To vary the sensitivity setting, turn the
cloth.
sensitivity control knob.
ś Do not put pressure on the
If the wiper switch is set in AUTO mode
windshield glass.
when the Engine Start/Stop button is in
the ON position, the wiper will operate
NOTICE
once to perform a self-check of the
system. Set the wiper to the OFF (O)
ś When washing the vehicle, set the
position when the wiper is not in use.
wiper switch in the OFF (O) position
to stop the auto wiper operation. The
wiper may operate and be damaged
if the switch is set in the AUTO mode
while washing the vehicle.
ś Do not remove the sensor cover
located on the upper end of the
passenger side windshield glass.
Damage to system components
could occur and may not be covered
by your vehicle warranty.
ś Because of using a photo sensor,
temporary malfunction could occur
according to sudden ambient light
change made by stone and dust
while driving.
5-94
05
Front windshield washers
WARNING
When the outside temperature is below
freezing, ALWAYS warm the windshield
using the defroster to help prevent
the washer fluid from freezing on the
windshield and obscuring your vision
which could result in an accident and
serious injury or death.
NOTICE
ś To prevent possible damage to the
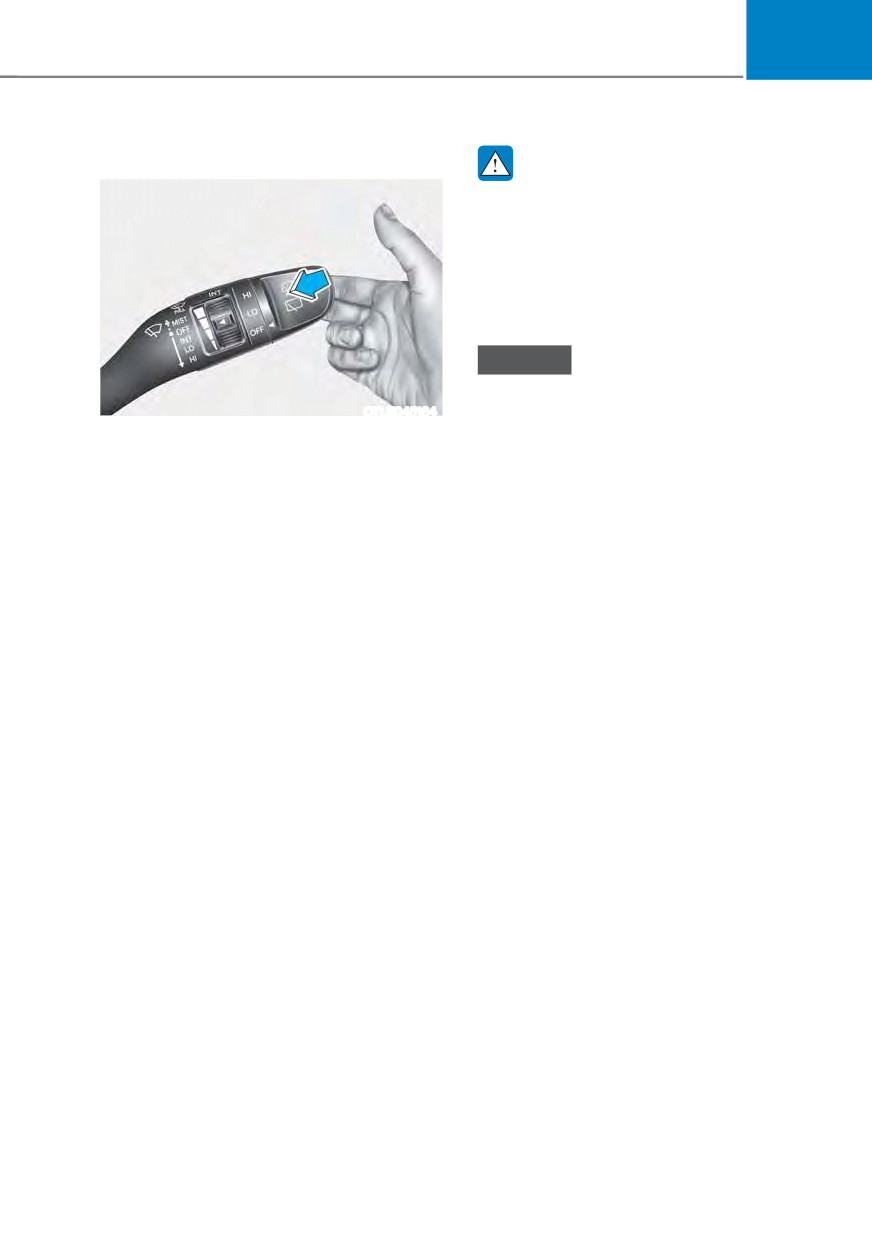
OTLE045164
washer pump, do not operate the
washer when the fluid reservoir is
In the OFF position, pull the lever gently
empty.
toward you to spray washer fluid on the
windshield and to run the wipers 1-3
ś To prevent possible damage to the
cycles. The spray and wiper operation
wipers or windshield, do not operate
will continue until you release the lever. If
the wipers when the windshield is
the washer does not work, you may need
dry.
to add washer fluid to the washer fluid
ś To prevent damage to the wiper
reservoir.
arms and other components, do
not attempt to move the wipers
manually.
ś To prevent possible damage to the
wipers and washer system, use anti-
freezing washer fluids in the winter
season or cold weather.
5-95
Convenience features
Rear window wiper and washer
Auto rear wiper (if equipped)
The rear wiper will operate while the
vehicle is in reverse with the front wiper
ON by selecting the function from the
Settings menu on the LCD display.
Select:
-
6HWXS Ɵ 8VHU 6HWWLQJV Ɵ &RQYHQLHQFH
Ɵ $XWR 5HDU :LSHU LQ 5
OTLE045165
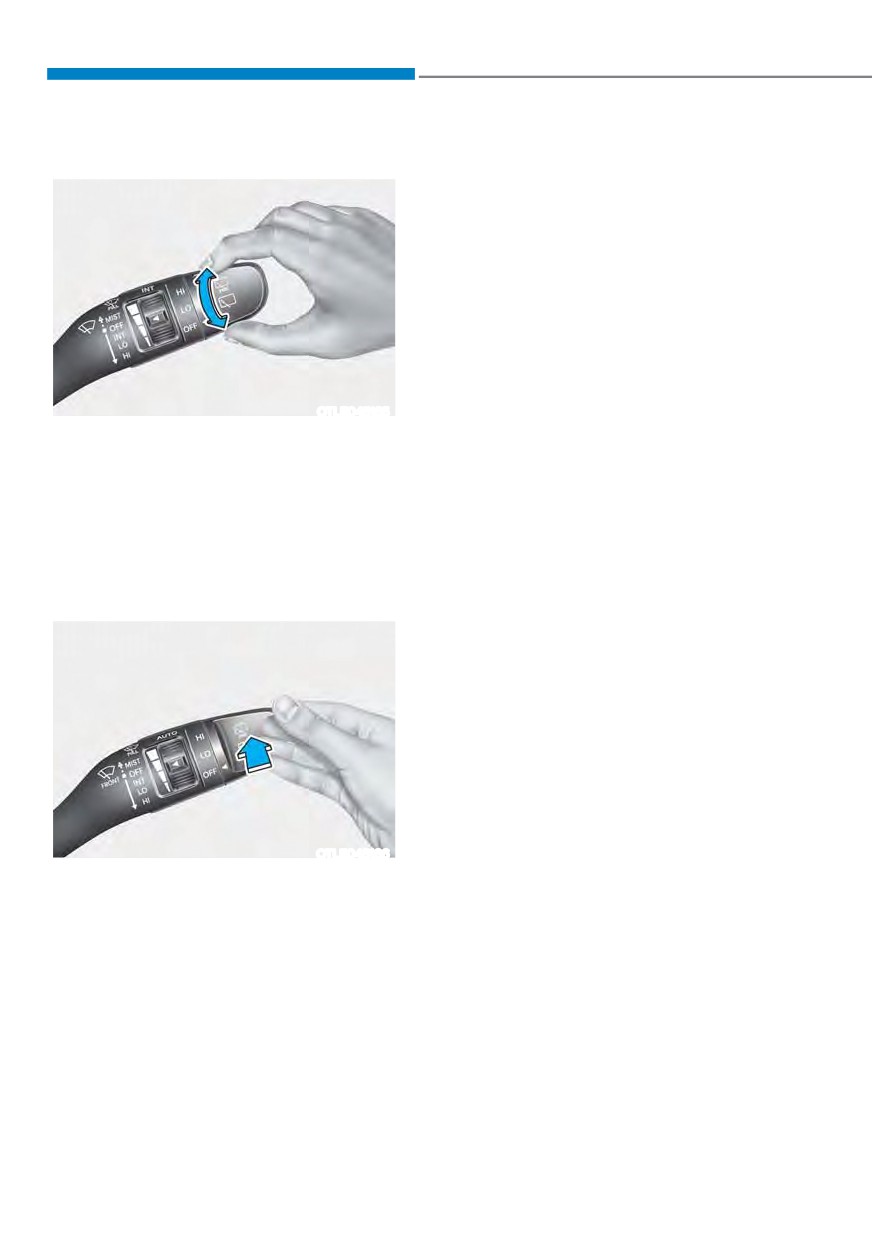
The rear window wiper and washer
switch is located at the end of the wiper
and washer switch lever. Turn the switch
to the desired position to operate the
rear wiper and washer.
HI - High wiper speed
LO - Low wiper speed
OFF - Off
OTLE045166
Push the lever away from you to spray
rear washer fluid and to run the rear
wipers 1~3 cycles. The spray and wiper
operation will continue until you release
the lever.
5-96
05
0$18
$/ &/,0$7
( &21752/ 6<67(0 ǣ,) (48,33('Ǥ
OTM050121L
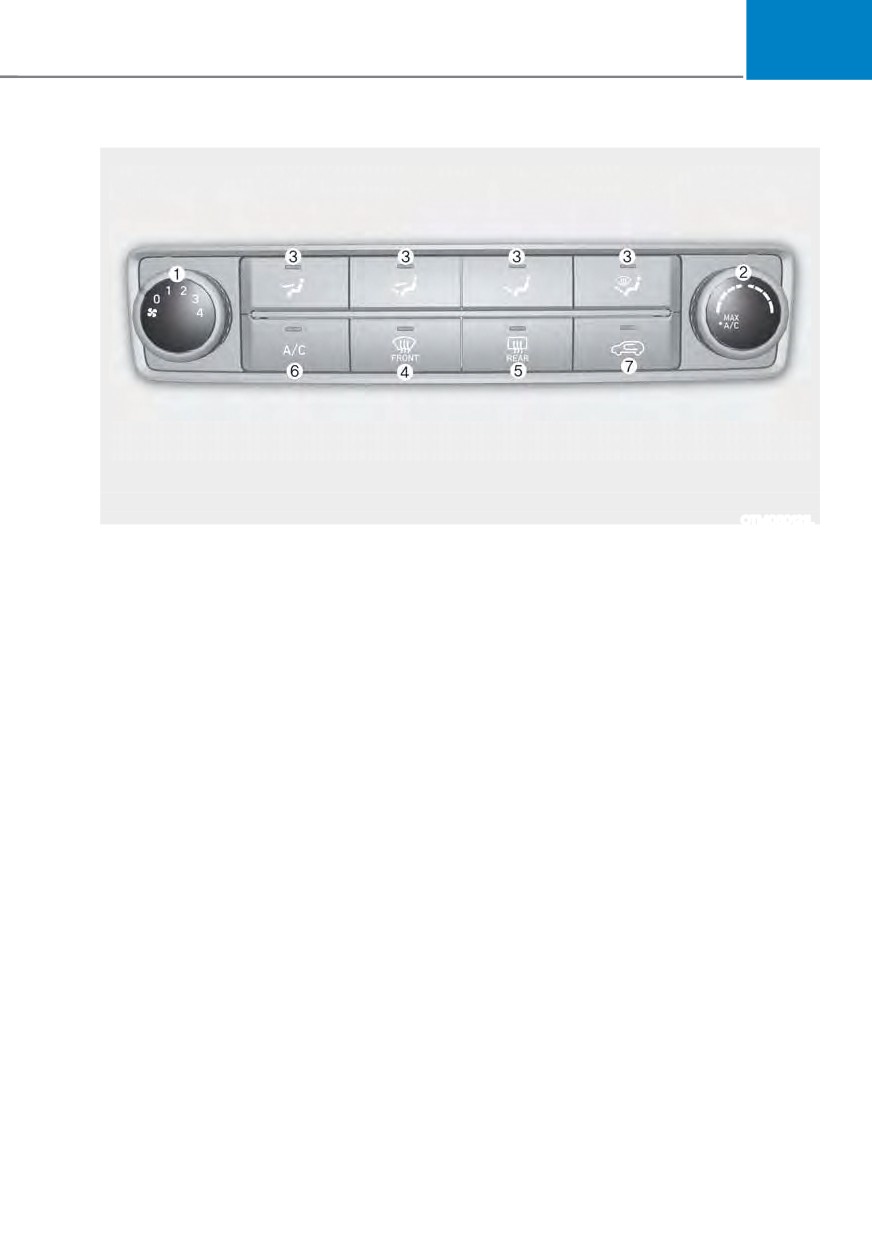
1. Fan speed control knob
6. Air conditioning button
2. Temperature control knob
7. Air intake control button
3. Mode selection button
4. Front windshield defroster button
5. Rear window defroster button
5-97
Convenience features
Heating and air conditioning
3. Set the temperature control to the
desired position.
1. Start the engine.
4. Set the air intake control to the
2. Set the mode to the desired position.
outside (fresh) air position.
To improve the effectiveness of
5. Set the fan speed control to the
heating and cooling, select:
desired speed.
- Heating:
6. If air conditioning is desired, turn the
- Cooling:
air conditioning system on.
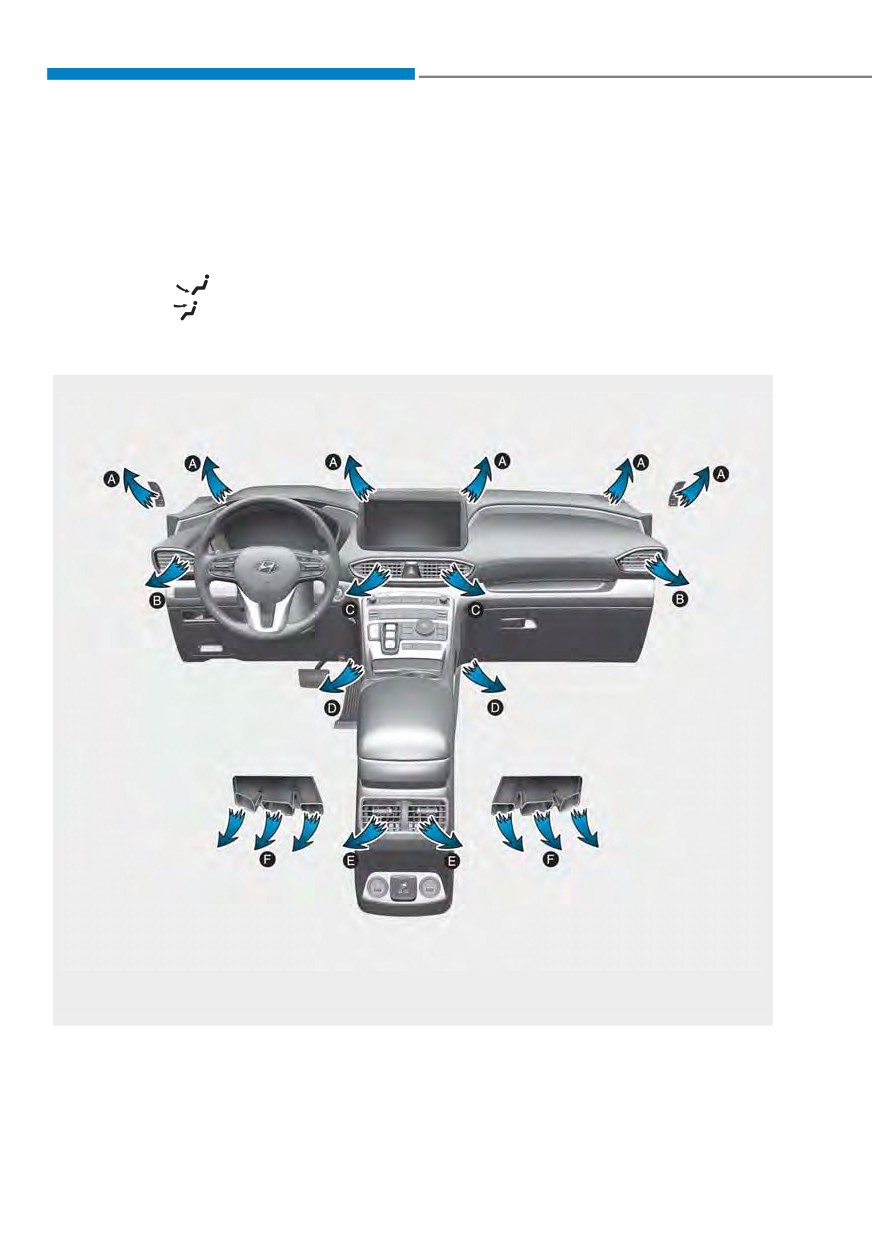
Mode selection (3)
The actual shape of air conditioner may differ from the illustration.
OTMA050100
The mode selection button controls the direction of the air flow through the ventilation
system.
5-98
05
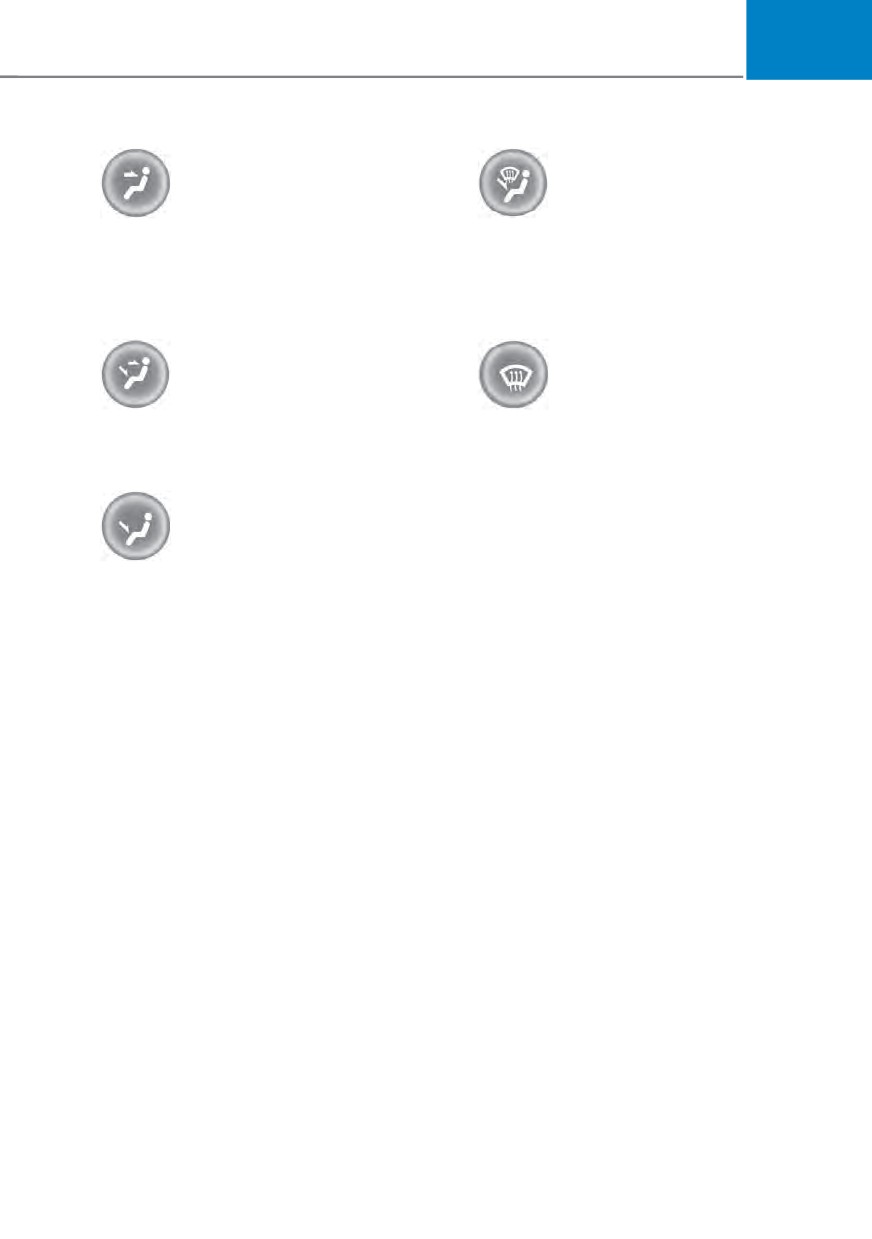
Floor/Defrost-Level
Face-Level (B, C, E)
(A, C, D, E, F, G)
Air flow is directed toward the upper
Most of the air flow is directed to the
body and face. Additionally, each outlet
floor and the windshield with a small
can be controlled to direct the air
amount directed to the side window
discharged from the outlet.
defrosters.
Bi-Level (B, C, D, E, F, G)
Front defroster (A, D)
Air flow is directed towards the face and
Most of the air flow is directed to the
the floor.
windshield with a small amount of air
directed to the side window defrosters.
A/C MAX-Level (B, D) (if equipped)
Floor-Level (A, C, D, E, F, G)
To operate the A/C MAX, turn the
temperature control knob to extreme
Most of the air flow is directed to the
left. Air flow is directed toward the upper
floor, with a small amount of the air
body and face.
being directed to the windshield and side
In this mode, the air conditioning and the
window defrosters.
recirculated air position will be selected
automatically.
After the interior has cooled sufficiently,
whenever possible, move the
temperature knob away from A/C MAX
and press the A/C button.
5-99
Convenience features
Front
Recirculated air position
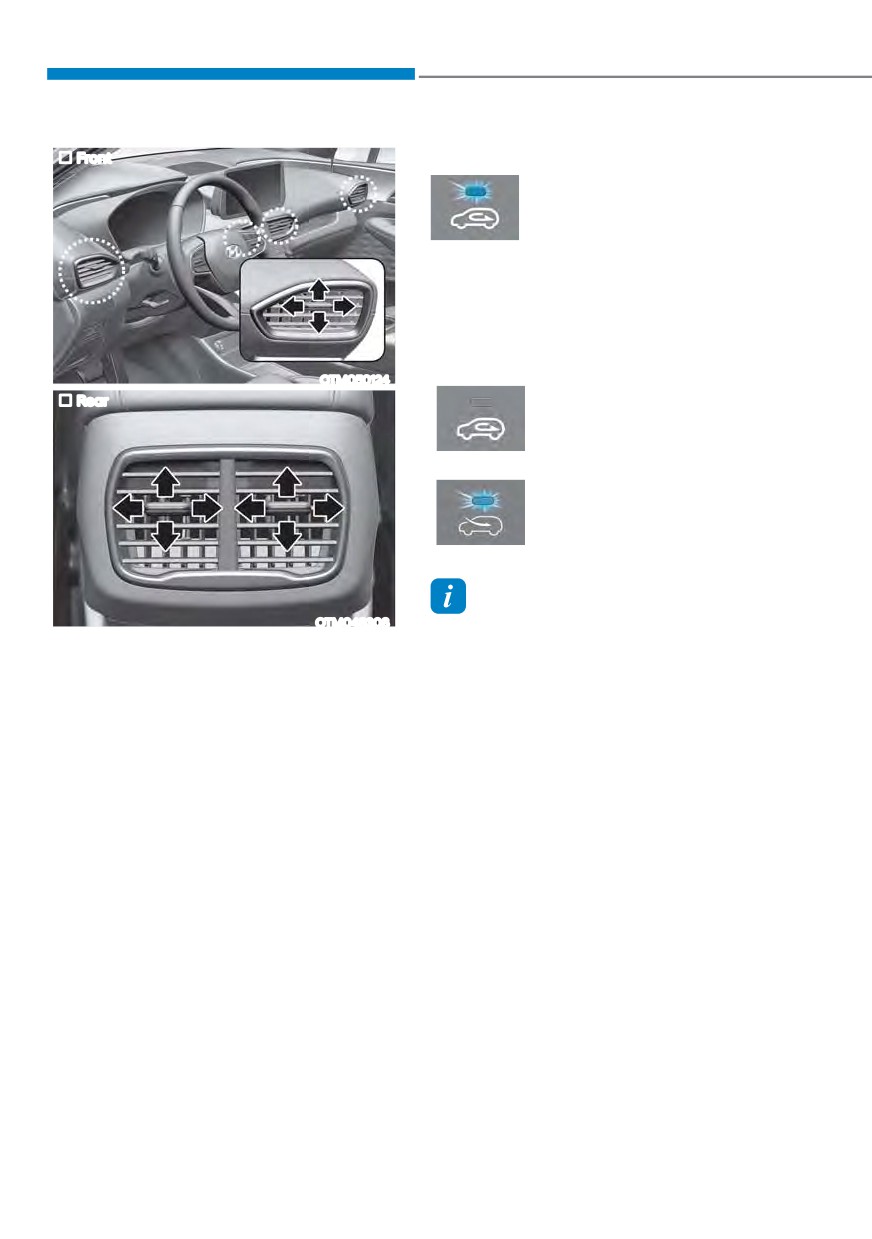
With the recirculated air
position selected, air from the
passenger compartment will
be drawn through the heating
system and heated or cooled
according to the function
selected.
Outside (fresh) air position
Type A
OTM050124
With the outside (fresh) air
Rear
position selected, air enters
the vehicle from outside
and is heated or cooled
according to the function
Type B
selected.
Information
OTM048308
Using the system in the fresh air position is
Instrument panel vents
recommended.
The outlet vents can be opened or closed
Prolonged operation of the heater in the
separately using the vent control lever.
recirculated air position (without air
If you move the vent control lever to the
conditioning selected) can cause fogging of
left end, the outlet vents can be closed.
the windshield and side windows and the
air within the passenger compartment will
Temperature control
become stale.
The temperature will increase by turning
In addition, prolonged use of the air
the knob to the right. The temperature
conditioning with the recirculated air
will decrease by turning the knob to the
position selected will result in excessively
left.
dry air in the passenger compartment.
Air intake control
This is used to select outside (fresh) air
position or recirculated air position. To
change the air intake control position,
press the control button.
5-100
05
System operation
WARNING
Ventilation
ś Continued climate control system
operation in the recirculated air
1. Set the mode to the
position.
position may allow humidity to
2. Set the air intake control to the
increase inside the vehicle which
outside (fresh) air position.
may fog the glass and obscure
3. Set the temperature control to the
visibility.
desired position.
ś Do not sleep in a vehicle with the air
4. Set the fan speed control to the
conditioning or heating system on. It
desired speed.
may cause serious harm or death due
to a drop in the oxygen level and/or
Heating
body temperature.
1. Set the mode to the
position.
ś Continued climate control system
operation in the recirculated air
2. Set the air intake control to the
position can cause drowsiness
outside (fresh) air position.
or sleepiness, and loss of vehicle
3. Set the temperature control to the
control. Set the air intake control
desired position.
to the outside (fresh) air position as
4. Set the fan speed control to the
much as possible while driving.
desired speed.
5. If dehumidified heating is desired,
Fan speed control
turn the air conditioning system (if
Turn the knob to the right to increase
equipped) on.
the fan speed and airflow. Turn the knob
If the windshield fogs up, set the mode
to the left to decrease fan speed and
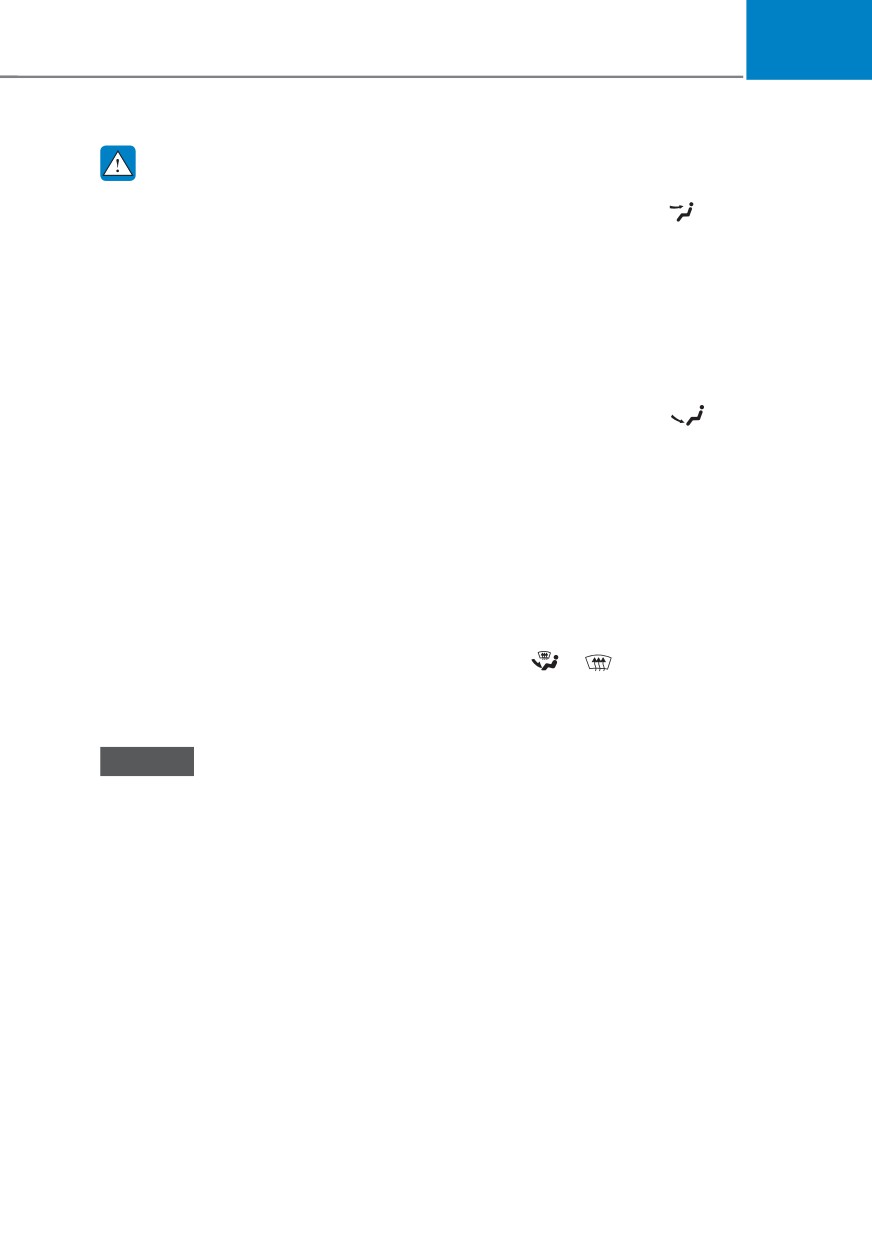
to the
or
position.
airflow.
Setting the fan speed control knob to the
Operation Tips
“0” position turns off the fan.
ś To help keep dust or unpleasant fumes
from entering the vehicle through the
NOTICE
ventilation system, temporarily set the
Operating the fan speed when the
air intake control to the recirculated
ignition switch is in the ON position
air position. Be sure to return the
could cause the battery to discharge.
control to the fresh air position when
Operate the fan speed when the engine
the irritation has passed to keep fresh
is running.
air in the vehicle. This will help keep
the driver alert and comfortable.
Air conditioning (A/C) (if equipped)
ś To prevent interior fog on the
Press the A/C button to turn the air
windshield, set the air intake control
conditioning system on (indicator light
to the fresh air position and fan speed
will illuminate). Press the button again to
to the desired position, turn on the air
turn the air conditioning system off.
conditioning system, and adjust the
temperature control to the desired
temperature.
5-101
Convenience features
Air conditioning
Air conditioning system operation tips
HYUNDAI Air Conditioning Systems are
ś
If the vehicle has been parked in
filled with R-1234yf refrigerant.
direct sunlight during hot weather,
open the windows for a short time
1. Start the engine. Push the air
to let the hot air inside the vehicle
conditioning button.
escape.
2. Set the mode to the position.
ś
After sufficient cooling has been
3. Set the air intake control to the
achieved, switch back from the
outside air or recirculated air position.
recirculated air to the fresh outside air
4. Adjust the fan speed control and
position.
temperature control to maintain
ś
To help reduce moisture inside of
maximum comfort.
the windows on rainy or humid
days, decrease the humidity inside
NOTICE
the vehicle by operating the air
conditioning system with the windows
When using the air conditioning system,
and sunroof closed.
monitor the temperature gauge closely
ś
Use the air conditioning system every
while driving up hills or in heavy traffic
when outside temperatures are high.
month for a few minutes to ensure
maximum system performance.
Air conditioning system operation may
cause engine overheating. Continue to
ś
If you operate the air conditioner
use the fan but turn the air conditioning
excessively, the difference between
system off if the temperature gauge
the temperature of the outside air and
indicates engine overheating.
that of the windshield could cause
the outer surface of the windshield to
fog up, causing loss of visibility. In this
case, set the mode selection knob to
the
position and set the fan speed
control knob to the lowest speed
setting.
5-102
05
System maintenance
Checking the amount of air
conditioner refrigerant and
Cabin air filter
compressor lubricant
When the amount of refrigerant is low,
the performance of the air conditioning
is reduced. Overfilling also reduces the
performance of the air conditioning system.
Therefore, if abnormal operation is found,
have the system be inspected by an
authorized HYUNDAI dealer.
NOTICE
OIK047401L
It is important that the correct type and
amount of oil and refrigerant is used.
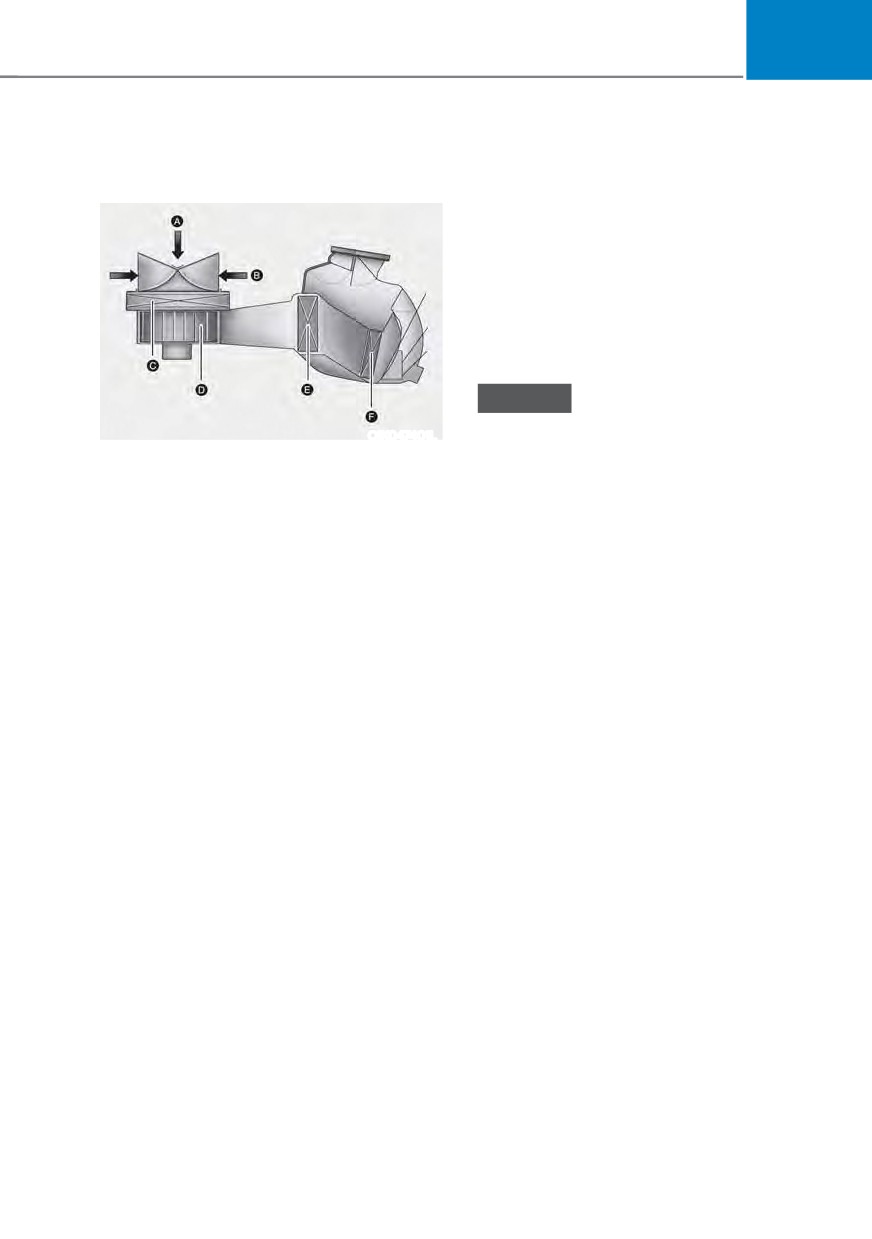
[A] : Outside air, [B] : Recirculated air
[C] : Cabin air filter, [D] : Blower
Otherwise, damage to the compressor
and abnormal system operation may
[E] : Evaporator core, [F] : Heater core
occur. To prevent damage, the air
The cabin air filter is installed behind
conditioning system in your vehicle
the glove box. It filters the dust or other
should only be serviced by trained and
pollutants that enter the vehicle through
certified technicians.
the heating and air conditioning system.
Have the cabin air filter be replaced by
an authorized HYUNDAI dealer according
to the maintenance schedule.
If the vehicle is being driven in severe
conditions such as dusty or rough roads,
more frequent climate control filter
inspections and changes are required.
If the air flow rate suddenly decreases,
have the system be checked at an
authorized HYUNDAI dealer.
5-103
Convenience features
NOTICE
ś The refrigerant system should only
be serviced by trained and certified
technicians to insure proper and safe
operation.
ś The refrigerant system should be
serviced in a well-ventilated place.
ś The air conditioning evaporator
(cooling coil) shall never be repaired
or replaced with one removed from
a used or salvaged vehicle and new
OTM050040L
replacement MAC evaporators shall
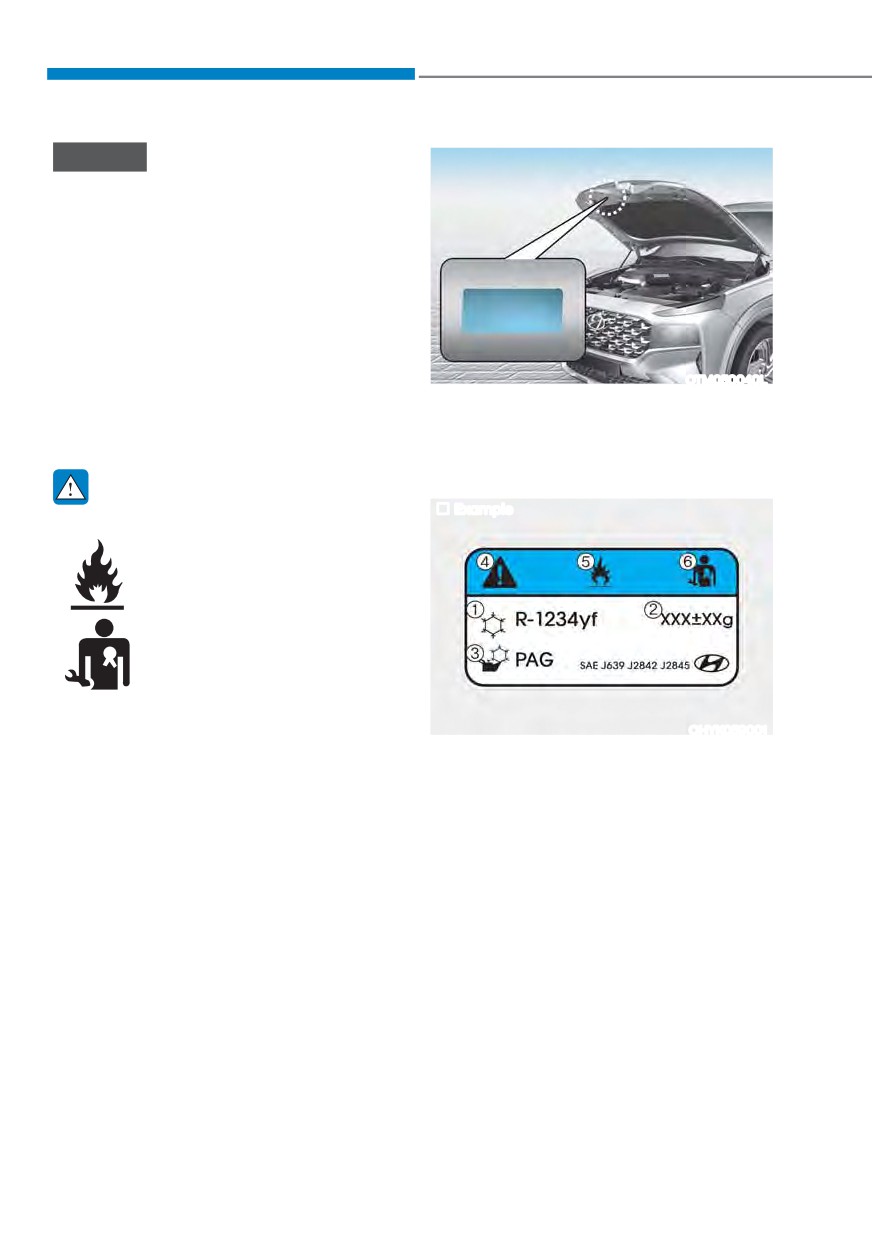
Air Conditioning refrigerant label
be certified (and labeled) as meeting
You can find out which air conditioning
SAE Standard J2842.
refrigerant is applied to your vehicle on
the label located inside of the hood.
WARNING
Example
Vehicles equipped with R-1234yf
Since the refrigerant is
mildly flammable and
operated at high pressure,
the air conditioning system
should only be serviced
by trained and certified
technicians. It is important
that the correct type and
amount of oil and refrigerant
are used.
OHYK059001
All refrigerants should be reclaimed
Each symbols and specification on
with proper equipment.
the air conditioning refrigerant label is
Venting refrigerants directly to the
represented as below:
atmosphere is harmful to individuals
1. Classification of refrigerant
and environment. Failure to heed these
warnings can lead to serious injuries.
2. Amount of refrigerant
3. Classification of compressor lubricant
4. Caution
5. Flammable refrigerant
6. To require registered technician to
service air conditioning system
5-104
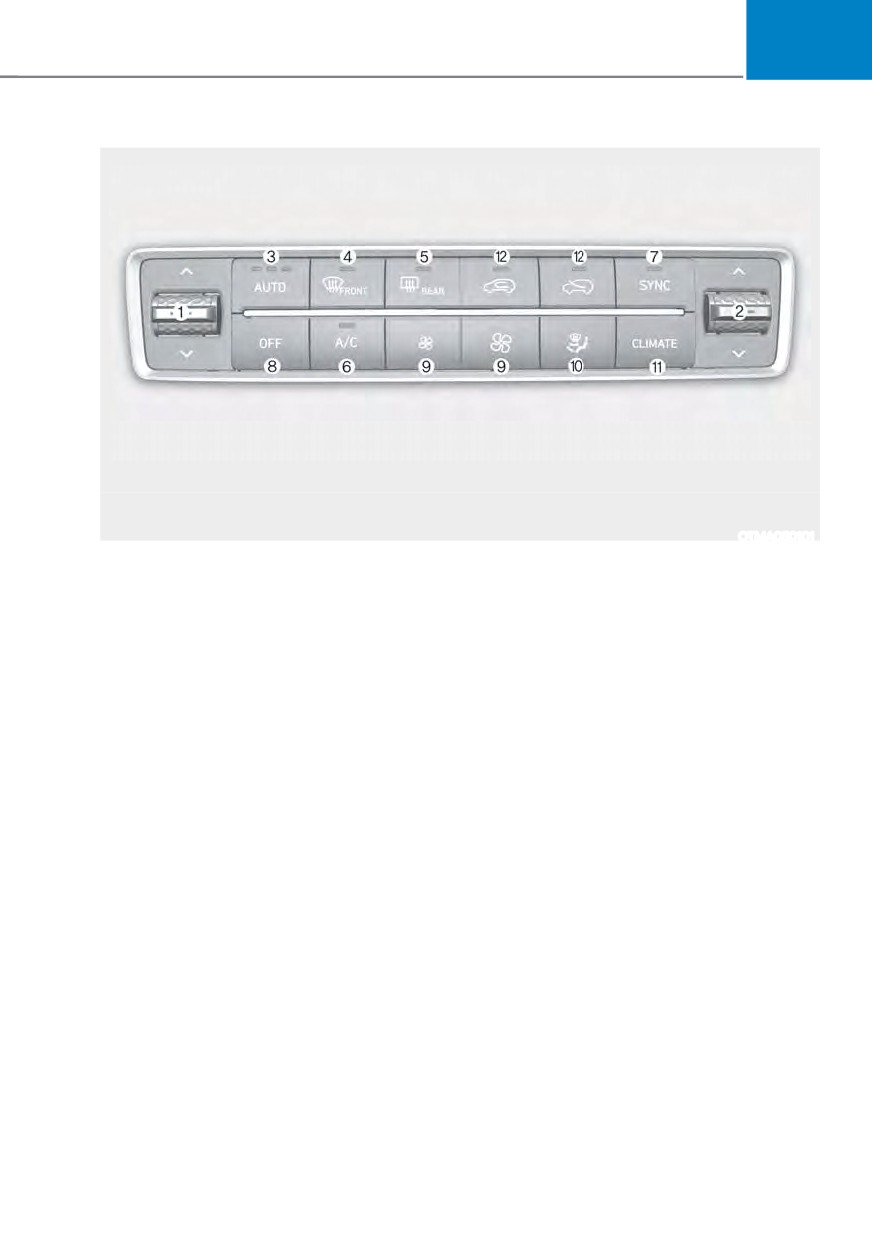
05
$8720$7,& &/,0
$7( &21752/ 6<67(0 ǣ,) (48,33('Ǥ
The actual shape of air conditioner may differ from the illustration.
OTMA050101
1. Driver’s temperature control knob
7. SYNC button
2. Passenger’s temperature control knob
8. OFF button
3. AUTO (automatic control) button
9. Fan speed button
4. Front windshield defroster button
10.Mode selection button
5. Rear window defroster button
11. Climate control button
6. Air conditioning button
12. Air intake control button
5-105