Hyundai Equus (2016 year). Instruction - part 26

Maintenance
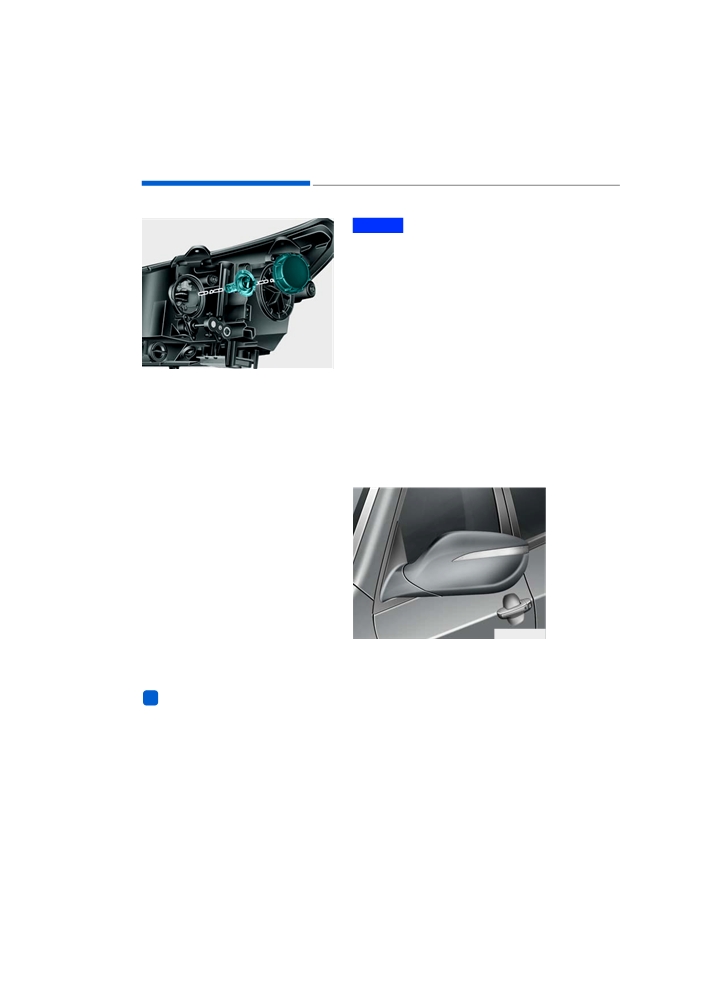
Headlight (HID type) bulb
replacement (if equipped)
When the headlamp does not oper-
ate, have the vehicle checked by an
authorized EQUUS dealer.
WARNING
- HID Headlamp low beam
(if equipped)
Do not attempt to replace or
OVI075186N
inspect the low beam (XENON
bulb) to avoid an electric shock
danger. When the low beam
(XENON bulb) does not operate,
have your vehicle checked by
an authorized EQUUS dealer.
NOTICE
Your High Intensity Discharge
(HID) headlamp, equipped with
OVI075187N
your vehicle, contains mercury.
13. Remove the mounting bolts.
When scrapping your vehicle, the
14. Pull the headlamp assembly out
HID Headlamp should be properly
from the vehicle.
disposed of in advance. The
removed HID headlamp should be
recycled, re-used or disposed as
hazardous waste.
OVI079110L
15. Remove the clips.
16. Disconnect the power connec-
tor(s) from the back of the head-
lamp assembly.
7-72

Maintenance
07
Headlamp bulb
i
Information
HID lamps have superior perform-
ance in comparison to halogen bulbs.
HID lamps are estimated to last twice
as long as halogen bulbs, or longer, by
the manufacturer, depending on the
usage hours. HID lamps needs to be
replaced at some point within the
vehicle life. Frequent turning the
headlamps ON and OFF shortens the
HID lamps life. HID lamps do not
blow out in the same manner as halo-
gen incandescent lamps. When a
OKH073081N.
headlamp blows out after a period of
operation, the lamp light gradually
WARNING
fades away after being turned ON.
Even when the lamp is turned ON by
- Halogen bulbs
turning ON the switch, it needs to be
• Halogen bulbs contain pres-
replaced. The HID lamp components
surized gas. Thus, if broken, it
are more complex than the ones of
produced fragments of glass.
conventional halogen bulbs. Thus, the
repairing costs are more expensive.
• Always carefully handle the
bulbs to avoid scratches and
abrasions. If the bulbs are lit,
Headlight (bulb type), front turn
avoid contact with liquids.
signal, position, side marker
• Never touch the glass with
and fog light bulbs
bare hands. Any remaining oil
When a bulb is out, have the vehicle
may cause the bulb to over-
checked by an authorized EQUUS
heat and explode upon being
dealer.
lit.
• When a bulb is damaged or
cracked, immediately replace
it. Then, carefully dispose of it.
• Wear eye protection while
replacing a bulb. If hot, cool
down the bulb before han-
dling it.
7-73
Maintenance
NOTICE
When the headlamp (Low) does
not operate, have the vehicle
checked by an authorized EQUUS
dealer.
Turn signal light - bulb type
When the light bulb does not oper-
ate, have the vehicle checked by an
authorized EQUUS dealer.
OVI075111N
17. Remove the headlamp cover by
Position light, Front fog light
turning it in a counterclockwise
direction.
When the light bulb does not oper-
ate, have the vehicle checked by an
18. Disconnect the headlamp bulb
authorized EQUUS dealer.
socket connector.
19. Loosen the wire, which holds the
headlamp, by depressing the end
Side repeater light bulb
and pushing it upward.
replacement (if equipped)
20. Remove the bulb from the head-
lamp assembly.
21. Install a new headlamp, and fas-
ten the headlamp wire by align-
ing it with the groove.
22. Connect the headlamp socket
connector.
23. Close the headlamp cover by
turning it in a clockwise direction.
24. Connect the power connector(s)
to the back of the headlamp
OVI075031N
assembly.
If the light bulb is not operating, have
25. Reinstall the headlamp assembly
to the vehicle.
the vehicle checked by an authorized
EQUUS dealer.
i
Information
Always readjust the headlamp angle,
after an accident or the headlamp
installment by an authorized EQUUS
dealer.
7-74

Maintenance
07
Rear combination light bulb
High mounted stop light
replacement
1. Remove the rear seat
OVI075032N
OVI075035N
(1) Stop, tail light and side marker
(2) Rear turn signal light
(3) Back-up light
Rear back-up light
When the light bulb does not oper-
ate, have the vehicle checked by an
authorized EQUUS dealer.
Turn signal, stop and tail light
OVI075120N
When the light bulb does not oper-
5 Seater
ate, have the vehicle checked by an
1.Disconnect the negative battery
authorized EQUUS dealer.
cable.
2.Remove the rear seat cushion.
NOTICE
A skilled technician should check
or repair the rear combination
light. Otherwise, it may damage
related parts of the vehicle.
7-75

Maintenance
OVI075121N
OVI075127N
3.Loosen the mounting bolts, and
5. Push the hook, and disconnect the
then remove the rear seat back.
main connector.
Tightening torque :
34.3~53.9 N.m
3.5~5.5 kgf.m,
25.3~39.8 lb-ft
OVI075125N
6.Loosen the mounting bolts, and
then disconnect the connector.
7.Remove the side seat.
OVI075123N
4.Disconnect the connector.
7-76

Maintenance
07
Left
OVI075127N
OVI075129N
Right
4 Seater
1.Disconnect the negative battery
cable.
2.Remove the rear seat cushion.
OVI075130N
4. Disconnect the connectors and
hose.
2. Remove the rear package tray
OVI075128N
trim
3. Loosen the mounting bolts, and
then remove the rear seat back.
Tightening torque
: 34.3~53.9 N.m
3.5~5.5 kgf.m,
25.3~39.8 lb-ft
OVI075131N
1.Remove the rear door scuff trim.
7-77

Maintenance
OVI075132N
OVI075135N
2.Loosen the mounting screw, and
6.Remove the rear seat belt lower
then remove the rear wheel house
anchor.
trim.
Tightening torque
: 39.2~53.9 N.m
4.0~5.5 kgf.m
28.9~39.8 lb-ft
OVI075133N
3.Remove the cap, and then loosen
the mounting screw.
4.Remove the rear pillar trim.
OVI075136N
7. Loosen the mounting screws, and
then remove the package tray
trim.
OVI075134N
5.Push the hook, and remove the
rear seat belt cover.
7-78

Maintenance
07
3. Replace the high mounted
License plate lamp replace-
stop light
ment
OVI075137N
OVI075039N
1.Remove the high mounted stop
1.Open the trunk.
lamp after removing screws.
2.Disconnect the negative battery
2.Install a new light.
cable.
4. Installation
Reinstall it in the reverse order.
OVI075150N
3. Using a screwdriver, and open the
trunk lid latch cover(1).
4. Using a screwdriver, remove the
trunk lid switch(2), and disconnect
the connector.
7-79

Maintenance
NOTICE
Be careful not to damage the fas-
teners between the trunk lid trim
and trunk lid.
OVI075151N
5.Loosen the clip and fastener(3),
and then remove the trunk lid
cover(4).
OVI075154N
OVI075152N
6.Remove the clips and screws.
OVI075158N
8.Loosen the nuts and disconnect
the connectors.
OVI075153N
7.Remove the trunk lid trim.
7-80

Maintenance
07
OVI075155N
OVI075157N
9. Loosen the bolts and remove the
11. Remove the bolts and the license
trunk key hold.
plate lamp.
12. Install a new light.
13. Reinstall it in the reverse order.
OVI075156N
10. Open the trunk lid panel.
NOTICE
Be careful not to damage the fas-
teners between the trunk lid panel
and trunk lid.
7-81

Maintenance
Interior light bulb replacement
3. Install a new bulb in the socket.
■ Sunvisor lamp
4. Align the lens tabs with the interior
light housing notches, and secure
the lens into place.
5. When the map lamp and room
lamp do not operate, have the
vehicle checked by an authorized
EQUUS dealer.
NOTICE
Be careful not to smear or damage
lens, lens tab, and plastic hous-
OVI075188N
ings.
■ Glove box lamp
i
Information
When the luggage lamp does not oper-
ate, have the vehicle checked by an
authorized EQUUS dealer.
OVI075038N
1. Use a flat-blade screwdriver to
gently take out the lens from the
interior light housing.
2. Pull the bulb straight out.
WARNING
Before working on the interior
lights, surely press OFF the
lights to avoid burning your fin-
gers or an electric shock.
7-82

Maintenance
07
APPEARANCE CARE
Exterior care
Insects, tar, tree sap, bird droppings,
industrial pollutants and similar
Exterior general caution
deposits damage your vehicle’s fin-
It is very important to follow the label
ish, if not immediately removed.
directions when using any chemical
Even prompt washing with plain
cleaner or polish. Read all the warn-
water may not completely remove all
ings and cautions on the label.
these deposits. A mild soap, which is
safe for a painted surface, may be
High-pressure washing
used.
• When using high-pressure wash-
After soaping, thoroughly rinse the
ers, make sure to maintain suffi-
vehicle body with lukewarm or cold
cient distance from the vehicle.
water. Do not allow soap to dry on
the finish.
Insufficient clearance or excessive
pressure can lead to component
damage or water penetration.
CAUTION
• Do not spray the camera, sensors
or its surrounding area directly with
• Do not use strong soap,
chemical detergents or hot
a high pressure washer. Shock
applied from high pressure water
water. Do not wash the vehicle
when it is under direct sun-
may cause the device to not oper-
ate normally.
light, or when its body is
warm.
• Do not bring the nozzle tip close to
• Be careful when washing the
boots (rubber or plastic covers) or
connectors as they may be dam-
side windows of your vehicle.
Especially, with high-pressure
aged if they come into contact with
high pressure water.
water, water may penetrate
into the windows and wet the
interior.
Finish maintenance
• To prevent damage to plastic
Washing
parts and lamps, do not wash
To protect your vehicle’s paint from
the vehicle with chemical sol-
rust and deterioration, thoroughly
vents or strong detergents.
wash the vehicle at least once a
month with lukewarm or cold water.
After each off-road driving, you
WARNING
should wash the vehicle. Pay special
attention to removing any salty and
- Wet brakes
muddy substances. Make sure the
After washing the vehicle, test
drain holes on the lower door edges
the brake operations to check
and on the rocker panels are kept
whether it is affected by water.
clear and clean.
When the braking performance
is deteriorated, dry the brakes
by lightly applying them and
driving forward at a slow speed.
7-83

Maintenance
A spot remover, which removes oil,
tar, and other similar materials, peels
off the wax coating from the finish.
Make sure to re-wax these areas,
even when the rest of the vehicle
does not need be waxed.
CAUTION
• Wiping dust or dirt off the
body with a dry cloth will
OVI075189N
scratch the finish.
• Do not use a steel- or wool-
abrasive cleaner, or strong
CAUTION
detergents, which is high in
• Washing the engine compart-
alkaline or caustic agents on
ment with the water of high
chrome-plated, or which
pressure is not recommend-
anodizes aluminum parts.
ed. It may fail electrical cir-
This may damage the protec-
cuits, engine and any other
tive coating and cause discol-
related part, located in the
oration or paint deterioration.
engine compartment.
• Never allow water or other liq-
uids to contact with electri-
Finish damage repair
cal/electronic components
Deep scratches or stone chips on the
and the air duct. These may
paint must be repaired in a prompt
damage them.
manner. Any exposed metal area
quickly gets rusty, and repairing it
may cost a lot.
Waxing
A good coat of wax bars contamina-
i
Information
tion from the vehicle paint. Maintain a
good coat of wax on your vehicle to
When your vehicle requires any metal
protect it.
repair or replacement after damage,
Wax the vehicle when the wax polish
make sure the body shop applies anti-
vanishes.
corrosion materials to the parts to be
repaired or to be replaced.
Always wash and dry the vehicle
before waxing. Use a good quality
liquid or paste wax, and follow the
manufacturer’s instructions. Wax all
metal trim to protect it and to main-
tain its luster.
7-84
Maintenance
07
Bright-metal maintenance
WARNING
• Use a tar remover to remove road
tar and insects, not scraping or
After washing the vehicle, test
using a sharp object.
the brakes by slowly applying
• To protect a bright metal surface
them to check whether they are
from corrosion, apply a coat of wax
affected by water. When braking
or chrome preservative, or polish
performance is impaired, dry
the surface.
the brakes by lightly applying
• In winter or in coastal areas, apply
them while driving forward at a
slow speed.
a bright metal part with a heavy
coat of wax or preservative. If nec-
essary, coat the part with non-cor-
rosive petroleum jelly or other pro-
Aluminum wheel maintenance
tective compound.
The aluminum wheels are coated
with a clear protective finish.
Underbody maintenance
• Do not use any abrasive cleaner,
Corrosive materials, which are used
polishing compound, solvent, or
wire brushes on aluminum wheels.
to remove ice, snow or dusts, may
accumulate across the vehicle
They may scratch or damage the
finish.
underbody. When these materials
are not promptly removed, rusting
• Clean the wheel, while it is cool.
process may accelerate across the
• Use only a mild soap or neutral
underbody, such as the fuel lines,
detergent, and thoroughly rinse
frame, floor pan and exhaust system,
with water. Also, always clean the
regardless of the rust-protection
wheels after driving on a salted
treatment.
road. This prevents corrosion.
Thoroughly wash the vehicle under-
• Avoid washing the wheels with an
body and wheel openings with luke-
automatic high-speed washing
warm or cold water once a month,
brush.
after driving off a road, or after the
• Do not use any alkaline or acid
winter season. Pay special attention
detergent. It may damage and cor-
to the underbody areas to find any
rode the aluminum wheels coated
mud or dirt. Remaining road dirt or
with a clear protective finish.
grime across the vehicle underbody
does more harm than good. The
lower edges of doors, rocker panels,
and frame members have drain
holes, which should not be clogged
with dirt; clogging in these areas may
cause rusting.
7-85
Maintenance
Corrosion protection
Moisture breeds corrosion
Protecting your vehicle from corro-
Moisture creates a condition in which
sion
corrosion is most likely to occur. For
example, a corrosion process is
HYUNDAI produces a vehicle of the
accelerated by high humidity, partic-
highest quality by using the most
ularly when a temperature is just
advanced design and construction
above the freezing point. In such
practices to combat corrosion.
condition, the vehicle surface is kept
However, this is only one part of anti-
in contact with moisture that is slow
corrosion resistance practices. To
to evaporate.
achieve a long-term corrosion resist-
ance of your vehicle, your coopera-
Mud is particularly corrosive
tion and assistance are required.
because it is slow to dry and holds
moisture in contact with the vehicle.
Although the mud appears to be dry,
Common causes of corrosion
it may still retain some moisture
The followings are the most common
inside and promote corrosion.
causes of corrosion:
A high temperature also accelerates
• Road salt, dirt and moisture, which
a corrosion process, when the air is
accumulate across the vehicle
unventilated, and when the moisture
underbody.
pervades. For all these reasons, it is
• Exposure of an unprotected metal
particularly important to keep your
to corrosion due to the removal of
vehicle clean, and remove mud or
paint or protective coat, possibly by
any other accumulated substances.
a stone, gravel, abrasion, minor
This applies not only to the visible
scrape, or dent.
surfaces but particularly to the vehi-
cle underbody.
High-corrosion areas
To help prevent corrosion
In an area, where your vehicle is reg-
ularly exposed to corrosive materi-
You can prevent corrosion from the
als, an anti-corrosion measure is
start by following the below precau-
particularly important. Some of the
tions.
common causes of instant vehicle
corrosion are road salts, dust, chem-
icals, salty air and industrial pollu-
tants.
7-86
Maintenance
07
Keep your car clean
Keep your garage dry
The best way to prevent corrosion is
Do not park your vehicle in a damp or
to keep your vehicle clean and free
unventilated garage. This creates the
of corrosive materials. Constant
environment, which is favorable to
attention to the underbody is particu-
corrosion. This is particularly true,
larly important.
when you wash your vehicle in a
garage, when the garage is still wet,
or when the garage is covered with
•
In an area, which is high in corro-
snow, ice, or mud. Even, a high tem-
sive materials, such as salts on a
perature of a garage may accelerate
road, salty air, industrial pollutants,
corrosion, until it is properly ventilat-
acid rain, you should take extra
ed, and moisture evaporates.
care to prevent corrosion. In winter,
wash off the underbody at least
once a month and make sure to
Keep paint and trim in good condi-
clean the underbody when the win-
tion
ter is over.
Scratches or chips over the finish
•
When cleaning the vehicle under-
should be immediately covered with
body, give particular attention to
a "touch-up" paint to prevent corro-
the components, such as fenders,
sion. When the bare metal is
which are hidden underneath.
exposed, it is recommended to visit a
Thoroughly wash the vehicle.
qualified body or paint shop.
When you just damp the under-
body, across which mud is accu-
Bird droppings : Bird droppings are
mulated, without washing off the
highly corrosive and may damage
mud, accelerates corrosion, rather
painted surfaces in just a few hours.
than preventing it. High-pressure
Always remove bird droppings as
water and steam are particularly
soon as possible.
effective in removing accumulated
mud and corrosive materials.
•
When cleaning lower door panels,
Don't neglect the interior
rocker panels and frame members,
Moisture may be dense over the floor
make sure that drain holes are kept
mats and carpeting, causing corro-
clean. Thus moisture can evapo-
sion. Check the floor mats at a regu-
rate, without being trapped inside
lar basis to make sure that it is dry.
to accelerate corrosion.
Pay particular attention, when carry-
ing fertilizers, cleaning materials or
chemicals inside the vehicle.
These should be carried only in
proper containers. Any spills or leak-
ages should be cleaned up, flushed
with clean water and thoroughly
dried.
7-87

Maintenance
Interior care
Fabric
Dust the fabric off with a whisk
Interior general precautions
broom or vacuum cleaner. Clean it
Do not use chemicals, such as per-
with a mild soap, recommended for
fume, cosmetic oil, sun cream, hand
upholstery or carpets. Immediately
cleaner, and air freshener, inside the
remove a stain with a fabric spot
vehicle, because they may damage
cleaner. When a stain is not immedi-
or discolor the interior. When one of
ately removed, the stain may perma-
the above materials contacts the
nently remain, and its color is
interior part, immediately wipe them
changed. Also, its fire-resistance
off. Refer to the vinyl-cleaning
capacity is reduced, when the mate-
instructions for the proper cleaning
rial is not properly maintained.
procedure.
NOTICE
CAUTION
Unauthorized cleaner or incorrect
• Never allow water or other liq-
cleaning procedures may impair
uids to come in contact with
the fabric surface and the fire-
electrical/electronic compo-
resistant capacity.
nents inside the vehicle as
this may damage them.
Cleaning the lap/shoulder belt
• When cleaning leather prod-
webbing
ucts (i.e. steering wheel and
Clean the belt webbing with a mild
seats), use a neutral detergent
soap, recommended for cleaning
or a low-alcohol solution.
upholstery or carpet. Follow any
When using a solution, which
instructions of the soap. Do not
is rich in alcohol, acid or alka-
bleach or re-dye the webbing, as the
line, the leather color may
webbing surface may deteriorate.
fade or the surface may get
stripped off.
Cleaning the interior window
glass
When the inner window surface
Cleaning the upholstery and
becomes fogged (possibly covered
interior trim
with oily, greasy or waxy film), they
Vinyl
should be cleaned with a glass
Dust the vinyl off with a whisk broom
cleaner. Follow any directions of the
or vacuum cleaner. Clean a vinyl sur-
glass cleaner.
face with a vinyl cleaner.
NOTICE
Do not scrape or scratch the inner
surfaces of the rear windows. This
may damage the defroster grid of
the rear windows.
7-88