Hyundai Equus (2016 year). Instruction - part 25
Maintenance
07
Tire chains
Radial-ply tires
Tire chains, if necessary, should be
Radial-ply tires provide longer tread
installed on the drive wheels (rear
life, better road hazard resistance
wheels).
and smoother riding at a high speed.
Make sure that the chains are
The radial-ply tires used on this vehi-
cle are of belted construction, and
installed in accordance with the man-
ufacturer's instructions.
are to improve your driving and han-
dling. Radial-ply tires have the same
To minimize the abrasion of tires and
loading capacity as the bias-ply or
chains, do not use the chains, when
bias-belted tires of the same size.
unnecessary.
Inflate the radial-ply tires to the same
recommended inflation pressure. It is
not recommended to attempt a
cross-combination of radial-ply tires
and bias-ply(or bias-belted) tires on
the same vehicle. Any cross-combi-
nation of radial-ply and bias-ply(or
bias-belted) tires on one vehicle will
seriously deteriorate vehicle han-
dling. The best rule to follow is:
Identical radial-ply tires should
always be used for a set of four tires.
A tire, which is driven for a long peri-
od of time, is more susceptible to
irregular tread abrasion. It is very
important to rotate tires, at the inter-
val instructed in this chapter, to use it
up to its potential tread life. Any cut
and puncture on a radial-ply tire is
repairable, only when it is on the
tread, because of the side wall flex-
ing. Consult your tire dealer for a
radial-ply tire repair.
7-55

Maintenance
FUSES
Blade type
When the newly-replaced fuse
blows, there may be an electrical
problem. Avoid using any pertinent
systems. Immediately consult an
authorized EQUUS dealer.
Normal
Blown
Three kinds of fuses are to be used:
a blade type for lower amperage rat-
Cartridge type
ing, and a cartridge type and a fusible
link for higher amperage ratings.
WARNING
- Fuse replacement
Normal
Blown
• Never replace a fuse with the
one of a different rating.
Fusible link
• A higher capacity fuse may
cause damage or a fire.
• Never use a wire or an alu-
minum foil, instead of a prop-
er fuse - even as an emergent
Blown
Normal
measure. It may damage
OVI075172N
extensive wirings and cause a
fire.
A vehicle’s electrical system is pro-
tected from a possible electrical
overloading damage by fuses.
This vehicle has 4 fuse panels - two
CAUTION
on the driver’s side, another on the
panel bolster of the passenger's
Do not use a screwdriver or any
side, and the other in the engine
other metal object to remove a
compartment.
fuse. It may cause a short cir-
cuit and damage the system.
When any of your lights, acces-
sories, or controls does not operate,
check the appropriate circuit fuse.
When a fuse is out, some elements
i
Information
may melt inside.
The actual fuse, relay panels, and
When the electrical system does not
labels may differ from the equipped
operate, check the fuse panel on the
items.
driver's side first.
Before replacing the fuse, disconnect
the negative battery cable. Always
replace it with a fuse of the same rat-
ing.
7-56

Maintenance
07
NOTICE
Inner panel fuse replacement
Driver’s side
• When replacing a blown fuse or
relay with a new one, make sure
the new fuse or relay fits tightly
into the clips The incomplete
fastening fuse or relay may
cause the vehicle wiring and
electric systems damage and a
possible fire.
• Do not remove fuses, relays and
terminals fastened with bolts or
nuts. The fuses, relays and ter-
minals may be fastened incom-
OVI075100N
pletely, and it may cause a pos-
Front passenger’s side
sible fire. If fuses, relays and ter-
minals fastened with bolts or
nuts are blown, consult an
authorized EQUUS dealer.
• Do not input any other objects
except fuses or relays into
fuse/relay terminals such as a
driver or wiring. It may cause
contact failure and system mal-
function.
OVI075173N
1. Turn OFF the ignition switch and
all the other switches.
2. Open the fuse panel cover.
7-57

Maintenance
Driver’s side
When the headlamps or other electri-
cal components do not operate, but
when the fuses are not blown out,
check the fuse panel in the engine
compartment. In case that a fuse is
blown out, it must be replaced.fuse is
blown, it must be replaced.
Fuse switch
OVI075101N
Front passenger’s side
OVI075102N
Always set the transportation fuse
OVI075174N
switch in the "ON" position. When
3.Pull straight out a fuse, which is
you press it OFF, some devices,
suspected to be out. Use the fuse
such as the audio and the digital
puller provided in the panels either
clock, must be reset. Also, the Smart
on the driver’s side or the front pas-
Key may not properly operate.
senger’s side.
4. Check the removed fuse. When
NOTICE
the fuse is out, replace it.
• Always set the transportation
Spare fuses are provided in the
fuse switch in the "ON" position
fuse panels in the front passen-
while driving.
ger's side. (or in the fuse panel of
• Do not repeatedly press the
the engine compartment)
transportation fuse switch. The
5. Install a new fuse of the same rat-
fuse switch may be worn out.
ing, and tightly secure it in the
clips.
i
Information
When it is loosely fit, consult an
When you do not drive your vehicle
authorized EQUUS dealer.
more than 1 month, press OFF the
When you do not have a spare fuse,
transportation fuse switch to prevent
use a fuse of the same rating from a
a battery discharge.
circuit, such as a cigarette lighter fuse,
which may not be needed to drive.
7-58

Maintenance
07
Engine compartment fuse
NOTICE
replacement
After checking the fuse panel in
the engine compartment, securely
close the fuse panel cover. If not,
electrical failures may occur due
to a possible water contact.
Main fuse
OVI075175N
OVI075177N
When the main fuse is out, it must be
removed in the following procedure:
1. Open the fuse panel cover on the
right side of the engine compart-
OVI075176N
ment.
1. Turn OFF the ignition switch and
2. Loosen the nuts, as shown in the
all the other switches.
above illustration.
2. Open the fuse panel cover by
3. Use a new fuse of the same rating.
pressing the tab.
4. Install the new fuse in the reverse
3. Check the removed fuse. When
order.
the fuse is out, replace it. To
remove or insert the fuse, use the
i
Information
fuse puller in the panel on the front
passenger’s side.
When the main fuse is blown out, con-
sult an authorized EQUUS dealer.
4. Install a new fuse of the same rat-
ing, and tightly secure it in the
clips. When it is loosely fit, consult
an authorized EQUUS dealer.
7-59

Maintenance
Fuse/relay panel description
Under the fuse/relay panel covers, the fuse/relay labels are attached for infor-
mation, such as fuse/relay name and capacity.
Instrument panel fuse panel
Engine compartment fuse panel
Driver’s side
OVI075105N
OVI075104N
Front passenger’s side
OVI075178N
OVI075103N
i
Information
Some fuse-panel information in this manual may be inapplicable to your vehicle.
Information in this manual reflects only the current information at the point of
printing. Refer to the fuse label, when inspecting the fuse panel.
7-60

Maintenance
07
Driver’s side instrument fuse panel
OVI073108N
7-61

Maintenance
Instrument panel (Driver’s side fuse panel)
Fuse Name
Fuse rating
Circuit Protected
PDM (B+)
25A
Smart Key Control Module
HAZARD
10A
Center Facia Switch
EPB
10A
Electric Parking Brake Switch, Crash Pad Switch
RF RECEIVER
10A
RF Receiver, Security Indicator
PDM (IG1)
10A
Smart Key Control Module
SHIFT LEVER (IG1)
10A
ATM Shift Lever IND.
A/BAG IND.
10A
Instrument Cluster
SMART KEY
10A
Start/Stop Button Switch
P/HANDLE
10A
Steering Tilt & Telescopic Module
Power Trunk Lid Control Module, Relax Module
Driver/Passenger Door Module, Rear Door Module
LH/RH, Passenger Door Lamp, Passenger Door Mood
MEMORY
10A
Lamp, Rear Door Lamp LH/RH, Rear Door Mood Lamp
LH/RH Instrument Cluster, Driver IMS Control Module,
BCM, Analogue Clock, LCD Panel Switch,
A/C Control Module, Data Link Connector
TPMS
10A
Tire Pressure Monitoring Module
ACTIVE H/REST
10A
Active Head Rest Sensor Module
CLUSTER
10A
Instrument Cluster, Head-Up Display
STOP LAMP
10A
Stop Lamp Switch, Smart Key Control Module
SHIFT LEVER (B+)
10A
Sport Mode Switch
A/V & Navigation Head Unit, Front Monitor, Split Unit,
MULTI MEDIA
15A
MTS Module, Front DIS Switch, Rear Monitor LH/RH,
Rear Console Switch, Rear Audio Switch
BCM
10A
BCM
E/R Junction Box (Fuse - B/UP LAMP, ESC, EHPS,
IG1
30A
AFLS, INJECTOR (IG1), CRUISE (IG1), ECU (IG1),
TCU)
1 MODULE
10A
Head-Up Display, Rain Sensor, Rear Power Seat Switch LH
F/LID
10A
Fuel Filler Door Switch, Front Console Switch
FOLD'G MIRR
10A
Driver/Passenger Door Module
SRS Control Module, Driver/Passenger Pre-Safe Seat
A/BAG
15A
Belt, Center Facia Switch, PODS Module
E/R Junction Box (FAM), Multifunction Switch
4 MODULE
10A
Driver/Passenger Door Module
ECS
15A
ECS Control Module
AUDIO (IG1)
10A
A/V & Navigation Head Unit, MTS Module
AFLS
10A
Head Lamp LH/RH, Adaptive Front Lighting Module
Driver Power Door Latch, Driver Power Seat Switch,
O/S HDL DRV
15A
Driver Door Lamp, Driver Door Mood Lamp, Driver Smart
Key Outside Handle
7-62

Maintenance
07
Fuse Name
Fuse rating
Circuit Protected
Rear CCS Control Module LH, Rear Seat Warmer
S/HEATER RR
15A
Module LH
Power Trunk Lid Control Module, Electro Chromic Mirror,
2 MODULE
10A
A/T Console Switch
A/C Control Module, AQS Sensor, Driver IMS Control
Module Relax Module, Driver/Passenger CCS Control
Module Driver/Passenger Seat Warmer Module,
A/CON
10A
Rear CCS Control, Module LH/RH, Rear Seat Warmer
Module LH/RH, Alternator Resistor (Alternator,
Instrument Cluster, USB Jack, Rear Console Switch)
Rear Power Door Latch LH, Rear Door Window Curtain
O/S HDL RR
15A
LH, Rear Smart Key Outside Handle LH
ECS Control Module, Front Console Switch, Crash Pad
Switch, Blind Spot Detection Radar LH/RH Tire Pressure
Monitoring Module, Stop Lamp Switch, Steering Tilt &
3 MODULE
10A
Telescopic Module, LDWS Camera Module Electric
Parking Brake Module, Front/Rear Parking Assist Sensor
LH/RH Front/Rear Parking Assist Sensor LH/RH (Center)
DR LOCK DRV
10A
Driver Door Module
S/HEATER DRV
15A
Driver CCS Control Module, Driver Seat Warmer Module
DR LOCK PASS
15A
Passenger Door Module
P/TRUNK
30A
Power Trunk Lid Control Module
P/SEAT PASS
30A
Relax Module
RH SAFETY
Passenger Power Window Module,
30A
POWER WINDOW
Rear Power Window Module RH
LH SAFETY
Driver Power Window Module,
30A
POWER WINDOW
Rear Power Window Module LH
7-63

Maintenance
Passenger’s side instrument fuse panel
OVI073160N
7-64

Maintenance
07
Instrument panel (Passenger’s side fuse panel)
Description
Fuse rating
Protected component
USB CHARGE
10A
USB Jack
IG2
30A
E/R Junction Box Fuse (ECW 10A, WASHER 15A)
E/R Junction Box (Blower Relay), A/C Control Module,
A/CON
10A
Cluster Ion Gen, LCD Panel Switch
Around View Module, Camera Module,
MODULE
10A
Instrument panel LH(Instrument Cluster,
Sunroof Module, Head-Up Display)
P/SEAT RR
20A
Rear LH Power Seat Relay Box
E-SHIFTER
10A
USB Jack
PDM(ACC)
10A
BCM, Smart Key Control Module
SUNROOF
20A
Sunroof Module,Sunroof Switch
PDM (IG2)
10A
BCM, Smart Key Control Module
POWER
Rear Power Outlet (5:5 Seat),Rear Console Lamp
20A
OUTLET RR
(5:5 Seat), Rear Power Outlet #1/#2(6:4 Seat)
E/R Junction Box (Power Outlet Relay FR),
INTERIOR LAMP
10A
Front Room Lamp
Rear Power Door Latch RH, Rear Door Curtain RH,
O/S HDL RR
15A
Rear Smart Key Outside Handle RH
Analogue Clock, Split Unit, Front Monitor,
Around View Module, Camera Module, MTS Module,
AUDIO
10A
Front DIS Switch, AMP, Rear Monitor LH/RH,
Rear Audio Switch, Rear Console Switch
LEG SUPPORT RR
15A
Rear RH Power Seat Relay Box
Passenger CCS Control Module, Passenger Seat
S/HEATER PASS
15A
Warmer Module (W/O CCS)
HTD STRG
15A
Steering Wheel Heated
ICE BOX
15A
Cool box
Passenger Power Door Latch,Passenger Power Seat
O/S HDL PASS
15A
Switch, Passenger Smart Key Outside Handle RH
Rear CCS Control Module RH, Rear Seat Warmer
S/HEATER RR
15A
Module RH (W/O CCS)
7-65

Maintenance
Engine compartment main fuse panel
Engine compartment sub fuse panel
OVI073109N/OVI073107N
7-66

Maintenance
07
Engine compartment main fuse panel
Fuse Name
Fuse rating
Circuit Protected
WIPER (B+)
30A
Electronic Control Wiper Module
FAM 2 (B+)
40A
FAM
FAM 1 (B+)
40A
FAM
START
30A
Start Relay
WASHER
15A
Washer Relay
WIPER (IG2)
10A
Electronic Control Wiper Module
DEICER
15A
Deicer Relay
CRUISE (B+)
10A
H/Lamp Relay, Smart Cruise Control Module
HORN
15A
Horn Relay
EPB 2
15A
Electric Parking Brake Module
EPB 1
15A
Electric Parking Brake Module
A/CON
10A
A/C Control Module
BLOWER
40A
Blower Relay
PRESAFETY
40A
Driver Pre-Safe Seat Belt
SEAT BELT LH
RR HTD
40A
RR HTD Relay
PRESAFETY
40A
Passenger Pre-Safe Seat Belt
SEAT BELT RH
ECU (IG1)
10A
ECM, Alternator
ESC Module, E/R Fuse &
ESC
10A
Relay Box (Multipurpose Check Connector)
EHPS
10A
EHPS Module
AFLS
10A
Head Lamp LH/RH
TCU
15A
TCM, Transmission Range Switch
HTD MIRR
10A
Driver/Passenger Power Outside Mirror
F/PUMP
20A
F/Pump Relay
ROOM LAMP
10A
Room Lamp Relay
ECU (B+)
15A
ECM, TCM
B/UP LAMP
10A
Steering Angle Sensor, B/UP LP RLY’S’
CRUISE (IG1)
10A
Smart Cruise Control Module
INJECTOR (IG1)
10A
Injector Drive Box
H/LAMP LH
15A
Head Lamp LH
H/LAMP RH
15A
Head Lamp RH
ECM, F/Pump Relay, Camshaft Position Sensor
3 SENSOR
10A
(BANK1/BANK2) (Intake/Exhaust)
Canister Close Valve, Oil Control Valve #1 ~ #4, E/R Fuse &
2 SENSOR
10A
Relay Box (C/Fan Relay), Purge Control Solenoid Valve
1 SENSOR
10A
ECM, Oxygen Sensor #1 ~ #4
INJECTOR (B+)
15A
Injector Drive Box
IGN COIL
20A
Condenser #1/#2, Ignition Coil #1 ~ #8
ECU
30A
ECU Relay
7-67

Maintenance
Engine compartment sub fuse panel
Fuse Name
Fuse rating
Circuit Protected
Alternator, E/R Fuse & Relay Box (Fuse - I/P POWER RH,
ALT
200A
EHPS, C/FAN, PDM (ACC), ECS, TRUNK, AMP,
POWER OUTLET FRT)
Smart Junction Box LH (Fuse - PDM (B+), HAZARD, EPB,
RF RECEIVER, SMART KEY, P/HANDLE, TPMS,
STOP LAMP, SHIFT LEVER (B+), P/SEAT PASS,
RH SAFETY POWER WINDOW, MULTI MEDIA, LH SAFETY
I/P POWER LH
80A
POWER WINDOW, 1 MODULE, F/LID, ECS, O/S HDL DRV,
S/HEATER RR, O/S HDL RR, DR LOCK DRV,
S/HEATER DRV, DR LOCK PASS, P/TRUNK,
Leak Current Autocut Device)
I/P Junction Box RH (Fuse - USB CHARGE, P/SEAT RR,
I/P POWER RH
60A
SUNROOF, O/S HDL RR, LEG SUPPORT RR,
S/HEATER PASS, O/S HDL PASS, S/HEATER RR)
C/FAN
70A
C/FAN Relay
EHPS
80A
EHPS Module
ESC 1
40A
ESC Module, Multipurpose Check Connector
ESC 2
40A
ESC Module, Multipurpose Check Connector
PDM (IG1)
40A
PDM (IG1) Relay
PDM (IG2)
30A
PDM (IG2) Relay
P/SEAT (DRV)
30A
Driver IMS Control Module, Driver Lumbar Support Valve
ECS
40A
ECS Relay
AMP
30A
AMP
PDM (ACC)
30A
PDM (ACC) Relay
STOP LAMP
15A
Stop Signal Electronic Module
B/UP LAMP
10A
B/UP LAMP Relay
POWER OUTLET
25A
POWER OUTLET FRT Relay
FRT
TRUNK
10A
TRUNK Relay
7-68

Maintenance
07
LIGHT BULBS
i Information
WARNING
After heavy rain or vehicle washing,
- Working on the lights
headlamp and taillight lenses may
Before working on the light,
appear to be frosty. This is caused by
firmly set the parking brake,
the temperature difference between
turn the ignition switch to the
the lamp inside and outside. This is
LOCK position, and turn OFF
similar to the dew condensation on
the lights. These are to prevent
your windows inside while raining.
a sudden vehicle movement,
This does not indicate a problem with
burning your fingers or an elec-
your vehicle. When water penetrates
tric shock.
into the lamp circuitry, have the vehi-
cle checked by an authorized EQUUS
dealer.
Use only the bulbs of the specified
wattage.
NOTICE
Make sure to replace the burned-
out bulb with a new one of the
same wattage rating. Otherwise, it
may cause damage to a fuse or an
electric wiring system.
NOTICE
When you are not equipped with
necessary tools, the appropriate
bulbs and the expertise, consult an
authorized EQUUS dealer. In many
cases, it is difficult to replace vehi-
cle light bulbs, because some parts
of the vehicle must be disassem-
bled before getting to the bulb.This
is especially true when disassem-
bling to replace the headlamp
bulb(s). Removing/installing the
headlamp assembly may damage
your vehicle.
7-69

Maintenance
Headlight, position light, turn
if equipped
signal light, side marker light
and front fog light bulb
replacement
OVI075113N
if equipped
OVI075030N
(1) Position light
(2) Headlamp (High)
(3) Headlamp (Low)
(4) Front side marker light
(5) Front turn signal light
(6) Front fog light
OVI075114N
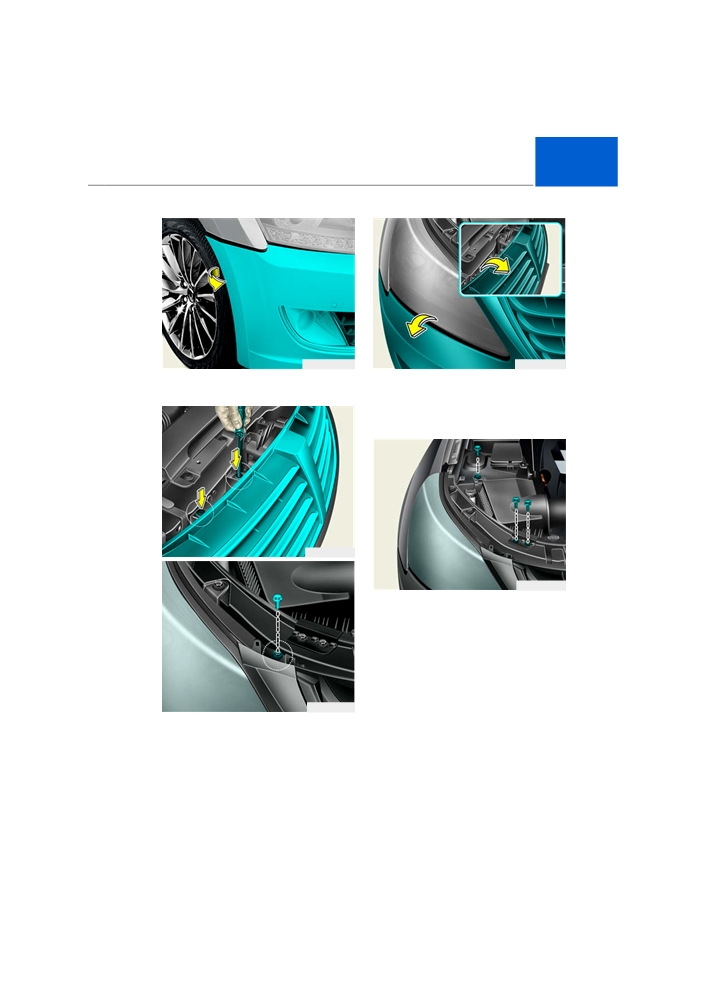
5. Pull out the cover (if equipped).
6. Insert a screw driver into the hole
(1) and lift up the screw driver
while pulling out the cover (2).
OVI075179N
1. Open the hood.
2. Disconnect the negative battery
cable.
OVI075180N
3. Press the fastener to open the
cover.
7. Remove the fastener and screw
under the wheel arch.
4. Open the cover.
7-70
Maintenance
07
OVI075181N
OVI075183N
8. Pull out the bumper.
10. Remove the front bumper.
11. Be careful not to damage the
clips inside of the front bumper.
OVI075182N
OVI075184N
12. When replacing the headlamp on
the right side, remove the bolts
and the air cleaner.
OVI075185N
9. Remove 4 fasteners on the grille
and the bolt.
7-71