Hyundai Santa Fe (2006 year). Manual - part 331


  Index      Hyundai     Hyundai Santa Fe - service repair manual 2006 year


Search            


Content   ..  329  330  331  332   ..


Hyundai Santa Fe (2006 year). Manual - part 331


ENGINE BLOCK

EMA -35

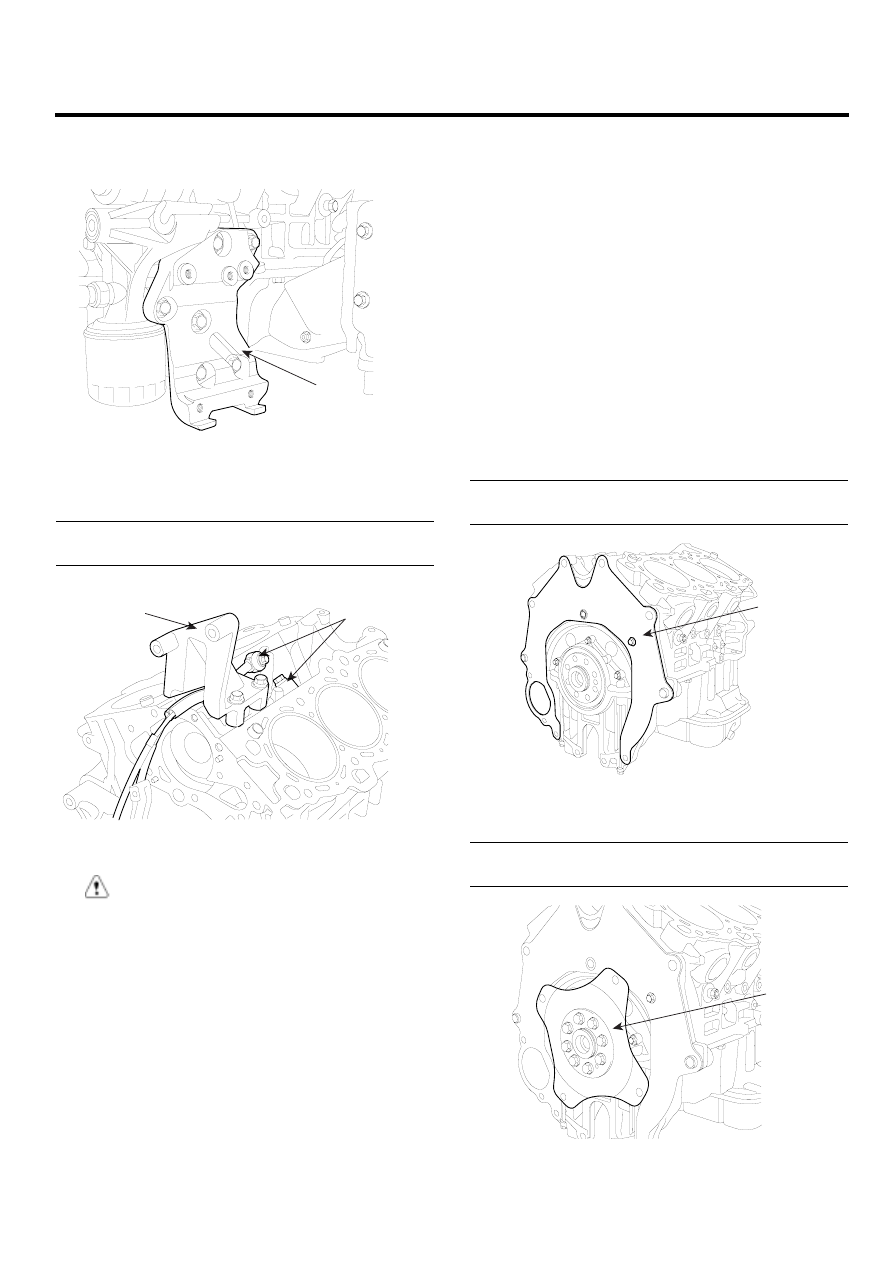
18. Install the air conditioning compressor bracket(A).

(Refer to ’HA’ group)

A

KCBF138A

19. Install the power steering pump bracket(A) and the

knock sensor(B).

Tightening torque
18.6 ~ 23.5Nm (1.9 ~ 2.4kgf.m, 13.7 ~ 17.4lb-ft)

A

B

KCBF122A

CAUTION

• On Bank 1, the black knock sensor connector

should be installed and on Bank 2, the gray
one should.

INSTALLATION

EF30F311

1.

Install the water pump.

2.

Install the air conditioning compressor.(Refer to ’HA’
group).

3.

Install the cylinder head.

4.

Install the power steering pump.(Refer to ’ST’ group).

5.

Install the generator.

6.

Install the intake manifold.

7.

Install the exhaust manifold.

8.

Install the timing belt.

9.

Install the rear plate(A).

Tightening torque
9.8 ~ 11.8Nm(1.0 ~ 1.2kgf.m, 7.2 ~ 8.7lb-ft)

A

KCBF121A

10. Install the drive plate(A).

Tightening torque
71.6 ~ 75.5Nm(7.3 ~ 7.7kgf.m, 52.8 ~ 55.7lb-ft)

A

KCBF120A

EMA -36

ENGINE (G6EA - GSL 2.7)

COOLING SYSTEM

COMPONENTS

E3589507

7

8

6

4

2

5

3

2

1

1.  Radiator
2.  Radiator bracket
3.  Coolant reservoir tank
4.  Radiator upper hose

5.  Radiator lower hose
6.  Radiator fan
7.  Shroud
8.  Motor assembly

SCMEM6010L

COOLING SYSTEM

EMA -37

1.  Water pump
2.  Water pump gasket
3.  Water pipe O-ring
4.  Water inlet pipe
5.  Water outlet pitting

6.  Thermostat
7.  Water inlet pitting
8.  Water temp. control assembly
9.  Water temp. control assembly gasket

14.7 ~ 21.6
(1.5 ~ 2.2, 10.8 ~ 15.9)

16.7 ~ 19.6
(1.7 ~ 2.0, 12.3 ~ 14.5)

16.7 ~ 19.6
(1.7 ~ 2.0, 12.3 ~ 14.5)

29.4 ~ 41.2

(3.0 ~ 4.2, 21.7 ~ 30.4)

TORQUE : N.m (kgf.m, lb-ft)

LDLG048A

EMA -38

ENGINE (G6EA - GSL 2.7)

ENGINE COOLANT REFILLING AND

BLEEDING

EDA90EDC

WARNING

Never remove the radiator cap when the engine is
hot. Serious scalding could be caused by hot fluid
under high pressure escaping from the radiator.

CAUTION

When pouring engine coolant, be sure to shut the
relay box lid and not to let coolant spill on the
electrical parts or the paint. If any coolant spills,
rinse it off immediately.

1.

Make sure the engine and radiator are cool to the
touch.

2.

Open the radiator cap.

3.

Loosen the drain plug, and drain the coolant.

4.

Tighten the radiator drain plug securely.

5.

Remove, drain and clean the reservoir tank.

6.

Fill water slowly through the radiator cap. Push the
upper/lower hoses of the radiator so as to bleed air
easily.

7.

Warm the engine until the cooling fan operates 2~3
times.
Accelerate the engine 2~3 times without load.

8.

Wait until the engine is cold.

9.

Repeat the steps 1~8 until the water drained is clean.

10. Fill fluid mixture with coolant and water(4 : 6) slowly

through the radiator cap. Push the upper/lower hoses
of the radiator so as to bleed air easily.

11. Start the engine and run so coolant circulates.

When the cooling fan operates and coolant circulates,
refill coolant through the radiator cap.

12. Repeat 11 until the cooling fan cycles 3 ~ 5 times and

bleed air sufficiently out of the cooling system.

13. Install the radiator cap and fill the reservoir tank to the

"MAX"(or "F") line with coolant.

14. Run the vehicle under idle until the cooling fan oper-

ates 2 ~ 3 times.

15. Stop the engine and wait until coolant gets cool.

16. Repeat 10 to 15 until the coolant level doesn’t fall any

more, bleeding air out of the cooling system.

NOTE

Check the coolant level again in the reservoir tank for
2 ~ 3 days after replacing coolant.


Content   ..  329  330  331  332   ..