Hyundai Santa Fe (2006 year). Manual - part 102


  Index      Hyundai     Hyundai Santa Fe - service repair manual 2006 year


Search            


Content   ..  100  101  102  103   ..


Hyundai Santa Fe (2006 year). Manual - part 102


ATA -166

AUTOMATIC TRANSAXLE (A5HF1)

REMOVAL

EEEA3EC8

1.

Remove the battery terminal.

2.

Lift the vehicle.

3.

Remove the splash shield.

4.

Loosen the drain plug and drain the transaxle oil.

5.

Remove the valve body cover.

6.

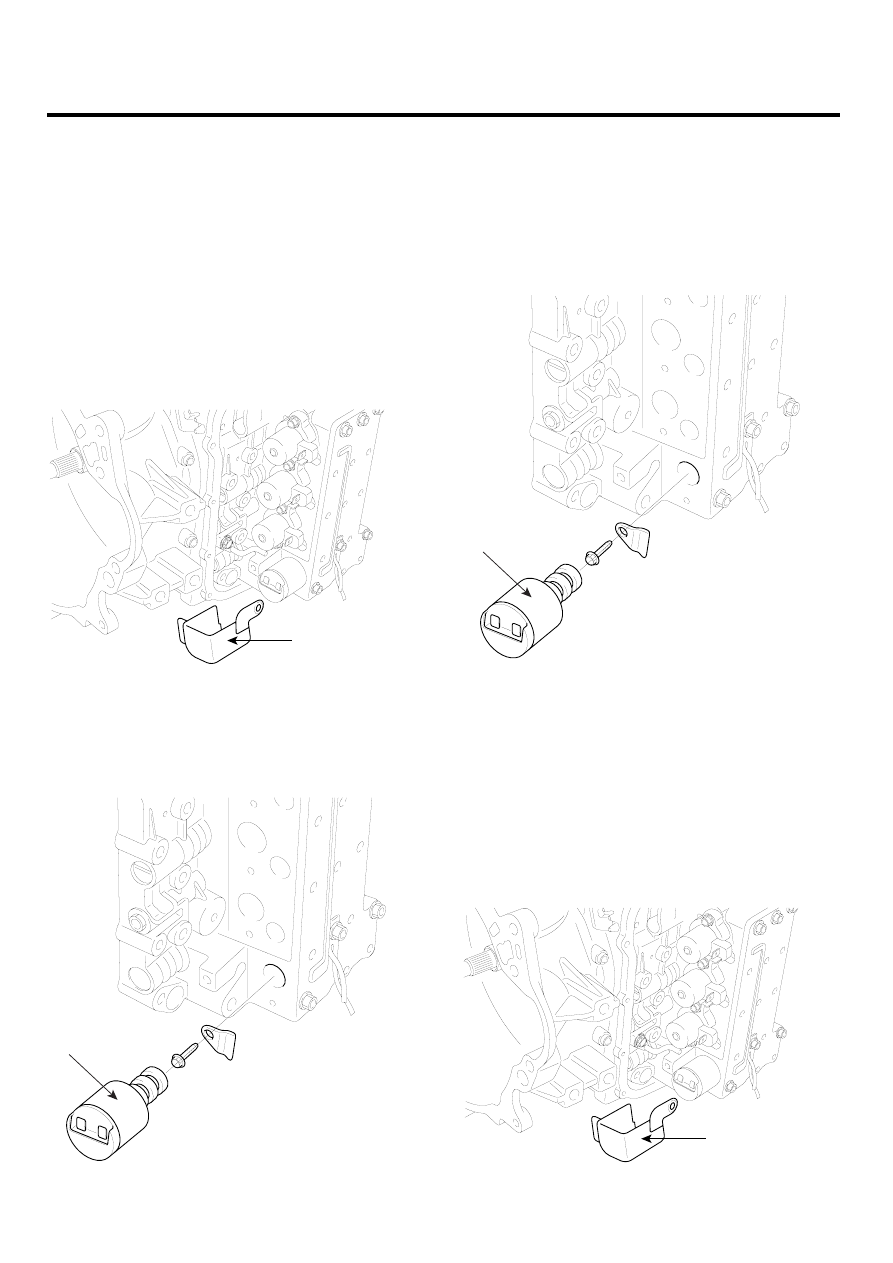
Remove the VFS reservoir(A).

A

SCMAT6034D

7.

Disconnect the VFS solenoid valve connector.

8.

Remove the solenoid valve assembly(A).

A

KKCF009D

INSTALLATION

E31C8972

1.

Install the solenoid valve(A).

CAUTION

Apply the ATF oil or White Vaseline to the O-ring
not to be damaged.

A

KKCF009D

2.

Connect the solenoid valve connector to the valve
body.

CAUTION

When connecting the solenoid valve connector,
check the connector for rust, dirt, or oil, then re-
connect it.

3.

Install the VFS reservoir(A).

A

SCMAT6034D

AUTOMATIC TRANSAXLE CONTROL SYSTEM

ATA -167

4.

Continue to apply liquid gasket at application points
at the valve body cover with Ø2.5mm (0.098in) thick-
ness.

Liquid gasket Part name : Threebond 1281B

SCMAT6052D

5.

Tighten the mounting bolt with the specified torque
after installing the valve body cover.

TORQUE :
10~12Nm(1.0~1.2kgf.m, 7~8lb-ft)

6.

Install the drain plug and refill the transaxle fluid.

TORQUE :
35~45Nm(3.5~4.5kgf.m, 25~32lb-ft)

7.

Install the splash shield.

8.

Lower the vehicle and install the battery terminal.

ATA -168

AUTOMATIC TRANSAXLE (A5HF1)

INPUT SPEED SENSOR

DESCRIPTION

EBD4BF9F

Sensor type

1.

Type : HALL SENSOR

2.

Operating voltage : DC 12V

3.

Current consumption : 22mA (Max)

Function

1.

Input shaft speed sensor: Detect the input shaft rotation at the OD & REV
retainer side to control oil pressure when shifting.

2.

Feedback control, clutch-clutch control, damper clutch control, shift range control,
incorrect ratio control and sensor trouble detection signal.

Connector

1.  Ground
2.  Power source
3.  Input

1

2

3

C242

SCMAT6004L

<Inside structure>

BKGF012B

Item

Inspection item

Standard value

Air gap

Input shaft speed sensor

0.05in(1.3mm)

Sensor resistance

Input shaft speed sensor

Over 4 MΩ

HIGH

Over 4.8V

Output voltage

LOW

Below 0.8V

AUTOMATIC TRANSAXLE CONTROL SYSTEM

ATA -169

REMOVAL

EED7E4CB

1.

Remove the battery terminal.

2.

Remove the battery and battery tray.

3.

Remove the air cleaner assembly. (see the automatic
transaxle-Removal/ installation procedures)

4.

Remove the input shaft speed sensor connector.

5.

Remove the input shaft speed sensor(A).

A

SCMAT6037D

INSTALLATION

EE7CFF15

1.

Install the new O-ring to the input shaft speed sensor.

2.

Install the input shaft speed sensor.

TORQUE:
10~12Nm(1.0~1.2kgf.m, 7~8lb-ft)

CAUTION

While installing the input shaft speed sensor, do
not allow dust or other foreign particles to enter
the transaxle.

3.

Check the connector for dust, dirt, or oil, and then
connect the connector securely.

4.

Installation is the reverse of removal.


Content   ..  100  101  102  103   ..